Tarsometatarsal Arthrodesis: An Intraoperative Masterclass for Midfoot Fusion
Key Takeaway
This masterclass guides fellows through tarsometatarsal (TMT) arthrodesis for midfoot arthrosis. We cover essential preoperative planning, patient positioning, and meticulous surgical execution from incision to closure. Detailed anatomical considerations, neurovascular protection, and crucial intraoperative pearls ensure optimal plantigrade foot reduction and stable fusion. Postoperative protocols for rehabilitation and complication management are also discussed.
Comprehensive Introduction and Patho-Epidemiology
Welcome to the operating theater, colleagues and fellows. Today, we are undertaking a definitive tarsometatarsal (TMT) arthrodesis, with a specific focus on the medial and central columns—namely, the first, second, and third TMT joints. This procedure is the cornerstone of surgical management for symptomatic midfoot arthrosis, a debilitating condition that severely compromises the biomechanics of the foot and the patient's overall gait efficiency. Our paramount objective is to achieve a stable, rigidly fused, and perfectly plantigrade foot, thereby restoring pain-free function and neutralizing the pathological forces that lead to midfoot collapse.
The patho-epidemiology of midfoot arthrosis is diverse. While primary osteoarthritis can occur, the vast majority of cases we encounter are post-traumatic, stemming from either subtle, missed Lisfranc ligamentous injuries or high-energy crush injuries and intra-articular fractures. The TMT joint complex, often referred to as the Lisfranc joint, represents the critical biomechanical transition zone between the midfoot and the forefoot. Biomechanical studies have unequivocally demonstrated that even a 1 to 2 millimeter residual displacement in the TMT complex dramatically decreases the articular contact area, exponentially increasing joint contact stresses and inevitably leading to rapid, progressive cartilaginous degeneration.
Beyond trauma, systemic inflammatory arthropathies, such as rheumatoid arthritis, frequently target the midfoot, leading to capsular attenuation, ligamentous incompetence, and subsequent dorsal subluxation of the metatarsal bases. Furthermore, we must always maintain a high index of suspicion for underlying Charcot neuroarthropathy, particularly in our diabetic patient population, where the midfoot is the most common site of architectural collapse (Brodsky Type 1). Regardless of the etiology, the end-stage presentation is remarkably similar: a rigid, painful, often deformed midfoot characterized by dorsal osteophytosis, midfoot abduction, and progressive flattening of the longitudinal arch. Tarsometatarsal arthrodesis remains the gold standard for addressing this end-stage pathology in the rigid medial and central columns.
Detailed Surgical Anatomy and Biomechanics
Before a scalpel ever touches the skin, a profound three-dimensional understanding of midfoot surgical anatomy is mandatory. The foot is an architectural marvel, designed to transition seamlessly from a flexible shock absorber at heel strike to a rigid lever arm during terminal stance and push-off. The TMT joints dictate this transition.
The Columnar Theory of the Foot
Surgically and biomechanically, we divide the foot into distinct functional columns:
* The Medial and Central Columns (Rigid): The medial column comprises the first ray (medial cuneiform and first metatarsal). The central column comprises the second ray (intermediate cuneiform and second metatarsal) and the third ray (lateral cuneiform and third metatarsal). These columns are designed for absolute rigidity to facilitate forward propulsion. The native first, second, and third TMT joints exhibit highly restricted motion (typically less than 2-3 degrees of sagittal and coronal plane movement). Therefore, arthrodesis of these joints is exceptionally well-tolerated and biomechanically sound, as it simply reinforces their natural rigid state.
* The Lateral Column (Mobile): The fourth and fifth TMT joints, articulating with the cuboid, are inherently mobile. They allow for critical forefoot accommodation to uneven terrain, with up to 10-15 degrees of sagittal motion. Consequently, arthrosis in the lateral column is typically managed with motion-preserving procedures (like interpositional arthroplasty or isolated osteophyte excision) whenever possible. Fusing the lateral column significantly increases the risk of adjacent segment disease and nonunion due to the high sheer forces.
Osteology and the Keystone Architecture
The osteology of the midfoot is defined by the "Roman Arch" configuration in the coronal plane, which provides inherent structural stability.
* The first TMT joint is deceptively expansive. It typically measures 28 to 30 millimeters from its dorsal lip to its plantar recess. This depth is a critical intraoperative trap; failure to prepare the joint down to its plantar-most extent leaves a cartilaginous hinge, preventing adequate compression and serving as a primary nidus for nonunion.
* The second TMT joint forms the apex of the transverse arch. The base of the second metatarsal is uniquely recessed proximally, wedged tightly between the medial and lateral cuneiforms like a keystone. This mortise-and-tenon anatomical arrangement is the primary bony stabilizer of the entire midfoot. Identifying and thoroughly debriding this proximal recess is technically demanding but absolutely vital.
Neurovascular and Soft Tissue Considerations
The dorsal aspect of the midfoot possesses a notoriously thin soft-tissue envelope, rendering neurovascular structures highly vulnerable to iatrogenic injury.
* Deep Peroneal Nerve and Dorsalis Pedis Artery: This neurovascular bundle is our primary concern. It courses distally over the anterior ankle, running deep to the extensor retinaculum and the extensor hallucis brevis (EHB) muscle belly, ultimately heading towards the first web space. During our medial incision, extreme caution is required when developing the interval between the extensor hallucis longus (EHL) and EHB. Retraction must be gentle and strictly blunt.
* Superficial Peroneal Nerve Branches: The medial and intermediate dorsal cutaneous nerves provide sensation to the dorsum of the foot. They are highly variable, arborizing extensively within the superficial subcutaneous fat. Careless dissection or aggressive self-retaining retractors can easily induce painful neuromas or persistent sensory deficits.
* Extensor Digitorum Brevis (EDB): Encountered during the lateral approach to the third TMT joint, this muscle belly often obscures the joint line. Rather than forcefully retracting the EDB—which places undue tension on the neurovascular bundle—we prefer to split the muscle longitudinally in line with its fibers to access the underlying capsule.
* Ligamentous Anatomy: While we are performing an arthrodesis, understanding the Lisfranc ligament complex is essential. The true Lisfranc ligament is a massive interosseous structure connecting the lateral aspect of the medial cuneiform to the medial aspect of the second metatarsal base. The dorsal ligaments are relatively weak, which explains the propensity for dorsal subluxation in traumatic injuries and inflammatory conditions.
Exhaustive Indications and Contraindications
Patient selection is the primary determinant of surgical success. A meticulously executed operation will fail if performed for the wrong indications or in a compromised host.
| Category | Specific Conditions and Parameters |
|---|---|
| Primary Indications | - Post-traumatic TMT arthrosis (prior Lisfranc injury, crush injury). - Primary osteoarthritis of the medial/central columns. - Inflammatory arthropathy (e.g., Rheumatoid Arthritis) with midfoot collapse. - End-stage planovalgus deformity with TMT instability. - Chronic, irreducible, or purely ligamentous Lisfranc injuries. |
| Absolute Contraindications | - Active local or systemic infection. - Severe peripheral arterial disease (inadequate perfusion for bone healing). - Medically unstable patient unfit for anesthesia. - Active, acute-phase Charcot neuroarthropathy (requires offloading until coalescence). |
| Relative Contraindications | - Poorly controlled diabetes mellitus (HbA1c > 8.0%). - Active heavy tobacco use (significantly increases nonunion risk). - Severe osteoporosis (compromises hardware purchase). - Inability to comply with strict, prolonged non-weight-bearing protocols. |
Conservative management must be exhausted prior to surgical intervention. This includes a robust trial of non-steroidal anti-inflammatory drugs (NSAIDs), activity modification, rigid carbon-fiber orthotics, stiff-soled rocker-bottom shoes, and potentially fluoroscopically guided intra-articular corticosteroid injections. Surgery is indicated when these measures fail to provide acceptable pain relief and functional restoration.
Pre-Operative Planning, Templating, and Patient Positioning
Meticulous preoperative planning is what separates a competent surgeon from a master surgeon. This phase dictates the intraoperative flow and anticipates potential pitfalls.
Clinical and Radiographic Evaluation
Our clinical examination must be exhaustive. We localize the pain precisely to the TMT joints, noting any dorsal exostoses (often palpable due to the thin dorsal skin). We evaluate the overall foot morphotype—is there a concomitant pes planovalgus or a cavovarus deformity that needs addressing?
Crucially, we perform the Silfverskiöld test to evaluate for equinus contracture. The hindfoot is locked in a neutral subtalar position, and ankle dorsiflexion is assessed with the knee fully extended and then flexed to 90 degrees. If dorsiflexion normalizes with knee flexion, an isolated gastrocnemius contracture is present. If equinus persists regardless of knee position, a combined Achilles contracture exists. Addressing equinus (via gastrocnemius recession or percutaneous Achilles lengthening) is mandatory; failure to do so leaves excessive dorsiflexion forces on the midfoot, vastly increasing the risk of hardware failure and nonunion.
Imaging is our roadmap:
* Weight-Bearing Radiographs: AP, lateral, and oblique views are non-negotiable. We assess joint space narrowing, subchondral sclerosis, osteophyte formation, and the talar-first metatarsal angle (Meary's angle) to evaluate sagittal plane collapse.
* Computed Tomography (CT): A non-weight-bearing CT scan is invaluable for preoperative templating. It delineates the exact extent of arthrosis, identifies subchondral cysts that may require bone grafting, and helps map out our screw trajectories, particularly for the recessed second TMT joint.
Operative Plan and Patient Positioning
Based on our imaging, we template our hardware. We typically utilize 3.5mm or 4.0mm solid cortical screws for the robust first TMT joint, and 3.5mm cannulated or solid screws for the second and third TMT joints. We must also have dorsal spanning plates and compression staples available, as bone quality dictates fixation strategy.
The patient is positioned supine on a fully radiolucent operating table, allowing unrestricted C-arm access. A padded bump is placed under the ipsilateral hip to internally rotate the leg, bringing the foot perpendicular to the floor. This is critical for obtaining true AP fluoroscopic views.
We utilize a proximal thigh tourniquet. While a calf tourniquet is an option, a thigh tourniquet is preferred if we anticipate harvesting autologous cancellous bone graft from the proximal tibia. The limb is exsanguinated with an Esmarch bandage, and the tourniquet is inflated to 250-300 mmHg. A bloodless field is absolutely essential for the meticulous joint preparation required in this procedure.
Step-by-Step Surgical Approach and Fixation Technique
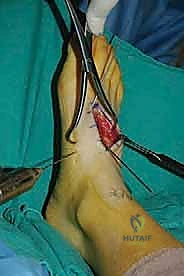
Let us proceed with the surgical execution. We will utilize a dual-incision technique to access the first three TMT joints while maintaining a robust, well-vascularized skin bridge to prevent wound necrosis.
1. Incisions and Deep Exposure
The Medial Incision (First and Medial Second TMT Joints):
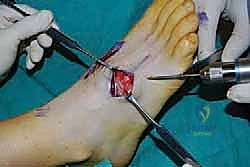
We begin with a 4 to 5-centimeter longitudinal incision centered over the lateral third of the first TMT joint, precisely over the interval between the EHL and EHB tendons. We sharply incise the skin and immediately transition to blunt dissection using Metzenbaum scissors to sweep away the superficial veins and dorsal cutaneous nerves.
Identifying the EHL (medial) and EHB (lateral), we carefully retract the EHB laterally. Deep to the EHB lies the neurovascular bundle—the deep peroneal nerve and dorsalis pedis artery. We use blunt Hohmann retractors to gently mobilize this bundle laterally. Under no circumstances should sharp retractors be placed against these structures.
Once the capsule of the first TMT joint is visualized, we incise it longitudinally. We elevate full-thickness subperiosteal flaps medially and laterally to expose the joint surfaces, being careful to preserve the plantar capsular attachments to maintain blood supply. We then extend our deep dissection proximally and laterally across the base of the first metatarsal to expose the medial aspect of the second TMT joint.
The Lateral Incision (Lateral Second and Third TMT Joints):
Our second incision is 4 centimeters long, centered dorsally over the third TMT joint. We maintain a skin bridge of at least 3 to 4 centimeters between our two incisions. Deepening the incision, we encounter the fleshy belly of the extensor digitorum brevis (EDB). Rather than forcefully retracting it, we bluntly split the EDB longitudinally in line with its fibers. This provides direct, tension-free access to the third TMT joint capsule, which is incised longitudinally. Through this lateral window, we can also access the lateral aspect of the second TMT joint.
2. Meticulous Joint Preparation
This is the most critical phase of the operation. The primary cause of nonunion in midfoot arthrodesis is inadequate joint preparation. We must transition from a sclerotic, arthritic joint to a robust, bleeding, bone-on-bone interface.
Starting with the first TMT joint, we use a combination of sharp osteotomes, curettes, and rongeurs to aggressively denude the articular cartilage from both the medial cuneiform and the base of the first metatarsal.
Crucial Technical Pearl: Remember the 28 to 30 millimeter depth of the first TMT joint. You must use curved ring curettes to reach the plantar-most recess of the joint. If you leave a plantar cartilaginous hinge, the joint will gap dorsally upon compression.
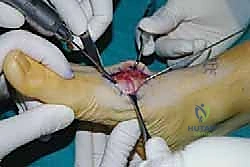
Once the cartilage is removed down to bleeding subchondral bone, we employ the "fish-scaling" or shingling technique. Using a 2.0-millimeter drill bit or a sharp osteotome, we create multiple perforations across the entire subchondral surface of both sides of the joint. This breaks through the sclerotic bone, allowing marrow elements and osteoprogenitor cells to flood the arthrodesis site, drastically enhancing the biological environment for fusion.
We repeat this exhaustive process for the second and third TMT joints. The second TMT joint requires particular attention due to its proximal recess. A lamina spreader placed carefully between the cuneiforms can aid in distracting the joint for complete visualization and debridement.
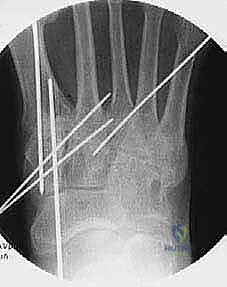
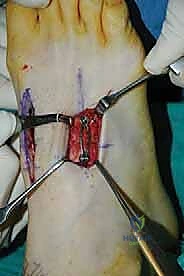
3. Temporary Stabilization and Alignment
With the joints prepared, we must restore the architectural alignment of the foot before definitive fixation. We manually reduce the joints, ensuring the metatarsal heads are perfectly aligned in the coronal plane and the foot is entirely plantigrade. We eliminate any residual dorsal subluxation or abduction deformity.
Once satisfied with the clinical alignment, we secure the reduction with temporary 0.062-inch Kirschner wires (K-wires).
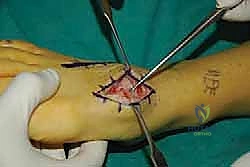
For the first TMT joint, we typically place two crossed K-wires. The first is driven from the dorsal-medial aspect of the medial cuneiform, aiming distally and plantarward into the base of the first metatarsal. The second is driven from the dorsal first metatarsal shaft, aiming proximally into the medial cuneiform.
We confirm our reduction and K-wire placement with multi-planar fluoroscopy. The AP view must show a congruent medial border of the second metatarsal with the medial border of the intermediate cuneiform. The lateral view must demonstrate a perfectly straight talar-first metatarsal axis.
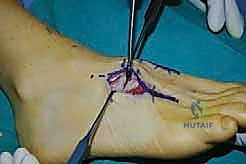
4. Definitive Fixation Strategy
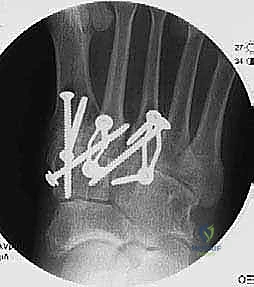
The gold standard for TMT arthrodesis fixation relies on the principle of absolute stability via interfragmentary compression.
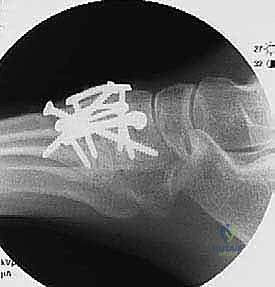
For the first TMT joint, we favor a robust crossed-screw construct. We utilize 3.5mm or 4.0mm solid cortical screws, utilizing a lag technique (overdrilling the near cortex). The first screw, the "home run" screw, is often directed from the dorsal-medial cuneiform into the plantar-lateral base of the first metatarsal. A second screw is placed from the dorsal first metatarsal into the plantar medial cuneiform.
For the second TMT joint, the classic "Lisfranc screw" trajectory is employed: from the medial cuneiform, across the joint, into the base of the second metatarsal. This provides immense biomechanical stability to the keystone of the midfoot. The third TMT joint is typically stabilized with a single lag screw from the dorsal third metatarsal into the lateral cuneiform.
If bone quality is poor (osteopenia) or if achieving adequate compression with screws alone is challenging due to the local anatomy, we augment or replace screw fixation with dorsal spanning locking plates. Dorsal plating provides excellent neutralization of the plantarflexion forces that act on the midfoot during the gait cycle.
Following hardware placement, we meticulously assess the construct under fluoroscopy. We verify that all joints are fully compressed, hardware is intraosseous without penetrating adjacent pristine joints (like the naviculocuneiform joint), and the overall alignment is anatomic.
5. Closure and Immobilization
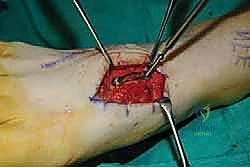
Prior to closure, we thoroughly irrigate the wounds to remove bone debris. The tourniquet is deflated, and meticulous hemostasis is achieved. The EDB muscle fascia is loosely reapproximated. The extensor retinaculum is repaired to prevent tendon bowstringing.
The subcutaneous tissues are closed with absorbable sutures, and the skin is closed with non-absorbable nylon using a vertical mattress technique to minimize tension on the delicate dorsal skin edges. The foot is then placed in a bulky, well-padded posterior splint with the ankle locked in strict neutral dorsiflexion.
Complications, Incidence Rates, and Salvage Management
Despite meticulous surgical technique, midfoot arthrodesis carries a recognized complication profile. Thorough preoperative patient counseling regarding these risks is mandatory.
| Complication | Estimated Incidence | Etiology and Risk Factors | Salvage and Management Strategy |
|---|---|---|---|
| Nonunion / Delayed Union | 5% - 15% | Inadequate joint prep (leaving plantar cartilage), smoking, diabetes, failure to address equinus contracture. | Prolonged immobilization, bone stimulator. If symptomatic: Revision arthrodesis with autologous bone grafting (iliac crest or proximal tibia) and rigid dorsal plating. |
| Hardware Prominence / Pain | 10% - 20% | Thin dorsal soft tissue envelope, prominent screw heads, bulky dorsal plates. | Conservative: Shoe modification, padding. Surgical: Hardware removal once solid radiographic and clinical union is confirmed (typically > 6-9 months post-op). |
| Neurovascular Injury | 2% - 5% | Iatrogenic injury to deep peroneal nerve, dorsalis pedis artery, or superficial dorsal cutaneous branches during exposure. | Prevention is key. If neuroma develops: Gabapentinoids, targeted nerve blocks. Refractory cases may require surgical neurectomy and burying the stump in deep muscle. |
| Adjacent Segment Disease | 10% - 30% (Long-term) | Altered biomechanics transferring stress to the naviculocuneiform (NC) or metatarsophalangeal (MTP) joints. | Conservative management first (orthotics). If severe, progressive arthrosis develops, extension of the fusion mass (e.g., NC joint arthrodesis) may be indicated. |
| Wound Dehiscence / Infection | 2% - 4% | Poor skin bridge planning, excessive retraction, hematoma formation, diabetic microangiopathy. | Aggressive local wound care, oral/IV antibiotics. Deep infections require immediate surgical debridement, hardware retention (if stable) or removal (if loose), and infectious disease consultation. |
Phased Post-Operative Rehabilitation Protocols
The biological timeline for midfoot arthrodesis dictates a strict, phased rehabilitation protocol. Bone healing in the midfoot is notoriously slow due to the dense cortical bone and relatively precarious blood supply compared to the metaphyseal regions of long bones.
Phase I: Maximum Protection (Weeks 0 - 2)
The patient remains strictly non-weight-bearing (NWB) in the initial posterior splint. The primary goals are wound healing, edema control (strict elevation above the heart), and pain management. At the two-week mark, sutures are removed, and clinical alignment is assessed.
Phase II: Continued Protection and Bone Healing (Weeks 2 - 6)
The patient transitions to a fiberglass short-leg cast or a rigid controlled ankle motion (CAM) boot, remaining strictly NWB. Crutches, a walker, or a knee scooter are utilized. Radiographs are obtained at the 6-week mark to assess for early signs of trabecular bridging and to ensure hardware remains intact without loss of correction.
Phase III: Progressive Loading (Weeks 6 - 10)
If 6-week radiographs demonstrate satisfactory progression of healing, the patient begins progressive partial weight-bearing (PWB) in the CAM boot. This typically starts at 25% body weight and advances weekly. Physical therapy is initiated focusing on active ankle range of motion (to combat stiffness), isometric strengthening, and proprioceptive training.
Phase IV: Return to Function (Weeks 10 and Beyond)
Once radiographic union is confirmed (typically between 10 to 12 weeks) and the patient is pain-free with full weight-bearing in the boot, they transition to a supportive, stiff-soled athletic shoe, often supplemented with a custom rigid carbon-fiber orthotic to support the transverse arch and protect the fusion mass. High-impact activities and running are generally restricted until at least 6 to 9 months post-operatively.
Summary of Landmark Literature and Clinical Guidelines
The evolution of tarsometatarsal arthrodesis has been heavily influenced by several landmark biomechanical and clinical studies.
Early literature by Myerson et al. established the foundational principles of midfoot arthrodesis, particularly emphasizing the necessity of restoring the anatomical alignment of the medial and central columns to prevent late-stage planovalgus collapse. Their clinical series demonstrated that in situ fusion of a deformed midfoot yields universally poor functional outcomes; anatomical reduction is paramount.
The debate between screw fixation versus dorsal plating has been a subject of extensive research. Biomechanical studies, such as those by Marks et al., have demonstrated that while crossed lag screws provide superior initial interfragmentary compression, dorsal plating constructs offer superior resistance to the plantarflexion bending moments experienced during the terminal stance phase of gait. Current clinical consensus, supported by recent comparative cohort studies, suggests a hybrid approach: utilizing lag screws for primary compression across the joint surfaces, augmented by dorsal neutralization plates in patients with osteopenia or multi-joint instability.
Furthermore, the literature heavily underscores the importance of meticulous joint preparation. Studies analyzing nonunion rates consistently point to retained plantar cartilage in the first TMT joint as the primary culprit. The adoption of aggressive subchondral drilling and the "fish-scaling" technique has been shown in prospective analyses to significantly reduce nonunion rates by optimizing the local osteogenic environment. Lastly, the absolute necessity of addressing concomitant equinus contracture is a universally accepted guideline, as failure to release the gastrocnemius-soleus complex places insurmountable stress on the midfoot fusion mass, leading to predictable hardware failure.
