Revision First Metatarsophalangeal Joint Arthrodesis: An Intraoperative Masterclass
Key Takeaway
Join us in the OR for an immersive masterclass on revision first MTPJ arthrodesis. We meticulously cover patient selection, comprehensive surgical anatomy, precise intraoperative techniques for various failure patterns, including bone grafting, and detailed postoperative care. Learn critical pearls and pitfalls to ensure successful outcomes in these challenging cases, restoring a stable, pain-free medial column.
Comprehensive Introduction and Patho-Epidemiology
Fellows, welcome to the operating theater. Today, we are tackling one of the most challenging, yet incredibly rewarding procedures in foot and ankle reconstruction: the revision first metatarsophalangeal joint (MTPJ) arthrodesis. This intervention transcends the mere mechanical fusion of a joint; it represents a complex biological and biomechanical salvage operation. Our primary objective is the restoration of medial column function, the alleviation of debilitating chronic pain, and the correction of multiplanar deformities that have invariably plagued our patients following previous, failed surgical endeavors. The ultimate goal is to engineer a painless, solid medial column, appropriate in length, that establishes a stable medial arch and a plantigrade foot, thereby mitigating pathological load transfer to the lesser rays.
The patho-epidemiology of first MTPJ surgical failures is multifaceted. Revision arthrodesis is strictly indicated for persistent pain, profound functional deficit, or significant deformity after a comprehensive trial of conservative management has been exhausted. These failures typically originate from several distinct clinical scenarios. First, failed primary hallux valgus surgery may present as recurrent or severe iatrogenic hallux varus, avascular necrosis (AVN) of the metatarsal head, or accelerated secondary osteoarthritis leading to profound stiffness and pain. Second, historical excisional arthroplasties, such as the Keller-Brandes procedure, frequently result in a destabilized medial column, manifesting as a recurrent valgus drift, a rigid "cock-up" deformity, or a completely flail toe. These particular cases are notoriously difficult due to the massive osseous voids left behind.
Third, prosthetic arthroplasties, particularly those utilizing Silastic implants, can induce a catastrophic, aggressive foreign-body giant cell reaction to particulate wear debris. This silicone synovitis causes massive osteolysis and cystic degeneration on both sides of the joint, obliterating native bone stock. Finally, we frequently encounter nonunions or malunions of primary first MTPJ arthrodeses. A nonunion presents with persistent pain, hardware failure, and gross instability at the fusion interface. Conversely, a malunion—while biologically fused—is biomechanically disastrous. A fusion that is excessively plantarflexed or straight leads to a painful intractable plantar keratosis (IPK) under the hallucal interphalangeal (IP) joint, while an excessively dorsiflexed fusion causes painful shoe-wear impingement and transfers excessive weight-bearing forces to the lesser metatarsal heads.
Detailed Surgical Anatomy and Biomechanics
In the realm of revision forefoot surgery, the surgeon must operate under the fundamental assumption that normal anatomical landmarks have been severely disrupted, if not entirely obliterated. Previous surgical incisions, dense fibrotic scar tissue, and aggressive bone resections significantly alter tissue planes, obscuring vital neurovascular structures and distorting musculotendinous balance. Mastery of both native and altered anatomy is non-negotiable for a successful outcome.
Osteology and Medial Column Mechanics
The first MTPJ is the keystone of the foot's medial column, serving as the primary fulcrum for propulsion during the toe-off phase of the gait cycle. Its proper alignment in the sagittal, transverse, and coronal planes is paramount. During a revision, we must critically assess the residual integrity of the first metatarsal length, the viability and vascularity of the metatarsal head (maintaining a high index of suspicion for AVN), and the remaining cortical bone stock of the proximal phalanx. Furthermore, the biomechanical relationship between the hallucal IP joint, the first MTPJ, and the first tarsometatarsal (TMT) joint must be thoroughly evaluated. Advanced degeneration of the first TMT or IP joints serves as a relative contraindication to MTPJ fusion, as a rigid MTPJ will inevitably transfer increased mechanical stress to these adjacent, already compromised articulations, exacerbating the patient's pain.
Neurovascular Topography
The dorsal aspect of the forefoot is an unforgiving landscape rich in delicate neurovascular structures. The medial dorsal cutaneous nerve (MDCN), a primary branch of the superficial peroneal nerve, courses along the dorsomedial aspect of the foot, frequently intersecting our standard surgical approaches. Iatrogenic injury or aggressive retraction of this nerve can result in debilitating neuromas or profound paresthesias that often eclipse the pain of the original pathology. Deep within the first web space lies the terminal branch of the deep peroneal nerve, which supplies critical sensation to the adjacent sides of the first and second toes and provides motor innervation to the extensor digitorum brevis. This nerve is particularly vulnerable during deep lateral soft tissue releases. Vascularly, while the dorsalis pedis artery is typically situated deeper and more proximally, the first dorsal metatarsal artery and its arborizations are frequently encountered. In a scarred bed, meticulous dissection is required to protect these vessels or ligate them cleanly to prevent postoperative hematoma.
Musculotendinous Intervals and Soft Tissue Envelopes
The extensor hallucis longus (EHL) tendon is the most prominent tendinous structure in the operative field, lying just lateral to our ideal dorsomedial incision line. It must be carefully mobilized and retracted laterally to expose the joint capsule. Fellows must remember that excessive or prolonged static retraction of the EHL can induce ischemic tendonitis or delayed rupture. Because previous surgeries generate dense, unyielding scar tissue that obliterates normal fascial gliding planes, we must meticulously raise full-thickness fasciocutaneous flaps off the metatarsus and proximal phalanx. "Skiving" through scar tissue will inevitably lead to skin edge necrosis and catastrophic wound breakdown. Handling these compromised soft tissue envelopes with extreme care preserves whatever tenuous vascularity remains.
Exhaustive Indications and Contraindications
The decision to proceed with a revision first MTPJ arthrodesis is complex and requires a nuanced understanding of the patient's physiological status, bone stock, and functional demands. We must carefully weigh the absolute and relative indications against potential contraindications to optimize surgical outcomes.
| Category | Specific Conditions | Clinical Rationale |
|---|---|---|
| Absolute Indications | Aseptic Nonunion of Primary Fusion | Persistent pain, hardware failure, and gross instability requiring rigid stabilization. |
| Symptomatic Malunion | Severe sagittal/transverse plane deformity causing intractable pain, IPK, or transfer metatarsalgia. | |
| Failed Silastic/Prosthetic Implant | Massive osteolysis and silicone synovitis requiring implant extraction and structural grafting. | |
| Severe Iatrogenic Hallux Varus | Loss of medial column stability and severe pain not amenable to soft tissue reconstruction. | |
| Relative Indications | Failed Keller Arthroplasty | Results in a flail toe or cock-up deformity; requires significant structural bone grafting to restore length. |
| Recurrent Hallux Valgus with OA | Advanced degenerative changes following failed primary osteotomies. | |
| Absolute Contraindications | Active Deep Infection | Fusing in the presence of active osteomyelitis guarantees failure; requires staged explantation, antibiotic spacers, and delayed reconstruction. |
| Severe Vascular Insufficiency | Ankle-Brachial Index (ABI) < 0.5 or non-palpable pulses without bypass options; high risk of amputation. | |
| Relative Contraindications | Advanced IP or TMT Joint Arthritis | Fusing the MTPJ transfers stress to adjacent joints; may require extended medial column fusion. |
| Active Charcot Neuroarthropathy | High risk of hardware failure and nonunion; requires prolonged immobilization prior to surgical intervention. |

When dealing with a failed prosthetic implant, as seen in cases of silicone synovitis, the bone loss is often cavernous. The surgeon must be prepared not only to remove the offending implant and all reactive particulate matter but also to reconstruct the massive void. Similarly, the "cock-up" deformity seen after a failed Keller arthroplasty presents a unique challenge: the intrinsic musculature has lost its insertion base, and the EHL is unopposed, requiring both structural lengthening and meticulous soft tissue balancing to restore a plantigrade digit.
Pre-Operative Planning, Templating, and Patient Positioning
Successful revision arthrodesis is never an improvisational endeavor; it is the direct result of obsessive, meticulous preoperative planning. The margin for error in revision cases is exceptionally narrow, demanding a comprehensive evaluation of both the patient and the pathology.
Clinical Evaluation and Advanced Imaging
A thorough history and physical examination form the bedrock of our planning. The surgeon must meticulously document any history of cigarette smoking, as nicotine-induced microvascular vasoconstriction exponentially increases the risk of nonunion. Peripheral circulation and protective sensation must be rigorously assessed. The age, orientation, and exact site of previous surgical scars must be mapped to plan the safest surgical approach, ideally incorporating or excising existing incisions to prevent narrow skin bridges that are prone to necrosis.
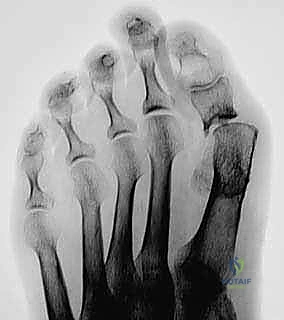
Radiographic evaluation begins with mandatory weight-bearing anteroposterior (AP) and lateral radiographs of the foot. These are essential for assessing the extent of osseous deficits from the proximal phalanx and metatarsal head. An oblique radiograph frequently provides critical three-dimensional insight regarding residual cortical bone stock. If AVN of the metatarsal head is suspected following a prior distal chevron osteotomy, a non-contrast MRI is invaluable, provided the patient does not have MRI-incompatible metallic implants. If latent infection is suspected—a common culprit in aseptic-appearing nonunions—it must be definitively ruled out. We routinely obtain a complete blood count, C-reactive protein (CRP) level, and erythrocyte sedimentation rate (ESR). While an isotope bone scan or tagged white blood cell scan can be helpful, clinical correlation is paramount, and a preoperative joint aspiration for cell count and culture should be considered if inflammatory markers are elevated.
Addressing Coexisting Forefoot Pathology
Addressing concomitant forefoot pathology is a critical, non-negotiable step. Any lesser toe deformities must be structurally corrected before setting the final hallux position. Attempting to position the hallux in a vacuum, ignoring the adjacent digits, will inevitably lead to improper valgus alignment and devastating, painful transfer lesions. Common adjunctive procedures include proximal interphalangeal joint (PIP) arthrodeses for rigid claw toes, MTPJ capsulotomies, extensor digitorum longus (EDL) lengthenings, and Weil osteotomies for transfer metatarsalgia.
Surgical Warning: When performing Weil osteotomies to address transfer metatarsalgia, never perform a Weil osteotomy of the second metatarsal head in isolation. An osteotomy of the third metatarsal head must accompany it to maintain the normal metatarsal cascade and prevent iatrogenic transfer metatarsalgia to the adjacent ray.
Patient Positioning and OR Setup
The operating room environment must be optimized for both surgeon ergonomics and unhindered access to the extremity. The patient is positioned supine on the operating table. The heels are placed at the absolute distal edge of the table, and the foot of the bed is dropped 20 to 30 degrees. This configuration allows the primary surgeon to sit comfortably at the end of the table, providing a direct, unencumbered axial view of the medial column. If structural autograft is anticipated, a sandbag or bump is placed under the ipsilateral buttock to facilitate access to the anterior iliac crest. A thigh tourniquet is applied, and prophylactic intravenous antibiotics are administered prior to exsanguination and inflation. The C-arm fluoroscopy unit must be positioned to enter from the contralateral side, draped for seamless intraoperative access to obtain true AP, lateral, and oblique views without contaminating the sterile field.
Step-by-Step Surgical Approach and Fixation Technique
We have completed our preoperative checks, the patient is optimized, and the surgical field is prepared. The execution of a revision arthrodesis requires extreme patience, respect for compromised soft tissues, and a versatile approach to joint preparation and fixation.
Incision and Soft Tissue Dissection
I utilize a dorsal, slightly curved longitudinal incision, meticulously planned to incorporate or cleanly excise previous dorsal scars. This incision is placed just medial to the EHL tendon and lateral to the MDCN, extending from the mid-diaphysis of the first metatarsal distally to the interphalangeal joint. Dissection through the subcutaneous tissue must be deliberate to identify and protect the MDCN. We then raise full-thickness fasciocutaneous flaps off the metatarsus and proximal phalanx. Due to dense postoperative scarring, this is a tedious process requiring sharp dissection. The EHL tendon is identified, freed from surrounding adhesions, and gently retracted laterally. Self-retaining retractors should be utilized under minimal tension and released periodically to prevent ischemic necrosis of the skin edges.
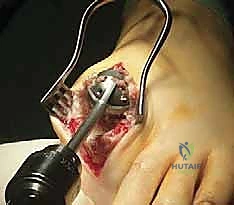
Joint Preparation and Debridement
A longitudinal capsulotomy exposes the MTPJ. Any retained hardware—screws, plates, or wire fragments—is meticulously extracted. A radical synovectomy is performed, excising all fibrotic, necrotic, or metallosis-stained tissue until healthy, punctate bleeding bone is encountered. The medial, lateral, and plantar soft tissue attachments (including the sesamoid complex if adhered) are released to allow maximum plantarflexion of the proximal phalanx, granting circumferential access to the articular surfaces.
For revisions of nonunions or failed bunionectomies with minimal bone loss, we employ a ball-and-socket preparation technique to maximize cancellous surface area contact and allow for multiplanar positional adjustments. After excising peripheral osteophytes, a 1.6-mm guidewire is driven centrally into the proximal phalanx.
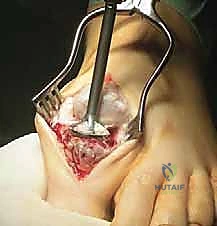
Over this guidewire, the base of the proximal phalanx is aggressively prepared using a convex cannulated reamer until a bleeding, concave subchondral bed is established.
Subsequently, a size-matched concave reamer is utilized to prepare the metatarsal head, stripping away sclerotic bone to reveal a bleeding convex surface that perfectly congruates with the prepared phalanx. Conversely, in cases of malunion where the primary goal is angular correction without further shortening, we utilize an oscillating saw to perform precise, flat-cut closing wedge osteotomies through the prior fusion mass.
Bone Grafting Strategies and Complex Revisions
In complex revision scenarios—such as failed excisional arthroplasties or explanted Silastic joints—the resulting osseous void dictates the mandatory use of structural bone graft to restore normal first ray length and mechanics. Leaving the first ray shortened will guarantee devastating transfer metatarsalgia to the lesser rays.
We harvest a tricortical block of autogenous bone from the ipsilateral anterior iliac crest. The metatarsal and phalangeal surfaces are prepared with flat cuts using an oscillating saw to create parallel, bleeding surfaces. The tricortical graft is then meticulously contoured using a rongeur and burr to fit precisely into the defect. The cortical surface of the graft is oriented dorsally or medially to provide maximum structural support against bending forces, while the cancellous portion interfaces with the host bone to promote rapid osteogenesis and creeping substitution.
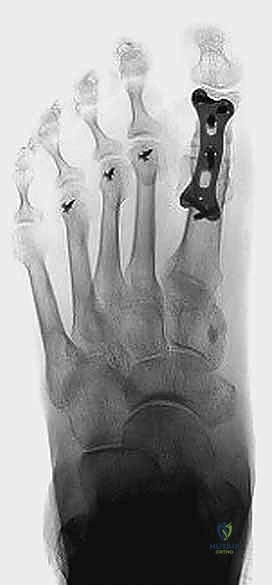
Definitive Fixation Methods
Rigid, stable fixation is the cornerstone of a successful arthrodesis. Once the joint (or graft construct) is provisionally pinned with K-wires in the ideal position—typically 10 to 15 degrees of valgus and 15 to 20 degrees of dorsiflexion relative to the first metatarsal axis—we proceed with definitive fixation. For standard revisions, a robust construct involves a solid, partially threaded 4.0mm or 4.5mm interfragmentary lag screw driven from the medial metatarsal neck into the lateral base of the proximal phalanx to achieve maximal compression. This is neutralized by a low-profile, dorsal titanium locking plate. In cases utilizing a structural interpositional block graft, lag screw compression across the entire construct is often impossible and risks fracturing the graft. In these instances, we rely on a longer, highly rigid dorsal locking plate spanning from the metatarsal diaphysis to the distal aspect of the proximal phalanx, utilizing locking screws to create a fixed-angle construct that bridges the defect and supports the graft during incorporation.
Complications, Incidence Rates, and Salvage Management
Despite meticulous technique, revision first MTPJ arthrodesis carries a significantly higher complication profile than primary fusion. The surgeon must be acutely aware of these risks, counsel the patient appropriately preoperatively, and possess the surgical armamentarium to manage them when they arise.
| Complication | Estimated Incidence in Revision | Etiology & Risk Factors | Salvage & Management Strategy |
|---|---|---|---|
| Aseptic Nonunion | 10% - 25% | Smoking, inadequate fixation, poor bone stock, thermal necrosis during reaming. | Prolonged immobilization, bone stimulator. Surgical revision with rigid locking plates, autogenous ICBG, or rhBMP-2. |
| Hardware Prominence | 15% - 30% | Thin dorsal soft tissue envelope, use of bulky standard-profile plates. | Conservative shoe wear modification. Surgical hardware removal strictly after radiographic confirmation of solid fusion. |
| Deep Infection | 2% - 5% | Compromised soft tissue, prolonged operative time, prior septic joint. | Aggressive surgical debridement, hardware removal, placement of antibiotic-impregnated cement spacer, IV antibiotics, delayed fusion. |
| Transfer Metatarsalgia | 10% - 20% | Excessive dorsiflexion of fusion, foreshortened first ray without structural graft. | Custom orthotics with metatarsal offloading pads. Surgical intervention via lesser metatarsal Weil osteotomies. |
| Malunion | 5% - 10% | Failure to account for lesser toe deformities, improper intraoperative fluoroscopic assessment. | Corrective closing or opening wedge osteotomy through the fusion mass depending on length requirements. |
The most dreaded complication is the recalcitrant nonunion, particularly in the setting of structural bone grafting. If a nonunion is asymptomatic, conservative management with custom stiff-soled shoe wear is appropriate. However, symptomatic nonunions require re-revision. This often involves taking down the pseudoarthrosis, utilizing orthobiologics such as recombinant human bone morphogenetic protein-2 (rhBMP-2) combined with cancellous allograft, and upgrading the fixation to a highly rigid plantar plate or a dual-plate construct to maximize biomechanical stability.
Phased Post-Operative Rehabilitation Protocols
Rehabilitation following revision first MTPJ arthrodesis is inherently more conservative than primary surgery, reflecting the compromised biology and the frequent reliance on bone grafting. The protocol must be strictly adhered to in order to prevent catastrophic hardware failure or graft collapse.
Phase 1: Immediate Post-Operative (Weeks 0-2)
The patient is placed in a bulky, well-padded posterior splint in the operating room. Strict non-weight-bearing (NWB) status is enforced using crutches, a walker, or a knee scooter. Elevation above the level of the heart is critical to manage edema and protect the tenuous dorsal skin incisions. At two weeks, sutures are removed provided the wound is completely sealed.
Phase 2: Protection and Early Callus Formation (Weeks 2-6)
Following suture removal, the patient is transitioned into a rigid, removable controlled ankle motion (CAM) boot. Weight-bearing status depends heavily on the intraoperative construct. If a standard revision without structural graft was performed with excellent compression, heel-touch weight-bearing may be permitted. If a structural iliac crest graft was utilized, strict NWB is maintained for a full 6 weeks to prevent shear forces from displacing the graft.
Phase 3: Progressive Loading (Weeks 6-12)
At the 6-week mark, new weight-bearing radiographs are obtained. If there is radiographic evidence of bridging trabeculae and no hardware failure, the patient may begin progressive weight-bearing as tolerated (WBAT) in the CAM boot. Physical therapy is initiated, focusing on edema control, strengthening of the intrinsic foot musculature, and maintaining mobility of the hallucal IP joint and ankle.
Phase 4: Return to Function (Weeks 12+)
At 10 to 12 weeks, assuming clinical and radiographic union is confirmed, the patient is transitioned out of the CAM boot into a stiff-soled, wide toe-box shoe. A carbon fiber insert may be utilized to minimize bending forces across the midfoot and forefoot. High-impact activities and running are generally discouraged until 6 months post-operatively.
Summary of Landmark Literature and Clinical Guidelines
The evolution of revision first MTPJ arthrodesis is deeply rooted in landmark orthopedic literature. Understanding these foundational texts provides the academic surgeon with the evidence base required to justify complex intraoperative decisions.
The biomechanical necessity of proper fusion positioning was definitively established by Coughlin et al. in their seminal works. They demonstrated that the ideal position for arthrodesis—approximately 10 to 15 degrees of valgus and 15 degrees of dorsiflexion relative to the first metatarsal—optimizes the weight-bearing cascade and minimizes the risk of interphalangeal joint arthritis and transfer metatarsalgia. In the context of revision surgery, deviating from these angles is the primary cause of secondary failure.
Brodsky and colleagues have extensively documented the outcomes of revision arthrodesis for failed primary fusions and failed implants. Their research underscores that while revision arthrodesis reliably relieves pain (with success rates often exceeding 80%), patients must be counseled that functional outcomes and patient-reported outcome measures (PROMs) will rarely match those of a successful primary fusion. Furthermore, Myerson's critical investigations into the management of massive bone defects have standardized the use of structural tricortical iliac crest autograft. His work established that attempting to bridge defects greater than 1.0 cm without structural support leads to unacceptably high rates of nonunion and profound biomechanical dysfunction of the medial column.
In conclusion, revision first MTPJ arthrodesis is a technically demanding procedure that requires a masterful understanding of altered anatomy, meticulous preoperative planning, and precise intraoperative execution. By strictly adhering to biomechanical principles, respecting the compromised soft tissue envelope, and utilizing robust fixation strategies, the orthopedic surgeon can successfully salvage these complex deformities, restoring a functional, plantigrade, and painless foot for the patient.
