Mini-Open Achilles Tendon Repair: An Intraoperative Masterclass
Key Takeaway
This masterclass details mini-open Achilles tendon repair, focusing on meticulous anatomy, patient positioning, and step-by-step intraoperative execution. Learn precise techniques for suture placement, tensioning, and closure. We cover critical pearls, potential pitfalls, and comprehensive postoperative management, ensuring optimal functional recovery for patients with acute Achilles ruptures.
Comprehensive Introduction and Patho-Epidemiology
The management of acute Achilles tendon ruptures remains one of the most vigorously debated topics in orthopedic surgery, yet the evolution of minimally invasive techniques has dramatically shifted the treatment paradigm. The Achilles tendon, the largest and strongest tendinous structure in the human body, is subjected to extraordinary biomechanical forces, routinely bearing loads up to ten times body weight during vigorous athletic activities. Acute ruptures predominantly afflict the "weekend warrior"—typically a male in his third to fifth decade of life—who engages in episodic, high-impact sports requiring sudden acceleration, deceleration, or explosive jumping. The classic mechanism involves an eccentric load applied to a dorsiflexed ankle, resulting in mechanical failure of the tendon fibers, most frequently occurring in the hypovascular "watershed" zone located 2 to 6 centimeters proximal to the calcaneal insertion.
Epidemiologically, the incidence of Achilles tendon ruptures has been steadily rising, currently estimated at 18 to 32 per 100,000 person-years in Western populations. This increase is multifactorial, attributed to an aging population maintaining higher levels of physical activity, alongside systemic risk factors such as fluoroquinolone antibiotic use, local or systemic corticosteroid administration, and underlying metabolic conditions like gout or hyperthyroidism. Patients universally describe a sudden, audible "pop" or the sensation of being struck in the posterior calf, followed by acute pain, swelling, and an immediate functional deficit in plantarflexion power. While the diagnosis is primarily clinical—hallmarked by a positive Thompson squeeze test, a palpable defect, and increased resting ankle dorsiflexion (the Matles test)—the decision-making process regarding intervention requires nuanced clinical judgment.
Historically, the orthopedic community was divided between traditional open surgical repair, which offered lower re-rupture rates but carried a notoriously high risk of devastating wound complications, and non-operative functional rehabilitation, which avoided surgical morbidity but historically demonstrated higher re-rupture rates and potential deficits in terminal plantarflexion strength. The advent of the mini-open and percutaneous Achilles tendon repair techniques represents a critical inflection point in this historical dichotomy. By combining the biomechanical advantages of secure, end-to-end surgical apposition with the biological benefits of a minimal incision, the mini-open approach drastically mitigates the risk of soft tissue necrosis and deep infection while restoring optimal resting tension to the gastroc-soleus complex.
This masterclass chapter provides an exhaustive, step-by-step technical guide to the mini-open Achilles tendon repair. It is designed for the operating orthopedic surgeon, detailing the precise anatomical considerations, rigorous preoperative planning, meticulous intraoperative execution utilizing modern jig-based systems, and evidence-based postoperative rehabilitation protocols required to achieve superior clinical outcomes. Mastery of this technique demands not only technical dexterity but a profound respect for the delicate posterior ankle soft-tissue envelope.
Detailed Surgical Anatomy and Biomechanics
A profound, three-dimensional understanding of the posterior ankle anatomy is the absolute prerequisite for executing a safe and effective mini-open Achilles repair. The soft tissue envelope in this region is unforgiving; the skin is thin, and the subcutaneous fat layer is sparse, providing minimal cushioning over the underlying tendinous structures. Immediately deep to the dermis, the surgeon must be acutely aware of the sural nerve and the small saphenous vein. The sural nerve, a purely sensory branch formed by the confluence of the medial sural cutaneous nerve (from the tibial nerve) and the lateral sural cutaneous nerve (from the common peroneal nerve), courses distally along the posterolateral aspect of the calf. Crucially, its anatomical path is highly variable; it typically crosses the lateral border of the Achilles tendon obliquely from medial to lateral at an average distance of 9.8 cm proximal to the calcaneal insertion, but this can range anywhere from 5 to 13 cm. In the distal third of the leg, it lies in close proximity to the lateral margin of the tendon, making it highly susceptible to iatrogenic injury during lateral dissection, percutaneous suture passing, or aggressive retraction.
Deep to the subcutaneous tissue lies the paratenon, a specialized, highly vascularized fascial layer that functions as a gliding mechanism and a critical source of extrinsic blood supply to the tendon. Unlike tendons with true synovial sheaths, the Achilles is enveloped by this paratenon, which consists of a superficial layer (the peritenon) and a deep layer (the epitenon). The anterior portion of the paratenon, often referred to as the mesotenon, carries the segmental blood vessels derived from the posterior tibial and peroneal arteries. Meticulous preservation and subsequent watertight closure of the paratenon are non-negotiable steps in the mini-open technique, as this tissue provides the essential biological milieu and cellular precursors necessary for robust tendon healing while preventing tethering of the tendon to the overlying skin.
The Achilles tendon itself is formed by the confluence of the gastrocnemius and soleus muscle aponeuroses. As the tendon descends toward its insertion on the posterior calcaneal tuberosity, its constituent fibers undergo a complex, 90-degree spiral rotation. The fibers originating from the medial gastrocnemius rotate to insert laterally, while the deeper soleus fibers rotate to insert medially. This spiraling architecture is a biomechanical marvel, allowing the tendon to store and release immense elastic energy during the stretch-shortening cycle of human locomotion. However, this complex internal topography also means that simple end-to-end suturing without respect to fiber orientation can result in a biomechanically inferior repair.

Blood supply to the tendon is derived from three primary sources: the musculotendinous junction proximally, the osseotendinous junction distally, and the extrinsic segmental vessels via the paratenon. Microangiographic studies have definitively identified a zone of relative hypovascularity located approximately 2 to 6 cm proximal to the calcaneal insertion. This "watershed" area precisely correlates with the most common site of acute rupture and degenerative tendinosis. Anterior to the tendon lies Kager's fat pad, a triangular adipose structure bordered by the Achilles tendon posteriorly, the flexor hallucis longus (FHL) muscle anteriorly, and the superior calcaneus inferiorly. Kager's fat pad is not merely inert filler; it is highly vascularized and actively contributes to the healing response following rupture. During surgery, the anterior epitenon should not be aggressively stripped from Kager's fat pad, as doing so devascularizes the anterior aspect of the tendon repair.
Exhaustive Indications and Contraindications
Patient selection is the cornerstone of successful outcomes in Achilles tendon surgery. The decision to proceed with a mini-open repair must be individualized, weighing the patient's physiological age, functional demands, medical comorbidities, and the specific pathoanatomy of the rupture. The ideal candidate for a mini-open repair is a healthy, active individual presenting with an acute rupture (typically less than 2 to 3 weeks old) located in the mid-substance of the tendon (2 to 6 cm proximal to the insertion). In these patients, surgical repair optimally restores the resting length and tension of the gastroc-soleus complex, maximizing plantarflexion power and endurance, which is critical for return to high-level athletics or demanding occupational activities.
Relative indications include patients who present with a delayed diagnosis (3 to 6 weeks post-injury) where a palpable gap remains, or those who have failed an initial trial of non-operative management due to elongation of the tendon and subsequent weakness. However, as the chronicity of the injury increases, the proximal muscle belly retracts, and the tendon ends become fibrotic, making a simple mini-open repair technically challenging or impossible. In cases where the gap exceeds 3 to 4 cm after maximal plantarflexion and proximal traction, traditional open techniques incorporating V-Y fascial advancement, turndown flaps, or flexor hallucis longus (FHL) transfers become necessary.
Contraindications to the mini-open technique are heavily weighted toward the integrity of the soft tissue envelope and the patient's systemic ability to heal. Absolute contraindications include active local soft tissue infection, profound peripheral arterial disease (e.g., an Ankle-Brachial Index < 0.5), or severe overlying dermatological conditions that preclude safe incision. Relative contraindications encompass poorly controlled diabetes mellitus, chronic high-dose systemic corticosteroid use, heavy tobacco use, and advanced physiological age with low functional demands. In these high-risk cohorts, the catastrophic consequences of a deep postoperative infection or wound dehiscence far outweigh the marginal biomechanical benefits of surgical repair over functional functional rehabilitation.
| Category | Indications for Mini-Open Repair | Contraindications for Mini-Open Repair |
|---|---|---|
| Timing of Injury | Acute ruptures (< 3 weeks) | Chronic, neglected ruptures (> 6 weeks) |
| Rupture Location | Mid-substance (2-6 cm proximal to insertion) | Avulsion fractures of the calcaneus, pure musculotendinous junction tears |
| Patient Profile | High-demand athletes, active adults | Sedentary lifestyle, non-ambulatory patients |
| Soft Tissue Status | Intact, healthy overlying skin | Active cellulitis, severe stasis dermatitis, compromised vascularity |
| Medical History | Medically optimized | Uncontrolled diabetes, severe peripheral vascular disease, heavy smoking |
Advanced imaging, while not strictly necessary for a classic acute presentation, plays a vital role in equivocal cases. Musculoskeletal ultrasound is a dynamic, cost-effective modality that can accurately measure the diastasis (gap) between tendon ends in varying degrees of plantarflexion. Magnetic Resonance Imaging (MRI) is reserved for cases of suspected chronic ruptures, partial tears, or when evaluating for concomitant pathology such as severe insertional calcific tendinopathy or retrocalcaneal bursitis, which might necessitate an alternative surgical approach.
Pre-Operative Planning, Templating, and Patient Positioning
Meticulous preoperative planning and flawless patient positioning are critical elements that dictate the flow and safety of the intraoperative procedure. In the preoperative holding area, the surgeon must personally verify the operative extremity, mark the surgical site, and perform a thorough neurovascular examination, documenting the baseline status of the sural and posterior tibial nerves. Deep vein thrombosis (DVT) risk stratification should be conducted using standardized tools (e.g., Caprini score), and appropriate pharmacological or mechanical prophylaxis should be planned according to institutional protocols and patient-specific risk factors.
Patient positioning for a mini-open Achilles repair is exclusively prone. However, the sequence of positioning is paramount. We strongly advocate for the application of a well-padded thigh tourniquet while the patient is still in the supine position on the transport stretcher. Applying the tourniquet in the prone position often leads to inadequate padding, pinching of the skin, and hyperextension of the lumbar spine as the limb is lifted. Once the tourniquet is secured, the patient is carefully log-rolled onto the operating table. The chest and pelvis must be supported by longitudinal gel rolls to allow for unencumbered excursion of the diaphragm and to prevent increased intra-abdominal pressure, which can exacerbate epidural venous bleeding. The arms are typically positioned on padded arm boards with the shoulders abducted no more than 90 degrees to protect the brachial plexus, and the ulnar nerves must be meticulously padded.
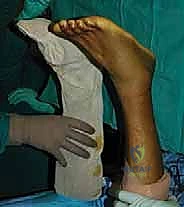
The lower extremities require specific attention. The patient should be positioned such that the knees are at the edge of the break in the operating table, or the feet should be suspended entirely off the end of the bed over a firm gel pad placed beneath the distal tibiae. This free suspension of the feet is a critical maneuver; it allows the surgeon to freely manipulate the ankle through a full range of motion, particularly into maximal equinus (plantarflexion), which is essential for approximating the tendon ends without tension during knot tying. Furthermore, prepping and draping both lower extremities into the sterile field is highly recommended. This allows the surgeon to intraoperatively compare the resting tension and cascade of the repaired Achilles tendon to the uninjured contralateral side, ensuring a physiological repair and avoiding over-tightening or under-tightening.
Prior to the formal surgical prep, an Examination Under Anesthesia (EUA) is performed. The relaxation of the gastroc-soleus complex often makes the palpable defect much more pronounced. The surgeon should carefully palpate the distal stump to confirm it is of sufficient length (at least 2 cm) to accommodate the suture anchors or distal locking sutures of the chosen mini-open system. The surgical team must ensure that all specialized instrumentation, such as the Achillon® system (Integra LifeSciences) or the PARS® system (Arthrex), along with appropriate high-tensile strength non-absorbable sutures (e.g., #2 FiberWire or Orthocord), are open and ready on the sterile back table. A contingency plan for conversion to a standard open repair must always be discussed with the operating room staff in the event of unforeseen complex tear patterns or inability to achieve secure fixation percutaneously.
Step-by-Step Surgical Approach and Fixation Technique
Incision and Superficial Dissection
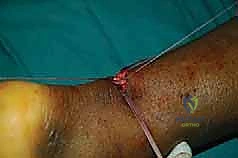
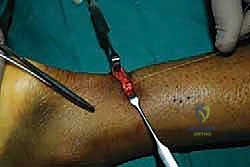
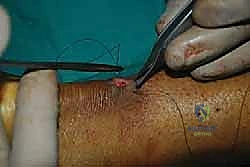
With the tourniquet inflated to 100 mmHg above systolic pressure, the procedure commences. The ankle is held in a neutral to slightly plantarflexed position. A 2 to 3 cm longitudinal skin incision is made precisely over the palpable defect. While transverse incisions have been described for cosmetic reasons, a longitudinal incision is vastly superior as it allows for proximal and distal extension if conversion to an open procedure becomes necessary. The incision is carried through the epidermis and dermis using a #15 blade.
Subcutaneous dissection must be performed with extreme care, utilizing blunt spreading with a small hemostat or Metzenbaum scissors. The surgeon must maintain a strict midline orientation to avoid the sural nerve laterally. The subcutaneous fat is gently swept aside to reveal the underlying paratenon. Hemostasis is achieved with precise bipolar electrocautery; aggressive use of monopolar cautery can lead to skin edge necrosis.
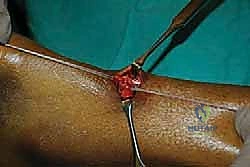
Paratenon Management and Hematoma Evacuation
Identification and preservation of the paratenon is a hallmark of this technique. The paratenon appears as a thin, glistening, whitish-translucent fascial layer covering the tendon.
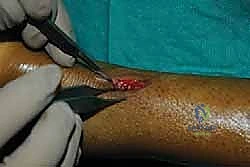
Using fine forceps, the paratenon is elevated and carefully incised longitudinally down the midline. This incision is extended proximally and distally just enough to expose the ruptured tendon ends. Deep to the paratenon, the surgeon will invariably encounter an organized fracture hematoma. This hematoma must be meticulously evacuated using a combination of blunt dissection, suction, and a small curette.
Evacuating the hematoma is crucial as it allows clear visualization of the tendon stumps and creates the biological space necessary for the ends to approximate without interposing clot, which can inhibit healing. During this stage, the plantaris tendon may be identified medially; if it is intact but obstructing the repair, it can be excised, though it is often left undisturbed.
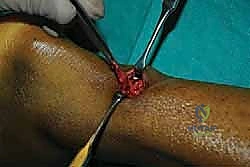
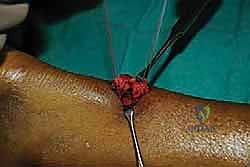
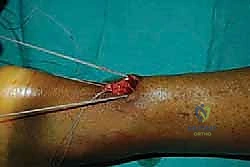
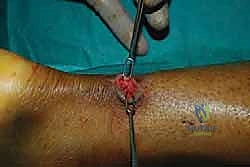
Mobilization and Tagging of Tendon Stumps
The proximal and distal tendon stumps typically exhibit a characteristic "mop-end" or frayed appearance. Using an Allis or Babcock clamp, the proximal stump is gently grasped and pulled distally.
Adhesions between the tendon and the anterior paratenon or Kager's fat pad are bluntly freed using a sweeping motion with a gloved finger or a blunt elevator. This mobilization is critical to allow the proximal muscle belly to excursion distally.
Once mobilized, heavy non-absorbable tag sutures (e.g., #0 Vicryl or Ethibond) are placed into both the proximal and distal stumps. These tag sutures act as handles, allowing the surgeon to apply controlled traction and manipulate the tendon ends into the jaws of the targeting jig.
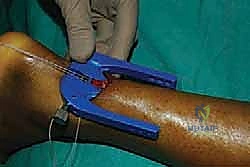
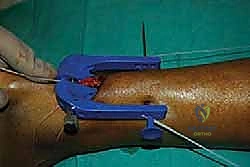
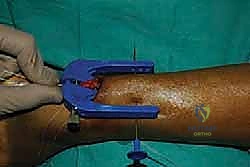
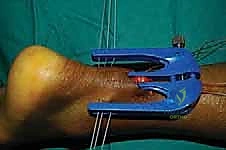
Introduction of the Targeting Jig and Suture Passing
The core of the mini-open technique relies on specialized targeting guides (such as the Achillon or PARS jigs) to pass sutures securely through the tendon substance while protecting the sural nerve. The inner arms of the jig are carefully inserted deep to the paratenon but superficial to the epitenon of the proximal stump.
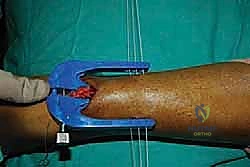
The jig is advanced proximally until the central window sits over the tendon stump. The tag sutures are pulled to draw the tendon firmly into the device.
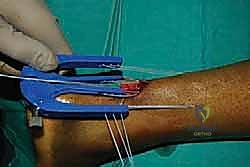
Once the jig is optimally positioned, the specialized needles, loaded with high-tensile core sutures (e.g., #2 FiberWire), are passed transversely through the guide holes, traversing the skin, subcutaneous tissue, paratenon, and the substance of the proximal tendon.
Typically, three to four core sutures are passed at varying levels to create a locking, multi-planar grasp on the tendon.
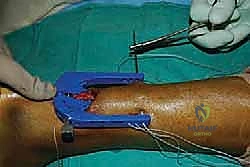
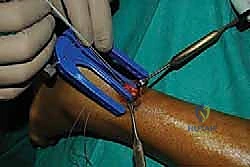
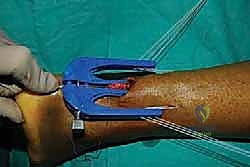
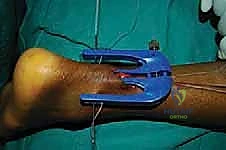
After the proximal sutures are passed, the jig is carefully withdrawn distally. As the jig exits the incision, it pulls the passed sutures through the central wound, effectively capturing the proximal tendon stump.
This entire process is then meticulously repeated for the distal tendon stump.

The jig is inserted deep to the paratenon over the distal stump, directed toward the calcaneal insertion.
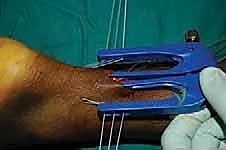
Needles are passed, ensuring secure purchase in the distal tissue.

Care must be taken not to advance the distal jig too forcefully against the calcaneus, which can cause iatrogenic injury to the insertion. The jig is again withdrawn, bringing the distal sutures into the main incision.
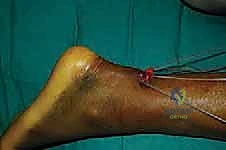
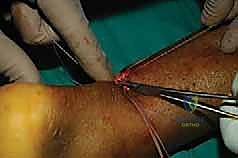
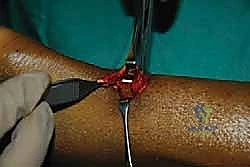
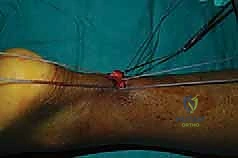
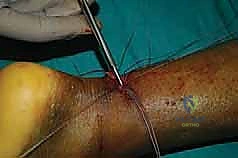
Tensioning, Knot Tying, and Restoration of Resting Length
With both proximal and distal core sutures now exiting the central mini-open wound, the critical phase of tensioning begins. The assistant places the ankle into approximately 15 to 20 degrees of plantarflexion (equinus) to approximate the tendon ends.
The surgeon matches the corresponding proximal and distal suture limbs.
Before tying the permanent knots, the resting tension of the ankle is compared to the prepped, uninjured contralateral leg. The goal is to perfectly recreate the physiological resting cascade.
The core sutures are tied using a series of secure, low-profile surgeon's knots.
It is imperative to bury these knots deep within the tendon substance or between the tendon ends to prevent postoperative knot prominence, which can irritate the overlying skin and cause painful bursa formation.
Once the primary core sutures are secured, the repair is visually inspected. The mop-ends should be cleanly apposed without gapping or excessive bunching.
If necessary, fine absorbable sutures (e.g., 2-0 Vicryl) can be used to run an epitenon-type stitch around the periphery of the repair site to tidy up frayed edges and improve the biological profile of the construct.
Layered Closure
The final, and arguably most important step for preventing complications, is the layered closure. The paratenon must be meticulously re-approximated over the repaired tendon using a running or interrupted 3-0 absorbable suture.
This watertight paratenon closure restores the extrinsic blood supply, provides a smooth gliding surface, and acts as a vital physical barrier between the tendon repair and the subcutaneous tissue.
Following paratenon closure, the subcutaneous layer is closed with inverted 3-0 or 4-0 absorbable sutures to take tension off the skin edges.
The skin is then closed with a non-absorbable monofilament (e.g., 3-0 or 4-0 Prolene) using a vertical mattress or subcuticular technique to optimize cosmetic outcome and minimize edge ischemia.
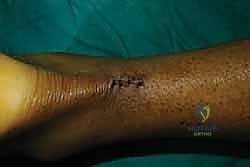
The wound is cleaned, dressed with a non-adherent dressing, and the limb is placed into a well-padded, short-leg anterior splint with the ankle secured in 15 to 20 degrees of plantarflexion.
Complications, Incidence Rates, and Salvage Management
Despite the minimally invasive nature of the mini-open technique, complications can and do occur, necessitating a high index of suspicion and prompt management. Sural nerve injury is the most frequently cited specific complication associated with percutaneous and mini-open systems, with historical incidence rates ranging from 2% to 10%. This typically occurs during the blind passage of the proximal lateral sutures. To mitigate this, surgeons must ensure the jig is placed deep to the paratenon and avoid sweeping laterally. If a patient presents postoperatively with lateral foot numbness or a painful Tinel's sign over the calf, initial management is expectant, utilizing neuromodulating medications (e.g., gabapentin). Persistent, debilitating neuromas may require surgical exploration, neurolysis, or excision and burying of the proximal nerve stump into deep muscle.
Wound healing complications and deep infections, while drastically reduced compared to traditional open repairs (dropping from historically >10% to <2% with mini-open techniques), remain a catastrophic possibility. Superficial wound dehiscence or delayed healing is managed with local wound care, oral antibiotics if cellulitis is present, and strict immobilization. Deep infection involving the tendon construct is a surgical emergency. It requires immediate return to the operating room for aggressive irrigation, debridement of necrotic tissue, and often, removal of the permanent suture material. Depending on the extent of debridement, the patient may be left with a massive tendon defect requiring complex salvage reconstruction once the infection is eradicated.
Re-rupture is the primary mechanical failure mode, occurring in 1% to 4% of mini-open repairs, typically within the first 12 weeks postoperatively during the transition from immobilization to weight-bearing. Re-ruptures present with a sudden recurrence of weakness and a new palpable gap. Management of a re-rupture is highly complex; direct repair is rarely possible due to severe tissue retraction and fibrosis. Salvage procedures are dictated by the size of the defect: gaps of 2-4 cm may be managed with a V-Y fascial advancement of the gastrocnemius aponeurosis
