Olecranon Fracture Fixation: An Intraoperative Masterclass in Open Reduction Techniques
Key Takeaway
Welcome to the operating theater, fellows. Today, we're tackling olecranon fractures. This masterclass will provide a granular, step-by-step walkthrough of open reduction and internal fixation, covering both tension band wiring and plate osteosynthesis. We'll delve into critical surgical anatomy, meticulous execution, and essential pearls to achieve optimal patient outcomes. Prepare for an immersive, real-time surgical experience, emphasizing precision and problem-solving.
Comprehensive Introduction and Patho-Epidemiology
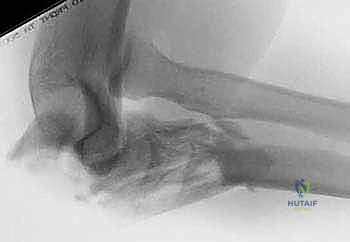
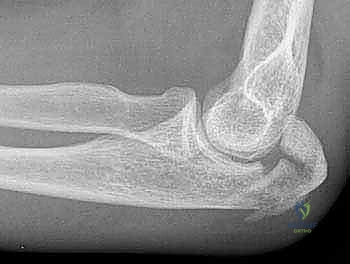
The olecranon fracture represents a quintessential orthopedic challenge, demanding a profound understanding of articular biomechanics, soft tissue envelope management, and rigid internal fixation. Constituting approximately 10% of all upper extremity fractures in adults, these injuries exhibit a classic bimodal epidemiological distribution. High-energy trauma, such as motor vehicle collisions or falls from significant heights, typically afflicts the younger demographic, resulting in complex, comminuted fracture patterns often associated with elbow instability. Conversely, the elderly population frequently sustains these fractures through low-energy mechanisms, primarily simple falls onto an outstretched hand or directly onto the point of the elbow, leading to transverse or oblique fractures exacerbated by underlying osteoporosis.
Regardless of the mechanism, the fundamental goal of operative intervention remains unwavering: the anatomic restoration of the greater sigmoid notch, the provision of absolute stability to permit early, active range of motion, and the prevention of post-traumatic arthrosis. The olecranon serves as the critical insertion point for the triceps brachii, the primary extensor of the elbow. Consequently, any displaced fracture fundamentally disrupts the extensor mechanism, rendering non-operative management obsolete for all but the most strictly undisplaced fractures. The powerful proximal pull of the triceps invariably leads to progressive displacement, nonunion, and profound functional deficit if surgical reduction is not achieved.
A meticulous secondary survey is the cornerstone of initial patient evaluation. The orthopedic surgeon must view the olecranon fracture not in isolation, but as a potential sentinel sign for a broader spectrum of ipsilateral upper extremity trauma. Concomitant injuries, such as radial head fractures, coronoid process fractures (the "terrible triad" variant), or distal radius fractures, are not uncommon and will radically alter the surgical algorithm. Furthermore, high-energy crush injuries or severe fracture-dislocations pose a distinct and immediate threat of compartment syndrome of the forearm. The surgeon must maintain a high index of suspicion, performing serial neurovascular examinations, assessing for pain out of proportion to the injury, and utilizing invasive compartment pressure monitoring if the clinical picture remains equivocal or if the patient is obtunded.
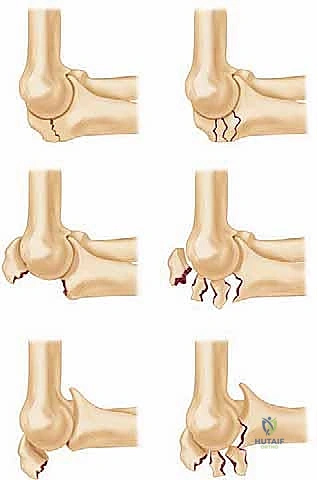
Fracture classification is paramount for guiding preoperative planning and selecting the optimal fixation construct. While numerous systems exist, the Mayo classification remains the most clinically pragmatic, categorizing fractures based on three critical determinants: displacement, comminution, and ulnohumeral stability. Type I fractures are undisplaced and generally amenable to conservative care. Type II fractures are displaced but maintain ulnohumeral stability, representing the classic indication for tension band wiring or simple plating. Type III fractures are displaced and associated with ulnohumeral instability (fracture-dislocations), mandating robust plate fixation and meticulous attention to collateral ligament integrity and coronoid reconstruction.
Detailed Surgical Anatomy and Biomechanics
A masterful surgical reconstruction is predicated upon an intimate, three-dimensional comprehension of elbow osteology and its surrounding soft tissue envelope. The elbow functions as a highly constrained, complex hinge joint. The proximal ulna, specifically the greater sigmoid notch, articulates with the humeral trochlea, providing the primary intrinsic osseous stability to the joint. This articulation encompasses an arc of nearly 180 degrees. The articular surface of the sigmoid notch is not continuous; it is interrupted by a transverse, non-articular "bare area" or groove. This anatomic nuance is of profound surgical significance. While anatomic reduction of the articular facets is non-negotiable to prevent arthrosis, minor comminution or slight step-offs within this bare area are well-tolerated. Recognizing this allows the surgeon to focus reduction efforts on the true articular surfaces without unnecessarily devitalizing bone fragments within the groove.
The muscular topography surrounding the olecranon is dominated by the triceps brachii. This massive muscle complex converges into a broad, resilient tendon that inserts over a large footprint on the proximal and posterior aspect of the olecranon, extending distally along the ulnar crest. This insertion is the primary deforming force in olecranon fractures, causing proximal migration of the avulsed fragment. However, this robust tendinous footprint also serves as a critical ally during surgical fixation. Sutures or wires can be anchored securely through the tendon, and the tendon itself can be split longitudinally to facilitate plate application without compromising its structural integrity. Laterally, the anconeus muscle provides dynamic stability and must be carefully elevated if lateral plate application is required, while medially, the flexor-pronator mass originates from the medial epicondyle, coming into play during complex fracture-dislocations involving the coronoid.
Neurovascular anatomy dictates the safe zones for surgical exposure and hardware placement. The ulnar nerve is the most vulnerable structure during olecranon fixation. It courses posterior to the medial epicondyle within the cubital tunnel, passing beneath Osborne’s fascia and between the two heads of the flexor carpi ulnaris. During a standard dorsal approach, aggressive medial dissection, indiscriminate retraction, or the careless placement of medial clamps or screws can easily result in iatrogenic ulnar neuropathy. The surgeon must maintain a hyper-vigilant awareness of the nerve's trajectory, often electing to formally identify and protect it if the fracture pattern necessitates medial extension of the exposure.
Biomechanically, the tension band principle is the foundational concept for treating simple, transverse olecranon fractures. The elbow joint experiences significant bending moments during active extension and flexion. The posterior cortex of the olecranon is subjected to tensile forces, while the anterior articular surface experiences compressive forces. A properly applied tension band construct—utilizing transcortical Kirschner wires and a figure-of-eight wire loop—neutralizes these posterior tensile forces and dynamically converts them into anterior compressive forces across the articular fracture line during active elbow flexion. This dynamic compression accelerates primary bone healing and allows for the immediate, aggressive postoperative mobilization that is essential for preventing elbow stiffness.
Exhaustive Indications and Contraindications
The decision to proceed with operative management for an olecranon fracture is dictated by a careful analysis of fracture morphology, patient physiology, and functional demands. The overarching indication for surgery is any disruption of the extensor mechanism or articular incongruity that threatens the long-term kinematic function of the elbow joint. Displaced fractures, defined as a gap greater than 2 to 3 millimeters, generally require internal fixation. Even in cases of minimal displacement, if the fracture displaces further upon active elbow flexion past 90 degrees against gravity, the extensor mechanism is deemed incompetent, and surgical stabilization is strongly recommended to prevent secondary displacement and nonunion.
Fracture-dislocations and highly comminuted fractures represent absolute indications for open reduction and internal fixation, almost exclusively utilizing pre-contoured locking or non-locking plates. In these complex scenarios, the olecranon fracture is often just one component of a broader instability pattern. The olecranon must be rigidly reconstructed to restore the greater sigmoid notch, which acts as the foundation for the ulnohumeral joint. Failure to achieve absolute stability in these cases will inevitably lead to chronic subluxation, accelerated post-traumatic osteoarthritis, and a profoundly stiff, painful elbow.
Contraindications to operative intervention are relatively sparse but must be respected to avoid catastrophic perioperative complications. Truly undisplaced fractures with an intact extensor mechanism (demonstrated by the patient's ability to actively extend the elbow against gravity) can be managed successfully with brief immobilization followed by progressive range of motion. Severe medical comorbidities that render the patient unfit for anesthesia represent a significant relative contraindication. In such scenarios, the risks of cardiopulmonary collapse may outweigh the functional benefits of a reconstructed elbow.
Furthermore, in profoundly frail, non-ambulatory elderly patients with severe dementia and minimal functional demands, the surgical risks, including wound breakdown, hardware prominence, and infection, must be carefully weighed against the consequences of a fibrous nonunion. In highly selected cases of extreme osteopenia where hardware purchase is impossible, non-operative management or primary excision of the proximal fragment with triceps advancement may be considered as a salvage procedure, though this significantly compromises extension power.
| Indication / Contraindication | Clinical Scenario | Recommended Management Strategy |
|---|---|---|
| Absolute Indication | Displaced >3mm, articular step-off >2mm | Operative Fixation (TBW or Plate) |
| Absolute Indication | Extensor mechanism failure (cannot extend against gravity) | Operative Fixation (TBW or Plate) |
| Absolute Indication | Fracture-dislocation (Monteggia variant, terrible triad) | Rigid Plate Fixation, Ligament Repair |
| Absolute Indication | Open fracture | Emergent I&D, definitive or provisional fixation |
| Relative Contraindication | Undisplaced fracture, intact extensor mechanism | Conservative: Splinting, early protected ROM |
| Relative Contraindication | Severe medical comorbidities (ASA IV/V) | Conservative management, accept nonunion |
| Relative Contraindication | Non-ambulatory, low-demand elderly with severe osteopenia | Excision and triceps advancement, or conservative |
| Relative Contraindication | Active local soft tissue infection | Delay internal fixation, external fixation if unstable |
Pre-Operative Planning, Templating, and Patient Positioning
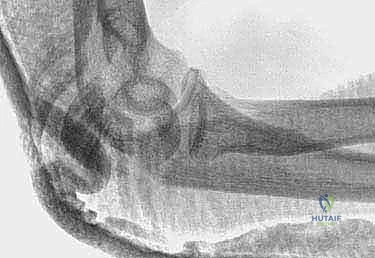
Preoperative planning is the silent architecture of a flawless surgical execution. It begins with a rigorous radiographic evaluation. Standard anteroposterior (AP) and true lateral radiographs of the elbow are mandatory. The true lateral view is the most critical imaging modality, allowing for the precise quantification of articular step-off, the degree of displacement, and the assessment of the radiocapitellar joint for associated subluxation. Oblique views can provide additional clarity regarding the extent of comminution, particularly in the coronal plane.
For complex fracture patterns, particularly those involving the coronoid process, the radial head, or extensive metaphyseal comminution, a Computed Tomography (CT) scan with three-dimensional reconstructions is indispensable. The CT scan delineates the exact size and location of coronoid fragments, which are often underappreciated on plain radiographs but are critical for restoring anterior stability. It also allows the surgeon to map out the fracture lines within the greater sigmoid notch, facilitating a mental rehearsal of the reduction sequence and the precise placement of interfragmentary lag screws.
Templating is a mandatory exercise for any complex olecranon fracture. Utilizing digital templating software or traditional acetate overlays on scaled radiographs, the surgeon must pre-select the appropriate implants. For tension band wiring, the length of the K-wires and the gauge of the cerclage wire must be determined. For plate fixation, the surgeon must choose between pre-contoured anatomic locking plates, standard 3.5mm LC-DCPs, or specialized hook plates, depending on the fracture's proximal extent and the degree of comminution. Anticipating the need for specialized equipment, such as bone graft substitute for metaphyseal voids or miniature screws for coronoid fixation, ensures that the surgical flow is uninterrupted.
Patient positioning must optimize surgical access while minimizing intraoperative complications. The lateral decubitus position is the gold standard for isolated olecranon fractures. The patient is placed securely on their side, utilizing a beanbag or pegboard, and all bony prominences are meticulously padded. The operative arm is draped over a specialized padded L-bar or a sterile bolster, allowing the elbow to flex freely to 120 degrees. This position provides unparalleled, direct, gravity-assisted access to the dorsal aspect of the elbow.
Alternatively, for complex fracture-dislocations requiring simultaneous anterior, medial, and lateral access (e.g., repairing a coronoid fracture via a medial approach while fixing the olecranon dorsally), the supine position with the arm draped across the chest or resting on a radiolucent hand table may be preferred. A sterile pneumatic tourniquet is applied high on the arm, padded with cast padding, and inflated to 250-300 mmHg after exsanguination with an Esmarch bandage, ensuring a bloodless field that is paramount for identifying articular fragments and protecting the ulnar nerve. Fluoroscopy must be positioned to allow unhindered AP and lateral imaging throughout the procedure without compromising the sterile field.
Step-by-Step Surgical Approach and Fixation Technique
The execution of olecranon fracture fixation demands precision, respect for soft tissues, and a biomechanically sound construct.
The Universal Dorsal Approach
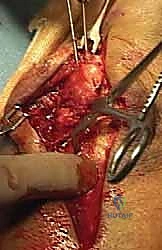
The procedure commences with a universal dorsal longitudinal incision. The incision is centered slightly lateral to the tip of the olecranon to avoid placing the scar directly over the bony prominence, which can lead to chronic irritation when the patient rests their elbow on a table. It extends proximally over the triceps tendon and distally along the subcutaneous border of the ulna, typically measuring 10 to 15 centimeters depending on the planned implant.
Full-thickness fasciocutaneous flaps are elevated medially and laterally. It is imperative to maintain the integrity of the subcutaneous fat attached to the skin to preserve the subdermal vascular plexus, thereby minimizing the risk of postoperative wound necrosis. Hemostasis must be meticulous, utilizing bipolar electrocautery. As the medial flap is elevated, the surgeon must remain cognizant of the ulnar nerve. While routine transposition is unnecessary and potentially harmful, the nerve must be protected from aggressive retraction. In cases of significant medial comminution or when applying a medial plate, the cubital tunnel should be opened, and the nerve formally identified and protected with a vessel loop.
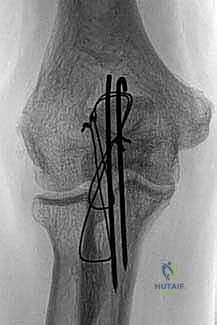
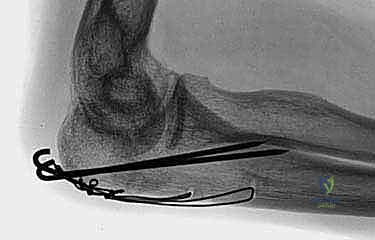
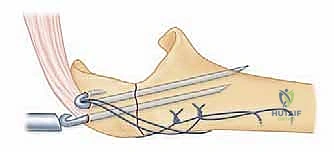
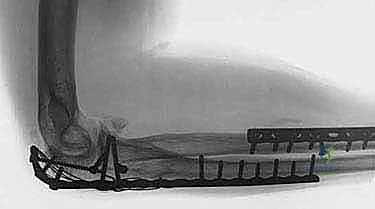
Tension Band Wiring Technique
For simple, transverse, or short oblique non-comminuted fractures (Mayo Type IIA), tension band wiring remains an elegant and highly effective technique.
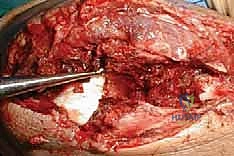
The fracture site is exposed by incising the triceps fascia and periosteum longitudinally. Hematoma and interposed periosteum are meticulously cleared using a curette and irrigation. The fracture is anatomically reduced using a large, pointed reduction clamp (tenaculum). One tine is placed on the proximal olecranon tip (often requiring a small stab incision through the triceps), and the other is placed on the distal ulnar shaft. A small drill hole can be made in the distal cortex to prevent the clamp from slipping.
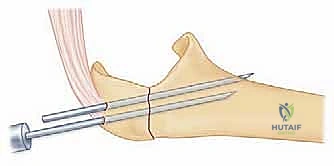
Once anatomic articular reduction is confirmed visually and fluoroscopically, two 1.6mm (or 2.0mm in larger patients) smooth Kirschner wires are introduced. The trajectory is paramount: they must be driven parallel to each other, starting from the proximal tip of the olecranon, angling slightly anteriorly to engage the robust anterior cortex of the ulna distal to the coronoid process. This transcortical purchase is biomechanically superior to intramedullary placement, drastically reducing the risk of proximal wire migration.
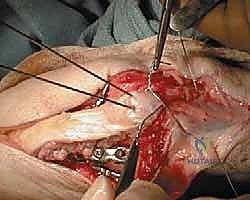
A transverse drill hole (typically 2.0mm or 2.5mm) is created in the distal ulnar shaft, approximately 2 to 3 centimeters distal to the fracture line. An 18-gauge or 20-gauge stainless steel cerclage wire is passed through this hole. A highly effective trick is to pass a 14-gauge intravenous angiocatheter through the bone tunnel first, then thread the wire through the catheter to facilitate passage. The wire is then crossed in a figure-of-eight configuration over the dorsal surface of the olecranon.
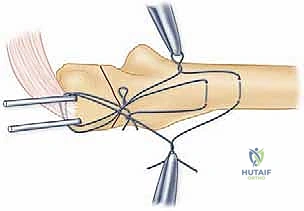
The proximal loop of the wire is passed deep to the triceps insertion, hooking around the protruding K-wires. The wire is then tightened symmetrically using heavy needle drivers or specialized wire tighteners. Symmetric twisting is crucial to ensure even tension across both limbs of the figure-of-eight. As the wire is tightened, the surgeon should observe the fracture site compressing. Finally, the proximal ends of the K-wires are bent 180 degrees, cut short, and impacted deeply into the triceps tendon to minimize hardware prominence, a notoriously common complication. The figure-of-eight knot is also cut short and buried within the soft tissue.
Plate Osteosynthesis Technique
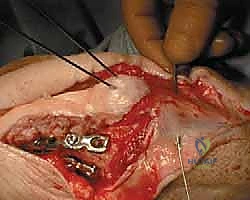
For comminuted fractures, oblique fractures extending distal to the coronoid, or fracture-dislocations (Mayo Type IIB and III), plate osteosynthesis is mandatory. The tension band principle fails in comminuted fractures because the anterior cortex cannot withstand the compressive forces, leading to collapse, shortening, and articular malunion.
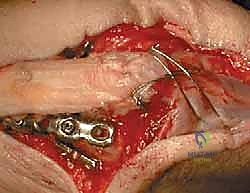
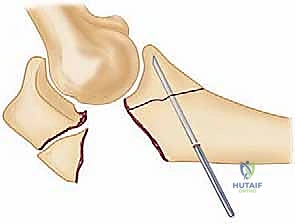
After exposing the fracture, articular fragments are meticulously pieced together. In cases of severe comminution, the joint is reconstructed from distal to proximal. Small articular fragments can be provisionally held with 1.0mm K-wires or fine bioabsorbable pins. If the coronoid is fractured, it must be addressed first, often requiring lag screw fixation from posterior to anterior or specialized anterior coronoid plates if the fragment is large enough.
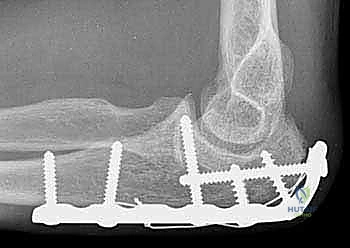
A pre-contoured anatomic olecranon locking plate is selected. These plates are designed to match the complex dorsal anatomy of the proximal ulna and wrap around the tip of the olecranon. The triceps tendon is split longitudinally in its midline to accommodate the proximal portion of the plate, allowing it to sit flush against the bone.
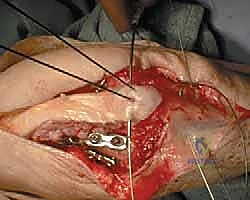
The plate is applied dorsally. The proximal locking screws are critical; they are directed distally down the intramedullary canal or angled to capture the coronoid process (the "home run" screw). This provides exceptional pull-out strength against the triceps. Distally, the plate is secured to the ulnar shaft using a combination of locking and non-locking cortical screws, ensuring at least three bicortical screws (six cortices) of purchase distal to the most distal fracture line.
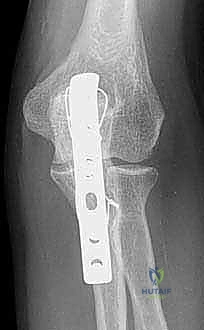
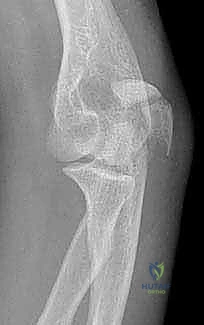
Intraoperative fluoroscopy is utilized liberally throughout the plating process. True lateral and AP views confirm articular reduction, plate positioning, and ensure that no screws are violating the radioulnar or ulnohumeral joints. The elbow is taken through a full, unhindered range of motion to confirm stability and the absence of impingement before closure.
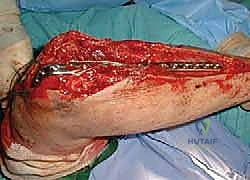

Closure involves a meticulous repair of the triceps split over the plate using heavy absorbable sutures. The fascial layers are closed to cover the hardware as completely as possible, followed by subcutaneous and skin closure. A bulky soft dressing and a posterior plaster splint are applied with the elbow in 60 to 70 degrees of flexion.
Complications, Incidence Rates, and Salvage Management
Despite meticulous surgical technique, olecranon fracture fixation is associated with a distinct complication profile. The subcutaneous nature of the proximal ulna makes hardware-related issues the most frequently encountered problem.
Symptomatic hardware prominence is ubiquitous, particularly with tension band constructs. Up to 80% of patients managed with K-wires and cerclage wire may report localized pain, skin irritation, or bursitis over the olecranon tip, necessitating secondary surgery for hardware removal once radiographic union is achieved (typically after 6 to 9 months). Plate fixation significantly reduces this specific complication, though bulky plates can still cause discomfort in asthenic individuals. Meticulous technique—specifically burying the K-wire ends deeply into the triceps and cutting the cerclage knot short—is the best preventative measure.
Ulnar neuropathy is a devastating complication, occurring in 2% to 10% of cases. It can result from direct iatrogenic injury during dissection, traction neurapraxia from aggressive retraction, or delayed irritation from prominent medial hardware or exuberant callus formation. Intraoperative vigilance is paramount. If postoperative ulnar nerve symptoms arise, initial management is observation and neurogenic medication. However, progressive or profound motor weakness mandates prompt surgical exploration, hardware revision if necessary, and formal anterior transposition of the ulnar nerve.
Infection, nonunion, and post-traumatic arthrosis occur less frequently but require aggressive salvage protocols. Deep infections (1-2%) demand immediate irrigation and debridement, hardware retention if stable (until union), and culture-directed intravenous antibiotics. Nonunion is rare (<5%) but is typically a consequence of inadequate fixation of a comminuted fracture with a tension band. Salvage requires revision open reduction, autologous bone grafting, and rigid internal fixation with a robust locking plate construct.
| Complication | Estimated Incidence | Etiology / Risk Factors | Management / Salvage Strategy |
|---|---|---|---|
| Symptomatic Hardware | 40% - 80% (TBW) 10% - 20% (Plates) |
Subcutaneous anatomy, proximal K-wire migration, prominent knots. | Hardware removal after confirmed radiographic union (typically >6 months). |
| Ulnar Neuropathy | 2% - 10% | Iatrogenic injury, traction, medial hardware impingement, |
