Supramalleolar Osteotomy for Ankle Malalignment: An Intraoperative Masterclass in Joint Preservation
Key Takeaway
This masterclass guides fellows through supramalleolar osteotomy for ankle malalignment. We cover crucial anatomy, meticulous preoperative planning, and granular intraoperative execution, from incision to fixation. Learn to navigate neurovascular structures, achieve precise correction, and manage potential pitfalls for optimal patient outcomes in this complex joint-preserving procedure.
Comprehensive Introduction and Patho-Epidemiology
The paradigm of treating end-stage ankle arthritis has historically oscillated between arthrodesis and total ankle arthroplasty. However, a nuanced understanding of joint biomechanics and the natural history of post-traumatic deformities has elevated the role of joint-preserving procedures. Welcome to the operating theater. Today, we are undertaking a technically demanding and profoundly rewarding intervention: a supramalleolar osteotomy (SMO) with internal fixation. This procedure transcends rudimentary bone cutting; it is an intricate exercise in restoring physiological biomechanics, preserving native articular cartilage, and ultimately conferring a pain-free, functional, and durable ankle joint to our patient. Every detail, from preoperative templating to the final torque of the locking screws, dictates the survivorship of the joint.
Before we initiate our first incision, it is imperative to establish the patho-epidemiological rationale for this intervention. Ankle arthritis, characterized by the progressive, irreversible degradation of articular cartilage and subsequent joint space obliteration, is a severely debilitating condition. Unlike the hip or knee, where primary idiopathic osteoarthritis is endemic, primary ankle arthritis is an epidemiological rarity. The overwhelming majority of cases we encounter in clinical practice are post-traumatic in origin. These are typically the sequelae of intra-articular pilon or malleolar fractures, severe chondral shearing injuries, or chronic, unaddressed lateral ligamentous instability. Inflammatory arthritides, neuropathic arthropathies such as Charcot neuroarthropathy, and primary synovial proliferative disorders constitute a smaller, yet clinically significant, subset of the etiology.
While ankle arthrodesis remains the gold standard for end-stage, diffuse arthritis—and total ankle arthroplasty (TAA) offers excellent outcomes for the low-demand, older demographic—both interventions carry inherent compromises. Arthrodesis sacrifices motion and invariably accelerates adjacent joint degeneration, particularly at the subtalar and talonavicular articulations. TAA, despite remarkable advancements in implant design, remains bounded by concerns regarding implant survivorship, polyethylene wear, and catastrophic failure in young, high-demand patients. A joint-preserving supramalleolar osteotomy offers a compelling, biomechanically sound alternative for carefully selected patients, specifically those presenting with asymmetric ankle arthritis driven by coronal or sagittal plane malalignment.
This distal tibial deformity—whether arising from a malunited fracture, a premature physeal arrest, or congenital dysplasia—fundamentally alters the tibiotalar contact area, geometry, and load distribution. Rigorous biomechanical investigations utilizing cadaveric models have elucidated that even a minor angular malalignment (as little as 2 to 3 degrees) can precipitously decrease the tibiotalar contact surface area by up to 40%. This reduction leads to focal, unicompartmental overloading, exponential increases in peak contact pressures, and accelerated, asymmetric cartilage degeneration. The natural history of this untreated malalignment is a predictable cascade of progressive pain, recalcitrant stiffness, and a profound disturbance of the physiologic heel-to-toe gait cycle. Our objective with an SMO is to surgically redistribute these pathological stresses across the ankle mortise, transferring the weight-bearing axis from the overloaded, arthritic compartment to the relatively preserved, healthier cartilage.
Detailed Surgical Anatomy and Biomechanics
To execute a supramalleolar osteotomy with precision, a profound, three-dimensional spatial awareness of the distal leg and hindfoot anatomy is non-negotiable. We must navigate a dense, unforgiving soft-tissue envelope while manipulating the skeletal architecture to exact angular tolerances.
Osteology and Articular Geometry
The ankle joint, or tibiotalar articulation, is a highly congruent, modified hinge joint. It is formed proximally by the tibial plafond, the medial malleolus, and the distal fibula—which collectively constitute the ankle mortise—and distally by the talar dome. The joint exhibits a slight oblique orientation in two distinct planes: it is directed posteriorly and laterally in the transverse plane, and laterally and downwardly in the coronal plane. This unique, multi-planar orientation dictates its kinematics, permitting approximately 6 degrees of axial rotation coupled with a primary flexion-extension arc ranging from 45 to 70 degrees.
Crucially, the tibiotalar joint does not function in isolation; it operates synergistically with the subtalar joint as an integrated ankle-subtalar complex during the stance phase of gait. Portions of the robust medial (deltoid) and lateral collateral ligamentous complexes cross both articulations, underscoring their biomechanical interdependence. When assessing the osteology, we are primarily concerned with the distal tibia and its spatial relationship to the talus. We must intimately appreciate the normal anatomical angles that govern load transfer. The Tibial-Ankle Surface (TAS) angle, measured on an anteroposterior (AP) radiograph, is formed by the intersection of the tibial mechanical axis and a line tangential to the distal tibial articular surface. Physiologically, the distal tibial plafond exhibits a slight valgus orientation, resulting in a TAS angle of approximately 93 degrees.
In the sagittal plane, the Tibial-Lateral Surface (TLS) angle is evaluated on a lateral radiograph. This angle is formed by the intersection of the tibial mechanical axis and the articular surface line, with its apex directed posteriorly, and normally measures around 80 degrees. Pathological deviations from these normative values form the basis of our preoperative deformity analysis and dictate the magnitude of our intraoperative correction. Understanding these angles is the bedrock of restoring the mechanical axis and offloading the compromised articular cartilage.
Neurovascular Structures at Risk
Intimate familiarity with the neurovascular arborization surrounding the distal tibia and fibula is paramount to avoiding catastrophic iatrogenic injury during our surgical approaches.
On the medial aspect, where we typically execute the tibial osteotomy, the saphenous nerve and great saphenous vein dictate our superficial dissection. The saphenous nerve, a purely sensory terminal branch of the femoral nerve, descends anterior to the medial malleolus alongside the vein, providing cutaneous innervation to the medial leg and foot. Meticulous identification, mobilization, and gentle retraction of this bundle are essential to prevent painful postoperative neuromas and wound healing complications secondary to venous congestion. Deep to the medial malleolus, within the fibro-osseous confines of the tarsal tunnel, lie the posterior tibial artery and tibial nerve. While our osteotomy is strictly supramalleolar, overly aggressive posterior periosteal stripping, errant retractor placement, or uncontrolled posterior saw blade excursion can easily compromise these critical structures, leading to devastating ischemic or neuropathic sequelae.
Laterally, during the fibular osteotomy, the superficial peroneal nerve (SPN) is the primary structure at risk. The SPN pierces the deep crural fascia in the distal third of the leg—typically 10 to 15 centimeters proximal to the lateral malleolar tip—before bifurcating into the intermediate and medial dorsal cutaneous branches. Its course is highly variable, making it exceptionally vulnerable during lateral incisions and subcutaneous dissection. Deep to the fibula lies the peroneal artery; while shielded by the interosseous membrane and musculature, it can be injured by over-penetration of the oscillating saw or drill bits. Anteriorly, the deep peroneal nerve and anterior tibial artery descend within the anterior compartment. These are generally protected during standard medial and lateral approaches but become highly relevant if an anterior surgical corridor is selected or if anterior retractors are placed too deeply over the tibial crest.
Muscular Intervals and Soft Tissue Envelope
The soft tissue envelope of the distal third of the tibia is notoriously tenuous, characterized by a lack of robust muscular coverage, particularly over the anteromedial face. This anatomical reality necessitates meticulous, atraumatic soft tissue handling to mitigate the risk of wound dehiscence and deep infection.
For our standard medial approach to the distal tibia, we exploit the internervous and intermuscular interval between the tibialis anterior muscle belly (innervated by the deep peroneal nerve) anteriorly, and the tibialis posterior muscle belly (innervated by the tibial nerve) posteriorly. The incision is typically longitudinal, centered over the planned osteotomy site. Following skin and subcutaneous tissue division, the periosteum must be incised sharply and elevated as a single, contiguous full-thickness flap.
Minimal periosteal elevation is the absolute rule; stripping should be strictly confined to the footprint of the planned fixation plate and the immediate osteotomy site. Excessive periosteal denudation devascularizes the cortical bone, significantly increasing the risk of delayed union, nonunion, and structural failure of the osteotomy hinge. The posterior neurovascular bundle is protected by placing a blunt Hohmann or malleable retractor subperiosteally along the posterior cortex of the tibia, ensuring the retractor tip remains intimately applied to the bone to avoid compressing the contents of the deep posterior compartment.
Exhaustive Indications and Contraindications
Patient selection is the single most critical determinant of success in supramalleolar osteotomy. This procedure is not a panacea for all ankle arthritis; it is a highly specific intervention for a distinct pathoanatomical profile. The ideal candidate is a younger, active patient with unicompartmental osteoarthritis driven by a correctable extra-articular or intra-articular deformity, who possesses a functional range of motion and competent ligamentous stability.
| Parameter | Indications for Supramalleolar Osteotomy | Absolute/Relative Contraindications |
|---|---|---|
| Arthritis Pattern | Asymmetric, unicompartmental OA (Takakura Stage 2 or 3a) | End-stage, diffuse, pan-articular OA (Takakura Stage 4); "Bone-on-bone" globally |
| Alignment | Coronal plane deformity (Varus/Valgus) > 4 degrees; Sagittal plane deformity | Neutral alignment with diffuse arthritis |
| Joint Mobility | Preserved functional ROM (>10° dorsiflexion, >25° plantarflexion) | Rigid ankle; Severe arthrofibrosis |
| Ligamentous Status | Competent or reconstructable collateral ligaments | Uncorrectable, severe chronic instability |
| Neurological Status | Intact protective sensation and motor function | Charcot neuroarthropathy; Severe peripheral neuropathy |
| Patient Profile | Young, high-demand, active lifestyle; BMI < 35 | Elderly, low-demand; Morbid obesity (BMI > 40); Active infection; Severe PVD |
| Hindfoot Status | Flexible hindfoot capable of compensating for realignment | Rigid, fixed hindfoot deformity (unless addressed concomitantly) |
The Takakura classification is instrumental in staging varus ankle osteoarthritis and guiding our indications. Stage 1 involves early sclerosis without joint space narrowing. Stage 2 exhibits narrowing exclusively at the medial gutter. Stage 3a shows obliteration of the medial joint space extending to the roof of the talar dome, while Stage 3b extends further laterally. Stage 4 is complete obliteration of the joint space. SMO is exquisitely indicated for Stages 2 and 3a. Once the disease progresses to Stage 3b or 4, the salvageable articular cartilage is insufficient, and arthrodesis or TAA becomes the obligatory pathway.
Pre-Operative Planning, Templating, and Patient Positioning
The success of a supramalleolar osteotomy is forged long before the patient enters the operating room. Meticulous preoperative planning is the blueprint for success; it is where we quantify the deformity, mathematically calculate the required correction, and anticipate every intraoperative contingency.
Clinical Assessment and Ligamentous Stability
Our clinical evaluation begins with a rigorous assessment of the patient's gait, observing the dynamic manifestation of the deformity. We meticulously inspect the soft tissue envelope, noting previous surgical scars, skin quality, and the presence of callosities that indicate abnormal load distribution. Vascular status is objectively confirmed via peripheral pulses, capillary refill, and, if indicated, an Ankle-Brachial Index (ABI). Neurological integrity, specifically protective sensation assessed via Semmes-Weinstein monofilaments, is paramount to rule out subclinical neuropathy.
Ligamentous stability of the ankle and hindfoot is a critical prerequisite. We perform rigorous anterior drawer, inversion, and eversion stress testing. A realignment osteotomy performed on a foundation of incompetent ligaments will inevitably fail, as the dynamic instability will persist and rapidly destroy any remaining cartilage. If instability is identified, concomitant ligamentous reconstruction (e.g., a modified Broström-Gould procedure) must be integrated into the surgical plan. Furthermore, we critically assess hindfoot flexibility using the Coleman block test. A chronic varus ankle often induces a compensatory valgus deformity in the subtalar joint. If this compensatory hindfoot valgus is flexible, it will spontaneously correct once the ankle mortise is realigned. However, if the hindfoot deformity has become rigid, an isolated SMO will result in a severely malaligned, symptomatic foot, necessitating a concurrent calcaneal osteotomy or subtalar fusion to achieve a plantigrade, biomechanically sound extremity.
Imaging Analysis and Deformity Characterization
Standardized, high-quality, weight-bearing radiographs are the cornerstone of our templating process. We require full-length, weight-bearing AP and lateral views of the entire tibia, extending from the knee joint to the foot. These panoramic views are indispensable for accurately defining the mechanical axis of the lower extremity and identifying any proximal deformities that might contribute to the distal malalignment.
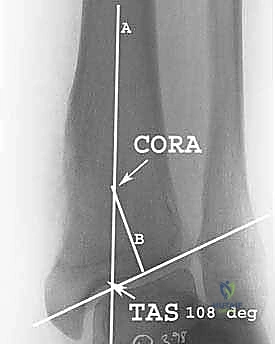
On the AP radiograph, we meticulously draw the tibial mechanical axis (which, in the tibia, is collinear with the anatomical axis) and a line tangent to the distal tibial articular surface. The intersection of these lines defines the Tibial-Ankle Surface (TAS) angle. We repeat this process on the lateral radiograph to determine the Tibial-Lateral Surface (TLS) angle. We meticulously compare these values against population norms and, ideally, against the patient's contralateral, asymptomatic limb to establish our target correction angles. Advanced imaging, specifically computed tomography (CT) or magnetic resonance imaging (MRI), is frequently employed to assess the volumetric extent of cartilage loss, identify subchondral cysts that may require grafting, and evaluate the integrity of the talar dome.
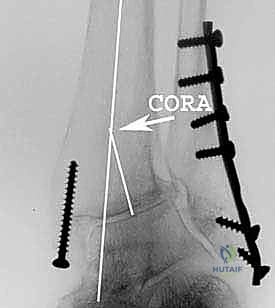
Understanding the Center of Rotation of Angulation
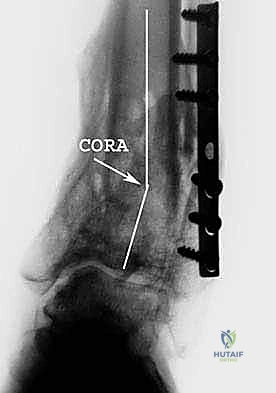
The Center of Rotation of Angulation (CORA) is the fundamental geometric principle governing deformity correction. It is mathematically defined as the intersection point of the mechanical axes of the proximal and distal bone segments. Accurate identification of the CORA is essential for executing a correction that does not introduce iatrogenic translation.
If an angular deformity is purely isolated, the CORA resides precisely at the apex of the deformity. However, if the deformity involves both angulation and translation, the CORA will be displaced proximally or distally. In the context of supramalleolar osteotomies for varus or valgus ankle arthritis, the deformity is often intra-articular or juxta-articular, placing the CORA very distally, frequently at or near the level of the ankle joint line itself.
The cardinal rule of osteotomy is this: if the osteotomy cut is executed exactly at the level of the CORA, angular correction can be achieved without inducing secondary translation. However, because making a cut directly through the joint line is impossible, our supramalleolar osteotomy must necessarily be performed proximal to the CORA. Consequently, to maintain the mechanical axis and avoid shifting the distal segment medially or laterally, we must intentionally translate the distal fragment during our angular correction. For example, in a medial opening-wedge osteotomy for a varus deformity, opening the wedge proximal to the joint line CORA will inherently push the distal segment laterally. We must anticipate and control this translation to ensure the mechanical axis perfectly bisects the talar dome upon completion.
Patient Positioning and Operating Room Setup
Positioning is the foundation upon which the entire procedure rests. The patient is placed supine on a radiolucent operating table. A critical maneuver is the placement of a small bump underneath the ipsilateral hip. This prevents the natural tendency of the relaxed lower extremity to fall into external rotation, ensuring the patella and the foot remain pointing directly at the ceiling. This neutral alignment is absolutely vital for accurate intraoperative clinical and fluoroscopic assessment of the mechanical axis.
The entire limb is meticulously prepped and draped from the mid-thigh down to the toes, allowing full visualization and manipulation of the extremity. A well-padded pneumatic tourniquet is applied to the proximal thigh to provide a bloodless surgical field, which is critical for identifying neurovascular structures and ensuring precise bone cuts. The fluoroscopic C-arm is positioned on the contralateral side of the table, draped sterilely, and configured to easily swing between AP, lateral, and mortise views without compromising the sterile field or requiring awkward maneuvering by the surgical team.
Step-by-Step Surgical Approach and Fixation Technique
With the patient prepped, the tourniquet inflated, and our preoperative plan meticulously reviewed, we proceed with the surgical execution. The sequence of steps is carefully orchestrated to maximize control over the osteotomy and ensure rigid, durable fixation.
The Lateral Fibular Osteotomy
In the vast majority of supramalleolar osteotomies, particularly those involving significant varus or valgus correction, a concomitant fibular osteotomy is mandatory. The fibula acts as a rigid lateral strut; attempting to open a medial tibial wedge or close a lateral tibial wedge without releasing the fibula will result in extreme tension on the lateral ligamentous complex, incomplete correction, or catastrophic fracture of the distal fibula.
We begin with a longitudinal incision over the distal fibula, carefully identifying and protecting the superficial peroneal nerve. We dissect down to the periosteum and elevate it minimally. The level of the fibular osteotomy is typically planned slightly proximal to the level of the tibial osteotomy. Using a microsagittal saw under continuous saline irrigation to prevent thermal necrosis, we perform an oblique or transverse osteotomy. If a significant lengthening of the lateral column is required (as in some varus corrections), an oblique cut allows for sliding and subsequent lag screw fixation. Once the fibula is completely transected, it immediately releases the lateral tether, allowing the ankle mortise to mobilize freely in the coronal plane.
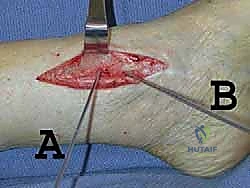
The Medial Tibial Approach and Soft Tissue Dissection
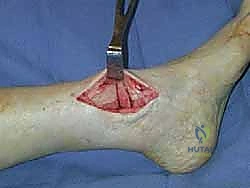
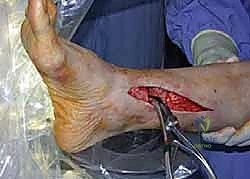
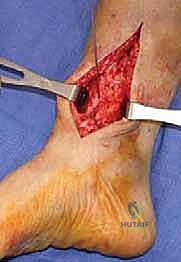
We now turn our attention to the primary procedure: the tibial osteotomy. For a varus deformity, we execute a medial opening-wedge osteotomy. A longitudinal incision, approximately 8 to 10 centimeters in length, is made centered over the medial aspect of the distal tibia, just proximal to the medial malleolus.
We carefully dissect through the subcutaneous tissues, identifying and gently retracting the great saphenous vein and saphenous nerve anteriorly. We identify the interval between the tibialis anterior and tibialis posterior tendons. The periosteum is sharply incised longitudinally and elevated as a single, thick flap using a Cobb elevator. We are exceptionally careful to limit this elevation only to the area required for our saw cuts and plate application. Retractors are placed subperiosteally: a blunt Hohmann anteriorly to protect the anterior neurovascular bundle, and a malleable retractor posteriorly, hugging the posterior cortex to shield the posterior tibial artery and tibial nerve.
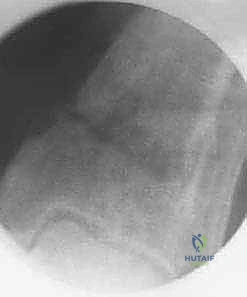
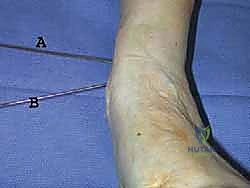
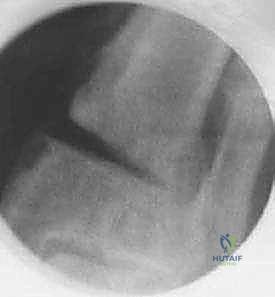
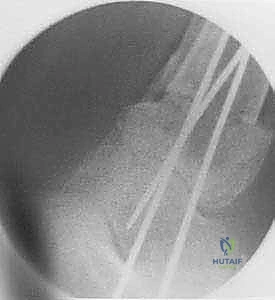
Executing the Supramalleolar Osteotomy
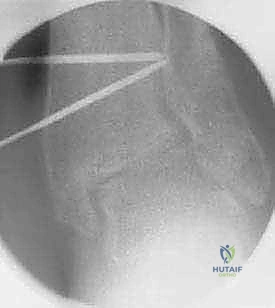
Under precise fluoroscopic guidance, we insert a smooth Kirschner wire (K-wire) to mark the trajectory of our planned osteotomy. For an opening-wedge osteotomy, this trajectory typically starts medially, 3 to 4 centimeters proximal to the joint line, and aims obliquely downward toward the lateral cortex, terminating approximately 1 to 1.5 centimeters proximal to the lateral articular margin. This lateral cortex will serve as our vital, intact mechanical hinge.
Once the K-wire trajectory is confirmed fluoroscopically to be perfect in both AP and lateral planes, we use an oscillating saw to initiate the cut. The saw blade must be kept strictly parallel to the K-wire. We cut through the medial, anterior, and posterior cortices, proceeding slowly and methodically. We stop the saw cut approximately 5 to 8 millimeters short of the lateral cortex. This uncut lateral bridge of bone is the most critical element of the procedure; it provides intrinsic stability to the osteotomy and prevents uncontrolled translation of the distal fragment. To ensure the posterior cortex is completely transected without plunging into the neurovascular bundle, we often complete the posterior cut manually using a sharp, thin osteotome.
Deformity Correction and Internal Fixation
With the osteotomy complete but the lateral hinge intact, we begin the delicate process of opening the wedge. We insert two stacked osteotomes or a specialized lamina spreader into the medial osteotomy gap. We open the wedge gradually, millimeter by millimeter, allowing the viscoelastic properties of the intact lateral cortical hinge to accommodate the stretch without fracturing. Rapid or forceful opening will inevitably snap the lateral hinge, converting a stable, controlled correction into an unstable, completely displaced fracture that is exponentially more difficult to manage.
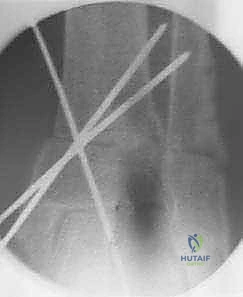
As we open the wedge, we continuously monitor the mechanical axis using a fluoroscopic alignment rod extending from the center of the knee to the center of the ankle. We open the wedge until the mechanical axis perfectly bisects the talar dome, and the TAS angle is restored to our preoperatively templated target (often introducing 1-2 degrees of overcorrection into slight valgus to compensate for anticipated postoperative subsidence).
Once the desired correction is achieved, the gap must be grafted to ensure rapid and robust union. We typically utilize structural allograft wedges (e.g., tricortical iliac crest) or a combination of cancellous autograft and synthetic bone void fillers, meticulously packed into the defect to provide mechanical support and osteoinductive stimulus.
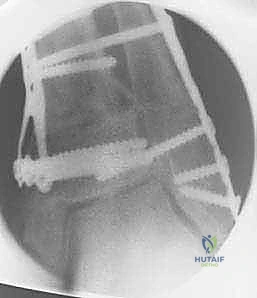
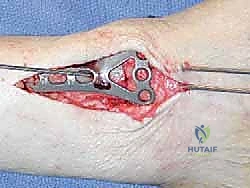
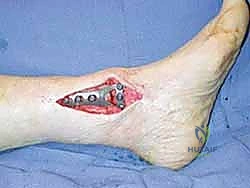
Finally, we secure the construct with rigid internal fixation. A pre-contoured, anatomically specific locking plate is applied to the anteromedial or medial aspect of the distal tibia.
We insert locking screws proximally and distally, ensuring bicortical purchase where possible and maximizing the spread of the screws to optimize biomechanical stability. The fibular osteotomy is then addressed; depending on the stability and gap, it may be left to heal without fixation, or secured with a small neutralization plate or intramedullary device.
Final fluoroscopic images in AP, lateral, and mortise views are obtained to confirm absolute perfection in alignment, hardware placement, and joint congruency. The wounds are irrigated copiously and closed in layers over a closed suction drain to prevent hematoma formation.
Complications, Incidence Rates, and
Clinical & Radiographic Imaging Archive

