
Comprehensive Introduction and Patho-Epidemiology
Lateral ankle sprains represent the most ubiquitous musculoskeletal injury encountered in both athletic and general populations, accounting for a staggering proportion of emergency department visits and sports medicine consultations. While the majority of these acute inversion injuries resolve with conservative management—encompassing rest, ice, compression, elevation (RICE), early functional bracing, and targeted physical therapy—a significant epidemiological subset fails to achieve dynamic stabilization. Current literature dictates that up to 20% of patients will progress to chronic lateral ankle instability (CLAI), a debilitating condition characterized by recurrent sprains, persistent pain, chronic edema, and the subjective sensation of "giving way."
Chronic lateral ankle instability is broadly categorized into mechanical instability (pathologic laxity of the ligamentous restraints) and functional instability (neuromuscular deficits, impaired proprioception, and delayed peroneal reaction times). Prolonged mechanical instability inevitably alters the complex kinematics of the tibiotalar and subtalar joints. This pathological motion leads to repetitive microtrauma to the articular cartilage, culminating in osteochondral lesions of the talus (OCLs), anterior tibial osteophytes (impingement syndrome), and ultimately, premature post-traumatic osteoarthritis. Interrupting this degenerative cascade is the primary objective of surgical intervention.
Historically, non-anatomic tenodesis procedures (e.g., Evans, Watson-Jones, Chrisman-Snook) were utilized to address CLAI. However, these procedures have largely fallen out of favor due to their alteration of normal hindfoot kinematics, restriction of subtalar motion, and long-term risk of lateral compartment overload and degeneration. The anatomic repair, popularized by Broström and modified by Gould, remains the gold standard for primary surgical management. Yet, in cases of severe tissue attenuation, generalized ligamentous laxity, revision surgery, or high-demand athletic populations, primary repair is frequently insufficient.
It is in these complex clinical scenarios that anatomic lateral ankle ligament reconstruction utilizing an allograft and interference screw fixation emerges as the definitive masterclass technique. By meticulously recreating the native footprints and biomechanical vectors of the anterior talofibular ligament (ATFL) and calcaneofibular ligament (CFL) using robust allograft tissue (typically a gracilis or semitendinosus tendon), the orthopedic surgeon can restore native joint kinematics without the donor-site morbidity associated with autograft harvest. This chapter provides an exhaustive, step-by-step guide to this advanced reconstructive procedure.
Detailed Surgical Anatomy and Biomechanics
A profound, three-dimensional understanding of the lateral ankle and subtalar anatomy is the absolute prerequisite for successful anatomic reconstruction. The lateral ligamentous complex is composed of three primary structures: the anterior talofibular ligament (ATFL), the calcaneofibular ligament (CFL), and the posterior talofibular ligament (PTFL). The ATFL is the most frequently injured ligament, failing in approximately 75% of lateral ankle sprains. It is a flat, quadrilateral structure measuring approximately 15 to 20 mm in length, 6 to 8 mm in width, and 2 mm in thickness. It originates from the anterior margin of the distal fibula, approximately 10 mm proximal to the fibular tip, and inserts onto the lateral articular facet of the talar body. Biomechanically, the ATFL is the primary restraint to anterior talar translation and internal rotation when the ankle is in plantarflexion—the precise position of maximum vulnerability during a classic inversion injury.
The CFL is a robust, cord-like structure that spans both the tibiotalar and subtalar joints, making it a critical stabilizer for both articulations. It measures 20 to 30 mm in length, 4 to 8 mm in width, and 3 to 5 mm in thickness. The CFL originates from the anterior border of the distal fibula, just distal to the ATFL origin, and courses posteroinferiorly—deep to the peroneal tendons and their retinaculum—to insert on a small tubercle on the lateral wall of the calcaneus. The angle between the ATFL and CFL is typically 100 to 105 degrees. Crucially, the CFL becomes taut in dorsiflexion, resisting inversion forces in this position. The PTFL is the strongest of the lateral complex, originating from the posterior fibular malleolus and inserting broadly onto the posterior talus. It is rarely injured in isolation and is generally not addressed during standard lateral ligament reconstruction.
Equally important to the ligamentous anatomy is the regional neurovascular network, which poses significant risk during surgical exposure. The superficial peroneal nerve (SPN) is the structure most vulnerable to iatrogenic injury. It pierces the deep crural fascia approximately 10 to 15 cm proximal to the lateral malleolus and descends anterolaterally, dividing into the medial and intermediate dorsal cutaneous nerves. The SPN courses directly over the operative field, superficial to the extensor retinaculum. The sural nerve, located posterolaterally, descends posterior to the lateral malleolus in close proximity to the small saphenous vein, supplying sensation to the lateral hindfoot.
Furthermore, the surgeon must intimately understand the osseous topography of the distal fibula, lateral talus, and lateral calcaneus. The lateral malleolus serves as the central hub for the reconstruction, requiring precise tunnel placement to avoid convergence or iatrogenic fracture. The talar neck and body transition zone houses the ATFL footprint, which must be identified accurately to prevent impingement of the graft during dorsiflexion. The calcaneal footprint of the CFL lies deep to the peroneal tendons, necessitating careful retraction of the peroneus brevis and longus to achieve a true anatomic reconstruction.
Exhaustive Indications and Contraindications
The decision to proceed with an allograft lateral ankle ligament reconstruction rather than a primary Broström-Gould repair requires careful patient selection and a thorough understanding of the biomechanical limits of native tissue. The primary indication for this procedure is symptomatic chronic lateral ankle instability that has definitively failed a comprehensive, supervised physical therapy program emphasizing peroneal strengthening and proprioceptive retraining. However, the specific indication for reconstruction (over repair) hinges on the quality of the native tissue and the mechanical demands of the patient.
Patients with generalized ligamentous laxity (e.g., Ehlers-Danlos syndrome, Marfan syndrome, or a high Beighton score) are prime candidates for allograft reconstruction, as their native collagen is inherently flawed and prone to premature failure if simply repaired. Similarly, patients presenting with a failed prior modified Broström procedure require reconstruction, as the local tissue is typically scarred, attenuated, and insufficient for a secondary repair. High-demand elite athletes, particularly those involved in cutting and pivoting sports (e.g., basketball, soccer), may also be considered for primary reconstruction to provide a more robust, immediate mechanical construct and potentially accelerate return to play.
Contraindications must be strictly observed to prevent catastrophic surgical failures. Active local or systemic infection is an absolute contraindication. Severe peripheral vascular disease or poorly controlled diabetes mellitus with significant microvascular compromise precludes elective reconstructive surgery due to unacceptably high risks of wound breakdown and deep infection. Advanced, end-stage tibiotalar or subtalar osteoarthritis is a relative contraindication; stabilizing a severely arthritic joint will not alleviate the patient's pain and may paradoxically exacerbate symptoms by increasing joint contact pressures. In such cases, arthrodesis is the more appropriate intervention.
| Category | Indications for Allograft Reconstruction | Contraindications |
|---|---|---|
| Primary | Failed conservative management with severe tissue attenuation | Active local or systemic infection |
| Systemic | Generalized hyperlaxity (e.g., Ehlers-Danlos, high Beighton score) | Severe peripheral vascular disease / ischemia |
| Revision | Failed prior primary repair (e.g., failed Broström-Gould) | Poorly controlled diabetes mellitus with neuropathy |
| Patient Profile | High-demand athletes (cutting/pivoting sports), morbid obesity | End-stage tibiotalar or subtalar osteoarthritis |
| Anatomic | Concomitant severe hindfoot varus (if corrected simultaneously) | Uncorrected, rigid hindfoot varus malalignment |
Crucially, the presence of a significant, uncorrected varus hindfoot alignment is a recipe for reconstructive failure. A varus heel places continuous, excessive tensile stress on the lateral ligamentous complex. If an allograft reconstruction is performed in the setting of a fixed or dynamic cavovarus foot without addressing the bony alignment (e.g., via a lateralizing calcaneal osteotomy or dorsiflexing first metatarsal osteotomy), the graft will inevitably stretch out and fail. Therefore, uncorrected structural malalignment remains an absolute contraindication to isolated soft-tissue reconstruction.
Pre-Operative Planning, Templating, and Patient Positioning
Meticulous preoperative planning is the cornerstone of a successful anatomic reconstruction. The clinical evaluation begins with a detailed history, distinguishing between acute inflammatory pain and the chronic, mechanical sensation of "giving way." On physical examination, the anterior drawer test is performed to assess ATFL integrity; anterior translation greater than 5 mm, or a side-to-side difference of greater than 3 mm, is highly suggestive of ATFL incompetence. The talar tilt test evaluates the CFL; a varus tilt exceeding 15 degrees, or a side-to-side difference of 10 degrees, indicates CFL disruption. The examiner must also assess for peroneal tendon subluxation, apprehension, and strength, as well as deeply evaluate the resting alignment of the hindfoot for varus deformity.

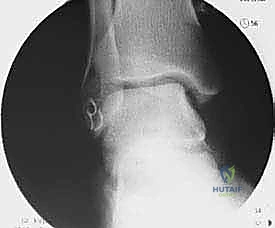
Standard weight-bearing radiographic evaluation is mandatory, including anteroposterior, lateral, and mortise views of the ankle, as well as a weight-bearing lateral of the foot to assess the medial longitudinal arch and Meary's angle. Stress radiographs (anterior drawer and varus tilt) can provide objective, quantifiable data regarding the degree of instability. Magnetic Resonance Imaging (MRI) without contrast is the gold standard advanced imaging modality. MRI allows for the direct visualization of ligamentous attenuation, discontinuity, or chronic thickening. Furthermore, it is critical for identifying concomitant intra-articular pathology, such as osteochondral lesions of the talus, loose bodies, or peroneal tendon tears, which are present in up to 30-50% of patients with CLAI and must be addressed concurrently.
Once the operative plan is confirmed, patient positioning in the operating theater is optimized for both arthroscopic and open intervention. The patient is placed in the supine position on a standard radiolucent operating table. A well-padded bump or gel roll is placed beneath the ipsilateral hip to internally rotate the operative leg, bringing the lateral malleolus and the posterolateral corner of the ankle into a directly superior, easily accessible orientation. A thigh tourniquet is applied but not inflated until the limb is exsanguinated.
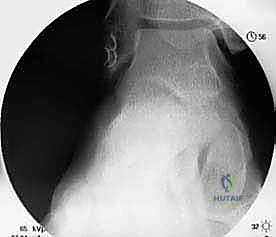
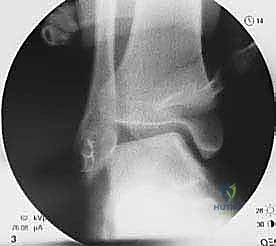
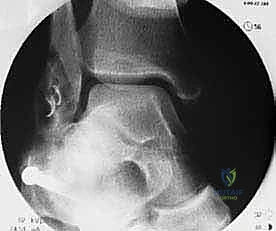
For the initial arthroscopic phase, a non-invasive ankle distractor or a thigh holder with a sterile kerlix loop is utilized to provide adequate joint distraction. The fluoroscopy unit (C-arm) is brought in from the contralateral side of the table. It is imperative that the C-arm can easily obtain true anteroposterior, mortise, and lateral views of the ankle without requiring the surgeon to break scrub or significantly reposition the patient's leg. Proper positioning and fluoroscopic access are non-negotiable prerequisites for accurate bony tunnel placement.
Step-by-Step Surgical Approach and Fixation Technique
Arthroscopic Evaluation and Joint Preparation
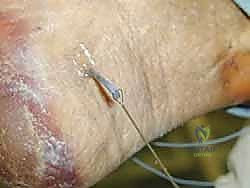
The procedure universally commences with a diagnostic and therapeutic ankle arthroscopy. Utilizing standard anteromedial and anterolateral portals, the tibiotalar joint is systematically inspected. The surgeon must evaluate the articular surfaces for osteochondral lesions, which, if present, are addressed via debridement and microfracture or marrow stimulation techniques. The lateral gutter is meticulously cleared of hypertrophic synovitis, scar tissue, and any loose bodies. This arthroscopic debridement not only addresses sources of intra-articular pain but also facilitates the subsequent open identification of the ATFL footprint on the talus. Once the arthroscopic portion is complete, the joint is drained, and the portals are closed with simple interrupted sutures.
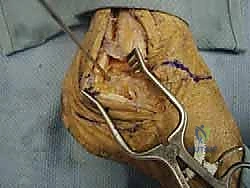
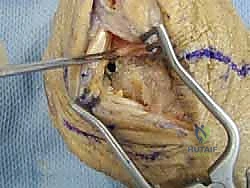
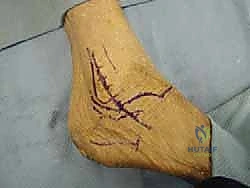
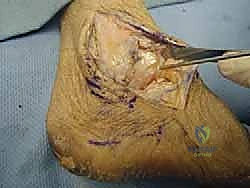
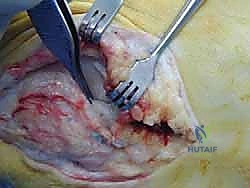
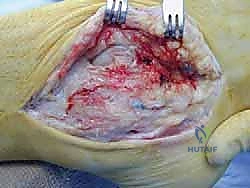
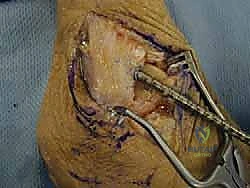
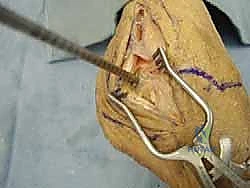
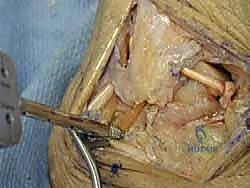
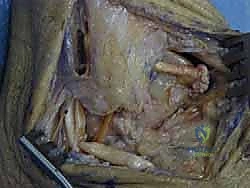
Incision and Neurovascular Protection
An anterior curvilinear incision or an extensile lateral incision is utilized, depending on the need to address concomitant peroneal pathology. The incision typically begins 3 to 4 cm proximal to the tip of the lateral malleolus, curving anteriorly and distally toward the sinus tarsi and the base of the fourth metatarsal. Dissection through the subcutaneous tissues must be performed with extreme caution using blunt dissecting scissors to identify and mobilize the intermediate dorsal cutaneous branch of the superficial peroneal nerve. Once identified, the nerve is gently retracted with a vessel loop. The inferior extensor retinaculum is identified and incised, exposing the underlying joint capsule and the attenuated remnants of the lateral ligamentous complex.
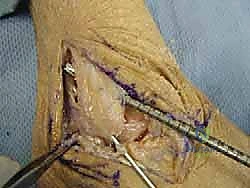
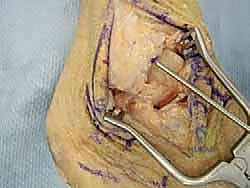
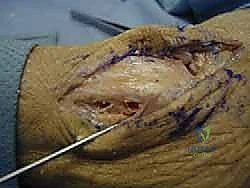
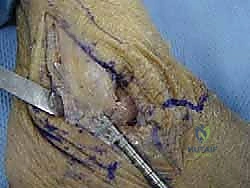
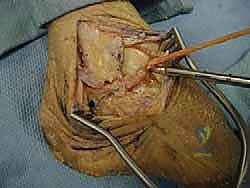
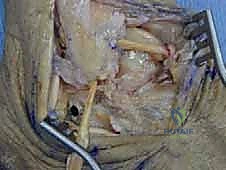
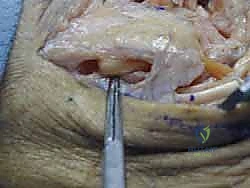
Talar and Calcaneal Tunnel Preparation
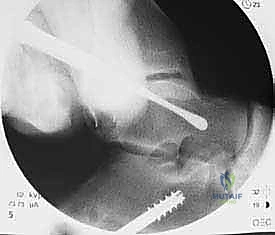
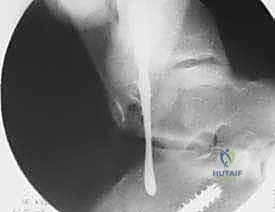
The anatomic footprints of the ATFL on the talus and the CFL on the calcaneus are sharply debrided to bleeding bone. For the talar tunnel, a guide pin is placed at the center of the ATFL footprint on the lateral talar body, aiming medially and slightly plantarly to avoid penetrating the subtalar joint or the superior articular surface of the talus. Fluoroscopy is used to confirm intraosseous placement. A 4.5 mm to 5.5 mm cannulated reamer (matched to the diameter of the prepared allograft) is used to drill a blind tunnel to a depth of 15 to 20 mm.
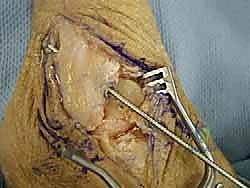
Attention is then turned to the calcaneus. The peroneal tendons are retracted superiorly to expose the CFL footprint on the lateral calcaneal wall. A guide pin is inserted at this footprint, aiming medially and slightly anteriorly toward the sustentaculum tali. Again, fluoroscopic confirmation is mandatory. A blind tunnel is reamed to a depth of 20 mm, ensuring adequate bone stock remains to support the interference screw. Copious irrigation is used to clear bone debris from both tunnels.
Fibular Tunnel Preparation and Graft Passage
The fibular preparation requires meticulous technique to avoid iatrogenic fracture of the lateral malleolus. Two separate converging tunnels or a single through-and-through tunnel can be utilized. For the two-tunnel technique, guide pins are placed at the anatomic origins of the ATFL (anterior border of the fibula) and the CFL (distal/anterior tip of the fibula). These pins are directed to converge within the medullary canal of the fibula, exiting posteriorly. The tunnels are reamed to the appropriate diameter.
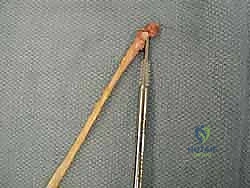
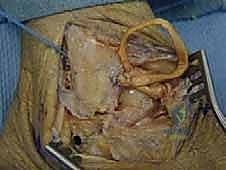
The allograft (typically a gracilis tendon) is thawed, prepared, and tubularized using Krackow running locking stitches with high-strength non-absorbable suture at both ends. The central portion of the graft is passed into the fibular tunnels and secured. Alternatively, the graft can be secured in the talus first. If starting at the talus, one limb of the graft is seated into the talar tunnel and secured with a biocomposite interference screw (typically 4.75 mm or 5.5 mm). The graft is then routed to the fibula, passed through the fibular tunnels, and finally routed deep to the peroneal tendons to reach the calcaneal tunnel.

Final Fixation and Tensioning
Tensioning the graft is the most critical biomechanical step of the procedure. The ATFL limb is tensioned first. The ankle is held in neutral dorsiflexion and slight eversion to restore the normal resting tension of the ATFL. While maintaining this position, the graft is secured within the anterior fibular tunnel using an interference screw.
Next, the CFL limb is tensioned. The ankle is moved into slight dorsiflexion and neutral inversion/eversion. The graft is pulled taut into the calcaneal tunnel and secured with the final interference screw. Following fixation, the ankle is taken through a full range of motion to confirm restoration of stability, absence of impingement, and appropriate isometric tensioning of the reconstructed ligaments. The extensor retinaculum is then imbricated over the repair to provide an additional layer of soft tissue coverage, and the wound is closed in a layered fashion.


Complications, Incidence Rates, and Salvage Management
While anatomic lateral ankle reconstruction with allograft is highly successful, it is a technically demanding procedure fraught with potential complications. The most common complication is iatrogenic nerve injury, specifically to the superficial peroneal nerve (SPN) or the sural nerve. SPN neurapraxia occurs in up to 5-10% of cases due to aggressive retraction or direct laceration during the surgical approach. While many cases of neurapraxia resolve spontaneously over 3 to 6 months, complete transection results in painful neuromas and permanent sensory deficits on the dorsum of the foot, often requiring subsequent surgical excision and burying of the nerve stump.
Post-operative stiffness, particularly a loss of terminal inversion and plantarflexion, is another frequent complication, occurring in approximately 10-15% of patients. This is often the result of over-tensioning the graft during fixation or prolonged post-operative immobilization. While a slight loss of inversion is often an acceptable trade-off for a stable ankle, severe stiffness can alter gait mechanics and lead to adjacent joint arthritis. Aggressive, early physical therapy is the primary treatment, though recalcitrant cases may require arthroscopic arthrolysis.
Recurrent instability, though rare with allograft reconstruction (less than 5%), can occur due to failure of graft incorporation, traumatic rerupture, or failure to address underlying bony malalignment (e.g., missed cavovarus foot). Hardware complications, such as interference screw back-out, osteolysis around the screw, or intra-articular penetration, require meticulous fluoroscopic technique to prevent. Iatrogenic fracture of the lateral malleolus is a catastrophic complication caused by improper tunnel trajectory or using a reamer that is too large for the patient's bone stock.
| Complication | Estimated Incidence | Etiology / Risk Factors | Salvage / Management Strategy |
|---|---|---|---|
| SPN Neurapraxia | 5% - 10% | Aggressive retraction, poor incision placement | Observation, Gabapentin; Neuroma excision if transected |
| Joint Stiffness | 10% - 15% | Over-tensioning the graft, prolonged immobilization | Aggressive PT, dynamic splinting, arthroscopic lysis of adhesions |
| Recurrent Instability | < 5% | Missed varus alignment, premature return to sport | Revision reconstruction, corrective calcaneal osteotomy |
| Iatrogenic Fibular Fracture | < 1% | Converging tunnels too close, oversized reamers | Open reduction internal fixation (ORIF) with plate and screws |
| Infection (Deep) | 1% - 2% | Poor soft tissue envelope, diabetes, smoking | I&D, hardware/graft removal, IV antibiotics |
Phased Post-Operative Rehabilitation Protocols
The success of an allograft lateral ankle ligament reconstruction relies just as heavily on a disciplined, phased post-operative rehabilitation protocol as it does on flawless surgical execution. The rehabilitation timeline must balance the biological requirement for graft incorporation and bone-tunnel healing with the clinical need to prevent debilitating arthrofibrosis.
Phase 1: Maximum Protection (Weeks 0 to 2)
Immediately post-operatively, the patient is placed in a well-padded, short-leg plaster or fiberglass splint with the ankle strictly immobilized in neutral dorsiflexion and slight eversion. The patient is strictly non-weight-bearing (NWB) on the operative extremity, utilizing crutches or a knee scooter. The primary goals during this phase are wound healing, edema control, and pain management. Strict elevation above the level of the heart is emphasized to minimize swelling, which can compromise the surgical incision.
Phase 2: Controlled Mobilization (Weeks 2 to 6)
At the two-week mark, the sutures are removed, and the patient is transitioned into a tall controlled ankle motion (CAM) boot. Weight-bearing is progressively advanced from partial to full weight-bearing as tolerated within the boot. Physical therapy is initiated, focusing on active and active-assisted range of motion (ROM) in the sagittal plane (plantarflexion and dorsiflexion). Inversion and eversion are strictly prohibited during this phase to protect the healing graft-bone interface. Isometric strengthening of the peroneal, tibial, and calf musculature is introduced.
Phase 3: Strengthening and Proprioception (Weeks 6 to 12)
By six weeks, the graft has achieved sufficient initial incorporation to tolerate multi-planar stress. The CAM boot is weaned, and the patient transitions to a supportive lace-up ankle brace (e.g., ASO brace) for daily activities. Therapy escalates to include dynamic strengthening, focusing heavily on eccentric control of the peroneal tendons. Proprioceptive training is a cornerstone of this phase, utilizing balance boards, BAPS boards, and single-leg stance exercises with eyes closed. Closed kinetic chain exercises, such as squats and lunges, are incorporated to restore functional lower extremity mechanics.
Phase 4: Return to Sport (Months 3 to 6)
The final phase focuses on sport-specific or activity-specific functional retraining. Patients begin a progressive running program, advancing from straight-line jogging to figure-of-eights, cutting, and pivoting drills. Plyometric exercises are introduced to restore explosive power. Clearance for full, unrestricted return to competitive sports is typically granted between 4 and 6 months post-operatively, contingent upon the patient demonstrating full, painless range of motion, symmetrical strength (at least 90% of the contralateral limb on isokinetic testing), and the ability to perform sport-specific agility drills without apprehension or instability.
Summary of Landmark Literature and Clinical Guidelines
The evolution of lateral ankle ligament surgery has been heavily guided by landmark biomechanical and clinical outcome studies over the past several decades
Detailed Chapters & Topics
Dive deeper into specialized chapters regarding lateral-ankle-ligament-reconstruction-using-allograft-and-interference-screw-fixation