Lateral Approach for Calcific Insertional Achilles Tendinopathy Decompression: A Masterclass
Key Takeaway
Join us in the OR for a masterclass on treating calcific insertional Achilles tendinopathy via the lateral approach. We'll meticulously dissect surgical anatomy, guide you through every intraoperative step, discuss crucial pearls and pitfalls, and outline comprehensive postoperative care. Learn precise techniques for calcaneal decompression and Achilles tendon repair, ensuring optimal patient outcomes. This comprehensive guide is designed for fellows seeking to master this challenging procedure.
Comprehensive Introduction and Patho-Epidemiology
Calcific insertional Achilles tendinopathy represents one of the most mechanically challenging, biologically complex, and functionally debilitating conditions encountered in contemporary foot and ankle surgery. As a common culprit behind chronic, recalcitrant posterior heel pain, it routinely leads to significant functional impairment, particularly in active athletic populations and middle-aged adults. Our goal in this masterclass is to transcend the basic mechanics of the surgical procedure. We must develop a profound, nuanced understanding of the underlying histopathology, the complex regional anatomy, and the critical intraoperative decision-making algorithms that separate a merely adequate surgical result from an exceptional, durable clinical outcome.
The pathophysiology of calcific insertional Achilles tendinopathy is rooted in a chronic, progressive intratendinous degeneration process, fundamentally distinct from acute traumatic ruptures. While midsubstance ruptures often occur in the hypovascular zone 2 to 6 centimeters proximal to the insertion, insertional tendinopathy involves the complex "enthesis organ." This organ is a highly specialized transitional zone where the tendon seamlessly transitions into uncalcified fibrocartilage, calcified fibrocartilage, and finally, the subchondral bone of the calcaneal tuberosity. Repetitive microtrauma, combined with mechanical impingement from a prominent posterosuperior calcaneal tuberosity (Haglund’s deformity), leads to mucoid degeneration, lipoid infiltration, neovascularization, and disorganized collagen architecture. Over time, this hostile mechanical environment provokes chondroid metaplasia, ectopic calcification, and frank ossification within the tendon substance, fundamentally altering its viscoelastic properties and load-bearing capacity.
Clinically, patients present with a highly characteristic history: an insidious, progressive onset of posterior heel pain that is consistently exacerbated by load-bearing activities, eccentric loading (such as descending stairs), and the direct mechanical friction of shoe wear against the posterior heel counter. The physical examination must be highly precise. Direct palpation over the central and lateral aspects of the Achilles insertion on the posterior calcaneus will elicit highly localized, diagnostic tenderness. Surgeons must be cautious during the clinical exam; aggressively squeezing the Achilles tendon proximal to the insertion can elicit a false-positive response for midsubstance tendinosis. A gentle yet firm palpation, differentiating insertional pain from the pain of retrocalcaneal bursitis or midsubstance tendinopathy, is paramount.
Furthermore, the astute clinician must always consider the broader systemic picture. Inflammatory enthesopathies—such as ankylosing spondylitis, psoriatic arthritis, reactive arthritis (Reiter syndrome), and inflammatory bowel disease—can manifest with identical focal symptoms. A thorough patient history, including a review of systems for axial joint stiffness, dermatological lesions, and gastrointestinal complaints, is an absolute necessity. While gross peritendinous swelling is less common in pure insertional disease compared to midsubstance paratenonitis, a palpably thickened, indurated tendon caliber at the insertion is universally present. Always ensure that concomitant gastrocnemius-soleus contracture has been rigorously evaluated and addressed via the Silfverskiöld test, as persistent equinus forces will invariably compromise both nonoperative and operative outcomes by drastically increasing the tensile load across the healing enthesis.
Detailed Surgical Anatomy and Biomechanics
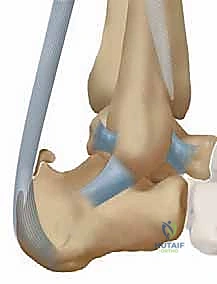
Mastery of the lateral approach demands an intimate, three-dimensional understanding of the posterior heel's surgical anatomy and the biomechanical forces at play. The Achilles tendon, representing the confluence of the gastrocnemius and soleus muscles, is the thickest and strongest tendon in the human body, capable of withstanding forces up to ten times body weight during vigorous athletic activity. It inserts over a broad, crescent-shaped footprint on the inferior half of the posterior calcaneal tuberosity. This inferior region is characterized by a highly rugose surface, which accommodates an extensive, dense network of Sharpey fibers. These penetrating collagen fibers are the biomechanical linchpin of the enthesis, providing the robust anchoring necessary to withstand immense tensile loads during the terminal stance phase of the gait cycle.
Immediately superior to this dense insertion footprint lies the superior half of the posterior calcaneal tuberosity, which presents a smooth, convex, almost articular-like surface. This smooth prominence forms the anterior osseous boundary of the retrocalcaneal bursa. This bursa, a synovial-lined potential space, occupies the critical interval between the anterior surface of the distal Achilles tendon, Kager's fat pad, and the superior calcaneus. It functions to reduce friction during ankle dorsiflexion. However, in the setting of a prominent posterosuperior calcaneal process, this bursa becomes chronically inflamed, hypertrophic, and fibrotic—a condition known as retrocalcaneal bursitis, which almost universally coexists with insertional tendinopathy. The pathological calcific spur typically originates exactly at the superior margin of the insertion footprint, extending proximally into the central and anterior tendon substance, often presenting as a dense, fragmented, or multilobulated osseous mass that acts as an internal mechanical irritant.
Neurovascular Considerations and the Sural Nerve
The primary neurovascular structure dictating the safety and trajectory of the lateral approach is the sural nerve. Formed by the confluence of the medial sural cutaneous nerve and the sural communicating branch, the sural nerve courses distally along the posterolateral aspect of the leg, intimately associated with the small saphenous vein. As it approaches the ankle, it runs posterior to the lateral malleolus and provides critical sensory innervation to the lateral hindfoot and midfoot. While the main trunk of the sural nerve generally lies anterior to our standard lateral incision, the complex and highly variable network of lateral calcaneal branches poses a significant surgical hazard.
These lateral calcaneal branches often cross directly into the planned surgical field, traversing the subcutaneous tissues overlying the lateral border of the Achilles tendon. Meticulous, sharp dissection and the absolute avoidance of aggressive, blind blunt dissection are mandatory. Any iatrogenic traction injury, crush injury, or sharp transection of the sural nerve or its calcaneal branches can result in devastating postoperative complications, including severe hyperesthesia, painful neuromas, and complex regional pain syndrome (CRPS). Surgeons must operate under the assumption that a calcaneal branch is present in the operative field until conclusively proven otherwise through direct, magnified visualization.
From a biomechanical perspective, the lateral approach offers distinct advantages over the traditional central tendon-splitting approach. Anatomical studies have consistently demonstrated that the thickest, most robust, and structurally critical insertion fibers of the Achilles tendon are located on the medial aspect of the calcaneal tuberosity. By utilizing a lateral approach, the surgeon can strategically elevate the lateral and central portions of the tendon to access and decompress the pathological retrocalcaneal space and central calcific spur, while deliberately preserving the pristine, biomechanically superior medial insertion fibers. This selective debridement minimizes the risk of catastrophic postoperative tendon avulsion and provides a more stable foundation for subsequent suture anchor repair, optimizing the load-to-failure characteristics of the construct.
Exhaustive Indications and Contraindications
The decision to proceed with operative intervention for calcific insertional Achilles tendinopathy must be predicated on a rigorous, evidence-based evaluation of the patient's symptoms, functional deficits, and response to comprehensive conservative management. Surgery is rarely indicated as a first-line treatment. A mandatory period of structured nonoperative care—typically lasting a minimum of 6 to 12 months—must be exhausted. This conservative regimen should include eccentric and concentric loading protocols (specifically modified to avoid dorsiflexion past neutral, which exacerbates impingement), judicious use of heel lifts or CAM boots, extracorporeal shockwave therapy (ESWT), and targeted physical therapy. Corticosteroid injections are strictly contraindicated due to the unacceptably high risk of iatrogenic tendon rupture, further tissue necrosis, and profound local immunosuppression.
When conservative measures fail to provide durable relief, and the patient experiences persistent, activity-limiting pain that significantly degrades their quality of life, surgical decompression becomes a highly viable and successful option. The primary surgical objectives are threefold: complete excision of the inflamed retrocalcaneal bursa, aggressive resection of the prominent posterosuperior calcaneal tuberosity (Haglund's deformity), and meticulous debridement of all necrotic, calcified, and degenerative intratendinous tissue. Achieving these three pillars of the procedure ensures both the removal of the mechanical block and the excision of the biological pain generator.
However, the surgeon must be acutely aware of the absolute and relative contraindications to this procedure. Compromised soft tissue envelopes, severe peripheral vascular disease, and uncontrolled medical comorbidities dramatically increase the risk of catastrophic wound complications. The posterior heel represents a watershed vascular zone, reliant on delicate anastomoses between the calcaneal branches of the peroneal and posterior tibial arteries. Active smoking is a profound relative contraindication; the vasoconstrictive effects of nicotine severely impair microvascular perfusion in this already vulnerable region, leading to unacceptably high rates of skin flap necrosis, delayed healing, and deep infection.
| Category | Specific Conditions and Criteria |
|---|---|
| Primary Indications | - Failure of >6 to 12 months of comprehensive, structured nonoperative management. - Persistent, severe posterior heel pain limiting activities of daily living (ADLs) or athletic participation. - Radiographic and MRI evidence of insertional calcification, tendinosis, and retrocalcaneal bursitis. - Prominent posterosuperior calcaneal tuberosity causing mechanical impingement. |
| Absolute Contraindications | - Active local or systemic infection (e.g., overlying cellulitis or osteomyelitis). - Severe peripheral vascular disease (PVD) or inadequate distal perfusion (ABI < 0.5). - Medically unstable patient unable to tolerate anesthesia or prolonged surgery. - Non-ambulatory status where pain relief does not meaningfully improve overall function. |
| Relative Contraindications | - Active smoking or nicotine use (requires mandatory cessation protocol with cotinine testing). - Poorly controlled Diabetes Mellitus (HbA1c > 8.0%). - Severe dermatological conditions affecting the posterior heel skin. - Crucial Caveat: If MRI dictates that >50% of the tendon cross-section requires resection, simple decompression is contraindicated; an FHL transfer is required. |
Pre-Operative Planning, Templating, and Patient Positioning
Thorough preoperative planning is the cornerstone of a successful lateral decompression. The surgical strategy must be dictated by high-quality, weight-bearing imaging studies. Standard weight-bearing radiographs of the foot and ankle, specifically a true lateral view of the heel, represent the fundamental diagnostic workhorse.
The lateral radiograph allows the surgeon to directly visualize the extent, morphology, and precise location of the insertional ossification. It is critical to assess the geometry of the posterosuperior calcaneal tuberosity. While historical radiographic metrics such as parallel pitch lines (Pavlov), the Chauveaux-Liet angle, and the Fowler-Philip angle are frequently discussed in classical literature, modern surgical consensus dictates that these measurements offer limited diagnostic, therapeutic, or prognostic value for this specific pathology. The surgeon’s focus must remain on the direct, qualitative visualization of the calcification and the mechanical prominence of the bone relative to the tendon insertion, planning the trajectory of the osteotomy to ensure adequate decompression without violating the weight-bearing surface of the calcaneus.
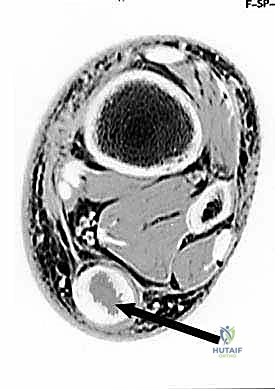
Magnetic Resonance Imaging (MRI) is an absolutely indispensable tool in the preoperative armamentarium. An MRI without contrast is indicated for all patients undergoing surgical consideration to assess the soft tissue envelope, confirm the presence of retrocalcaneal bursitis, and, most importantly, quantify the extent of intratendinous degeneration. The critical decision-making threshold hinges on the "50% rule." The surgeon must meticulously evaluate the axial and sagittal MRI sequences to estimate the cross-sectional area of the Achilles tendon involved by degenerative tendinosis and calcification. If the anticipated debridement will compromise greater than 50% of the tendon's insertion or midsubstance, a simple debridement and reattachment will be biomechanically insufficient. In such cases, the surgeon must be prepared to perform a concomitant flexor hallucis longus (FHL) tendon transfer to augment the repair and provide robust vascularized tissue to the defect.
Patient positioning is a critical logistical step that dictates surgical exposure and anesthetic management. The two primary options are the lateral decubitus position and the prone position. The lateral decubitus position is frequently preferred, particularly for obese patients or those with significant cardiopulmonary comorbidities, as it avoids the restrictive ventilatory mechanics associated with prone positioning. The patient is placed in a true lateral position with the operative leg up. All bony prominences must be meticulously padded. The operative limb is prepped and draped freely, allowing the surgeon to manipulate the ankle through a full range of motion, which is essential for assessing the adequacy of the bony resection and the tension of the tendon repair.
Alternatively, the prone position offers exceptional, symmetric access to the posterior heel and is highly advantageous if bilateral procedures are being performed simultaneously or if an FHL transfer is highly anticipated, as it provides a more familiar orientation for harvesting the FHL from the posterior compartment. Regardless of the chosen position, a well-padded proximal thigh tourniquet is applied. Following standard sterile prep and drape, the limb is exsanguinated with an Esmarch bandage, and the tourniquet is inflated (typically to 250-300 mmHg) to ensure a pristine, bloodless surgical field, which is absolutely critical for identifying delicate neural structures and ensuring precise osseous resection.
Step-by-Step Surgical Approach and Fixation Technique
With the patient optimally positioned and the tourniquet inflated, the surgical execution commences. The lateral approach requires precision, absolute respect for the delicate soft tissue envelope, and aggressive, definitive osseous resection. The surgeon must balance the need for adequate exposure with the imperative to preserve vascularity to the skin flaps.
Incision Planning and Soft Tissue Dissection
The incision is planned along the lateral aspect of the heel, carefully referencing palpable anatomical landmarks. The longitudinal incision should be placed approximately 1 to 1.5 centimeters anterior to the palpable lateral margin of the Achilles tendon, extending from roughly 3 centimeters proximal to the superior aspect of the calcaneal tuberosity down to the level of the inferior insertion footprint.
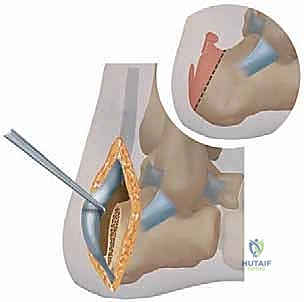
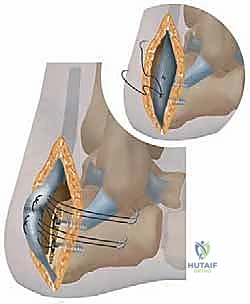
Dissection is carried sharply through the dermis and subcutaneous tissues. It is imperative to create full-thickness fasciocutaneous flaps to preserve the subdermal vascular plexus. The surgeon must remain hyper-vigilant for the sural nerve and its lateral calcaneal branches, which may traverse the proximal or distal extents of the incision. Once the paratenon is incised, the lateral border of the Achilles tendon is identified. Utilizing sharp dissection, the lateral 50% to 60% of the Achilles tendon is carefully elevated off its insertion on the calcaneus. The medial fibers are deliberately left intact to preserve the strongest biomechanical anchor point. Elevating the lateral tendon exposes the retrocalcaneal space, revealing the hypertrophic, inflamed bursa and the underlying calcific spur.
Osseous Resection and Tendon Debridement
Once exposure is achieved, the retrocalcaneal bursa is meticulously excised using a combination of sharp dissection and electrocautery. This provides a clear visualization of the posterosuperior calcaneal tuberosity (Haglund's deformity) and the intratendinous calcifications. The calcific spur, which often interdigitates intimately with the tendon fibers, is sharply dissected free. All necrotic, mucoid, and severely degenerated tendon tissue must be aggressively debrided until healthy, parallel collagen bundles are encountered.
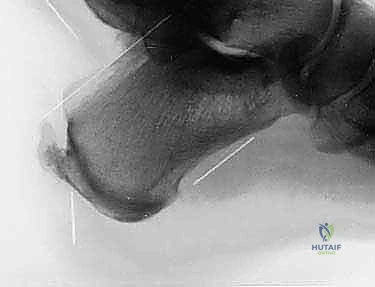
Attention is then turned to the osseous resection. An oscillating saw or broad osteotome is utilized to resect the posterosuperior calcaneal tuberosity. The trajectory of the osteotomy is critical: it must begin superiorly and course obliquely in an inferior and anterior direction, aiming toward the posterior facet of the subtalar joint. The goal is to remove sufficient bone to eliminate any impingement on the anterior aspect of the Achilles tendon during maximal ankle dorsiflexion. A common pitfall is under-resection, which leaves a residual bony prominence that will inevitably lead to recurrent symptoms. Following the primary osteotomy, a rasp or bone burr is used to smooth all sharp cortical edges, ensuring a completely frictionless surface for the tendon to glide against.
Tendon Reattachment and Construct Fixation
Following adequate bony resection and tendon debridement, the elevated lateral portion of the Achilles tendon must be securely reattached to the calcaneal footprint. The calcaneal bed is decorticated with a burr or curette to expose bleeding cancellous bone, which is essential for promoting a robust biological healing response. Fixation is typically achieved using a suture anchor construct.
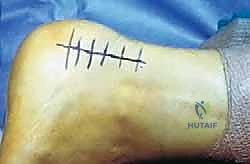
While single-row techniques have been used historically, modern biomechanical evidence strongly favors a double-row or knotless equivalent construct to maximize the footprint contact area and increase the ultimate load to failure. Typically, one or two fully threaded, double-loaded suture anchors (4.5mm to 5.5mm in diameter) are placed in the proximal aspect of the decorticated footprint. The sutures are passed through the elevated lateral tendon using a locking Krackow or Mason-Allen stitch configuration. The ankle is held in slight plantarflexion (approximately 10 to 15 degrees) to remove tension from the repair, and the sutures are tied or secured using distal knotless anchors. The tension must be carefully assessed; the repair should be secure, but overtensioning must be avoided to prevent equinus contracture. The wound is copiously irrigated, and the paratenon and subcutaneous layers are closed meticulously to eliminate dead space, followed by a tension-free skin closure.
Complications, Incidence Rates, and Salvage Management
Despite meticulous surgical technique, the lateral approach for calcific insertional Achilles tendinopathy decompression carries a distinct profile of potential complications. The posterior heel is notoriously unforgiving due to its tenuous vascular supply, high mechanical stresses, and minimal subcutaneous fat padding. Surgeons must be prepared to identify and manage these complications aggressively to prevent catastrophic outcomes.
Wound healing complications represent the most frequent and feared morbidity associated with this procedure. The incidence of superficial wound dehiscence or delayed healing ranges from 5% to 15%, while deep infection or frank flap necrosis occurs in 1% to 3% of cases. These risks are exponentially higher in patients with diabetes, peripheral vascular disease, or a history of tobacco use. Management of superficial dehiscence typically involves local wound care and immobilization, while deep necrosis may require aggressive serial debridements, negative pressure wound therapy (NPWT), and complex plastic surgery reconstruction, such as a reverse sural artery flap or free tissue transfer.
Sural nerve injury is another significant complication, occurring in up to 5% of lateral approach cases. This can range from transient neuropraxia due to retraction to permanent anesthesia or painful neuroma formation secondary to sharp transection. If a neuroma develops and fails conservative management (gabapentinoids, targeted injections), surgical exploration, neuroma excision, and burying the proximal nerve stump deep into the muscular belly of the flexor hallucis longus or soleus may be required as a salvage procedure.
| Complication Type | Estimated Incidence | Prevention Strategy | Salvage / Management Protocol |
|---|---|---|---|
| Wound Dehiscence / Necrosis | 5% - 15% | Full-thickness flaps, strict smoking cessation, atraumatic tissue handling, avoid excessive tourniquet time. | Local wound care, NPWT, reverse sural flap or free flap for massive defects. |
| Sural Nerve Injury / Neuroma | 2% - 5% | Meticulous sharp dissection, avoid blind retractor placement, direct visualization of lateral calcaneal branches. | Gabapentinoids, targeted steroid injections, surgical excision and proximal burying of the nerve stump. |
| Tendon Avulsion / Rupture | 1% - 3% | Preserve medial insertion, utilize double-row anchor constructs, strict adherence to phased rehabilitation. | Revision repair with FHL tendon transfer augmentation, V-Y advancement flap if massive retraction exists. |
| Persistent Pain / Under-resection | 5% - 10% | Intraoperative fluoroscopy to confirm adequate angle and depth of Haglund's resection, complete bursa excision. | Revision decompression, deepening of the osteotomy, aggressive debridement of residual calcifications. |
Phased Post-Operative Rehabilitation Protocols
The success of a lateral Achilles decompression relies as much on a disciplined, biologically respectful postoperative rehabilitation protocol as it does on the surgical execution itself. The rehabilitation must be carefully phased to protect the fragile suture anchor repair during the initial inflammatory and proliferative phases of healing, while progressively introducing mechanical load to stimulate collagen realignment and prevent crippling arthrofibrosis.
Phase 1: Maximum Protection (Weeks 0 to 2)
Immediately postoperatively, the patient is placed in a well-padded, short-leg splint or cast with the ankle in 15 to 20 degrees of plantarflexion (gravity equinus) to completely offload the repair. The patient is strictly non-weight-bearing on crutches or a knee scooter. Elevation is critical to minimize edema, which directly threatens the viability of the posterior skin incisions. At the 2-week mark, sutures are removed, provided the wound demonstrates pristine healing.
Phase 2: Controlled Mobilization (Weeks 2 to 6)
Following suture removal, the patient is transitioned into a controlled ankle motion (CAM) boot equipped with a large heel lift (typically 2 to 3 centimeters) to maintain relative plantarflexion. Weight-bearing is gradually advanced from touch-down to partial, and eventually to full weight-bearing as tolerated by week 6. During this phase, gentle, active range of motion (ROM) exercises are initiated out of the boot, strictly limiting dorsiflexion to neutral. No passive stretching is permitted, as this places excessive tensile strain on the maturing enthesis.
Phase 3: Progressive Strengthening (Weeks 6 to 12)
At the 6-week mark, assuming clinical and radiographic evidence of healing, the heel lifts are systematically removed from the CAM boot over a period of 2 to 3 weeks. The patient is gradually transitioned into a supportive athletic shoe. Physical therapy intensifies, focusing on concentric gastrocnemius-soleus strengthening, intrinsic foot muscle activation, and proprioceptive training. Eccentric loading is introduced very cautiously, initially performed only bilaterally and never descending past neutral dorsiflexion to avoid recurrent impingement at the osteotomy site.
Phase 4: Return to Activity (Weeks 12+)
Beyond 12 weeks, the focus shifts to sport-specific or occupation-specific functional training. Plyometrics, agility drills, and running progressions are introduced based on the patient's functional milestones and pain tolerance. Patients must be counseled that maximal medical improvement, including the complete resolution of postoperative swelling and the return of peak explosive plantarflexion strength, routinely takes 9 to 12 months. Premature return to high-impact activities dramatically increases the risk of catastrophic construct failure.
Summary of Landmark Literature and Clinical Guidelines
The evolution of surgical management for calcific insertional Achilles tendinopathy has been heavily shaped by several landmark biomechanical and clinical outcome studies. Historically, the central tendon-splitting approach was the gold standard. However, pioneering anatomical work demonstrated that the central approach often compromises the most robust, central-medial fibers of the Achilles footprint.
The transition toward the lateral approach was propelled by literature highlighting the biomechanical superiority of preserving the medial enthesis. Studies by Kolodziej et al. and Nunley et al. critically evaluated the footprint anatomy, demonstrating that a lateral approach allows for excellent visualization of the retrocalcaneal space and Haglund's deformity while maintaining the structural integrity of the medial tendon. Furthermore, clinical outcome series have consistently shown that the lateral approach yields equivalent or superior pain relief scores (AOFAS, FAAM) compared to central-splitting techniques, with a theoretically lower risk of complete postoperative avulsion.
The implementation of the "50% rule" for tendon debridement is another cornerstone of modern clinical guidelines. Biomechanical analyses have proven that if more than 50% of the tendon's cross-sectional area is resected due to severe calcific degeneration, the remaining tissue is insufficient to withstand normal physiological loads. In these instances, landmark papers by Myerson and others have validated the use of the Flexor Hallucis Longus (FHL) transfer. The FHL, due to its in-phase firing pattern, robust vascularity, and proximity to the Achilles, serves as an ideal autograft to augment the compromised repair, significantly reducing the risk of postoperative rupture in severe disease variants. Mastery of this literature is essential for the modern orthopedic surgeon to make evidence-based, intraoperative decisions that optimize patient outcomes.
