Agility Total Ankle Arthroplasty: An Intraoperative Masterclass
Key Takeaway
This masterclass details the Agility Total Ankle Arthroplasty, a fixed-bearing device requiring syndesmosis fusion. Fellows will learn comprehensive anatomy, meticulous patient positioning, and step-by-step intraoperative execution. We cover neurovascular protection, precise osteophyte removal, syndesmosis preparation, and critical distractor application. Gain insights into managing deformities, avoiding pitfalls, and ensuring a stable, plantigrade foot for successful outcomes.
Welcome, fellows and esteemed colleagues, to the operating theater. Today, we are undertaking a definitive procedure in the realm of foot and ankle reconstruction: the Agility Total Ankle Arthroplasty (TAA). This operation demands meticulous attention to detail, a profound understanding of ankle biomechanics, and precise, unyielding surgical execution. This intervention is not merely about replacing a degenerated joint; it is about restoring a stable, plantigrade foot and a functional, pain-free gait cycle in patients with end-stage arthropathy. Let us delve into the rigorous nuances of this unique fixed-bearing system, which necessitates a fusion of the distal tibia and fibula—a critical, defining design feature that provides a massive surface area for bone ingrowth and aggressively mitigates the risk of tibial component subsidence.
Comprehensive Introduction and Patho-Epidemiology
The Agility total ankle replacement system represents a monumental milestone in the evolution of ankle arthroplasty. Engineered as a robust, semi-constrained, fixed-bearing device, its design philosophy directly addresses the historical failures of early-generation implants, which predominantly suffered from catastrophic tibial subsidence. The tibial base plate is a highly porous-coated titanium implant, explicitly designed for stable, long-term biologic bone ingrowth. Uniquely, the Agility system requires a formal syndesmosis fusion between the distal tibia and fibula. This arthrodesis is paramount; it effectively creates a unified, broadened, and stable osseous mortise, distributing axial loads across a significantly larger surface area, which is an absolute prerequisite for the long-term survivorship of the implant. Furthermore, the tibial component is specifically engineered to be positioned in 23 degrees of external rotation, a crucial geometric detail that replicates normal transmalleolar axis alignment and optimizes postoperative biomechanics.
The talar component of the Agility system is a dome-shaped, cobalt-chrome alloy prosthesis featuring a porous-coated undersurface, also engineered for robust biologic fixation. The contemporary Agility LP (Low Profile) talar base plate is designed to cover the entire resected talar dome surface, minimizing stress shielding and preventing subsidence into the softer cancellous bone of the talar body. It is available in multiple sizes to precisely match diverse patient anatomies. Interposed between these metallic components is the ultra-high-molecular-weight polyethylene (UHMWPE) insert, which acts as the articulating bearing surface. The Agility LP variant features a highly advantageous front-loading spacer mechanism, which dramatically simplifies initial insertion, allows for precise intraoperative balancing, and facilitates significantly easier polyethylene exchange during subsequent revision surgeries.
Understanding the pathogenesis of end-stage ankle arthritis is critical for appropriate patient selection and preoperative planning. Unlike the hip and knee, where primary osteoarthritis is the dominant etiology, the vast majority of ankle arthritis—upwards of 70 to 80 percent—is secondary to previous trauma. Intra-articular fractures, particularly high-energy tibial pilon fractures and severe rotational ankle fractures, frequently initiate a cascade of irreversible degenerative changes. Even seemingly minor injuries, such as subtle syndesmosis disruptions, can be biomechanically devastating. Biomechanical studies have famously demonstrated that just one millimeter of lateral talar translation within the mortise decreases the tibiotalar contact area by 42%, thereby increasing articular cartilage contact stresses by a staggering margin.
Similarly, chronic collateral ankle ligament instabilities, often stemming from inadequately treated inversion sprains, significantly amplify shear stresses across the joint. Due to the ankle's inherently close-packed, highly congruent nature, any alteration in kinematics rapidly accelerates cartilage wear, ultimately leading to end-stage degenerative joint disease. Recognizing these underlying pathomechanical drivers is essential, as any residual deformity or instability must be meticulously corrected during the arthroplasty procedure to prevent premature catastrophic failure of the implant. A failure to recognize and address these concurrent deformities will inevitably subject the polyethylene bearing to asymmetric edge-loading, precipitating early catastrophic wear and osteolysis.
Detailed Surgical Anatomy and Biomechanics
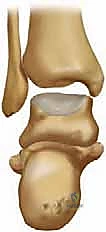
The ankle joint is far more complex than a simple uniaxial hinge; it is an intricate, multi-axial articulation involving four key osseous structures: the distal tibial plafond, the medial malleolus, the lateral malleolus of the fibula, and the trochlear surface of the talus. From a biomechanical perspective, it is best conceptualized as a dynamic mortise-and-tenon joint. For this mortise to remain stable under the massive forces of human locomotion—forces that can exceed five times body weight during normal walking—the tibia and fibula must be rigidly and elastically bound together.
This critical stabilizing function is performed by the syndesmotic ligamentous complex. The syndesmosis is composed of the Anterior Inferior Tibiofibular Ligament (AITFL), the robust Interosseous Ligament (which acts as a distal continuation of the interosseous membrane), and the Posterior Inferior Tibiofibular Ligament (PITFL), alongside the transverse tibiofibular ligament. Instability or widening of this mortise is a direct and rapid pathway to degenerative joint disease. In the context of the Agility system, we deliberately obliterate this dynamic relationship, replacing it with a rigid tibiofibular synostosis to support the oversized tibial tray. This non-anatomic but biomechanically necessary fusion requires meticulous preparation of the opposing tibial and fibular cortices to ensure a robust union.
The primary kinematic function of the ankle facilitates plantarflexion and dorsiflexion, though this motion involves a complex combination of rolling and sliding, with a shifting instantaneous center of rotation. Medially, the joint's stability is reinforced by the robust deltoid ligament complex. This fan-shaped structure consists of both superficial and deep layers, radiating from the medial malleolus to the sustentaculum tali of the calcaneus, the medial border of the plantar calcaneonavicular ("spring") ligament, the tuberosity of the navicular, and the medial surface of the talus. The deep deltoid is the primary restraint against lateral talar excursion and external rotation, and its integrity must be preserved during medial gutter debridement.
Laterally, the lateral collateral ligament complex provides crucial stability against inversion forces. This complex consists of the Anterior Talofibular Ligament (ATFL), the Posterior Talofibular Ligament (PTFL), and the Calcaneofibular Ligament (CFL). All these ligamentous structures are indispensable for accurate joint function and stability. Lateral instability is the most common form of chronic ankle instability and is frequently exacerbated by a pre-existing hindfoot varus deformity. During total ankle arthroplasty, balancing these ligaments is just as critical as precise bone cuts; failure to address coronal plane instability will inevitably lead to edge-loading, accelerated polyethylene wear, and early prosthetic loosening.
Neurovascular Topography of the Anterior Approach
During our standard anterior approach to the ankle, several critical neurovascular structures demand our utmost respect, meticulous identification, and rigorous protection. The anterior topography is fraught with structures that, if iatrogenically injured, can lead to devastating functional and symptomatic complications for the patient. A thorough understanding of these anatomic layers is non-negotiable for the operating surgeon.
The Superficial Peroneal Nerve (SPN), specifically its medial dorsal cutaneous branch, is frequently encountered within the superficial subcutaneous tissues in the distal half of our longitudinal incision. This nerve provides critical sensation to the dorsum of the foot and the medial aspect of the hallux. Injury, transection, or aggressive traction can lead to the formation of a highly symptomatic, debilitating neuroma or profound sensory deficits that significantly mar the patient's postoperative satisfaction, regardless of a perfectly placed implant. Meticulous blunt dissection in the subcutaneous layer is mandatory until this nerve is identified and gently retracted laterally.
Deep to the superficial fascia, we encounter the deep neurovascular bundle, which lies in close proximity to the extensor hallucis longus (EHL) tendon. This bundle contains the deep peroneal nerve and the anterior tibial artery and its accompanying venae comitantes. The deep peroneal nerve innervates the short extensors of the foot and provides critical sensation to the first dorsal web space. The anterior tibial artery is the primary arterial supply to the anterior compartment of the leg and continues distally as the dorsalis pedis artery, supplying the dorsum of the foot.
During deep dissection, numerous medial malleolar arterial branches and anterior lateral malleolar branches will be encountered crossing our surgical field. These vessels must be meticulously identified and either carefully coagulated with bipolar electrocautery or formally ligated to safely mobilize the main neurovascular bundle. This mobilization allows us to retract the bundle laterally, providing a safe, unobstructed window to the anterior ankle capsule without subjecting the vessels or nerves to dangerous tension. The extensor retinaculum must be incised in a stepped fashion to allow for anatomical repair during closure, preventing postoperative tendon bowstringing.
Exhaustive Indications and Contraindications
Patient selection is arguably the single most critical determinant of success in total ankle arthroplasty. The ideal candidate is typically an older, lower-demand patient with end-stage osteoarthritis, post-traumatic arthritis, or inflammatory arthropathy (such as rheumatoid arthritis) who possesses well-aligned hindfoot mechanics and adequate bone stock. However, as implant designs and surgical techniques have evolved, the indications have cautiously expanded to include slightly younger, more active patients, provided they understand the inherent limitations and potential need for future revision.
A thorough assessment of coronal and sagittal plane deformities is mandatory. While minor deformities can be addressed concurrently with osteotomies or soft tissue balancing, severe, rigid deformities pose a significant risk to implant longevity. The presence of profound avascular necrosis (AVN) of the talus is a major concern; while small, contained cystic lesions can be grafted, massive structural collapse of the talar body precludes the use of a standard talar component and may necessitate a custom implant or a conversion to a tibiotalotalocalcaneal (TTC) arthrodesis.
It is incumbent upon the operating surgeon to recognize that untreated adjacent joint arthritis (e.g., subtalar or talonavicular arthritis) may become more symptomatic following a successful ankle replacement due to increased mobilization of the foot. Furthermore, the status of the soft tissue envelope cannot be overstated. Patients with multiple prior surgical incisions, severely compromised skin, or a history of flap coverage over the anterior ankle represent extreme high-risk candidates for wound breakdown, which is the leading cause of early deep periprosthetic infection.
Below is an exhaustive breakdown of the indications and contraindications for the Agility Total Ankle Arthroplasty system:
| Category | Specific Conditions | Rationale / Surgical Implications |
|---|---|---|
| Primary Indications | End-stage primary osteoarthritis, Post-traumatic arthritis, Rheumatoid arthritis. | Debilitating pain refractory to exhaustive conservative management (bracing, injections, NSAIDs). Patient desires preservation of motion. |
| Relative Contraindications | Age < 50 years, High physical demand (heavy labor, impact sports), Moderate AVN of the talus, Obesity (BMI > 35), Prior anterior ankle incisions. | Increased risk of accelerated polyethylene wear, implant subsidence, and early aseptic loosening. Requires extensive preoperative counseling regarding lifespan of the prosthesis and wound healing risks. |
| Absolute Contraindications | Active or recent deep joint infection, Charcot neuroarthropathy, Severe uncorrectable malalignment (>20 degrees varus/valgus), Absent lower extremity sensation, Severe peripheral vascular disease, Inadequate bone stock. | Unacceptable risk of catastrophic failure, periprosthetic joint infection, wound necrosis, or amputation. Arthrodesis is the mandatory alternative in these scenarios. |
| Concurrent Requirements | Posterior Tibial Tendon Insufficiency (PTTI), Achilles/Gastrocnemius contracture, Severe ligamentous instability. | Must be aggressively corrected prior to or simultaneously with TAA (e.g., via calcaneal osteotomy, gastrocnemius recession, or lateral ligament reconstruction) to prevent eccentric loading and early implant failure. |
Pre-Operative Planning, Templating, and Patient Positioning
Successful execution of a total ankle arthroplasty begins weeks before the patient enters the operating room. Exhaustive preoperative planning, meticulous radiographic templating, and precise patient positioning are the foundational pillars upon which a successful reconstruction is built.
Preoperative Planning and Radiographic Templating
Our standard radiographic protocol requires a comprehensive suite of imaging studies. We demand weight-bearing anteroposterior (AP), lateral, and mortise oblique radiographs of the affected ankle. These are fundamental for assessing the pattern of joint space narrowing, the location and size of osteophytes, and the overall coronal alignment of the mortise. Furthermore, a weight-bearing lateral radiograph incorporating the entire foot is absolutely crucial for evaluating the longitudinal arch and detecting potential midfoot or forefoot collapse, which can drastically alter postoperative gait kinematics.
We also routinely obtain weight-bearing maximum plantarflexion and dorsiflexion lateral radiographs. This is the only reliable, objective method to measure true tibiotalar versus midfoot compensatory motion. It is essential for assessing the current functional range and establishing a baseline to predict postoperative capabilities. We must explicitly counsel the patient that preoperative range of motion is the single greatest predictor of postoperative range of motion; on average, we anticipate only a modest 5- to 10-degree absolute increase in total arc of motion. Realistic patient expectations are paramount to postoperative satisfaction.
Long-leg standing alignment radiographs (hip to ankle) are absolutely vital. We must determine the mechanical axis of the entire lower extremity to identify any proximal alignment issues (such as severe genu varum or valgum) that might drive asymmetric loading across the ankle joint. Advanced imaging, specifically a fine-cut Computed Tomography (CT) scan, is routinely indicated to evaluate bone stock, map the exact geometry of subchondral cysts, assess for avascular necrosis of the talus, and plan our precise bone resection strategy. Three-dimensional templating software is increasingly utilized to size components and anticipate the required depth of the syndesmotic resection.
Patient Positioning and Operating Room Setup
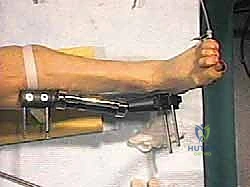
Proper patient positioning is critical for optimal surgical exposure and accurate intraoperative fluoroscopic evaluation. The patient is positioned supine on a radiolucent operating table. A crucial step is the placement of a well-padded bump underneath the ipsilateral hip. This bump serves to internally rotate the lower extremity, neutralizing the natural external rotation of the hip and bringing the ankle mortise into a true neutral AP alignment relative to the ceiling. This ensures that when the foot is pointing straight up, the malleoli are parallel to the floor, which is vital for accurate jig placement.
A well-padded thigh tourniquet is applied to provide a bloodless surgical field, which is essential for identifying the delicate anterior neurovascular structures. The leg is prepped and draped in a standard sterile fashion, ensuring the entire foot and leg up to the tourniquet are exposed. We utilize a sterile stockinette and impervious draping to minimize contamination risk. The C-arm fluoroscopy unit is brought in from the contralateral side of the table, positioned to allow for seamless transition between AP and lateral views without disrupting the sterile field or the surgeon's position.
Before incision, a formal "time-out" is conducted, and prophylactic intravenous antibiotics (typically a first-generation cephalosporin, or vancomycin in penicillin-allergic patients) are administered within one hour of tourniquet inflation. The surgeon must verify the presence of all necessary Agility implant sizes, trial components, and specific instrumentation trays before proceeding. The availability of bone graft (autograft from the resected tibia/talus, or allograft/demineralized bone matrix) must also be confirmed, as it is essential for the syndesmotic fusion.
Step-by-Step Surgical Approach and Fixation Technique
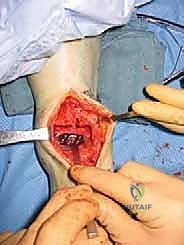
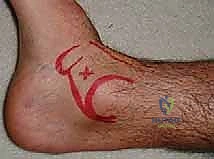
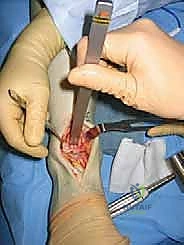
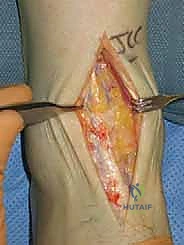
The surgical execution of the Agility TAA is a highly choreographed sequence of bone resections and soft tissue balancing. The procedure begins with a longitudinal anterior incision, typically 12 to 15 centimeters in length, centered over the ankle joint, just lateral to the crest of the tibia and extending distally toward the talonavicular joint.
Anterior Dissection and Joint Exposure
Meticulous dissection is carried through the subcutaneous tissues, taking extreme care to identify and protect the superficial peroneal nerve branches laterally. The extensor retinaculum is incised in line with the skin incision. We develop the internervous plane between the tibialis anterior (TA) tendon medially and the extensor hallucis longus (EHL) tendon laterally. The deep neurovascular bundle, located deep and slightly lateral to the EHL, is carefully mobilized and retracted laterally along with the extensor digitorum longus (EDL) tendons.
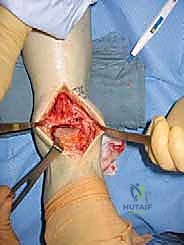
Once the anterior capsule is exposed, a generous capsulotomy is performed. We must aggressively resect the anterior capsule and any obstructing anterior tibial or talar osteophytes. This anterior exostectomy is crucial; failure to remove these osteophytes will not only limit postoperative dorsiflexion but can also artificially alter the placement of our cutting jigs, leading to malaligned bone cuts. A self-retaining retractor is placed to maintain exposure, ensuring the neurovascular bundle is protected from excessive tension.
With the joint fully exposed, we assess the medial and lateral gutters. Often, severe arthritic changes obliterate these spaces. A high-speed burr or a narrow osteotome is used to carefully clear the gutters, releasing contracted soft tissues and mobilizing the talus within the mortise. This soft tissue balancing is iterative and must be reassessed throughout the procedure to ensure symmetric tension in both the coronal and sagittal planes.
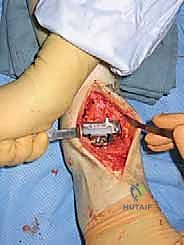
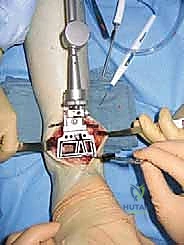
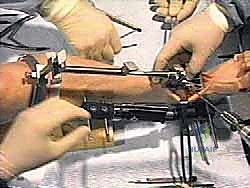
Jig Placement and Tibial Resection
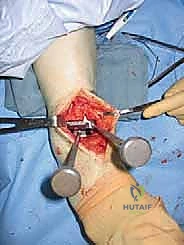
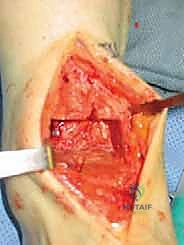
The core of the Agility technique lies in the accurate placement of the extramedullary alignment guide. The tibial cutting block is pinned to the anterior tibia, aligned with the mechanical axis of the tibia in both the AP and lateral planes. Fluoroscopy is heavily utilized here. The cutting block must dictate a resection that is perpendicular to the tibial axis in the coronal plane and matches the natural posterior slope of the distal tibia (typically 3 to 5 degrees) in the sagittal plane.
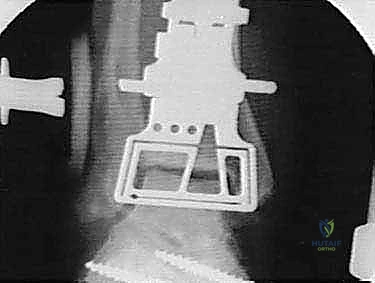
Once the jig is perfectly aligned and securely pinned, the tibial resection is performed using a wide, oscillating saw blade. The cut extends medially to, but not through, the medial malleolus, and laterally, it completely transects the medial cortex of the fibula. This lateral extension is the defining feature of the Agility system; we are intentionally creating a massive osseous void that encompasses the entire syndesmosis. The resected bone block is carefully removed and preserved, as it will be milled and utilized as autogenous bone graft for the syndesmotic fusion.
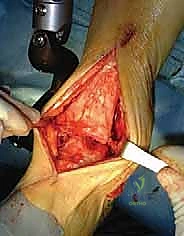
Following the primary tibial cut, the syndesmosis must be meticulously prepared. The opposing surfaces of the distal tibia and fibula are decorticated using a high-speed burr to expose bleeding cancellous bone. This preparation is the bedrock of the required tibiofibular arthrodesis. If this fusion fails, the tibial component will inevitably subside into the syndesmotic void, leading to catastrophic implant failure.
Talar Resection, Trialing, and Implantation
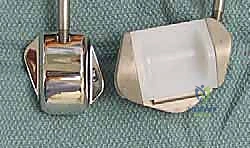
Attention is then turned to the talus. The talar cutting jig is applied, referencing off the previously made tibial cut to ensure parallel resection planes. The dome of the talus is resected, removing minimal bone to preserve the strong subchondral bone of the talar body. In the Agility LP system, chamfer cuts are also made to match the internal geometry of the talar component, ensuring a highly congruent fit that maximizes surface area contact and minimizes the risk of talar subsidence.
With the bone cuts complete, trial components are inserted. This is a critical phase where the surgeon assesses joint stability, ligamentous tension, and range of motion. The ankle is taken through a full arc of dorsiflexion and plantarflexion under fluoroscopic visualization. We must ensure there is no anterior or posterior impingement, and that the components do not lift off during motion. If coronal plane instability is noted, further soft tissue releases or a thicker polyethylene trial may be required.
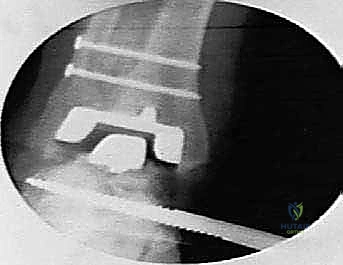
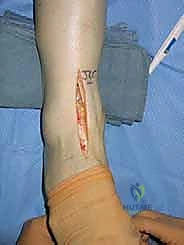
Once trialing is satisfactory, the real implants are opened. The prepared syndesmosis is densely packed with the previously harvested autograft bone. The porous-coated tibial and talar components are then impacted into place. The press-fit nature of these implants provides immediate rigid primary stability. The definitive polyethylene insert is then locked into the tibial baseplate.

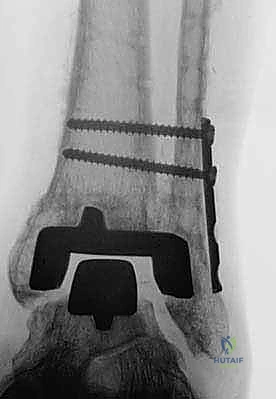
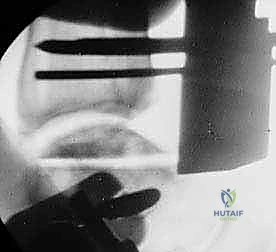
To secure the syndesmotic fusion and compress the fibula against the tibial component, two robust transmalleolar syndesmotic screws (typically 4.5mm or 6.5mm fully threaded cortical screws) are placed from lateral to medial, traversing the fibula, the syndesmotic space, and engaging the medial tibial cortex. Final fluoroscopic images are obtained to confirm perfect component seating, screw placement, and overall alignment. The wound is then irrigated copiously and closed in layered fashion over a closed-suction drain.
Complications, Incidence Rates, and Salvage Management
Total ankle arthroplasty, particularly with a complex system like the Agility, carries a distinct and unforgiving complication profile. The learning curve is notoriously steep, and even in experienced hands, complications can be limb-threatening. Intraoperative fractures are a primary concern, most frequently involving the medial or lateral malleolus. Medial malleolar fractures typically occur during the tibial resection if the saw blade strays, or during impaction of the tibial component if the mortise is overly tight. These must be immediately recognized and internally fixed, usually with lag screws or a tension band construct, to prevent postoperative instability.

The pathognomonic complication of the Agility system is delayed union or nonunion of the syndesmotic arthrodesis. Because the oversized tibial tray relies on the fibula for lateral support, failure of the syndesmosis to fuse results in a loss of lateral structural integrity. This inevitably leads to lateral subsidence of the tibial component, valgus tilting of the talus, and rapid, catastrophic failure of the arthroplasty. Aggressive bone grafting, rigid screw fixation, and strict adherence to postoperative non-weight-bearing protocols are the only defenses against this devastating complication.
Deep periprosthetic joint infection (PJI) is arguably the most dreaded complication, occurring in approximately 1% to 3% of primary cases. The anterior ankle has a tenuous soft tissue envelope with minimal muscle coverage; wound edge necrosis or dehiscence provides a direct conduit for superficial bacteria to reach the implant. Management of deep PJI almost universally requires a two-stage revision protocol: explantation of the components, aggressive debridement, placement of an antibiotic-impregnated cement spacer, and a prolonged course of intravenous antibiotics before any consideration of reimplantation or, more commonly, conversion to a fusion.
Polyethylene wear and subsequent osteolysis are long-term complications that dictate the ultimate survivorship of the implant. Asymmetric wear, driven by residual coronal plane deformity or ligamentous imbalance, generates massive amounts of particulate debris. This debris triggers a macrophage-mediated inflammatory response, leading to aggressive periprosthetic bone resorption (osteolysis) and aseptic loosening. Routine radiographic surveillance is mandatory to detect osteolysis early, allowing for isolated polyethylene exchange and bone grafting before catastrophic component subsidence occurs.
| Complication | Estimated Incidence | Etiology / Risk Factors | Salvage / Management Strategy |
|---|---|---|---|
| Intraoperative Malleolar Fracture | 5% - 10% | Errant saw cuts, aggressive component impaction, osteoporotic bone. | Immediate intraoperative Open Reduction Internal Fixation (ORIF) with screws or tension band. |
| Syndesmotic Nonunion / Subsidence | 10% - 15% | Inadequate bone grafting, failure of screw fixation, premature weight-bearing. | Revision TAA with massive structural grafting, or conversion to Tibiotalocalcaneal (TTC) arthrodesis. |
| Deep Periprosthetic Infection | 1% - 3% | Wound dehiscence, compromised host (diabetes, smoking, rheumatoid arthritis). | Two-stage revision: Explantation, antibiotic spacer, IV antibiotics, followed by TTC fusion. |
| Aseptic Loosening / Osteolysis | 10% - 20% (at 10 years) | Polyethylene wear debris, malalignment, edge-loading. | Polyethylene exchange with bone grafting of cysts; revision to larger components if baseplates are loose. |
Phased Post-Operative Rehabilitation Protocols
The postoperative rehabilitation following an Agility TAA is a delicate balancing act between protecting the tenuous soft tissue envelope, ensuring rigid healing of the syndesmotic fusion, and initiating early motion to prevent debilitating joint stiffness. We employ a strict, four-phased protocol that requires intense patient compliance and close monitoring by a skilled physical therapist.
Phase 1: Maximum Protection and Wound Healing (Weeks 0-2)
Immediately postoperatively, the patient is placed in a bulky, well-padded short leg splint in neutral dorsiflexion. The primary goals during this phase are strict elevation to control catastrophic edema, pain management, and absolute protection of the anterior incision. The patient is strictly non-weight-bearing (NWB) on the operative extremity. Crutches, a walker, or a rolling knee scooter are utilized for mobility. Deep venous thrombosis (DVT) prophylaxis is initiated per institutional protocol. At two weeks, the patient returns to the clinic for splint removal, meticulous wound inspection, and suture or staple removal.
Phase 2: Controlled Motion and Continued Protection (Weeks 2-6)
If the anterior wound is impeccably healed, the patient is transitioned into a removable Controlled Ankle Motion (
Clinical & Radiographic Imaging Archive