Revision Agility Total Ankle Arthroplasty: An Intraoperative Masterclass on Malleolar Fracture Management
Key Takeaway
Welcome, fellows, to a critical masterclass on revision Agility Total Ankle Arthroplasty, specifically focusing on malleolar fracture management. We'll meticulously navigate the complex anatomy, refine our preoperative planning, and execute precise intraoperative techniques for both acute and chronic malleolar fractures. This session emphasizes real-time decision-making, meticulous dissection, hardware application, and comprehensive complication avoidance and management strategies, ensuring optimal outcomes for our patients.
Comprehensive Introduction and Patho-Epidemiology
The evolution of total ankle arthroplasty (TAA) has been marked by significant biomechanical triumphs and equally instructive mechanical failures. Among the historical vanguard of these devices is the Agility Total Ankle System, a semi-constrained, fixed-bearing prosthesis that fundamentally altered our approach to end-stage ankle arthritis. However, the unique design philosophy of the Agility system—specifically its reliance on a mandatory tibiofibular syndesmotic fusion to support a broad tibial component—inherently established a complex biomechanical environment. When this delicate equilibrium is disrupted, it presents a distinct vulnerability for catastrophic failure, most notably manifesting as malleolar fractures and profound osteolysis. Revision of an Agility TAA is not merely a component exchange; it is a formidable reconstructive challenge that demands an exhaustive understanding of altered joint kinematics, compromised bone stock, and attenuated soft tissue envelopes.
The epidemiology of Agility TAA failure is intimately tied to its tribology and load-sharing mechanics. The primary culprits necessitating revision often involve the distal tibia and the talus, where failure is typically sustained through relentless axial loading. This force is compounded by the physiological effects of the prosthesis itself. Consider the insidious process of osteolysis: shed polyethylene particles, acting as foreign bodies, trigger a chronic, macrophage-mediated inflammatory cascade. This immune response, while attempting to clear microscopic debris, inadvertently upregulates osteoclastic activity, leading to the autodestruction of the surrounding bone. This creates massive, expansile cystic lesions that hollow out the metaphyseal bone, leaving a fragile cortical shell that simply cannot support the implant.
Furthermore, a lack of robust bone ingrowth into the sintered beads of the initial implant can create persistent micromotion at the prosthesis-bone interface. This micromotion acts as a constant mechanical irritant, preventing full osseointegration and leading to further erosions, fibrous tissue interposition, and eventual subsidence of the components into either the distal tibia or the talus. As the implant subsides, the tension on the collateral ligaments is lost, leading to edge-loading of the polyethylene insert. This asymmetric loading exponentially accelerates wear rates, creating a vicious cycle of debris generation, osteolysis, and progressive deformity.
By definition, revision in this context spans a broad spectrum of surgical interventions. It can range from addressing a localized soft-tissue imbalance or repairing an acute periprosthetic fracture adjacent to a well-fixed implant, to the vastly more complex procedure of complete implant explantation, massive bone grafting, and insertion of a stemmed revision prosthesis. Malleolar fractures, whether acute intraoperative complications or late-stage fatigue failures, represent a critical juncture in the survivorship of the Agility ankle. Managing these fractures intraoperatively during a revision requires a masterclass in osteosynthesis, utilizing advanced plating techniques, structural bone grafting, and meticulous soft tissue handling to restore the ankle mortise and salvage the limb.
Detailed Surgical Anatomy and Biomechanics
Osseous Architecture and Implant-Bone Interface
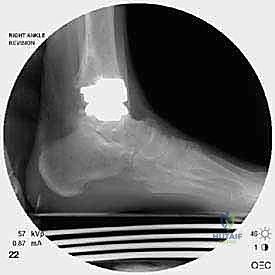
Before initiating any surgical incision, the revision arthroplasty surgeon must possess a profound, three-dimensional understanding of the compromised osseous anatomy. In the context of a failed Agility TAA, the native anatomy is invariably distorted by prior bone resections, osteolytic cysts, and heterotopic ossification. The medial and lateral malleoli are our primary structural pillars, providing critical stability to the ankle mortise. However, the initial bone cuts required for the Agility tibial component inherently thin these malleoli, dramatically reducing their cross-sectional area and rendering them highly susceptible to iatrogenic or stress-induced fractures.
The medial malleolus, formed by the distal extension of the tibia, is the critical anchor for the deltoid ligament complex. Its structural integrity is paramount for preventing valgus collapse of the hindfoot. In the revision setting, the medial malleolus is often sclerotic, thinned, or actively fractured due to impingement from a subsiding talar component. Conversely, the lateral malleolus, formed by the distal fibula, provides the origin for the lateral collateral ligaments. Because the Agility system requires syndesmotic arthrodesis, the fibula is subjected to altered stress-sharing mechanics. If the syndesmosis fails to fuse (nonunion) or if the tibial component subsides asymmetrically, the fibula experiences immense cantilever bending forces, frequently culminating in a fatigue fracture.
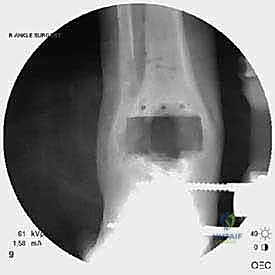
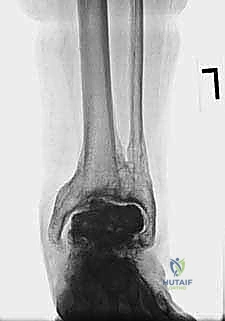
The distal tibia and talar domes represent the primary load-bearing surfaces and the epicenters of osteolysis. The subchondral bone plate, which normally distributes axial loads, has been removed. In its place, the surgeon will often encounter cavitary defects filled with granulomatous tissue and metallosis. Understanding the spatial relationship of these defects is crucial, as the revision strategy will mandate bypassing this compromised metaphyseal bone to achieve diaphyseal fixation using stemmed components. The biomechanical goal is to bypass the stress risers and transfer the load to the healthy cortical bone of the tibial and talar shafts.
Ligamentous and Syndesmotic Integrity
Ligamentous integrity is frequently compromised long before the index arthroplasty due to chronic, end-stage deformity, and this attenuation is only exacerbated by the altered kinematics of a failing implant. The lateral ankle ligaments—comprising the anterior talofibular ligament (ATFL), calcaneofibular ligament (CFL), and posterior talofibular ligament (PTFL)—are the primary restraints against varus instability. In the presence of a lateral malleolar fracture or fibular subsidence, these ligaments become functionally incompetent, leading to lateral joint line opening and catastrophic edge-loading of the prosthesis.
The medial ankle is stabilized by the deltoid ligament complex, a robust, fan-shaped structure consisting of superficial and deep components. The deep deltoid is the primary restraint to anterior and lateral translation of the talus. Failure of the medial malleolus or chronic attenuation of the deltoid inevitably leads to severe, progressive valgus deformity. Reconstructing this ligamentous tension during revision is exceptionally difficult; thus, restoring the osseous anatomy of the medial malleolus is the most reliable method of re-establishing medial stability.
The syndesmotic ligament complex (AITFL, PITFL, and interosseous ligament) is arguably the most critical soft-tissue structure in the context of the Agility system. Because the original implant design aimed to fuse this joint to create a wide base of support, the native ligaments were often sacrificed or rendered obsolete. In revision surgery, particularly when transitioning to a modern, non-syndesmosis-fusing implant, the surgeon must evaluate whether the fibula can be stabilized independently or if a structural syndesmotic reconstruction (or permanent rigid fixation) is required to maintain the lateral column of the ankle mortise.
Soft Tissue Envelope and Neurovascular Considerations
The soft tissue envelope in revision ankle surgery is notoriously unforgiving. The anterior compartment houses the extensor tendon complex—the anterior tibial tendon (ATT), extensor hallucis longus (EHL), and extensor digitorum longus (EDL). Following the index procedure, dense scar tissue invariably binds these tendons, limiting their excursion and contributing to postoperative stiffness, particularly a loss of plantarflexion. Meticulous tenolysis is often required, but it must be performed with extreme caution to avoid devascularizing the tendons.
Lying deep to this extensor retinaculum is the critical neurovascular bundle, comprising the deep peroneal nerve and the anterior tibial artery and vein. These structures are directly in the path of the standard anterior surgical approach. In the revision setting, normal tissue planes are obliterated; the neurovascular bundle is frequently tethered to the pseudocapsule or directly to the underlying prosthesis. Iatrogenic injury during exposure is a catastrophic complication that can lead to foot drop or ischemic necrosis of the dorsal foot.
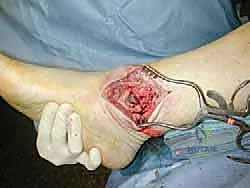
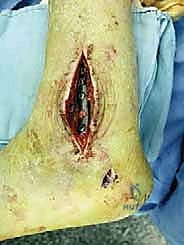
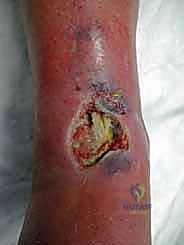
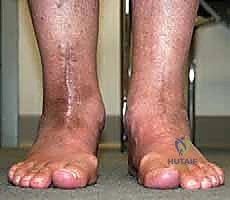
Wound complications are the Achilles heel of anterior ankle approaches. The blood supply to the anterior ankle skin is precarious, relying on specific angiosomes that may have been compromised by prior incisions, trauma, or peripheral vascular disease. Multiple prior incisions, combined with the direct apposition of the tendon complex against the skin due to loss of subcutaneous fat, accelerate the risk of anterior incision failure. The surgeon must employ a "no-touch" technique for the skin edges, utilize full-thickness fasciocutaneous flaps, and be prepared to involve plastic surgery for local rotational flaps or free tissue transfer if wound breakdown occurs.
Exhaustive Indications and Contraindications
The decision algorithm for revising a failed Agility Total Ankle Arthroplasty is complex and multifaceted. It requires a delicate balance between the patient's clinical symptoms, the radiographic evidence of failure, and the physiological capacity of the host to withstand a massive reconstructive procedure. The primary indication for revision is intractable, progressive pain accompanied by functional decline that is directly attributable to the implant. This pain is typically mechanical in nature, worsening with weight-bearing and often localized to the malleoli or the deep joint space, signaling impending or actual catastrophic failure.
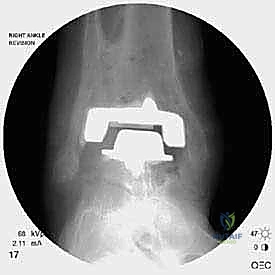
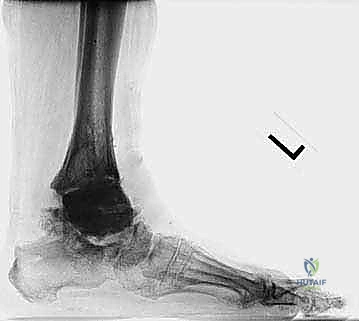
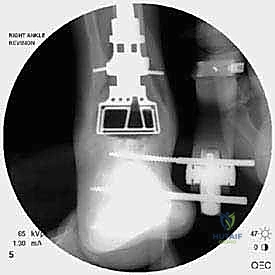
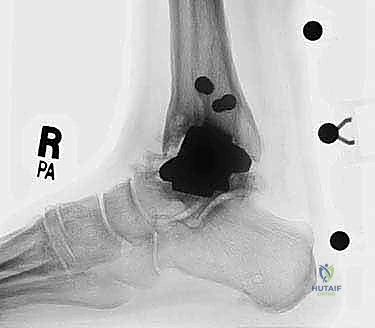
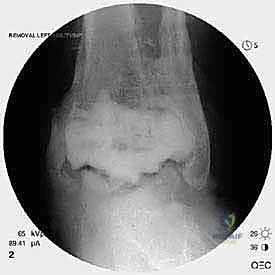
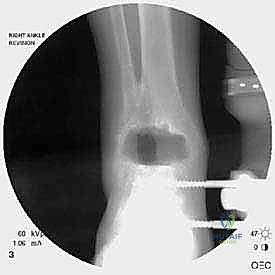
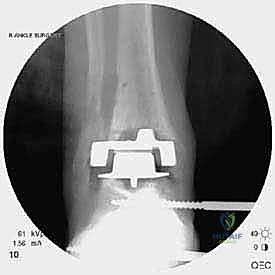
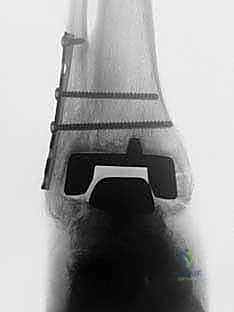
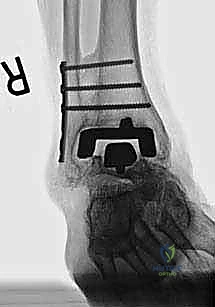
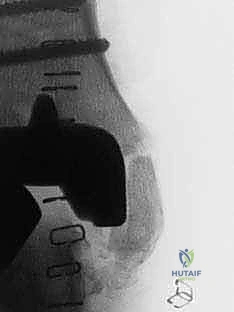
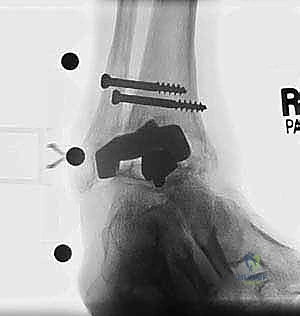
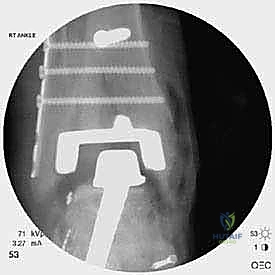
Radiographic indications are equally critical and often dictate the urgency of the intervention. Progressive osteolysis, characterized by expanding radiolucent cysts greater than 2 millimeters at the bone-implant interface, is a definitive trigger for revision, even in the mildly symptomatic patient, to prevent irreversible loss of bone stock. Implant subsidence, a change in the component alignment (varus/valgus tilt), or the presence of a periprosthetic malleolar fracture are absolute indications for surgical intervention. Acute malleolar fractures, particularly those occurring intraoperatively or shortly after the index procedure, require immediate osteosynthesis to prevent displacement and subsequent implant loosening.
Contraindications must be rigorously evaluated to prevent disastrous outcomes. Absolute contraindications include active, untreated local or systemic infection. In the presence of deep periprosthetic joint infection, a single-stage revision is strictly contraindicated; the patient must undergo a two-stage procedure involving explantation, placement of an antibiotic-impregnated cement spacer, and a prolonged course of intravenous antibiotics. Severe peripheral vascular disease, profound peripheral neuropathy (such as advanced Charcot neuroarthropathy), and an inadequate soft tissue envelope that cannot support a surgical incision are also absolute contraindications to revision arthroplasty, often pushing the treatment algorithm toward arthrodesis or amputation.
Relative contraindications require nuanced clinical judgment. Severe osteopenia or massive bone loss that precludes stable fixation of even custom-stemmed revision components may necessitate a tibiotalocalcaneal (TTC) arthrodesis instead of a revision TAA. Patient non-compliance, active smoking, and poorly controlled diabetes mellitus (HbA1c > 8.0%) significantly increase the risk of wound complications, nonunion, and infection. In these scenarios, the surgeon must optimize the patient medically prior to any elective revision, or opt for a more definitive, salvage-type procedure if optimization is not feasible.
| Category | Indications for Revision TAA | Contraindications for Revision TAA |
|---|---|---|
| Clinical | Intractable, mechanical joint pain; progressive loss of function; instability. | Active local/systemic infection (Absolute); profound neuropathy/Charcot (Absolute). |
| Radiographic | Progressive osteolysis (>2mm radiolucency); implant subsidence; component migration. | Massive, un-reconstructible bone loss (Relative); avascular necrosis of the entire talus (Relative). |
| Structural | Acute or chronic periprosthetic malleolar fractures; syndesmotic nonunion with hardware failure. | Inadequate soft tissue envelope/active ulceration (Absolute); severe uncorrectable malalignment (Relative). |
| Patient Factors | Medically optimized; compliant with strict non-weight-bearing protocols. | Active smoking (Relative); poorly controlled diabetes (Relative); severe peripheral vascular disease (Absolute). |
Pre-Operative Planning, Templating, and Patient Positioning
Advanced Imaging Modalities and Templating
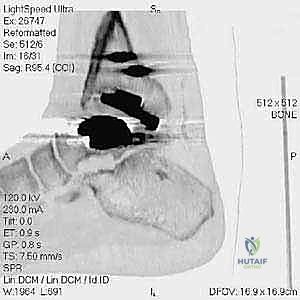
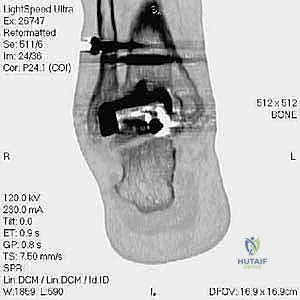
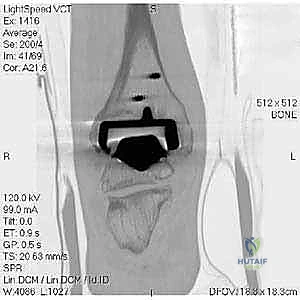
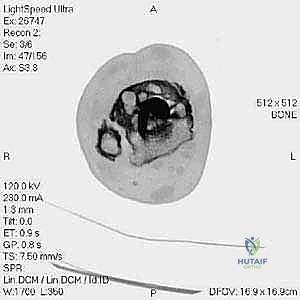
The foundation of a successful revision arthroplasty is laid long before the incision is made, relying heavily on advanced, multi-planar imaging. Standard weight-bearing radiographs (anteroposterior, lateral, and mortise views) are mandatory for assessing overall alignment, gross subsidence, and the presence of malleolar fractures. However, plain films drastically underestimate the extent of osteolysis behind the metallic components. Therefore, a high-resolution Computed Tomography (CT) scan with Metal Artifact Reduction Sequence (MARS) is the gold standard and an absolute necessity.
The MARS CT allows the surgeon to volumetrically quantify the bone loss in the distal tibia and talus, map the exact dimensions of osteolytic cysts, and evaluate the remaining cortical thickness of the malleoli. This three-dimensional understanding is critical for determining whether structural allograft, particulate autograft, or custom metal augments will be required to fill cavitary defects. Furthermore, the CT scan dictates the sizing of the revision stems, ensuring adequate diaphyseal engagement to bypass metaphyseal deficiencies.
Pre-operative digital templating is a non-negotiable step. The surgeon must template the anticipated bone resections, the size and length of the tibial and talar stems, and the required polyethylene thickness to restore joint line height and ligamentous tension. In cases of severe malleolar bone loss or complex fractures, templating also involves planning the trajectory of locking screws and the placement of fibular strut grafts. Anticipating the need for specialized revision instrumentation, fluoroscopy, and a variety of implant constraints ensures the surgical team is prepared for any intraoperative contingency.
Patient Optimization and Positioning
Medical optimization is a rigorous process that requires a multidisciplinary approach. The patient's nutritional status (albumin, prealbumin), glycemic control, and vascular perfusion must be optimized. Smoking cessation is strictly enforced, ideally confirmed with cotinine testing, given the catastrophic effects of nicotine on microvascular perfusion and bone healing—factors that are already severely compromised in the revision setting.
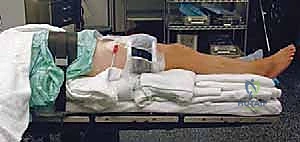
In the operating theater, the patient is typically positioned supine on a radiolucent table. A bump is placed under the ipsilateral hip to internally rotate the leg, bringing the foot into a true anteroposterior orientation, which is critical for accurate fluoroscopic assessment of the ankle mortise. A well-padded thigh tourniquet is applied to provide a bloodless surgical field, though its use should be judicious to minimize ischemic time to the already tenuous anterior skin flaps.
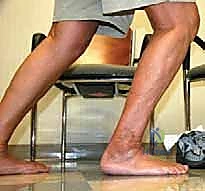
The entire lower extremity is prepped and draped free to allow for dynamic assessment of ankle range of motion and ligamentous stability during the procedure. Crucially, the ipsilateral iliac crest must also be prepped and draped in the event that autologous cancellous or structural bone graft is required to manage massive osteolytic defects or to augment a malleolar fracture repair. The fluoroscopy unit (C-arm) is positioned on the contralateral side of the table, ensuring unobstructed, orthogonal views of the ankle joint throughout the reconstruction.
Step-by-Step Surgical Approach and Fixation Technique
Soft Tissue Dissection and Implant Exposure
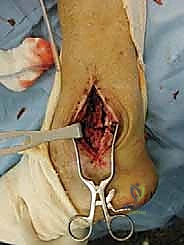
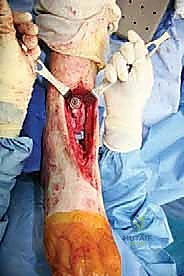
The surgical approach for revising an Agility TAA is fraught with peril due to the compromised soft tissue envelope. The standard anterior longitudinal incision is typically utilized, often incorporating the previous surgical scar to avoid creating narrow skin bridges that are prone to necrosis. The incision must be extensile, extending proximally along the tibial crest and distally over the talonavicular joint. Deep dissection must proceed with full-thickness fasciocutaneous flaps; subcutaneous undermining is strictly prohibited to preserve the delicate angiosomal blood supply.
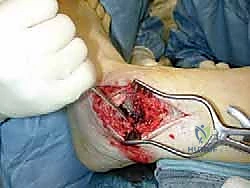
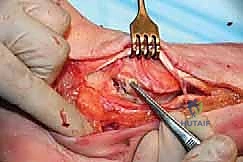
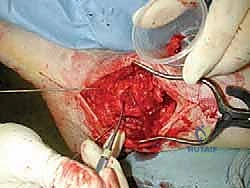
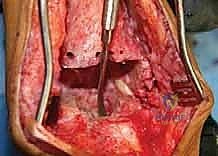
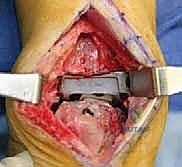
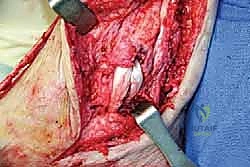
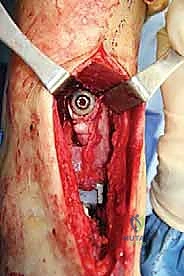
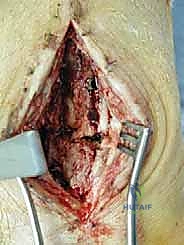
Upon incising the extensor retinaculum, the anterior tibial tendon (ATT) is retracted medially, while the extensor hallucis longus (EHL) and the neurovascular bundle are carefully mobilized and retracted laterally. This interval provides the most direct access to the anterior ankle capsule. In the revision setting, the surgeon will encounter a dense, hypertrophic pseudocapsule heavily infiltrated with black metallosis and polyethylene wear debris. This pseudocapsule must be meticulously excised to expose the underlying implants, taking extreme care not to inadvertently transect the tethered deep peroneal nerve or anterior tibial artery.
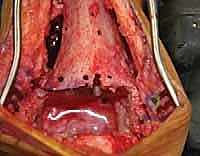
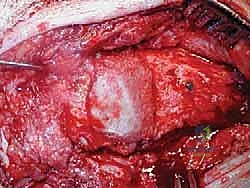
Once the joint space is entered, a thorough synovectomy and debridement of all particulate debris are performed. Multiple deep tissue cultures (minimum of three to five) must be obtained prior to the administration of prophylactic intravenous antibiotics to rule out an indolent, subclinical periprosthetic joint infection. The interface between the implant and the bone is then carefully defined using specialized thin osteotomes and flexible gigli saws, preparing for the perilous extraction phase.
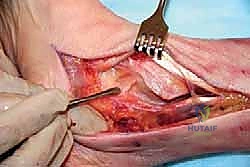
Implant Extraction and Joint Debridement
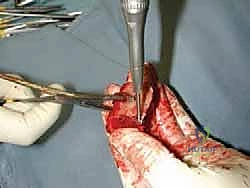
Explantation of the Agility components requires patience, finesse, and a profound respect for the remaining bone stock. The Agility tibial component is notoriously broad, and aggressive leverage will invariably result in catastrophic fracture of the already thinned medial or lateral malleoli. The polyethylene insert is removed first to create working space within the joint. Next, thin, flexible osteotomes are meticulously advanced along the prosthesis-bone interface to disrupt any areas of fibrous or osseous integration.
For the tibial component, the syndesmotic interface must be carefully dismantled. If the syndesmosis is fused, a microsaw or high-speed burr is used to carefully separate the component from the fibula. Slap hammers and extraction devices should be used with gentle, axial force; excessive toggling must be avoided. The talar component, which often subsides deeply into the talar body, is similarly freed using curved osteotomes.
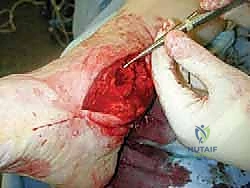
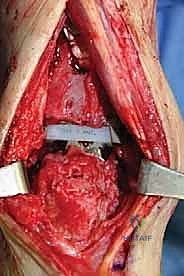
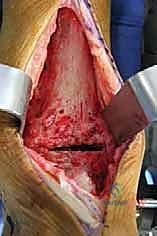
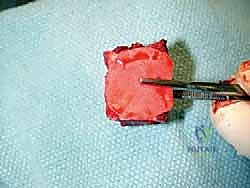
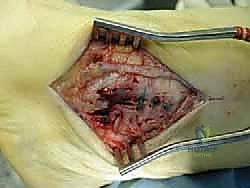
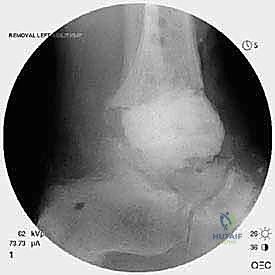
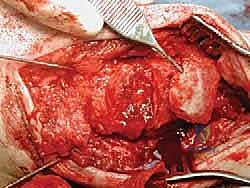
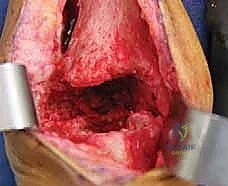
Following explantation, the surgeon is typically confronted with massive cavitary defects in the distal tibia and talus. These osteolytic cysts must be aggressively curetted using high-speed burrs and angled curettes until bleeding, healthy cancellous bone is encountered. All fibrous membranes lining the cysts must be removed, as they contain the inflammatory macrophages that drive osteolysis. The bony voids are then copiously irrigated with pulsatile lavage to remove residual debris and prepare the bed for bone grafting and reimplantation.
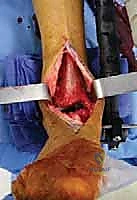
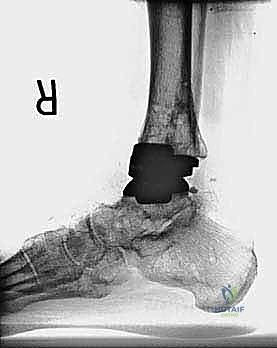
Management of Malleolar Fractures and Bone Defects
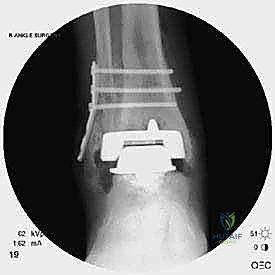
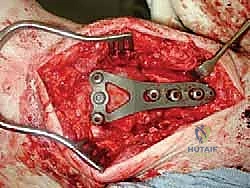
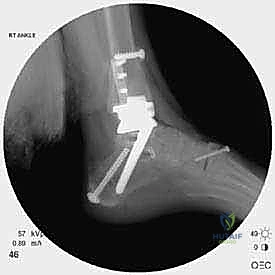
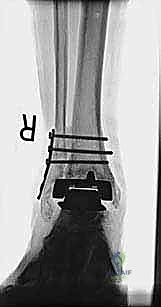
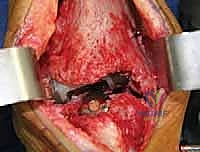
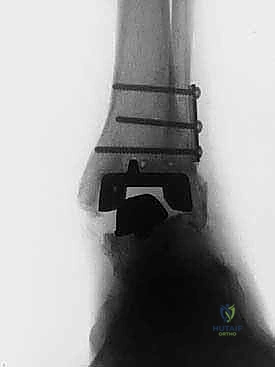
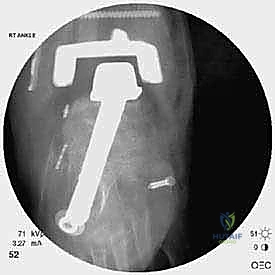
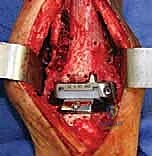
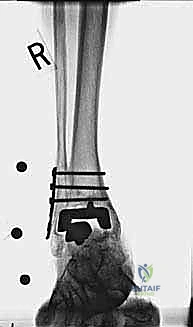
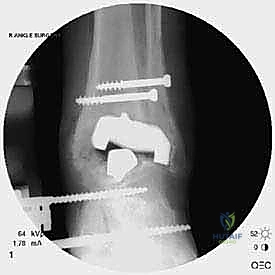
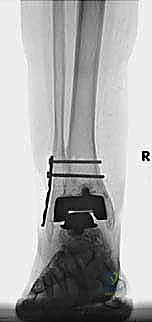
The crux of this masterclass lies in the intraoperative management of malleolar fractures. If a medial malleolar fracture is present, or if the bone is critically thinned, it must be addressed prior to final implant seating. For transverse or short oblique fractures, a tension band wiring technique or the use of partially threaded cancellous screws can provide compression. However, in the revision setting where bone quality is poor, a medially applied locking plate often provides superior biomechanical stability. If the medial malleolus is entirely absent or non-viable, a structural allograft (such as a femoral head) must be fashioned and secured with rigid internal fixation to reconstitute the medial buttress.
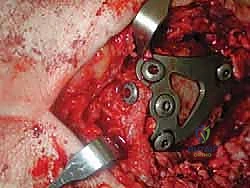
Lateral malleolar fractures are equally challenging, given the altered syndesmotic anatomy left behind by the Agility system. If the fibula is fractured or severely compromised by osteolysis, rigid osteosynthesis is mandatory. This is typically achieved using a robust, anatomically contoured lateral locking plate. In cases of severe comminution or bone loss, an intramedullary fibular strut allograft can be inserted prior to plating to restore length and structural integrity.
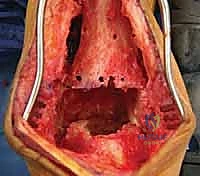
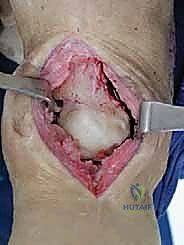
Managing the central cavitary defects is critical for the survival of the revision prosthesis. Small, contained defects can be densely packed with morselized autograft (from the iliac crest) or allograft. However, massive uncontained defects require structural support. The surgeon must carefully fashion structural allograft blocks to fill the voids, effectively rebuilding the metaphyseal platform. These grafts must be rigidly stabilized, often utilizing the stem of the revision prosthesis itself to achieve a press-fit construct that bypasses the defect and engages the diaphyseal bone.
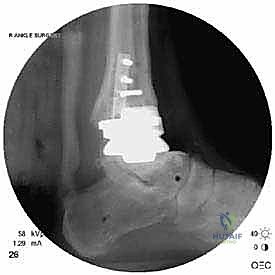
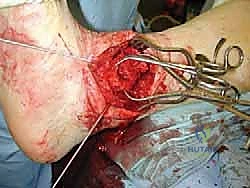
Implantation of the Revision Prosthesis
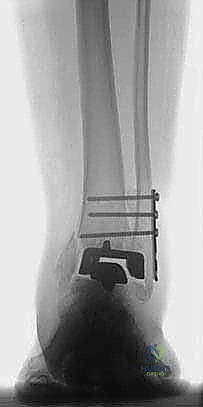
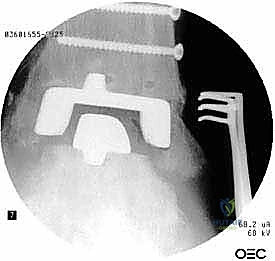
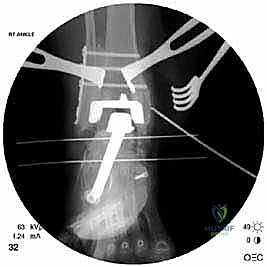
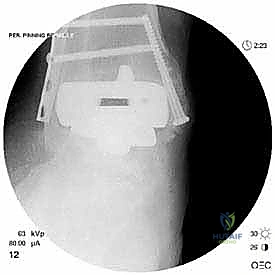
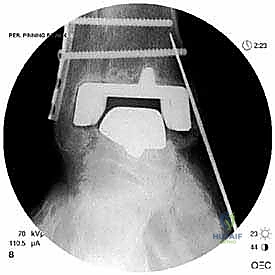
With the malleoli stabilized and the bone defects grafted, the surgeon proceeds to the implantation of the revision TAA. The mechanical axis of the tibia must be precisely re-established. Given the loss of metaphyseal bone, revision systems universally rely on intramedullary stems for both the tibial and talar components. The tibial canal is sequentially reamed to accommodate a stem that achieves diaphyseal cortical chatter, providing immediate rigid fixation.
The talar component is similarly prepared, often requiring a stemmed peg that engages the body or neck of the talus, depending on the remaining bone stock. Trial components are inserted, and the ankle is taken through a full range of motion under fluoroscopic guidance. The surgeon meticulously assesses for impingement, appropriate ligamentous tension, and the stability of the malleolar fracture repairs under dynamic loading. Gaps are balanced by adjusting the thickness of the polyethylene trial.
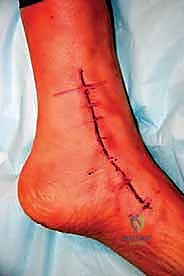
Once optimal sizing and balancing are achieved, the definitive implants are inserted. If structural bone grafts were utilized, the stems of the prosthesis are carefully driven through the grafts, locking them into place. The final polyethylene insert is impacted, and the joint is irrigated one final time. The extensor retinaculum is meticulously repaired to prevent tendon bowstringing, and the skin is closed in a tension-free manner using non-absorbable sutures, completing the reconstructive tour de force.
Complications, Incidence Rates, and Salvage Management
Revision total ankle arthroplasty is a high-stakes endeavor, carrying a complication profile significantly higher than primary arthroplasty. Intraoperative complications are heavily skewed toward iatrogenic fractures and neurovascular injury. The fragile nature of the osteolytic malleoli makes them highly susceptible to propagation of existing fractures or the creation of new ones during implant extraction or stem reaming. Incidence of intraoperative malleolar fracture during revision T
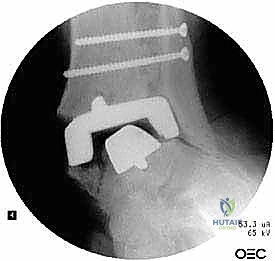
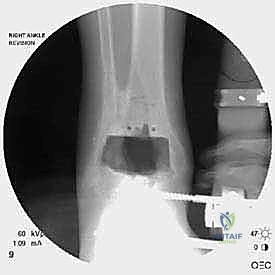
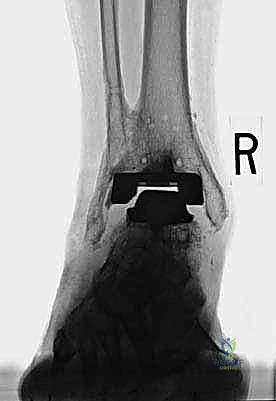
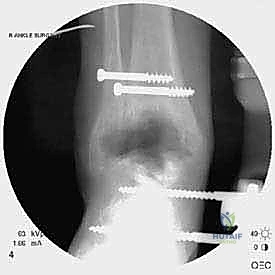
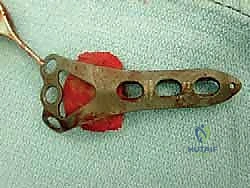
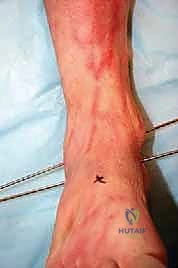
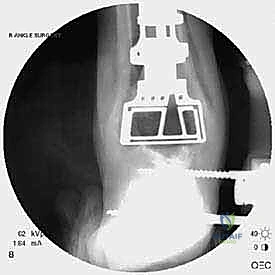
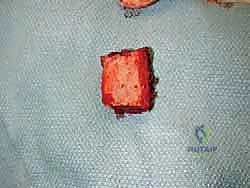
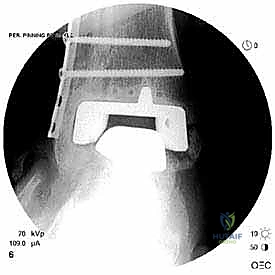
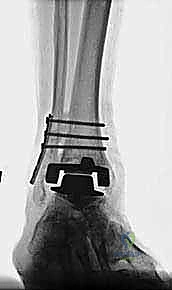
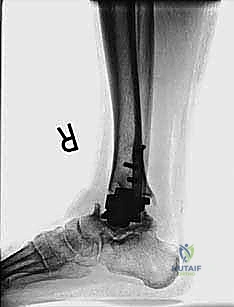
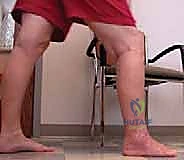
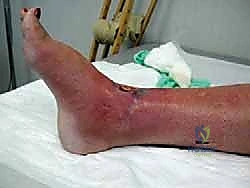
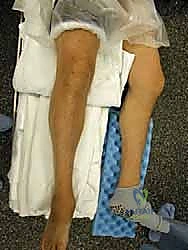
Clinical & Radiographic Imaging Archive