TNK Total Ankle Arthroplasty: An Intraoperative Masterclass for End-Stage Ankle Arthritis
Key Takeaway
This masterclass provides a granular, real-time walkthrough of TNK Total Ankle Arthroplasty for end-stage arthritis. We cover meticulous preoperative planning, precise patient positioning, and a detailed, step-by-step intraoperative execution, emphasizing critical anatomical considerations and instrument use. Fellows will gain insights into pearls, pitfalls, and comprehensive postoperative management to optimize patient outcomes.
Comprehensive Introduction and Patho-Epidemiology
The evolution of Total Ankle Arthroplasty (TAA) represents one of the most dynamic and challenging frontiers in modern orthopedic surgery. For decades, ankle arthrodesis was universally championed as the unequivocal gold standard for end-stage ankle arthritis, reliably providing pain relief at the inescapable cost of native joint kinematics and the subsequent, almost inevitable, accelerated degeneration of adjacent hindfoot articulations. Today, we are performing TAA using advanced, biomechanically optimized implants like the TNK system. This highly specialized procedure is primarily indicated for patients suffering from end-stage osteoarthritis (OA) or rheumatoid arthritis (RA) of the tibiotalar joint. The TNK system, in particular, represents a powerful surgical intervention designed not merely to alleviate debilitating pain, but to meticulously restore functional range of motion and preserve the intricate biomechanical symphony of the foot and ankle complex.
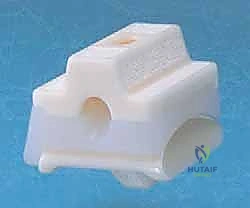
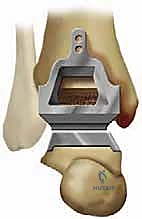
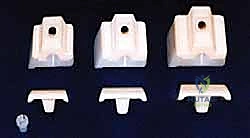
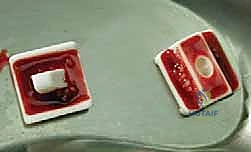
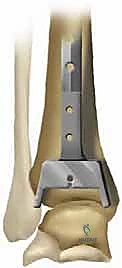
The TNK ankle is distinguished as a semi-constrained, two-component implant masterfully crafted from alumina ceramic. This material choice is not arbitrary; alumina ceramic offers exceptional wear characteristics and unparalleled biocompatibility. A defining feature of the TNK system is its proprietary alumina bead coating, engineered to provide a highly porous surface that facilitates rapid, robust, and enduring osteointegration. This cementless fixation strategy prioritizes long-term biologic incorporation over the immediate, yet potentially transient, stability of polymethylmethacrylate (PMMA) bone cement. By utilizing a semi-constrained design, the TNK prosthesis effectively balances the need for intrinsic stability—crucial in an inherently load-bearing joint with a small surface area—with the necessary degrees of freedom required to accommodate the complex, multi-axial rotational forces experienced during the human gait cycle.

Understanding the distinct patho-epidemiology of ankle arthritis is paramount for successful surgical intervention. Unlike the hip and knee, where primary, idiopathic osteoarthritis reigns supreme, the vast majority of ankle OA cases are post-traumatic in etiology. These typically stem from a history of severe malleolar fractures, recurrent ligamentous instability leading to chronic microtrauma, profound cartilage shear injuries, or subtle malunions that insidiously alter the joint's load-bearing axis over decades. This post-traumatic cohort often presents with complex, asymmetric wear patterns, frequently accompanied by significant coronal plane deformities—such as varus or valgus malalignment—which must be meticulously addressed intraoperatively to prevent catastrophic edge-loading of the prosthesis. In valgus OA cases, surgeons must maintain a high index of suspicion for concomitant severe pes planovalgus and posterior tibial tendon insufficiency, which may necessitate staged or simultaneous soft tissue and bony reconstruction to ensure a biomechanically sound foundation for the TAA.
Conversely, rheumatoid arthritis (RA) of the ankle presents a uniquely destructive inflammatory paradigm. Driven by an aggressive, proliferative synovial pannus, RA leads to symmetric joint space narrowing, profound periarticular osteopenia, and global capsuloligamentous attenuation. In these patients, the ankle is rarely affected in isolation; advanced stages frequently involve extensive hindfoot pathology, particularly devastating the talonavicular, subtalar, and calcaneocuboid joints. Patients typically present with agonizing weight-bearing pain—often most severe during the first steps of the morning—progressing to continuous pain with any arc of motion, accompanied by chronic, symmetrical joint effusion and profound stiffness. Differentiating isolated talonavicular joint involvement from true tibiotalar arthritis is a critical clinical skill, requiring careful palpation, targeted diagnostic injections, and meticulous radiographic analysis to ensure the primary pain generator is accurately targeted by the arthroplasty.
Detailed Surgical Anatomy and Biomechanics
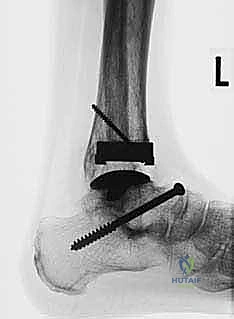
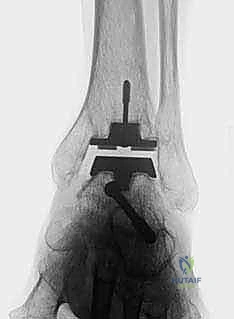
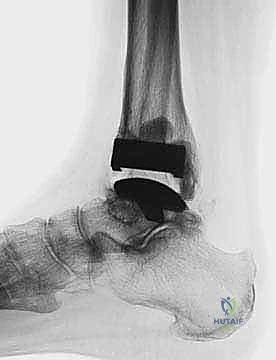
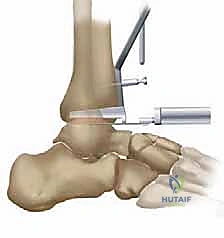
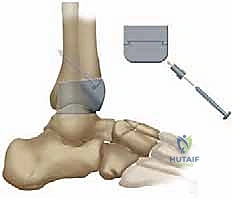
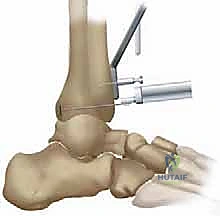
A profound, three-dimensional understanding of ankle surgical anatomy and native biomechanics is the absolute foundation upon which a successful TNK Total Ankle Arthroplasty is built. Physiologically, the native tibial plafond is not a simple orthogonal surface. In the coronal plane, it rests nearly perpendicular to the anterior longitudinal axis of the tibial shaft. However, in the sagittal plane, it exhibits a critical, naturally occurring posterior slope. The TNK tibial component is meticulously designed to replicate this native anatomy. To achieve optimal kinematics and load distribution, the tibial prosthesis must be implanted perfectly perpendicular to the anterior longitudinal axis of the tibia in the coronal plane, while deliberately incorporating a 10-degree posterior slope in the sagittal plane. Failure to recreate this slope will result in anterior impingement, restricted dorsiflexion, and accelerated component wear.

The talar component's spatial orientation is equally critical to the survivorship of the construct. Unlike the sloped tibial preparation, the talar resection and subsequent component placement must be oriented parallel to the ground, or more accurately, parallel to the plantar aspect of the weight-bearing foot. This orientation ensures that the reactive ground forces generated during the stance phase of gait are transmitted perpendicularly across the ceramic articulation. The talar dome itself is a truncated cone, wider anteriorly than posteriorly, a geometric reality that inherently dictates the ankle's stability in dorsiflexion and its relative laxity in plantarflexion. The TNK system accommodates this by providing a congruent, highly polished ceramic articular surface that allows for smooth, low-friction gliding while relying on the integrity of the medial and lateral ligamentous complexes to provide terminal restraint.
Navigating the soft tissue envelope via the standard anterior approach requires an intimate knowledge of the ankle's neurovascular topography. The anterior compartment of the lower leg transitions into the dorsum of the foot, carrying structures that are highly vulnerable during surgical exposure. The superficial peroneal nerve (SPN), with its variable medial and intermediate dorsal cutaneous branches, frequently crosses the planned incision line within the subcutaneous tissues. Deeper, the interval between the tibialis anterior (TA) tendon and the extensor hallucis longus (EHL) tendon serves as our primary surgical corridor. This specific medial orientation is highly strategic for the TNK system, which lacks a fibular resurfacing component, thereby allowing the surgeon to concentrate the exposure entirely on the anterior and medial aspects of the tibiotalar joint.
Directly beneath the extensor retinaculum lies the critical anterior neurovascular bundle, comprised of the deep peroneal nerve (DPN) and the anterior tibial artery, which transitions into the dorsalis pedis artery at the level of the joint line. As the dissection deepens, this bundle invariably comes into direct view and must be meticulously mobilized and retracted laterally. The DPN provides essential motor innervation to the extensor digitorum brevis and sensory innervation to the first web space; iatrogenic injury here can result in a devastating foot drop and painful neuromas. Retracting these structures laterally, rather than medially, utilizes the robust belly of the EHL as a protective cushion, safeguarding the delicate neurovascular structures from the aggressive retractors and oscillating saw blades required for the bony resections.
Exhaustive Indications and Contraindications
Patient selection is arguably the single most critical determinant of long-term success in Total Ankle Arthroplasty. The ideal candidate for a TNK prosthesis is an older, relatively low-demand patient suffering from end-stage, debilitating osteoarthritis or rheumatoid arthritis, who possesses a well-aligned hindfoot, competent ligamentous stabilizers, and robust bone stock. For patients with RA, systemic rheumatologic management must be optimized prior to surgical intervention. We strictly utilize Larsen’s radiographic grading scheme to stratify these patients; TAA is definitively indicated for Larsen grades 3 and 4, where joint space is severely compromised but sufficient subchondral bone remains to support the implant.
Conversely, absolute contraindications must be rigorously respected to avoid catastrophic failure. Larsen Grade 5—the mutilans-type rheumatoid arthritis characterized by profound, unrecoverable bone loss and architectural collapse—is a strict contraindication for the TNK system in our practice, as the alumina bead coating requires a viable, structurally sound cancellous bed for osteointegration. Active or recent deep infection of the ankle joint, Charcot neuroarthropathy, severe peripheral vascular disease, and profound, uncorrectable peripheral neuropathy represent absolute barriers to arthroplasty. In these scenarios, tibiotalar arthrodesis, often supplemented with robust internal fixation and orthobiologics, remains the safest and most reliable salvage pathway.
Relative contraindications require nuanced clinical judgment and often necessitate concurrent or staged procedures. Significant coronal plane deformities (varus or valgus exceeding 15 to 20 degrees) historically precluded TAA. However, with advanced techniques, these can be addressed if the surgeon is prepared to perform concomitant calcaneal osteotomies, medial or lateral ligamentous reconstructions, or Achilles tendon lengthenings to achieve a plantigrade, neutrally aligned foot. Avascular necrosis (AVN) of the talus is another highly challenging scenario; if the necrotic segment exceeds 25-30% of the talar body, the risk of component subsidence is unacceptably high, steering the decision-making matrix back toward arthrodesis or custom, stem-supported talar prostheses.
| Parameter | Indications for TNK TAA | Contraindications for TNK TAA |
|---|---|---|
| Primary Pathology | End-stage OA, Post-traumatic OA, RA (Larsen Grades 3-4) | Charcot neuroarthropathy, Active/Recent Joint Infection |
| Bone Quality | Adequate subchondral bone stock for cementless integration | Severe osteopenia, Larsen Grade 5 RA, >30% Talar AVN |
| Alignment | Neutral alignment or correctable deformity (<15 degrees) | Rigid, uncorrectable severe varus/valgus deformity |
| Soft Tissue Envelope | Intact neurovascular status, competent ligamentous restraints | Severe peripheral vascular disease, profound neuropathy |
| Patient Profile | Older, low-demand, compliant with rehabilitation | Young, high-impact laborers, elite athletes, non-compliant |
Before any surgical intervention is finalized, a comprehensive trial of nonoperative management must be exhausted and documented. For OA, this includes aggressive activity modification, custom rigid ankle-foot orthoses (AFOs) or rocker-bottom shoe modifications, targeted physical therapy, nonsteroidal anti-inflammatory drugs (NSAIDs), and judicious use of intra-articular corticosteroid or viscosupplementation injections. For RA, modern biologic disease-modifying antirheumatic drugs (DMARDs) managed by a rheumatologist are the cornerstone of care. We generally favor TAA over tibiotalar arthrodesis in patients who have bilateral ankle arthritis or concomitant severe hindfoot stiffness, as preserving sagittal motion in the tibiotalar joint significantly reduces the mechanical burden on the already compromised adjacent joints.
Pre-Operative Planning, Templating, and Patient Positioning
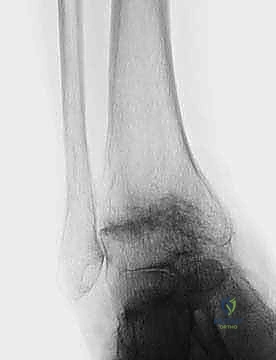
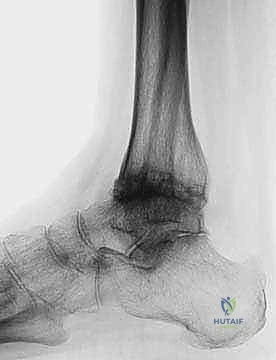
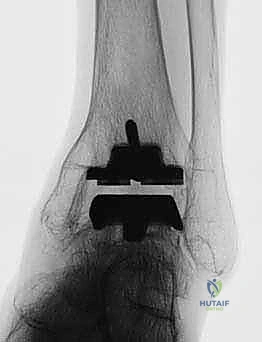
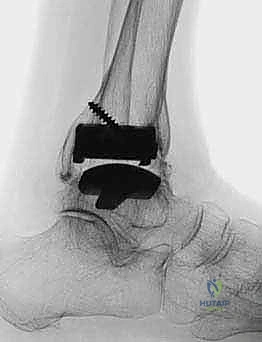
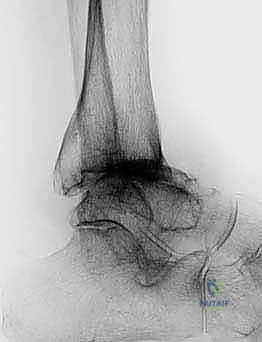
The surgical masterclass of a TNK Total Ankle Arthroplasty begins weeks before the patient enters the operating theater, rooted in exhaustive preoperative planning. Standard imaging is the first critical step. We mandate comprehensive, weight-bearing anteroposterior (AP), lateral, and mortise radiographs of the affected ankle to accurately gauge the extent of articular cartilage loss, subchondral sclerosis, and the precise degree of coronal and sagittal deformity. Crucially, we also obtain full weight-bearing radiographs of the ipsilateral foot (AP and lateral) to assess for associated foot malalignment, such as midfoot collapse, severe pes planovalgus, or cavovarus deformities, which must be factored into the overall reconstructive plan.
For complex cases—particularly those involving significant post-traumatic deformity, suspected avascular necrosis, or extensive subtalar pathology—advanced cross-sectional imaging is mandatory. High-resolution computed tomography (CT) scans with 3D reconstructions are invaluable for detecting hidden subtalar lesions, evaluating the true volumetric extent of talar cysts, and mapping the precise bony architecture. This 3D mapping allows the surgeon to anticipate areas of poor bone stock where the alumina bead coating of the TNK implant may struggle to achieve initial press-fit stability. In select, highly deformed cases, we utilize computer simulation and patient-specific instrumentation (PSI) to virtually execute the bony resections prior to the actual surgery.
Templating and component sizing are exact sciences in the TNK system. The prosthesis is available in three distinct sizes: small, medium, and large. We meticulously template the implant directly onto the preoperative, properly scaled weight-bearing lateral and AP radiographs. On the lateral view, we mark our proposed tibial resection level, aiming precisely for 8 to 15 mm above the distal tibial articular surface, while strictly incorporating the mandatory 10-degree posterior slope. The anteroposterior dimension of the tibial plafond is carefully measured to ensure the selected component will not overhang anteriorly or posteriorly, which could cause soft tissue irritation or posterior neurovascular impingement. Our overarching goal is to select the largest possible component that intimately fits the native bony anatomy, thereby maximizing the surface area for ceramic bead integration and optimizing the biomechanical load transfer.

Patient positioning in the operating room must be executed with flawless precision, as it dictates the accuracy of all subsequent jig placements. The patient is placed in a standard supine position on a radiolucent operating table. A critical maneuver is the placement of a firm bolster underneath the ipsilateral hip. This simple yet vital step prevents the natural tendency of the lower extremity to fall into excessive external rotation, ensuring a neutral, perfectly vertical alignment of the patella and tibial tubercle. A well-padded thigh tourniquet is applied and inflated prior to incision to achieve a pristine, bloodless surgical field, which is absolutely essential for identifying delicate neurovascular structures and making precise bony cuts. The foot and ankle must remain entirely free to move through a full arc of motion, and the C-arm fluoroscopy unit must be positioned to easily swing into place for orthogonal imaging, verifying jig placement and final component seating.
Step-by-Step Surgical Approach and Fixation Technique
The Anterior Approach and Exposure
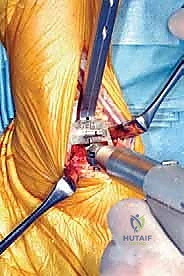
With the patient optimally positioned and the limb exsanguinated, we initiate the surgical approach. We utilize a standard, 10-cm longitudinal incision, carefully centered over the anterior aspect of the ankle joint. A #15 blade is used to make a precise skin incision, extending from approximately 5 cm proximal to the anticipated joint line, continuing distally across the joint, and terminating over the midfoot at the level of the talonavicular joint.
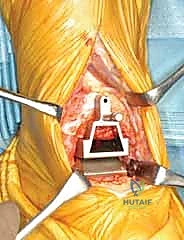
The dissection is deepened through the subcutaneous fat with meticulous hemostasis. At this superficial level, the surgeon must remain hyper-vigilant for the superficial peroneal nerve branches, which are highly variable in their course and exquisitely prone to transection or aggressive traction injury. Once the extensor retinaculum is identified, it is sharply divided in a longitudinal fashion. We specifically target the interval between the tibialis anterior (TA) tendon medially and the extensor hallucis longus (EHL) tendon laterally. This specific internervous and intertendinous corridor provides direct, centralized access to the anterior tibiotalar capsule.
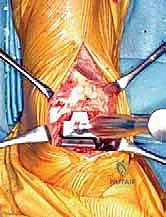
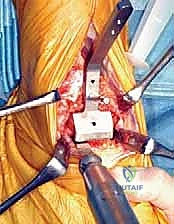
As the deep dissection progresses, the critical anterior neurovascular bundle—comprising the dorsalis pedis artery and the deep peroneal nerve—will come into direct view beneath the EHL tendon. This is a paramount juncture in the operation. Using blunt dissection, these structures must be meticulously identified, mobilized, and gently retracted to the lateral side of the working field. We utilize narrow, blunt-tipped Hohmann or Gelpi retractors to maintain this exposure, ensuring the retractors rest on bone and do not compress the nerve. Once the bundle is safely secured laterally, a formal, aggressive anterior ankle capsulotomy is performed. In patients with rheumatoid arthritis, this step is immediately followed by a comprehensive, radical synovectomy. We meticulously excise all inflamed, hypertrophic synovial tissue from the gutters and the extensor tendon sheaths, extending distally to the talonavicular joint, thereby eliminating the inflammatory burden and vastly improving intra-articular visualization.
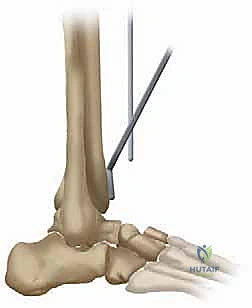
Tibial Preparation and Resection
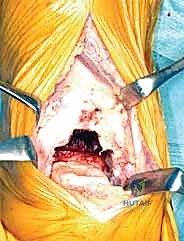
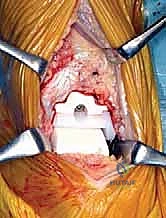
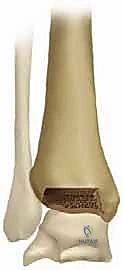
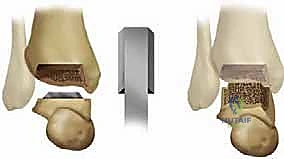
With the tibiotalar joint fully exposed, our focus shifts to the exacting preparation of the distal tibia. The first step is the radical debridement of all anterior tibiotalar osteophytes using a sharp 1/4-inch osteotome or a Leksell rongeur. Often, a massive anterior tibial osteophyte obscures the true joint line and limits dorsiflexion; its removal is critical for proper seating of the cutting guides and for restoring the native center of rotation. Once the anatomy is clearly delineated, we determine the precise tibial resection level based on our preoperative templating, aiming to preserve as much dense subchondral bone as possible while creating sufficient space for the ceramic prosthesis.
The TNK tibial
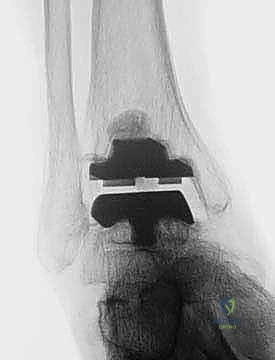
Clinical & Radiographic Imaging Archive