INBONE Total Ankle Arthroplasty: An Intraoperative Masterclass
Key Takeaway
Join us in the OR for an INBONE Total Ankle Arthroplasty masterclass. This guide offers an exhaustive, real-time walkthrough, detailing crucial anatomical landmarks, meticulous surgical techniques, and advanced strategies for deformity correction. We'll cover everything from preoperative planning and patient positioning to precise intramedullary alignment and soft tissue balancing, ensuring you gain a deep understanding of this unique system.
Comprehensive Introduction and Patho-Epidemiology
Welcome, colleagues and fellows, to the operating theater. Today, we are undertaking a complex reconstruction for end-stage ankle arthrosis utilizing the INBONE™ Total Ankle System. The evolution of total ankle arthroplasty (TAA) has been marked by significant biomechanical and engineering advancements, transitioning from early, highly constrained designs with unacceptable failure rates to modern, anatomically respectful prostheses. The INBONE™ system distinguishes itself within this modern cohort through its unique, heavily modular intramedullary referencing architecture. This design paradigm, while demanding a rigorous and unforgiving surgical technique, provides unparalleled precision in coronal and sagittal deformity correction, making it a formidable tool in the armamentarium of the reconstructive foot and ankle surgeon. Our definitive goal is the restoration of a stable, pain-free, and biomechanically functional ankle joint, and we will meticulously deconstruct every critical intraoperative step required to achieve this objective.
Before we even approach the surgical field, a profound understanding of the underlying patho-epidemiology driving the patient to our operating table is mandatory. Unlike osteoarthritis of the hip and knee, which is predominantly a primary, idiopathic degenerative process, end-stage ankle arthritis is overwhelmingly post-traumatic in etiology. A history of significant ankle trauma—ranging from severe intra-articular pilon fractures and rotational ankle fracture-dislocations to chronic lateral ligamentous instability with recurrent microtrauma—initiates a cascade of progressive articular cartilage degradation. This biomechanical insult frequently manifests as an asymmetrical wear pattern, leading to relative anterior subluxation of the talus, a progressive varus or valgus tilt within the ankle mortise, and compensatory hindfoot malalignment. Understanding this traumatic etiology is critical, as it dictates the frequent presence of retained hardware, distorted anatomical landmarks, and complex, multi-planar deformities that must be addressed concurrently with the arthroplasty.
Primary osteoarthrosis of the ankle, while it does exist, remains relatively rare and its precise pathogenesis is often poorly understood, though it may be linked to subtle, unrecognized biomechanical malalignments or genetic predispositions affecting cartilage durability. Conversely, inflammatory arthropathies present a distinctly different and highly destructive clinical picture. Conditions such as rheumatoid arthritis, hemochromatosis, or pigmented villonodular synovitis (PVNS) drive a progressive, proliferative synovial inflammation that results in aggressive erosive changes across the articular surfaces. These patients frequently present with a constellation of interrelated pathologies, including chronic posterior tibial tendinopathy, progressive valgus hindfoot collapse, eventual valgus tilt of the talus within the mortise, potential lateral malleolar stress fractures due to fibular impingement, and a compensatory forefoot varus. Other, less common etiologies leading to end-stage joint destruction include the sequelae of treated septic arthritis, hemophilic arthropathy, and carefully selected, quiescent cases of Charcot neuroarthropathy.
The clinical presentation of these patients is highly characteristic and provides critical clues for our operative planning. Patients invariably report chronic, debilitating anterior ankle pain that is exacerbated by weight-bearing activities and ambulation. They frequently describe profound ankle stiffness, particularly a marked limitation in dorsiflexion, which severely impairs their ability to navigate stairs or inclines. On physical examination, an antalgic gait is universally present, often accompanied by a compensatory external rotation of the entire lower extremity; this maneuver allows the patient to roll over the medial border of the foot, effectively bypassing the painful sagittal plane motion required for a normal toe-off. Objective findings include painful and globally restricted ankle range of motion (ROM), palpable anterior osteophytes, joint effusion, and varying degrees of coronal plane deformity. Post-traumatic cases with a history of chronic lateral instability typically exhibit a rigid varus ankle and hindfoot posture, whereas inflammatory cohorts are more likely to present with a flexible or rigid flatfoot deformity, severe valgus collapse of the ankle and hindfoot, and an associated equinus contracture.
Detailed Surgical Anatomy and Biomechanics
Navigating the surgical landscape of the anterior ankle requires an intimate and uncompromising knowledge of its complex anatomy. We are operating within an exceptionally confined anatomical corridor, bordered by critical osseous structures and heavily populated with vital neurovascular bundles that are entirely unforgiving of surgical trauma. The foundational osseous structure is the ankle mortise, a highly congruent, constrained articulation formed by the distal tibia and fibula. The tibial plafond, forming the roof of the joint, possesses a subtle but biomechanically crucial posterior slope in the sagittal plane. In the coronal plane, its articular surface typically rests at an 88 to 92-degree angle relative to the mechanical axis of the tibia. The medial malleolus extends distally to form the medial articular wall, while the fibula acts as the lateral malleolus. The fibula is not merely a stabilizing strut; it actively bears approximately one-sixth of the axial load transmitted across the ankle joint, and its precise anatomical length and rotational alignment are absolute prerequisites for the stability and longevity of any total ankle prosthesis.
The talus is a unique and structurally complex bone, functioning as the crucial intercalary segment connecting the leg to the foot. Remarkably, approximately sixty percent of its surface area is covered by hyaline cartilage, leaving limited real estate for vascular ingrowth, which renders it highly susceptible to avascular necrosis following extensive surgical dissection. The talar dome is characterized by a dual radius of curvature—a larger radius anteriorly and a smaller radius posteriorly—which dictates the complex, rolling-and-sliding kinematics of dorsiflexion and plantarflexion. The instantaneous center of rotation is not a fixed point but rather a dynamic locus that shifts throughout the arc of motion. Furthermore, the integrity of the ankle mortise is entirely dependent upon the distal tibiofibular syndesmosis. This robust fibrous joint, comprising the anterior inferior tibiofibular ligament (AITFL), the interosseous membrane, and the posterior inferior tibiofibular ligament (PITFL), must be meticulously preserved. Any iatrogenic compromise of the syndesmosis during tibial preparation will lead to catastrophic mortise widening and rapid prosthetic failure.
The anterior surgical approach mandates strict adherence to "no-touch" zones to protect the regional neurovascular structures. The Superficial Peroneal Nerve (SPN) is a primary structure of concern. It courses deep to the crural fascia before piercing it in the distal third of the leg, subsequently branching to provide sensory innervation to the dorsum of the foot. A critical surgical pearl, born of extensive clinical experience, is the recognition of a highly consistent, aberrant branch of the SPN that frequently crosses directly over, or immediately proximal to, the anterior tibiotalar joint line. This specific branch is exquisitely vulnerable during the initial superficial dissection and retractor placement; it must be definitively identified, meticulously mobilized, and gently retracted laterally. Iatrogenic injury to this nerve branch results in devastating neuropathic pain, painful neuroma formation, and distressing dorsal numbness that can overshadow an otherwise technically perfect arthroplasty.

Deeper within the surgical corridor, we encounter the primary neurovascular bundle comprising the Deep Peroneal Nerve and the Anterior Tibial Artery. This bundle courses longitudinally between the extensor hallucis longus (EHL) and the extensor digitorum longus (EDL) proximally, before crossing deep to the EHL tendon to lie between the EHL and the tibialis anterior (TA) tendon at the level of the joint. The deep peroneal nerve provides critical motor innervation to the anterior compartment musculature and sensory innervation to the first web space, while the anterior tibial artery (continuing distally as the dorsalis pedis artery) is the primary vascular supply to the anterior leg and dorsal foot. While not directly exposed in the anterior midline approach, the posterior tibial artery and its vital deltoid branch must be constantly kept in mind. The deltoid branch provides the dominant blood supply to the medial aspect of the talar body. Overly aggressive soft tissue stripping along the medial gutter or medial talar neck during deformity correction or osteophyte resection can easily compromise this precarious blood supply, precipitating devastating avascular necrosis and subsequent collapse of the talar component.
Exhaustive Indications and Contraindications
The decision to proceed with a total ankle arthroplasty, particularly utilizing a complex intramedullary system like the INBONE™, requires rigorous patient selection. The primary indication is debilitating, end-stage osteoarthritis, post-traumatic arthrosis, or inflammatory arthritis of the tibiotalar joint that has proven entirely refractory to an exhaustive course of non-operative management. This conservative regimen must have included extensive physical therapy, aggressive activity modification, the use of custom rigid ankle-foot orthoses (AFOs) or specialized footwear modifications (such as rocker-bottom soles), and judicious utilization of intra-articular corticosteroid or biologic injections. The ideal candidate is typically an older, lower-demand individual with a relatively preserved soft tissue envelope, adequate bone stock, and a well-aligned hindfoot. However, advancements in prosthetic design and surgical technique have cautiously expanded these indications to include slightly younger, more active patients who possess a strong desire to preserve joint mobility and avoid the adjacent-segment degenerative changes commonly associated with ankle arthrodesis.
Deformity management is a critical consideration when determining candidacy for the INBONE™ system. The inherent stability provided by the robust intramedullary tibial stem allows for the correction of significant coronal plane deformities that might be considered contraindications for surface-replacement prostheses. We can reliably address varus or valgus deformities approaching 15 to 20 degrees, provided that the deformity is at least partially correctable passively, and that the surgeon is prepared to perform the necessary concomitant soft tissue balancing procedures (such as deltoid release for varus, or lateral ligamentous reconstruction for valgus) and structural osseous realignments (such as calcaneal osteotomies). Sagittal plane deformities, most notably severe equinus contractures, must also be carefully evaluated. While anterior osteophyte resection and posterior capsular releases are standard components of the procedure, a rigid equinus deformity may necessitate a formal percutaneous or open tendo-Achilles lengthening to restore adequate dorsiflexion and prevent catastrophic anterior subluxation of the talar component postoperatively.
Despite these expanded capabilities, strict contraindications remain, and ignoring them invites catastrophic failure. Absolute contraindications include any evidence of active or recent deep infection within the ankle joint or surrounding soft tissues. Severe, uncorrectable malalignment of the lower extremity mechanical axis, profound peripheral vascular disease resulting in inadequate distal perfusion, and a severely compromised anterior soft tissue envelope (due to prior trauma, multiple surgeries, or severe skin conditions) absolutely preclude TAA. Charcot neuroarthropathy is generally considered an absolute contraindication due to the high risk of rapid aseptic loosening, subsidence, and periprosthetic fracture in the setting of profound neuropathy and compromised bone architecture. Furthermore, complete absence of functional motor control across the ankle joint, such as in severe paralytic conditions, renders arthroplasty futile, as active dynamic stabilization is essential for prosthetic longevity.
Relative contraindications require nuanced clinical judgment and extensive preoperative counseling. Severe osteoporosis presents a significant challenge, particularly regarding the risk of intraoperative fracture during intramedullary reaming and the long-term risk of component subsidence. Chronic immunosuppression, poorly controlled diabetes mellitus, and active, heavy tobacco use drastically increase the risks of wound dehiscence, deep infection, and delayed osseous integration. Younger patient age (typically defined as under 50 years) combined with high physical demands or a desire to return to impact sports remains a highly controversial relative contraindication. While modern prostheses are more durable, the finite lifespan of the polyethylene bearing and the risks of aseptic loosening in high-demand scenarios must be thoroughly discussed, often leading the surgeon to recommend ankle arthrodesis as a more durable, albeit motion-sacrificing, alternative in this specific demographic.
| Category | Specific Conditions | Clinical Rationale |
|---|---|---|
| Absolute Indications | End-stage osteoarthritis, post-traumatic arthritis, inflammatory arthritis | Refractory to all conservative measures; severe pain and functional limitation. |
| Absolute Contraindications | Active deep infection, severe peripheral vascular disease, inadequate soft tissue envelope, active Charcot neuroarthropathy | Unacceptable risk of catastrophic failure, non-healing wounds, or rapid prosthetic collapse. |
| Relative Contraindications | Severe osteoporosis, poorly controlled diabetes, heavy smoking, young age/high physical demand | Increased risk of subsidence, wound complications, infection, and early aseptic loosening. |
| Deformity Considerations | Coronal deformity >15-20°, severe rigid equinus | Requires extensive soft tissue balancing, osteotomies, or Achilles lengthening; pushes limits of prosthetic constraint. |
Pre-Operative Planning, Templating, and Patient Positioning
Thorough and meticulous preoperative planning is the absolute cornerstone of a successful total ankle arthroplasty, and it is particularly critical when utilizing the INBONE™ system due to its reliance on precise intramedullary referencing. The planning process begins with a comprehensive radiographic suite. High-quality, weight-bearing anteroposterior (AP), lateral, and mortise views of the affected ankle are mandatory to accurately assess the degree of joint space narrowing, map the extent and location of osteophyte formation, and evaluate the overall coronal and sagittal alignment of the tibiotalar joint. We routinely obtain identical views of the contralateral, asymptomatic ankle to serve as a patient-specific anatomical template. Furthermore, weight-bearing AP, lateral, and oblique views of the entire foot are essential to identify any concurrent hindfoot, midfoot, or forefoot deformities that could compromise the biomechanical environment of the new ankle joint. Weight-bearing AP and lateral views of the entire tibia and fibula are also routinely obtained to rule out proximal bowing or malunions that would interfere with the passage of the intramedullary alignment rod.

Advanced imaging is frequently required to refine the surgical blueprint. In cases of complex post-traumatic deformity, extensive heterotopic ossification, or ill-defined patterns of bone loss, a non-contrast Computed Tomography (CT) scan with 3D reconstructions provides invaluable, high-resolution detail of the bony architecture. This allows for precise volumetric measurement of subchondral cysts, accurate mapping of massive anterior or posterior osteophytes that require resection, and detailed assessment of the syndesmotic integrity. Magnetic Resonance Imaging (MRI) is less routinely utilized but becomes indicated if there is a high clinical suspicion of avascular necrosis involving the talar body or the distal tibial plafond. Assessing the vascularity and structural integrity of the subchondral bone is paramount, as implanting a prosthesis onto necrotic bone guarantees early, catastrophic subsidence and failure.
Preoperative templating is a non-negotiable step. Using digital templating software calibrated to the specific magnification of the radiographs, we meticulously size the anticipated talar and tibial components. For the INBONE™ system, determining the optimal diameter and length of the modular tibial stem is critical. The stem must be robust enough to provide rigid fixation and resist subsidence, yet sized appropriately to avoid cortical impingement or iatrogenic fracture during insertion. We also template the anticipated level of the tibial and talar bone resections to ensure adequate space for the polyethylene bearing while preserving sufficient bone stock for component support. This templating process forces the surgeon to anticipate the necessary depth of resection and to pre-plan the sequence of any required ancillary procedures, such as a medial displacement calcaneal osteotomy for a varus hindfoot or a Cotton osteotomy for a residual forefoot varus.
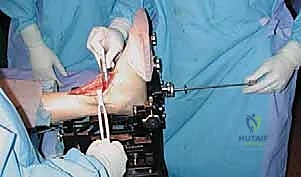
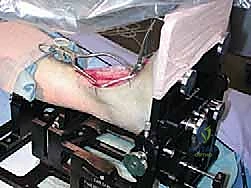
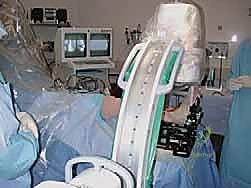
Operating room setup and patient positioning demand obsessive attention to detail, as any deviation can severely compromise the accuracy of the intramedullary referencing guides. The patient is positioned supine on a radiolucent operating table. It is absolutely critical that the plantar aspect of the operative foot is positioned at the very distal edge of the table. This specific positioning allows for unimpeded, full range of motion of the ankle and provides the necessary clearance for the attachment and manipulation of the bulky INBONE™ leg holder and alignment frame. A substantial bolster is placed securely under the ipsilateral hip to neutralize the natural tendency for external rotation of the lower extremity, ensuring that the patella and the foot are perfectly aligned and directed vertically towards the ceiling. A large, high-powered fluoroscopic C-arm is an absolute necessity; a mini C-arm is entirely inadequate for this procedure. The fluoroscopy unit must be capable of straddling the operative leg and the complex alignment frame, allowing for unobstructed imaging in both the AP and lateral planes throughout the entirety of the procedure.
Step-by-Step Surgical Approach and Fixation Technique
Alright, team, the planning is complete, the patient is optimally positioned, and the equipment is verified. Let us proceed with the surgical execution. Meticulous technique, respect for the soft tissues, and precise osseous preparation are paramount.
The Anterior Corridor and Soft Tissue Dissection
We utilize a standard, extensile anterior approach to access the tibiotalar joint. The incision must be precise and respectful of the tenuous anterior vascularity.
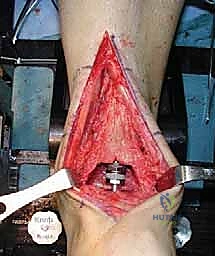
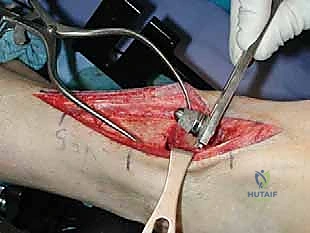
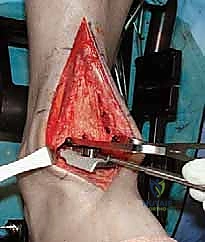
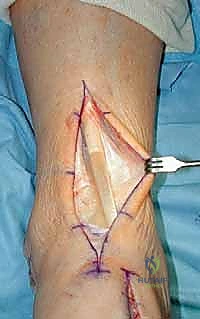
"Scalpel, please. We will make a longitudinal, midline incision over the anterior aspect of the ankle. We begin approximately 10 centimeters proximal to the tibiotalar joint line, positioned about 1 centimeter lateral to the palpable crest of the tibia, and extend the incision distally, crossing the joint line, to terminate just beyond the talonavicular joint." This generous length is not arbitrary; it is absolutely necessary to provide adequate exposure for the bulky cutting guides and to allow for tension-free retraction of the delicate skin edges. Under no circumstances should direct, forceful tension be applied to the skin margins with rakes or sharp retractors. We must rapidly develop full-thickness fasciocutaneous flaps to minimize the risk of marginal skin necrosis, a complication that can rapidly evolve into a limb-threatening deep space infection.

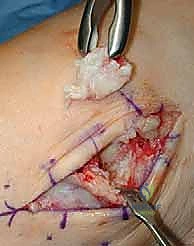
As we deepen the dissection through the subcutaneous adipose tissue, extreme vigilance is required. "Let us carefully dissect through the subcutaneous layer. We must immediately identify and protect the superficial peroneal nerve. Dr. Smith, please gently retract the nerve and its branches laterally using a blunt Senn retractor." As previously emphasized, we must actively search for the aberrant branch of the SPN that frequently crosses the surgical field directly over the joint capsule. Once the superficial nerves are secured, we expose the deep crural fascia and the extensor retinaculum. "Identify the course of the extensor hallucis longus (EHL) tendon. We will sharply divide the retinaculum directly over the EHL tendon." We purposefully avoid opening the dedicated sheath of the tibialis anterior (TA) tendon whenever anatomically possible. Preserving the TA retinaculum prevents postoperative bowstringing of the tendon and, crucially, provides a robust layer of vascularized tissue between the tendon and the skin closure, mitigating the risk of tendon exposure in the event of superficial wound dehiscence.
TECH FIG 1 • In this case there is no separate sheath for the tibialis anterior (TA) tendon. Nonetheless, the retinaculum was opened lateral to the tendon, and upon closure the TA will not be immediately up against the suture line.
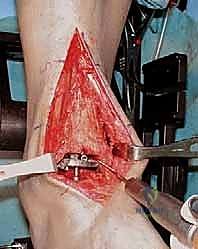
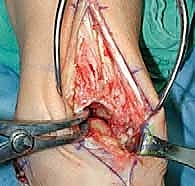
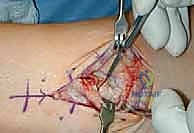
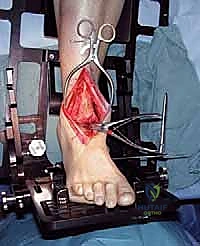
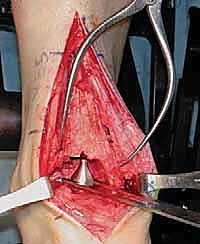
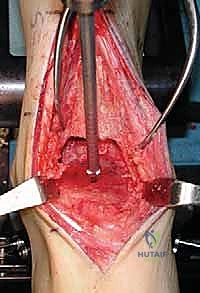
We now enter the deep surgical interval between the TA tendon medially and the EHL tendon laterally. The deep neurovascular bundle (anterior tibial artery and deep peroneal nerve) is identified deep to the EHL. This entire bundle must be meticulously mobilized and retracted laterally along with the EHL and EDL tendons. "Carefully sweep the neurovascular bundle laterally. We must maintain direct visualization of the artery to ensure it is not compromised by our retractors." With the neurovascular bundle safely out of the field, we expose the anterior capsule of the ankle joint. A rigorous anterior capsulotomy is performed, excising the thickened, fibrotic capsule to expose the underlying tibiotalar articulation. "We must now perform a comprehensive anterior exostectomy. Use the rongeur and the small oscillating saw to resect the massive anterior tibial and talar osteophytes." This step is critical not only to restore the native joint line and improve dorsiflexion but also to ensure that our cutting guides sit flush against the true anatomical cortex of the tibia and talus, rather than resting on distorted osteophytic bone.
Intramedullary Referencing and Tibial Preparation
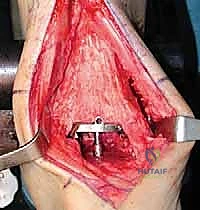
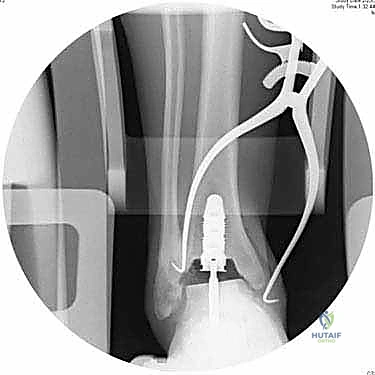
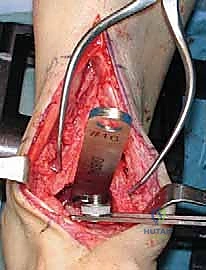
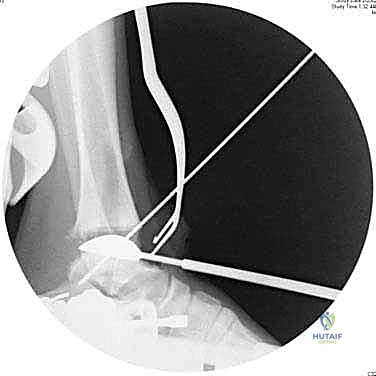
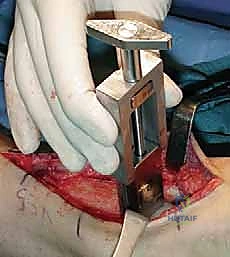
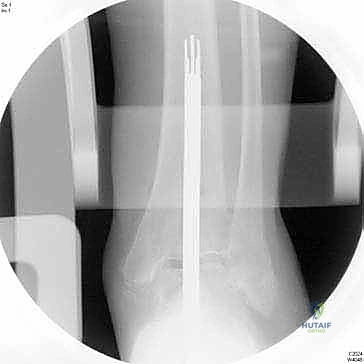
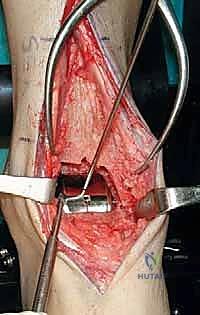
With the joint adequately exposed and the osteophytes cleared, we transition to the defining phase of the INBONE™ procedure: intramedullary referencing. The specialized INBONE™ leg holder is securely attached to the patient's foot and calf. This frame must be rigidly stabilized, as it serves as the foundational reference point for all subsequent bone cuts. "Let us assemble the alignment frame. Ensure the foot is perfectly plantigrade and the heel is firmly seated within the heel cup." Once the frame is secured, we identify the optimal entry point for the tibial intramedullary canal, typically located just posterior to the anterior tibial cortex, centered over the talar dome. A starter hole is created, and the flexible intramedullary reamers are sequentially passed up the tibial canal to determine the anatomical axis.
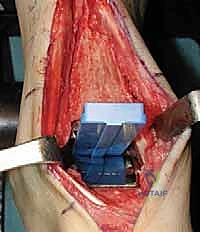
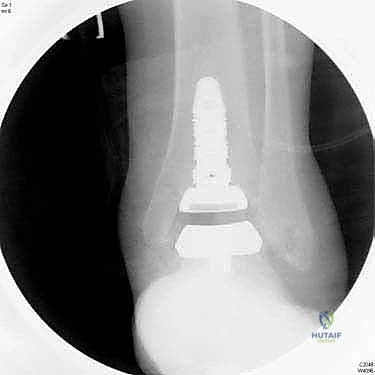
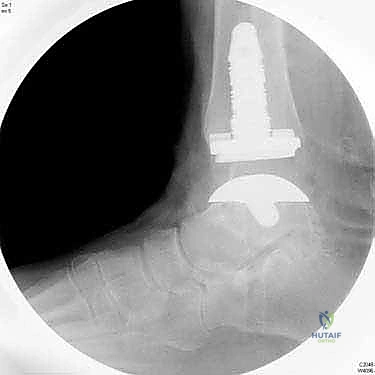
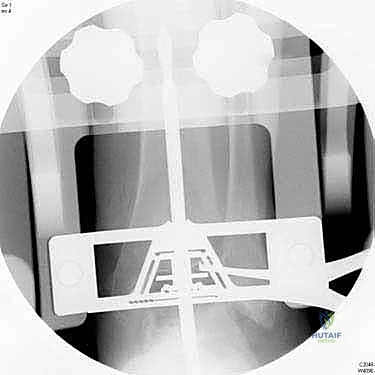
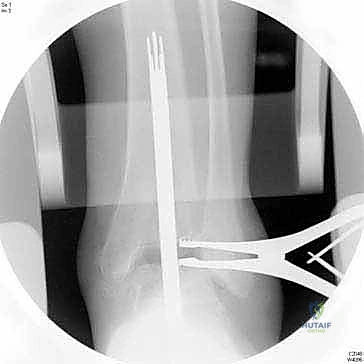
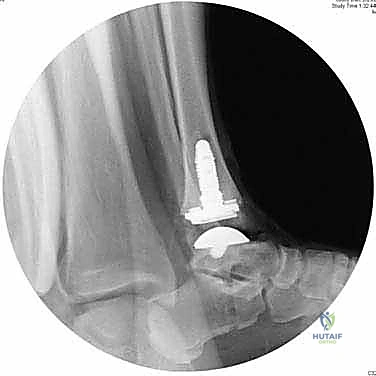
The intramedullary alignment rod is then inserted. This rod dictates the coronal and sagittal alignment of the tibial cutting block. "Fluoroscopy, please. Let's verify the position of the IM rod in both the AP and lateral planes." The rod must be perfectly centered within the tibial canal to ensure a neutral mechanical axis. Based on the preoperative templating and the intraoperative position of the IM rod, the tibial cutting block is attached to the alignment frame and lowered onto the anterior tibia. The block is meticulously adjusted to dictate the precise depth of resection and the degree of posterior slope (typically matching the patient's native anatomy or set to a neutral 0-degree slope depending on the specific INBONE™ iteration being utilized). Once the position is radiographically confirmed as perfect, the cutting block is rigidly pinned to the anterior tibia using smooth Steinmann pins.
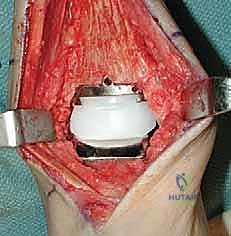
"Saw, please. We will now execute the tibial resection." Utilizing a wide oscillating saw blade, the tibial plafond is resected through the slots in the cutting guide. Extreme caution must be exercised to protect the medial and lateral gutters. "Do not plunge the saw
Clinical & Radiographic Imaging Archive