
Comprehensive Introduction and Patho-Epidemiology
Welcome to the operating theater, colleagues. Today, we are undertaking a profoundly challenging and limb-saving procedure: an axial screw arthrodesis for the reconstruction of a Charcot midfoot deformity. This intervention extends far beyond the mere mechanical application of orthopedic hardware. It requires a profound, nuanced understanding of the unique pathophysiology of Charcot neuroarthropathy, meticulous preoperative planning, and uncompromising precision in execution. Our ultimate objective is to salvage a functional, plantigrade, and braceable limb in a patient whose physiology is fundamentally compromised by sensory deprivation, profound autonomic dysfunction, and severely degraded osteoclast-mediated bone quality.
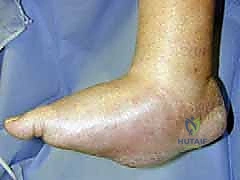
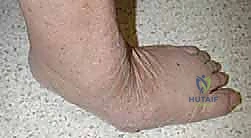
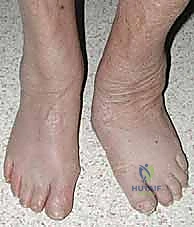
Before we even contemplate making our primary incisions, it is absolutely imperative that we internalize the aggressive, destructive nature of the Charcot foot. This progressive arthropathy manifests almost exclusively in patients afflicted with profound peripheral neuropathy, the most prevalent etiology globally being long-standing, poorly controlled diabetes mellitus. The catastrophic loss of protective sensation, operating in tandem with repetitive, unrecognized microtrauma during the gait cycle, precipitates a cascade of bony dissolution, periarticular fragmentation, and eventual gross architectural collapse. Left unchecked, this relentless progression reliably culminates in the classic "rocker-bottom" foot deformity, predisposing the patient to intractable plantar ulceration, deep soft tissue infection, osteomyelitis, and ultimately, major limb amputation.
The Pathophysiology of Charcot Neuroarthropathy
The underlying pathogenesis of Charcot neuroarthropathy is notoriously multifaceted, driven by a synergistic combination of neurotraumatic and neurovascular theories. The neurotraumatic theory posits that the profound loss of protective proprioception and nociception allows the patient to subject their foot to repetitive mechanical stresses that would ordinarily elicit a protective pain response. Over time, these cumulative microfractures and ligamentous attenuations lead to massive joint instability. Conversely, the neurovascular theory emphasizes the role of autonomic neuropathy. The loss of sympathetic vasomotor control induces a state of chronic, localized hyperemia. This neurally mediated increase in peripheral blood flow actively stimulates osteoclastic bone resorption, dramatically weakening the osseous architecture and rendering the midfoot highly susceptible to catastrophic structural failure under normal physiological loads.
Motor neuropathy further exacerbates this destructive cycle by inducing profound intrinsic muscle imbalance. The loss of motor innervation to the intrinsic musculature of the foot, coupled with the unopposed pull of the extrinsic leg musculature, frequently results in a rigid equinus contracture of the ankle complex. This equinus deformity acts as a biomechanical multiplier, drastically increasing the focal pressures exerted across the forefoot and midfoot during the stance phase of gait. This abnormal force vector directly contributes to the breakdown of the tarsometatarsal (TMT) and intercuneiform joints. Concurrently, intrinsic muscle wasting leads to dynamic clawing of the hallux and lesser digits, further distalizing the plantar pressure distribution and compounding the risk of ulceration.
Autonomic dysfunction also ravages the integumentary system. The loss of sudomotor function results in profoundly dry, anhidrotic, and hyperkeratotic skin, which is highly prone to fissuring. These fissures critically compromise the skin's barrier function, providing a direct portal of entry for opportunistic pathogens. Furthermore, the absence of vasomotor tone contributes to chronic dependent edema and venous stasis, creating a hostile local environment that severely impedes wound healing and exponentially increases the risk of postoperative surgical site infections. Because this entire destructive process is characteristically painless, patients frequently present to our clinics in the late stages of the disease, exhibiting massive soft tissue swelling, gross clinical deformity, and deep, potentially limb-threatening ulcerations.
Eichenholz Staging and Clinical Progression
To effectively navigate the surgical decision-making process, we must rigorously apply the Eichenholz staging system, which remains the gold standard for classifying the clinical and radiographic progression of Charcot neuroarthropathy. Stage I, the Developmental or Inflammatory phase, is characterized clinically by a hyperemic, profoundly swollen, and erythematous foot that mimics acute cellulitis or deep infection. Radiographically, this stage is defined by active bony dissolution, periarticular debris formation, subluxation, and frank dislocation. Operating during the acute inflammatory zenith of Stage I is historically fraught with high complication rates, including massive hardware failure and wound dehiscence, due to the hyperemic, osteopenic nature of the bone.
Stage II, the Coalescence phase, marks the beginning of the reparative process. Clinically, the profound edema, erythema, and local calor begin to slowly subside. Radiographically, we observe the absorption of fine osseous debris, the fusion of larger fracture fragments, and the early stages of sclerosis. This represents a transitional phase where the foot is becoming less volatile, but the structural deformity remains highly unstable. Surgical intervention may be considered during this phase if the deformity is rapidly progressing despite rigorous offloading, but extreme caution must be exercised regarding the timing and the robustness of the chosen fixation construct.
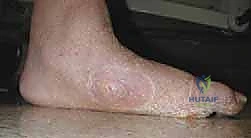
Stage III, the Consolidation or Remodeling phase, represents the end-stage of the disease process. The inflammatory signs have completely resolved, and the foot is clinically quiescent. Radiographically, there is definitive osseous consolidation, remodeling of fracture fragments, and rounding of bone margins. However, this consolidation often occurs in a state of severe malalignment, resulting in a rigid, non-plantigrade foot with prominent bony exostoses—most commonly at the plantar-medial aspect of the midfoot. Patients presenting in Stage III with a stable but unbraceable deformity, or those with recurrent ulcerations overlying a rigid bony prominence, are prime candidates for the corrective arthrodesis techniques we will discuss today.
Detailed Surgical Anatomy and Biomechanics
Fellows, a meticulous, three-dimensional understanding of midfoot osteology and its associated neurovascular topography is absolutely paramount. Ignorance of these anatomical relationships will invariably lead to catastrophic iatrogenic injury, massive intraoperative hemorrhage, or the creation of a biomechanically inferior construct doomed to early failure. The midfoot is not merely a collection of bones; it is a highly complex, load-bearing arch system that relies on specific columnar integrity to translate forces from the hindfoot to the forefoot during the gait cycle.
Osteology and Columnar Theory of the Midfoot
The midfoot is conceptually divided into three distinct longitudinal columns, a biomechanical model that dictates our surgical reconstruction strategy. The Medial Column, comprised of the navicular, the medial cuneiform, and the first metatarsal, is the primary load-bearing axis of the medial longitudinal arch. It is highly mobile and essential for shock absorption and terrain adaptation. The Middle Column, consisting of the intermediate and lateral cuneiforms along with the second and third metatarsals, is the rigid, stabilizing core of the foot. The base of the second metatarsal is recessed proximally between the medial and lateral cuneiforms, acting as the anatomical "keystone" of the Lisfranc complex. The Lateral Column, formed by the cuboid and the fourth and fifth metatarsals, is highly mobile and accommodates uneven surfaces during the stance phase.
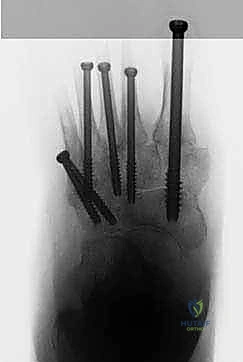
Charcot fracture-dislocations most frequently target the tarsometatarsal (Lisfranc) joints and the transverse tarsal (Chopart) joints. The pattern of destruction often involves a combination of ligamentous failure and periarticular fragmentation, leading to the collapse of the medial longitudinal arch and the creation of a midfoot "break." When executing an axial screw arthrodesis, our primary biomechanical objective is to span these zones of massive bony dissolution. We must anchor our fixation in the relatively preserved, structurally sound bone located proximal (e.g., the talus or navicular) and distal (e.g., the metatarsal shafts) to the primary zone of Charcot destruction, effectively "beaming" the compromised midfoot to restore the columnar architecture.
Critical Neurovascular Corridors
The dorsal aspect of the foot, which serves as our primary surgical corridor for midfoot reconstruction, is a veritable minefield of critical neurovascular structures that demand constant vigilance. The dorsalis pedis artery, the direct distal continuation of the anterior tibial artery, courses distally from the anterior ankle joint. It typically resides in the interval between the extensor hallucis longus (EHL) and the extensor digitorum longus (EDL) tendons, crossing directly over the navicular and middle cuneiform before diving into the first intermetatarsal space. In our diabetic patient population, preserving this vessel is non-negotiable, as it is often a primary source of collateral perfusion to the compromised forefoot.
Accompanying the dorsalis pedis artery is the deep peroneal nerve. This nerve provides critical sensory innervation to the first web space and essential motor innervation to the extensor digitorum brevis muscle. Iatrogenic injury to this nerve during deep dissection or retractor placement can result in painful neuromas or further sensory degradation. More superficially, the superficial peroneal nerve bifurcates into the medial and intermediate dorsal cutaneous nerves. These branches exhibit immense anatomical variability and course directly through the subcutaneous tissues of the dorsal midfoot. They are exceptionally vulnerable during our initial skin incisions and superficial dissection; aggressive retraction can easily cause traction neurapraxia or frank transection.
Furthermore, the dorsal venous arch presents a significant intraoperative challenge. These superficial, thin-walled veins can be a source of profound, obscuring hemorrhage if not meticulously identified, isolated, and ligated or cauterized early in the procedure. In the setting of Charcot neuroarthropathy, where autonomic dysfunction already predisposes the limb to extreme venous stasis and edema, failure to achieve immaculate hemostasis will severely compromise visualization and drastically increase the risk of postoperative hematoma formation, which serves as an ideal culture medium for deep infection.
Muscular Intervals and Tendon Balancing
Navigating the muscular and tendinous anatomy is crucial not only for exposure but also for restoring the dynamic balance of the foot post-reconstruction. The tibialis anterior tendon, the primary dorsiflexor of the ankle, inserts robustly onto the medial aspect of the medial cuneiform and the plantar-medial base of the first metatarsal. In severe medial column Charcot collapse, this insertion site is frequently involved in the fragmentation or is completely dislocated. If the tendon is attached to an unsalvageable bone fragment, it must be meticulously detached, tagged with a heavy non-absorbable suture, and formally reattached to the reconstructed medial column to prevent a catastrophic postoperative drop foot or dynamic supination deformity.
The tibialis posterior tendon, the primary dynamic stabilizer of the medial longitudinal arch, possesses a broad, complex insertion footprint encompassing the navicular tuberosity, all three cuneiforms, the cuboid, and the bases of the second, third, and fourth metatarsals. While we rarely need to detach this tendon during a dorsal midfoot approach, its integrity must be assessed, as its failure is often a primary catalyst in the initial collapse of the arch. The extensor tendons (EHL and EDL) serve as our primary anatomical landmarks for defining our dorsal surgical intervals. They must be gently mobilized and retracted using blunt instruments (like Penrose drains or smooth vessel loops) to avoid crushing the tendon substance or stripping its paratenon, which could lead to severe postoperative adhesions.
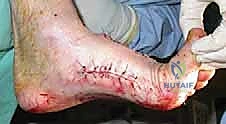
Surgical Warning: In the Charcot patient, bone quality is universally poor—often resembling wet cardboard or soft butter—and the surrounding soft tissues are profoundly friable and ischemic. Meticulous, atraumatic, "no-touch" dissection techniques are paramount. Aggressive retraction or careless handling of the soft tissue envelope will inevitably precipitate devastating wound necrosis, hardware exposure, and subsequent deep infection, rapidly transforming a reconstructive triumph into an amputation.
Exhaustive Indications and Contraindications
The decision to proceed with major operative reconstruction in a Charcot patient is arguably one of the most complex judgments in orthopedic surgery. We must carefully balance the severe risks of major surgery in a medically compromised host against the natural history of the disease, which frequently leads to amputation if left untreated. Surgery is never indicated simply to correct a radiographic abnormality; it is indicated to salvage a limb that is functionally failing.
Patient Selection Criteria
The primary goal of non-operative management—utilizing total contact casting (TCC) or specialized Charcot Restraint Orthotic Walkers (CROW)—is to achieve a stable, plantigrade foot that can be accommodated in custom footwear. When this non-operative paradigm fails, surgical intervention becomes necessary. The absolute indications for axial screw midfoot arthrodesis include progressive, severe deformity that renders the foot structurally unbraceable. If the skeletal architecture has collapsed to the point where no orthotic can prevent skin breakdown, surgical realignment is mandatory.
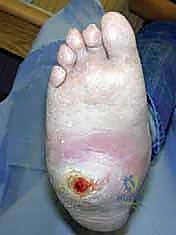
Recurrent, recalcitrant plantar ulcerations that fail to heal despite rigorous offloading and optimal wound care are a critical indication for surgery. These ulcerations are almost invariably caused by underlying bony prominences—typically the collapsed cuboid laterally or the dislocated medial cuneiform medially. If we do not surgically resect the exostosis and realign the skeletal columns to distribute plantar pressures evenly, the ulcer will inevitably recur, eventually leading to deep osteomyelitis. Furthermore, acute, highly unstable fracture-dislocations of the midfoot (often seen following minor trauma in a neuropathic patient) require prompt surgical stabilization to prevent rapid, catastrophic progression to a rocker-bottom deformity.

Finally, gross clinical instability on physical examination is an indication for fusion. If the midfoot segments demonstrate abnormal, multidirectional motion under stress, the limb cannot effectively bear weight. This instability will lead to rapid destruction of adjacent joints and soft tissues. In these scenarios, the application of "superconstruct" principles—utilizing fixation that spans far beyond the zone of injury and utilizes the strongest available hardware—is required to achieve a rigid, durable arthrodesis.
Absolute and Relative Contraindications
It is equally critical to recognize when not to operate. Proceeding with major internal fixation in the presence of specific contraindications is a guaranteed pathway to failure.
| Contraindication Type | Specific Condition | Rationale and Management Strategy |
|---|---|---|
| Absolute | Active Deep Infection / Osteomyelitis | Hardware placement in an infected bed guarantees chronic biofilm formation. Infection must be eradicated first via aggressive debridement, antibiotic spacers, and IV antibiotics. |
| Absolute | Severe Peripheral Arterial Disease (PAD) | Inadequate perfusion will result in massive wound necrosis and failure of bone healing. ABI < 0.5 or TcPO2 < 30 mmHg requires prior vascular bypass or endovascular intervention. |
| Absolute | Medically Unstable Patient | Recent myocardial infarction, uncontrolled sepsis, or severe diabetic ketoacidosis. Life over limb. The patient must be medically optimized by an internist prior to elective reconstruction. |
| Relative | Acute Eichenholz Stage I (Inflammatory) | Hyperemic, osteopenic bone holds hardware poorly. High risk of construct failure. Preferable to utilize TCC until transitioning to Stage II/III, unless facing an acute, reducible fracture-dislocation. |
| Relative | Profound Malnutrition / Immunosuppression | Poor healing potential. Optimize albumin, prealbumin, and vitamin D levels. Adjust immunosuppressive regimens (e.g., in transplant patients) in consultation with their primary specialists. |
| Relative | Active Venous Stasis Ulcerations | High risk of surgical site infection due to compromised local integument. Aggressive compression therapy and wound care must be instituted to heal the skin envelope prior to incision. |
Pre-Operative Planning, Templating, and Patient Positioning
Fellows, I cannot overstate this: the battle is frequently won or lost before the patient even enters the operating room. The complexity of Charcot reconstruction demands an exhaustive, highly detailed preoperative blueprint. We must anticipate every anatomical distortion and have a clear, step-by-step plan for hardware placement, as intraoperative improvisation in these cases is highly perilous.
Advanced Imaging and Pre-Operative Templating
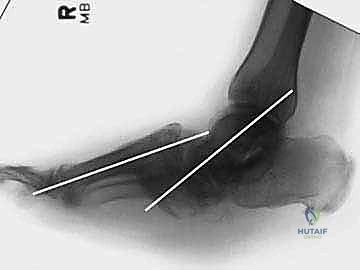
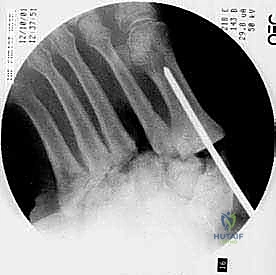
Standard weight-bearing anteroposterior, lateral, and oblique radiographs are our baseline, but they are grossly insufficient for complex surgical planning. They provide a two-dimensional representation of a profound three-dimensional deformity. We rely heavily on high-resolution Computed Tomography (CT) scans with 3D reconstructions. The CT scan allows us to meticulously map the extent of bony fragmentation, identify hidden areas of osteolysis, and precisely determine the location of the rigid bony prominences that are driving ulceration. Crucially, it allows us to identify the zones of "good bone" proximal and distal to the destruction, which will serve as our anchor points for the axial screws.
If there is any clinical suspicion of underlying infection—particularly in the presence of a chronic ulcer—advanced nuclear imaging or Magnetic Resonance Imaging (MRI) is mandatory. While MRI can be confounded by the severe marrow edema inherent to Charcot neuroarthropathy, the presence of rim-enhancing fluid collections, sinus tracts, or cortical disruption highly correlates with osteomyelitis. In ambiguous cases, a dual-isotope Indium-111 labeled white blood cell (WBC) scan combined with a Technetium-99m bone marrow scan remains the most specific modality for differentiating sterile neuropathic osteoarthropathy from active osteomyelitis.
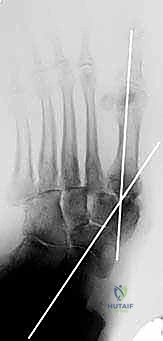
Once the imaging is acquired, rigorous digital templating is performed. We must pre-select our hardware. For the axial screw technique, we utilize large-bore, solid or cannulated screws designed to function as internal beams. For the robust medial column (targeting the talus to the first metatarsal), we template for 6.5mm, 7.0mm, or 8.0mm screws. For the lesser rays of the middle and lateral columns, 4.5mm or 5.5mm screws are typically selected. We must ensure a vast inventory of screw lengths is available in the OR, often ranging from 60mm to 120mm, as we are spanning multiple joint complexes.
Medical Optimization and Surgical Timing
The diabetic patient presenting for Charcot reconstruction is inherently medically complex. A multidisciplinary approach is not optional; it is a prerequisite for success. We mandate tight glycemic control, aiming for a preoperative Hemoglobin A1c of less than 7.5% to 8.0%. Elevated A1c levels are directly correlated with impaired leukocyte function, compromised wound healing, and a dramatically increased risk of postoperative surgical site infections. Nutritional status is assessed via serum albumin and prealbumin; malnutrition must be aggressively corrected with dietary supplementation prior to elective surgery.
Vascular optimization is equally critical. Every patient must undergo rigorous non-invasive vascular testing, including Ankle-Brachial Indices (ABI), toe pressures, and Transcutaneous Oxygen Pressures (TcPO2). A TcPO2 of less than 30 mmHg or an ABI of less than 0.5 indicates severe ischemia that will likely preclude wound healing. In such cases, a formal consultation with vascular surgery is obtained for potential lower extremity revascularization (bypass or angioplasty) prior to our orthopedic intervention.
The timing of the surgery is dictated by the Eichenholz stage. While acute, highly unstable fracture-dislocations may require early intervention, we generally prefer to delay major reconstructive arthrodesis until the patient has transitioned out of the acute inflammatory phase (Stage I) and into the coalescence or consolidation phases (Stages II/III). Operating during the hyperemic phase is technically treacherous due to massive hemorrhage and the inability of the softened bone to hold hardware. We utilize total contact casting to immobilize the limb, reduce edema, and allow the bone to consolidate before attempting definitive internal fixation.
Patient Positioning and Operating Room Setup
Positioning must facilitate unhindered access to the entire foot and ankle while optimizing intraoperative fluoroscopy. The patient is positioned supine on a radiolucent operating table. A significant gel bump is placed under the ipsilateral hemipelvis. This maneuver internally rotates the lower extremity, neutralizing the natural external rotation of the hip and bringing the patella and toes to point directly toward the ceiling. This crucial adjustment ensures that our true AP and lateral fluoroscopic views are orthogonal, which is vital for precise guidewire and screw trajectory.
A well-padded pneumatic tourniquet is applied to the proximal thigh. However, in patients with severe peripheral arterial disease or heavily calcified vessels, tourniquet use may be contraindicated due to the risk of inducing acute ischemia or plaque rupture. If utilized, it is typically inflated to 250-300 mmHg only after the initial soft tissue releases (such as the Achilles lengthening) have been performed, ensuring a bloodless field for the meticulous deep dissection required in the midfoot.
The entire lower extremity is prepped and draped in a sterile fashion from the mid-thigh down to the toes. We utilize a sterile stockinette and an extremity drape to allow for full, unrestricted manipulation of the knee, ankle, and foot during the procedure. The fluoroscopy unit (C-arm) is positioned on the contralateral side of the table, draped sterilely, and brought in directly over the operative field. The monitor must be positioned in the direct line of sight of the primary surgeon.
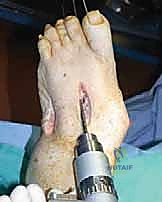
Step-by-Step Surgical Approach and Fixation Technique
Alright, team, the patient is prepped, the plan is set. We will now execute the axial screw technique. This procedure demands patience, respect for the compromised soft tissues, and a relentless pursuit of biomechanical stability.
Equinus Correction and Soft Tissue Releases
Before we address the midfoot deformity, we must neutralize the deforming forces acting upon it. The most significant of these is the profound equinus contracture driven by the Achilles tendon. Failure to correct this contracture will leave a massive plantarflexion moment acting across our newly reconstructed midfoot, virtually guaranteeing hardware breakage or nonunion. Therefore, a Tendo-Achilles Lengthening (TAL) or a formal gastroc-soleus recession is the mandatory first step of this operation.
For severe, rigid contractures, we perform a percutaneous triple hemisection TAL. With the knee extended and the ankle held in maximal dorsiflexion to place the tendon under tension, we make our first stab incision medially, approximately 4 cm proximal to the calcaneal insertion, transecting the medial half of the tendon. The second cut is made laterally, 2-3 cm proximal to the first, transecting the lateral half. The final cut is made medially, another 2-3 cm proximal. Upon the third cut, a palpable "give" is felt as the tendon fibers slide and lengthen. We must achieve a minimum of 10 to 15 degrees of passive dorsiflexion beyond neutral. If the contracture is primarily isolated to the gastrocnemius, an open Strayer or Baumann recession may be preferred to preserve soleus power.
Surgical Approaches for Midfoot Exposure
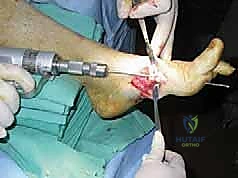
With the equinus corrected, we inflate the tourniquet and turn our attention to the midfoot. We typically employ a two-incision dorsal approach to access the medial and middle columns simultaneously while preserving a wide skin bridge to prevent necrosis.
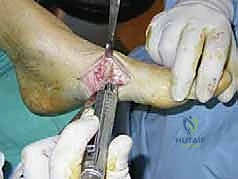
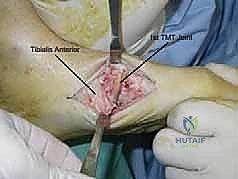
The medial incision is centered over the first TMT joint, extending proximally to the navicular and distally along the shaft of the first metatarsal. We incise the skin and carefully bluntly dissect through the subcutaneous tissues, meticulously identifying and retracting the medial branch of the superficial peroneal nerve and the saphenous vein. We perform a subperiosteal dissection to expose the medial cuneiform and the base of the first metatarsal. The insertion of the tibialis anterior is identified; if it is attached to a non-viable fragment, it is released and tagged for later repair.
The central dorsal incision is placed in the interval between the second and third metatarsals, extending proximally over the intermediate and lateral cuneiforms. Here, the dissection is more perilous. We must carefully identify the EHL and EDL tendons and retract them. Deep to the tendons, we must isolate and protect the dorsalis pedis artery and the deep peroneal nerve, typically retracting them laterally with a vessel loop. This exposes the complex articulation of the middle column, including the critical keystone of the second metatarsal base. The soft tissues in these patients are often thickened and scarred; sharp, precise dissection with a #15 blade and fine periosteal elevators is essential.
Joint Preparation and Deformity Correction
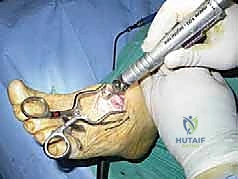
The hallmark of Charcot arthropathy is the presence of dense, sclerotic, avascular bone interspersed with areas of profound osteolysis and fibrous tissue. To achieve arthrodesis, we must aggressively resect this pathological tissue until we reach healthy, bleeding, cancellous bone. Using a combination of osteotomes, rongeurs, and high-speed burrs, we systematically debride the TMT and intercuneiform joints. We must remove all cartilage, fibrous debris, and sclerotic endplates.
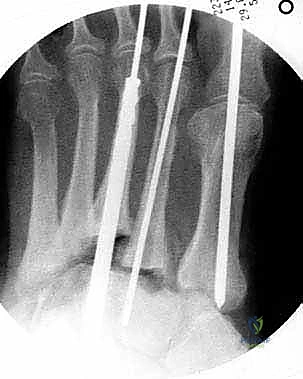
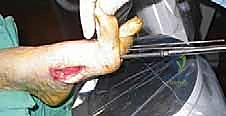
Once the joints are adequately prepared, we must reduce the deformity. This is often the most physically demanding portion of the case. The classic Charcot deformity involves a dorsal subluxation of the midfoot with a plantarflexed forefoot, creating the rocker-bottom prominence. We utilize large pointed reduction forceps, lamina spreaders, and sometimes temporary external fixation pins used as "joysticks" to manipulate the bony segments. The goal is to restore the medial longitudinal arch, realign the metatarsals with the hindfoot, and ensure a
Clinical & Radiographic Imaging Archive


Detailed Chapters & Topics
Dive deeper into specialized chapters regarding axial-screw-technique-for-midfoot-arthrodesis-in-charcot-foot-deformities