Minimally Invasive Gradual Realignment and Arthrodesis for Charcot Foot Deformity: An Intraoperative Masterclass
Key Takeaway
This masterclass details a two-stage minimally invasive approach for Charcot foot deformity. We'll cover comprehensive preoperative planning, precise patient positioning, and granular intraoperative execution of gradual realignment with external fixation, followed by percutaneous arthrodesis. Emphasis is placed on neurovascular protection, meticulous technique, and managing potential pitfalls to achieve stable, plantigrade foot reconstruction and prevent amputation.
Comprehensive Introduction and Patho-Epidemiology
Welcome, fellows, to the operating theater. Today, we are tackling one of the most challenging, limb-threatening conditions encountered in orthopaedic surgery: Charcot neuroarthropathy. We will be performing a two-stage minimally invasive gradual correction of a severe midfoot Charcot deformity. This specific technique, heavily influenced by the pioneering work of Dr. Dror Paley, utilizes multiplanar circular external fixation followed by percutaneous arthrodesis. This approach offers profound physiological and mechanical advantages over traditional open methods, particularly for severe, unstable deformities with compromised soft tissue envelopes.
Charcot neuroarthropathy is a progressive, destructive, and ultimately deforming process affecting the joints and osseous structures, most frequently in the foot and ankle. It manifests secondary to underlying peripheral neuropathy, most commonly from diabetes mellitus, though neurosyphilis, syringomyelia, and chronic alcoholism are also documented etiologies. The pathophysiology is driven by a combination of neurotraumatic and neurovascular theories. The profound loss of protective sensation, coupled with repetitive, unrecognized microtrauma, initiates a cascading inflammatory response. Simultaneously, autonomic neuropathy leads to a hyperemic state, increasing osteoclastic activity and resulting in profound regional osteopenia.
As this destructive cycle progresses through the classic Eichenholtz stages—development, coalescence, and reconstruction—the structural integrity of the foot is decimated. Ligamentous laxity, joint subluxation, and frank dislocation occur, ultimately leading to severe osseous malalignment. The classic "rocker-bottom" deformity emerges as the midfoot collapses, transferring immense localized pressure to the plantar aspect of the cuboid and cuneiforms. Our primary goal in managing chronic Charcot neuroarthropathy is to restore a plantigrade, anatomically aligned foot, impart rigid stability, prevent devastating complications like recurrent ulceration, deep infection, and major amputation, preserve limb length, and ultimately, return the patient to functional ambulation.
Traditionally, acute realignment procedures involving extensive open osteotomies, aggressive joint débridement, acute manual reduction, and massive internal fixation have been the standard of care. However, in these extremely deformed, osteopenic feet, acute realignment is fraught with catastrophic complications. Large open incisions in vasculopathic patients frequently lead to significant soft tissue necrosis, neurovascular compromise, profound wound dehiscence, and incomplete deformity reduction. Furthermore, acute shortening of the osseous column to achieve closure often results in a functionally compromised, shortened foot. This is precisely where our two-stage gradual correction method shines. It allows for the precise, controlled, multiplanar realignment of dislocated Charcot joints via distraction histiogenesis and ligamentotaxis, minimizing soft tissue trauma and virtually eliminating the risk of acute neurovascular compromise.
Detailed Surgical Anatomy and Biomechanics
Before we make a single incision or advance a wire, we must meticulously review the critical anatomy of the midfoot and hindfoot. Navigating the Charcot foot requires a profound understanding of distorted spatial relationships, focusing heavily on neurovascular safe zones and osseous landmarks relevant to our circular fixation strategy. The biomechanical failure in Charcot foot is not merely a static collapse; it is a dynamic, multiplanar deformity driven by unopposed muscle forces acting on a structurally incompetent osseous arch.
Osteology and Joint Relationships
The hindfoot, comprising the calcaneus and talus, serves as our proximal foundational anchor during frame application. We will be fixing our rings directly to the calcaneal tuberosity and the talar neck. Fortunately, the subtalar joint is frequently spared in midfoot Charcot patterns, and our surgical philosophy dictates preserving its motion whenever possible to dissipate stress away from our future midfoot arthrodesis site. Understanding the talocalcaneal angle and the pitch of the calcaneus is critical for restoring the posterior pillar of the longitudinal arch.
The midfoot, encompassing the navicular, cuboid, and the three cuneiforms, represents the epicenter of the typical Charcot collapse. These structures articulate with the talus and calcaneus proximally (Chopart's joint) and the metatarsals distally (Lisfranc joint). The primary sites of osseous fragmentation and subluxation are most frequently observed at the talonavicular, calcaneocuboid, and cuneonavicular joints. During our gradual distraction phase, we rely on the remaining ligamentous hinges and the principle of ligamentotaxis to pull these subluxated midfoot bones back into anatomic alignment without requiring massive open resections.
The forefoot, consisting of the metatarsals and phalanges, acts as our distal lever arm for correction. We will be spanning our external fixator from the metatarsal shafts proximally into the hindfoot and distal tibia. The biomechanical lever of the forefoot is often severely compromised by an equinus contracture of the Achilles tendon, which places an enormous, unyielding plantarflexion force on the calcaneus. This force, transmitted through the collapsing midfoot during the stance phase of gait, is the primary driver of the rocker-bottom deformity and must be neutralized early in the procedure.
Neurovascular Structures
Navigating the medial aspect of the foot requires absolute vigilance regarding the posterior tibial neurovascular bundle. Comprising the posterior tibial artery, posterior tibial nerve, and venae comitantes, this bundle runs posterior to the medial malleolus before arborizing into the medial and lateral plantar nerves and arteries deep to the abductor hallucis. When placing transosseous wires or half-pins into the calcaneus or medial midfoot, we must meticulously utilize safe zones, blunt dissection, and tissue-protecting drill sleeves to avoid catastrophic injury to these structures. Additionally, the saphenous nerve and great saphenous vein, running anterior to the medial malleolus, must be protected during distal tibial ring application.
On the lateral side, the sural nerve descends along the posterolateral aspect of the calf and foot, supplying sensation to the lateral heel and border of the foot. Transfixion wires and half-pins directed into the lateral calcaneus or the cuboid region must respect this structure's trajectory. Furthermore, the superficial peroneal nerve, which transitions from the lateral compartment to the anterolateral leg, divides into the intermediate and medial dorsal cutaneous nerves. These branches fan out across the dorsum of the foot, making pin placement in the distal tibia and dorsal forefoot perilous without careful, blunt spreading to the bone.
The dorsal and plantar aspects of the foot present their own unique challenges. The dorsalis pedis artery, a direct continuation of the anterior tibial artery, runs superficially over the dorsum of the midfoot, accompanied by the deep peroneal nerve. It is often palpable and provides a critical, sometimes solitary, blood supply to the forefoot in diabetic patients. Conversely, the plantar aspect houses the intricate network of the medial and lateral plantar nerves and arteries. Because our Stage 2 percutaneous screw insertion for solid arthrodesis will involve a plantar-to-dorsal approach, extreme caution and precise fluoroscopic targeting are demanded to avoid traversing these vital plantar structures.
Muscular Intervals and Dynamic Forces
The Achilles tendon is the largest and strongest tendon in the human body, formed by the confluence of the gastrocnemius and soleus muscles. In the context of Charcot neuroarthropathy, an insidious equinus contracture of this tendon complex is nearly ubiquitous. This contracture acts as a deforming bowstring, forcing the forefoot into dorsiflexion relative to the hindfoot, thereby causing the midfoot to collapse plantarly. Our percutaneous Z-lengthening of the Achilles tendon is not merely an adjunctive step; it is a mandatory, foundational maneuver to neutralize this deforming force and allow for successful realignment.
The tibialis anterior tendon, inserting into the medial cuneiform and the base of the first metatarsal, normally acts as a primary dorsiflexor and invertor. In a collapsed Charcot foot, its mechanical advantage is severely altered, often contributing to a supination deformity or failing to counteract the overpowering equinus forces. Understanding its insertion point is crucial when planning our forefoot wire trajectories, ensuring we do not impale or tether the tendon against the bone, which would restrict post-operative toe clearance.
The peroneal tendons, specifically the peroneus brevis inserting onto the base of the fifth metatarsal and the peroneus longus traversing the plantar foot to insert on the first metatarsal and medial cuneiform, play significant roles in foot eversion and plantarflexion of the first ray. In certain Charcot patterns, a spastic or contracted peroneus brevis can drive a severe forefoot abduction deformity. Recognizing these dynamic muscle-tendon imbalances allows us to plan targeted percutaneous tenotomies or lengthenings if the external fixator alone cannot overcome the soft tissue resistance during the gradual distraction phase.
Exhaustive Indications and Contraindications
The decision to utilize a two-stage minimally invasive gradual realignment with circular external fixation is nuanced and requires a comprehensive evaluation of the patient's local tissue viability, systemic health, and psychological readiness. This technique is not a panacea for all diabetic foot complications, but rather a highly specialized tool for specific, complex reconstructive scenarios where traditional open surgery carries an unacceptable risk of failure. Patient selection is arguably the most critical determinant of success in Charcot reconstruction.
This technique is primarily indicated for patients presenting with severe, rigid, or unstable midfoot and hindfoot Charcot neuroarthropathy (Eichenholtz stage II or III) complicated by profound osseous malalignment, such as a severe rocker-bottom deformity with midfoot ulceration. It is particularly advantageous in patients with compromised soft tissue envelopes—such as those with active, non-healing plantar ulcerations, severe venous stasis changes, or a history of prior wound dehiscence—where large surgical incisions would likely result in necrosis. Furthermore, it is the treatment of choice when acute deformity correction is impossible without excessive bony resection that would leave the patient with an unacceptably shortened, dysfunctional foot.
Conversely, absolute contraindications include active, untreated deep osseous infection (osteomyelitis) requiring massive surgical débridement, as the presence of hardware in a grossly infected field is disastrous. Severe peripheral arterial disease (PAD) that has not been optimized or bypassed is another absolute contraindication; without adequate perfusion, neither the bone nor the pin tracts will heal, leading to rapid, catastrophic failure and amputation. Additionally, patients with profound cognitive impairment, severe psychiatric illness, or a demonstrated history of medical non-compliance are poor candidates, as the management of a Taylor Spatial Frame requires daily, meticulous adjustments and rigorous pin site care.
| Category | Indications for Gradual Correction via Circular Fixation | Contraindications (Relative & Absolute) |
|---|---|---|
| Pathology | Severe midfoot/hindfoot Charcot collapse (Eichenholtz II/III) | Active, untreated osteomyelitis requiring massive resection (Absolute) |
| Deformity | Rigid rocker-bottom deformity, severe multiplanar malalignment | Mild, flexible deformities manageable with total contact casting (Relative) |
| Soft Tissue | Active plantar ulceration, poor skin envelope, severe edema | Gross gangrene or unsalvageable soft tissue necrosis (Absolute) |
| Vascular | Adequate perfusion (ABI > 0.5, palpable pulses or biphasic doppler) | Severe un-revascularized Peripheral Arterial Disease (PAD) (Absolute) |
| Patient Factors | Motivated patient, capable of managing frame adjustments | Severe non-compliance, cognitive impairment, uncontrolled severe psychiatric illness (Absolute) |
| Systemic | Optimized glycemic control (HbA1c ideally < 8.0%) | Profound malnutrition, end-stage renal disease on dialysis (Relative - high risk) |
Metabolic optimization prior to surgery cannot be overstated. We mandate a rigorous preoperative workup, including a multidisciplinary team approach involving endocrinology, vascular surgery, and infectious disease specialists. Hemoglobin A1c levels must be optimized, ideally below 8.0%, to mitigate the risk of post-operative infection and ensure adequate bone healing. Vascular studies, including Ankle-Brachial Indices (ABI), toe pressures, and potentially CT angiography, are mandatory to confirm that the limb has sufficient perfusion to withstand the metabolic demands of osteogenesis and soft tissue healing induced by the gradual distraction process.
Pre-Operative Planning, Templating, and Patient Positioning
Fellows, meticulous preoperative planning is the bedrock of this procedure. This is not merely about identifying the gross deformity; it is an exercise in three-dimensional spatial reasoning, requiring us to understand the multiplanar nature of the collapse and plan the trajectory of every single wire, half-pin, and beaming screw. The success of the Taylor Spatial Frame relies entirely on the accuracy of our preoperative data input and the precision of our intraoperative execution.
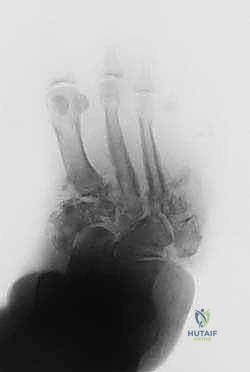
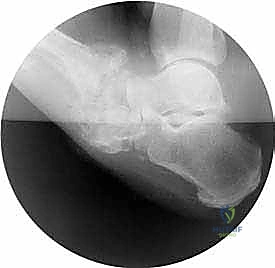
Imaging and Templating
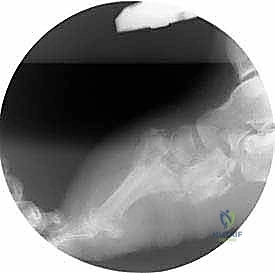
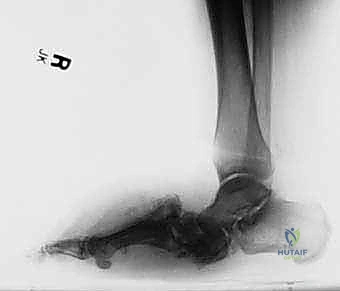
Our evaluation begins with high-quality, standard weight-bearing anteroposterior (AP), lateral, and oblique radiographs of the foot and ankle, supplemented by a full-length AP and lateral radiograph of the tibia. On the AP radiograph, we meticulously evaluate midfoot adduction or abduction, talonavicular coverage, and the talar-first metatarsal angle (Meary's angle) in the transverse plane. The lateral radiograph is critical for assessing the magnitude of the rocker-bottom deformity, the degree of equinus, and forefoot dorsiflexion or plantarflexion. Meary's angle on the lateral view quantifies the sagittal plane collapse, while the calcaneal pitch angle helps us assess the integrity of the posterior pillar.
Advanced imaging is frequently invaluable. Computed Tomography (CT) scans with 3D reconstructions are heavily utilized to assess bone stock quality, identify occult fragmentation, map joint congruity, and precisely localize areas of coalition or autofusion that may require percutaneous osteoclasis. Intraoperatively, we will rely exclusively on live fluoroscopy. It is imperative to ensure that the C-arm is appropriately draped and positioned to allow for seamless, orthogonal (AP and lateral) views of the entire foot, ankle, and distal tibia without requiring the surgical team to reposition the patient's leg, which could disrupt our frame alignment.
Taylor Spatial Frame (TSF) Software Planning
The Taylor Spatial Frame is the mathematical engine of our gradual correction. We utilize the proprietary web-based software to generate the daily prescription for the patient. This requires the precise input of mounting parameters, deformity parameters, and hardware specifications. We must first define our reference ring; for complex foot deformities, the distal tibial ring is typically chosen as the stable, proximal anchor. We then define the "corresponding point," which is the theoretical center of rotation of angulation (CORA) within the foot, usually located at the apex of the Charcot collapse in the midfoot.
Based on our preoperative radiographic measurements and confirmed by intraoperative fluoroscopic images, we input the specific magnitude and axis of the deformity in all six degrees of freedom (translation and angulation in the coronal, sagittal, and axial planes). The software's algorithm then generates a precise, daily schedule of strut adjustments. This allows us to dictate the exact rate and duration of the realignment process, typically aiming for a safe distraction rate of 1.0 to 1.5 millimeters per day. This rate is continuously monitored and adjusted post-operatively based on the patient's pain tolerance, soft tissue tension, and radiographic evidence of joint space widening.
Patient Positioning and OR Setup
The patient is positioned supine on a radiolucent operating table. The affected limb is meticulously prepped and draped from the mid-thigh down to the tips of the toes, allowing unrestricted, circumferential access to the foot, ankle, and the entire lower leg. A small bump or gel roll is placed under the ipsilateral hip to internally rotate the limb slightly; this compensates for the natural external rotation of the hip and ensures the foot rests in a true neutral position relative to the ceiling, facilitating accurate AP fluoroscopic imaging.
A sterile high-thigh tourniquet is applied but is deliberately not inflated initially. While we may choose to inflate it briefly for the Achilles tendon lengthening or if unexpected, brisk bleeding is encountered during pin insertion, we generally prefer to execute the entire frame application without a tourniquet. This allows for continuous, real-time assessment of distal perfusion and capillary refill as we manipulate the foot and apply tension to the soft tissues. The C-arm is brought in from the contralateral side of the table, positioned to capture both the distal tibia and the entire foot without striking the external fixator rings.
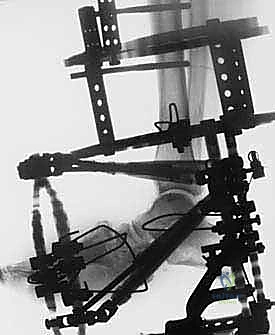
Step-by-Step Surgical Approach and Fixation Technique
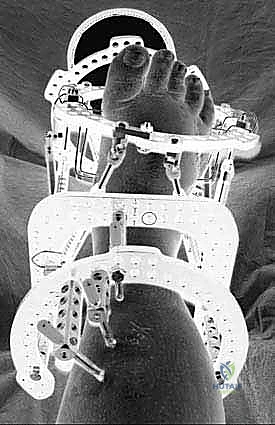
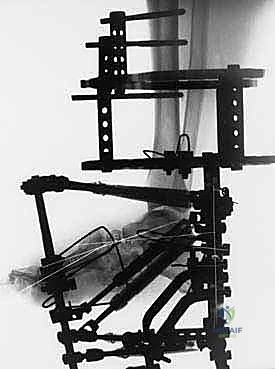
Alright, fellows, let us scrub in. This is where surgical theory meets mechanical reality. Our procedure is divided into two distinct stages. Stage 1 focuses on achieving a neutral hindfoot, applying the multiplanar circular external fixator, and initiating the gradual, software-driven realignment of the midfoot. Stage 2, performed weeks later once anatomic alignment is achieved, involves the percutaneous insertion of robust internal fixation (beaming) to achieve a solid, permanent arthrodesis.
Stage 1: External Fixation Application and Gradual Realignment
1. Achilles Tendon Lengthening
Our first objective is to obliterate the deforming equinus force and achieve a neutral hindfoot position, a prerequisite for successful forefoot alignment. We perform a percutaneous triple hemisection (Z-lengthening) of the Achilles tendon.
Identify the medial and lateral borders of the Achilles tendon under tension. Make a 1-2 cm transverse stab incision on the medial side of the tendon, approximately 3-4 cm proximal to its calcaneal insertion. Using a #15 blade, incise exactly two-thirds of the tendon's width. Distally, make a second 1-2 cm transverse incision on the lateral side, approximately 2 cm proximal to the insertion, again incising two-thirds of the width. A third incision is often made proximally on the medial side.
With the incisions complete, forcefully but smoothly dorsiflex the ankle. You will feel and hear a palpable "pop" as the tendon fibers slide and lengthen. Aim to achieve at least neutral dorsiflexion (0 degrees), ideally 5-10 degrees of dorsiflexion, without requiring excessive manual force. The small skin incisions are then closed with simple interrupted absorbable sutures.
2. Distal Tibial Fixation Block Application
We must now create a rigidly stable proximal anchor for our Taylor Spatial Frame. We begin by applying a full, appropriately sized external fixation ring to the distal tibia. This ring must be positioned orthogonally to the mechanical axis of the tibia and situated approximately 2-3 cm proximal to the ankle joint line to allow for swelling and prevent anterior impingement during dorsiflexion.
We utilize a U-plate fixed to the anterior tibia for initial stability. Insert a 1.8-mm smooth, bayonet-tipped wire lateromedially through the distal tibia, ensuring it is perfectly parallel to the ankle joint in the coronal plane.
CRITICAL PEARL: When driving lateromedial wires in the distal tibia, you must be acutely aware of the superficial peroneal nerve anterolaterally and the saphenous nerve and great saphenous vein medially. Always make a generous stab incision, spread down to the periosteum with a hemostat, and utilize a wire sleeve to protect the soft tissues during drilling.
We supplement this initial reference wire with two or three additional points of robust fixation. We prefer a delta configuration of 5.0-mm hydroxyapatite-coated half-pins for maximum multiplanar stability. Make a stab incision, use a blunt trocar to dissect to the bone, insert a drill guide, pre-drill both cortices, and advance the half-pin under continuous fluoroscopic guidance. For larger patients or those with profound osteopenia, a second distal tibial ring is added 10-15 cm proximally, connected via threaded rods, creating an immovable tibial block.
3. Hindfoot Fixation
With the tibial block secure, we must secure the hindfoot in the neutral position we achieved via the Achilles lengthening. With an assistant holding the foot plantigrade, we apply a U-plate (or a half-ring) to the posterior calcaneus.
Insert two crossing 1.8-mm smooth wires, or olive wires for compression, through the calcaneal tuberosity. These wires should diverge widely to capture the maximum volume of cancellous bone.
CRITICAL PITFALL: The medial calcaneal wire is fraught with danger. You must avoid the posterior tibial neurovascular bundle. Make your medial stab incision carefully, stay inferior and posterior to the neurovascular bundle's known trajectory, and use a drill sleeve. Fluoroscopy is mandatory to ensure the wires do not breach the subtalar joint.
Next, we insert a 1.8-mm mediolateral smooth wire directly through the anatomic neck of the talus. This wire is tensioned and fixed to the calcaneal U-plate or directly to the tibial ring. This critical wire locks the talus to the calcaneus, preventing unwanted motion at the subtalar joint during the distraction phase and providing a solid hindfoot block.
4. Forefoot Fixation and Stirrup Wires
We now mount a full external fixation ring (or a foot plate) to the forefoot, which will serve as our distal segment for gradual multiplanar distraction.
Insert two crossing 1.8-mm smooth wires through the shafts of the metatarsals, typically spanning from the first or second metatarsal across to the fourth or fifth. Aim for the diaphyseal bone to maximize purchase.
CRITICAL PITFALL: Do not attempt to drive a single wire through all five metatarsals, as the transverse arch makes this impossible without causing severe neurovascular injury in the intermetatarsal spaces. Use independent wires that capture 2-3 metatarsals each. In cases of severe toe clawing, 1.5-mm digital wires can be driven axially through the phalanges and secured to the forefoot ring.
Finally, to focus the distraction forces precisely at the collapsed Charcot joints and prevent unwanted stretching of normal joints, we place "stirrup wires." Insert two 1.8-mm wires through the osseous segments immediately proximal and distal to the primary apex of the deformity. These wires are bent 90 degrees just outside the skin and attached to the struts, acting as localized tethers to control the specific vectors of correction.
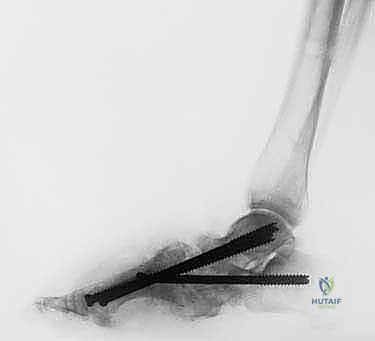
Stage 2: Percutaneous Arthrodesis (The "Beaming" Technique)
Once the gradual distraction phase is complete (typically 3-6 weeks) and the software confirms anatomic alignment has been restored, the patient returns to the operating room for Stage 2. The external fixator remains in place to hold the reduction.
Through tiny 1 cm stab incisions on the plantar or posterior aspect of the foot, we insert massive, solid core, fully threaded bolts (typically 6.5mm to 8.0mm in diameter) across the entire medial and lateral columns of the foot.
For the medial column, a guide pin is driven from the plantar aspect of the first metatarsal head, straight down the medullary canal of the metatarsal, across the medial cuneiform, through the navicular, and deep into the body of the talus. After reaming, a solid bolt is advanced over the wire. A similar "beaming" screw is placed down the lateral column, from the fifth metatarsal base into the calcaneus. These intra-osseous beams act as internal rebar, providing permanent, rigid stability to the newly realigned foot. The external fixator is then removed.
Complications, Incidence Rates, and Salvage Management
While minimally invasive gradual correction drastically reduces the catastrophic soft tissue complications associated with open Charcot surgery, it is a highly complex procedure with its own unique set of challenges. The presence of transcutaneous hardware for extended periods in a diabetic, neuropathic patient population inherently carries risks. Meticulous surgical technique, rigorous postoperative surveillance, and immediate intervention are required to manage these complications and prevent them from compromising the final limb salvage outcome.
Pin tract infections are by far the most common complication, occurring in nearly every patient to some degree during the treatment course. These are typically superficial and present as localized erythema, serous drainage, and mild pain at the wire interface. Wire breakage or loosening can occur due to the massive cyclical loads placed on the frame during weight-bearing or due to poor initial bone purchase in osteopenic bone. Deep space infections and osteomyelitis are rare but devastating, often necessitating premature frame removal and aggressive surgical débridement.
| Complication | Estimated Incidence | Preventative Strategy | Salvage / Management Protocol |
|---|---|---|---|
| Superficial Pin Tract Infection | 60% - 80% | Daily chlorhexidine pin care, optimal wire tensioning, avoiding skin tethering. | Oral antibiotics (e.g., Cephalexin, Doxycycline), increased frequency of local pin care, silver sulfadiazine dressings. |
| Wire/Pin Loosening or Breakage | 15% - 25% | Use of olive wires, maximizing bone purchase, adequate strut tightening, limiting excessive early weight-bearing. | Return to OR for wire exchange or removal if redundant. Over-drill and place a larger half-pin if necessary. |
| Deep Infection / Osteomyelitis | 3% - 5% | Strict sterile technique, avoiding thermal necrosis during drilling (use saline cooling), optimizing HbA1c. | Immediate hardware removal at the infected site, aggressive surgical débridement, IV antibiotics, placement of antibiotic-loaded cement spacers. |
| Premature Consolidation | 5% - 10% | Ensuring adequate osteoclasis/release during Stage 1, adhering to the 1mm/day distraction schedule. | Return to OR for percutaneous osteotomy or joint release to re-establish mobility for the frame. |
| Delayed Union / Non-union | 10% - 15% | Meticulous |
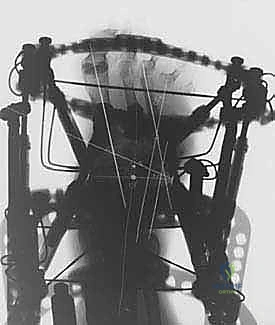
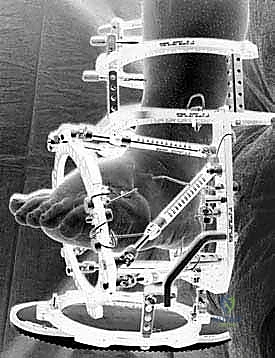
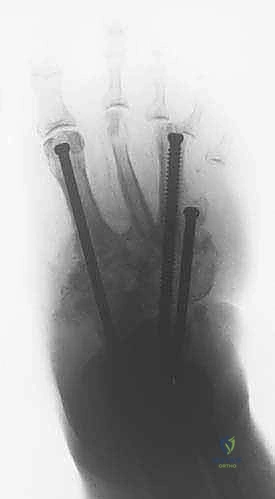
Clinical & Radiographic Imaging Archive