Femoral Neck Fracture Fixation: An Intraoperative Masterclass
Key Takeaway
This masterclass provides an exhaustive, real-time guide to femoral neck fracture fixation, covering both Closed Reduction and Percutaneous Fixation (CRPF) and Open Reduction and Internal Fixation (ORIF). Fellows will learn critical surgical anatomy, meticulous intraoperative techniques, and strategies for managing potential complications. We delve into preoperative planning, patient positioning, hardware application, and essential postoperative care, ensuring a comprehensive understanding from incision to rehabilitation.
Comprehensive Introduction and Patho-Epidemiology
Welcome, colleagues and fellows, to the operating theater. Today, we are undertaking a masterclass on a critical, ubiquitous, and historically unforgiving injury: the femoral neck fracture. Often dubbed the "unsolved fracture" by early pioneers of orthopedic surgery, this injury continues to present profound biomechanical and physiological challenges. Our definitive goal is to achieve stable, anatomical fixation, preserve the delicate vascularity of the femoral head, and restore the patient to their pre-injury level of function. We will dissect the nuances of closed reduction and percutaneous fixation (CRPF), as well as open reduction and internal fixation (ORIF), adapting our surgical strategy to the specific fracture morphology and the patient's physiological envelope.
The epidemiology of femoral neck fractures exhibits a classic bimodal distribution, reflecting two distinct pathophysiological mechanisms. In the elderly population, these are predominantly low-energy fragility fractures secondary to osteopenia or frank osteoporosis. The architectural deterioration of the proximal femur, specifically the loss of the primary compressive and tensile trabecular streams, renders the femoral neck highly susceptible to torsional forces during a simple ground-level fall. The systemic impact of this injury in the geriatric population cannot be overstated; it is a sentinel event associated with a one-year mortality rate approaching 20-30%, largely driven by subsequent cardiopulmonary complications, venous thromboembolism, and general physiological decompensation.
Conversely, in the younger population, femoral neck fractures are the result of high-energy trauma, such as motor vehicle collisions or falls from significant heights. These patients frequently present with concomitant life-threatening polytrauma. The high-energy shear forces required to fracture dense, healthy cortical bone often result in highly unstable fracture patterns, severe soft-tissue envelopes, and a dramatically increased risk of vascular disruption to the femoral head. In this demographic, the injury is a true orthopedic emergency, where the timing of reduction and fixation is inextricably linked to the survivability of the femoral head.
Understanding the unique pathoanatomy of intracapsular fractures is the foundation of our surgical rationale. Unlike extracapsular intertrochanteric fractures, the femoral neck lacks a robust periosteal layer. Consequently, fracture healing relies entirely on endosteal union, requiring absolute stability and anatomical reduction. Furthermore, the synovial fluid within the joint capsule contains fibrinolysins that inhibit primary hematoma formation, further impeding the osteogenic cascade. These factors combine to make the femoral neck a hostile environment for fracture healing, demanding meticulous surgical precision to prevent the twin nemeses of this injury: nonunion and avascular necrosis (AVN).
Detailed Surgical Anatomy and Biomechanics
Before we even consider making an incision or advancing a guide wire, a profound, three-dimensional understanding of the regional anatomy is paramount. The proximal femur is a critical anatomical nexus, rich in delicate neurovascular structures and subject to some of the highest biomechanical forces in the human body.
Osteology and Fracture Classification
The femoral head articulates with the acetabulum to form the enarthrodial (ball-and-socket) hip joint. The femoral neck serves as the critical cantilever connecting the head to the femoral shaft via the greater and lesser trochanters. A vital structural landmark is the calcar femorale, a dense, vertically oriented plate of bone extending from the posteromedial aspect of the femoral shaft deep into the cancellous bone of the neck. This structure acts as the primary buttress against compressive forces and is the anatomical foundation upon which we base our inferior screw fixation.
Fractures of the femoral neck are universally classified to guide treatment and predict prognosis. The Garden Classification describes the degree of displacement and impaction based on the AP radiograph:
* Garden I: Incomplete or impacted valgus fracture. The compressive trabeculae are angulated but intact.
* Garden II: Complete, non-displaced fracture. The trabecular lines are interrupted but maintain normal alignment.
* Garden III: Complete, partially displaced fracture. The femoral head tilts into varus, and the posterior retinacular vessels are severely stretched.
* Garden IV: Complete, fully displaced fracture. The femoral head loses all contact with the neck and may rotate back into a seemingly normal anatomical position within the acetabulum, completely severing the vascular supply.
The Pauwels Classification evaluates the biomechanical stability of the fracture by measuring the angle of the fracture line relative to the horizontal plane.
* Type I: <30 degrees. These experience primarily compressive forces and are inherently stable.
* Type II: 30-50 degrees. These experience a mix of shear and compressive forces.
* Type III: >50 degrees. These are highly unstable, dominated by vertical shear forces that promote varus collapse and have the highest risk of nonunion.
Neurovascular Supply and Ischemic Risks
The blood supply to the femoral head is notoriously tenuous. The primary reason for the high rates of avascular necrosis (AVN) following displaced fractures is the disruption of this retrograde vascular network. The Medial Femoral Circumflex Artery (MFCA) is the dominant supplier. Arising from the profunda femoris artery, it courses posteriorly between the pectineus and iliopsoas, giving rise to the critical lateral epiphyseal artery. It provides the superior, inferior, and posterior retinacular arteries that ascend along the femoral neck within the synovial reflection. Displaced fractures, particularly those with posterior comminution, readily shear these delicate vessels.
The Lateral Femoral Circumflex Artery (LFCA) provides a secondary, lesser contribution, primarily supplying the anterior and inferior aspects of the neck via anterior retinacular branches. Finally, the Artery of the Ligamentum Teres (Foveal Artery), a branch of the obturator artery, supplies a negligible volume of the femoral head in adults but is clinically significant in the pediatric population.
During our surgical approaches, we must also protect regional neural structures. The Femoral Nerve lies anteriorly within the femoral triangle and is at risk during anterior approaches or from aggressive medial retraction. The Sciatic Nerve courses posteriorly, deep to the gluteus maximus, and is vulnerable during posterior approaches or if the limb is subjected to excessive internal rotation and traction on the fracture table. The Lateral Femoral Cutaneous Nerve is highly prone to iatrogenic injury during anterior or anterolateral incisions, leading to meralgia paresthetica.
Surgical Approaches and Muscular Intervals
When closed reduction fails and ORIF is mandated, our choice of surgical approach dictates the muscular intervals we exploit. The Anterior Approach (Smith-Petersen) utilizes the superficial internervous plane between the sartorius (femoral nerve) and tensor fascia lata (superior gluteal nerve), and the deep plane between the rectus femoris and gluteus medius. This provides unparalleled visualization of the anterior femoral neck.
The Anterolateral Approach (Watson-Jones) exploits the interval between the tensor fascia lata and the gluteus medius. It requires less muscle detachment than the anterior approach and is excellent for accessing the anterior and superior aspects of the femoral neck for direct reduction. The Direct Lateral Approach (Hardinge) splits the gluteus medius and vastus lateralis; while ubiquitous in arthroplasty, it is less commonly utilized for isolated neck fractures due to the risk of postoperative abductor weakness. Finally, the Posterior Approach (Kocher-Langenbeck) separates the gluteus maximus and medius, detaching the short external rotators. While standard for posterior acetabular fractures, it is rarely indicated for femoral neck fixation due to the risk of further disrupting the tenuous MFCA blood supply.
Lower Extremity Anatomy and Positioning Risks
Fellows, while our operative focus is the proximal femur, a holistic anatomical understanding of the entire lower extremity is mandatory, particularly regarding patient positioning on the fracture table. The lower leg comprises the Tibia, the primary weight-bearing bone, and the Fibula, the lateral strut serving as a critical site for muscle origin. These are bound by the Interosseous Membrane, a dense fibrous septum dividing the leg into compartments.
We must be acutely aware of structures like the Peroneus Longus (Fibularis Longus), which originates from the proximal fibula and lateral tibial condyle, and the Flexor Hallucis Longus (FHL), originating from the posterior fibula. Understanding these structures is vital for distal neurovascular assessment. When placing the patient in the traction boot, excessive pressure over the proximal fibula will compress the common peroneal nerve against the bone, leading to a devastating iatrogenic foot drop. Furthermore, high-energy trauma causing femoral neck fractures frequently results in concomitant distal injuries; failing to recognize a compromised leg compartment before applying sustained traction can precipitate acute compartment syndrome.
Exhaustive Indications and Contraindications
The decision-making algorithm for treating a femoral neck fracture requires synthesizing the fracture morphology, the patient's physiological age, bone density, and baseline ambulatory status. We must decide between joint preservation (internal fixation) and joint replacement (arthroplasty).
Internal fixation with cannulated screws is the gold standard for non-displaced or impacted fractures (Garden I and II) across all age groups. The inherent stability of these patterns allows for percutaneous fixation with minimal physiological insult, yielding high union rates. In young, physiologically robust patients (typically under 60-65 years of age), joint preservation is fiercely attempted even for displaced fractures (Garden III and IV). In these cases, anatomical reduction (closed or open) followed by rigid internal fixation is mandated to preserve the native hip joint, despite the acknowledged risks of AVN and nonunion.
Conversely, in the elderly, low-demand patient with a displaced fracture (Garden III and IV), internal fixation carries an unacceptably high failure rate (often exceeding 30-40% due to poor bone stock and compromised vascularity). In this demographic, arthroplasty (hemiarthroplasty or total hip arthroplasty) is the treatment of choice. Arthroplasty allows for immediate, unrestricted weight-bearing, drastically reducing the complications of prolonged immobility and minimizing the need for revision surgery.
Contraindications to internal fixation include delayed presentation (typically >3 weeks) in displaced fractures, where the femoral head is presumed avascular and the fracture edges have resorbed. Pathologic fractures secondary to malignancy are also generally treated with arthroplasty or specialized oncologic reconstructions, as the diseased bone will not support standard osteosynthesis.
| Treatment Modality | Primary Indications | Relative/Absolute Contraindications |
|---|---|---|
| CRPF (Cannulated Screws) | Garden I/II (All ages); Garden III/IV in young patients (<60 yrs); Pauwels I/II. | Elderly patients with displaced (Garden III/IV) fractures; Severe baseline hip osteoarthritis; Pathologic fractures. |
| Sliding Hip Screw (DHS) | Basal neck fractures; Vertical shear patterns (Pauwels III) in young patients (often with a derotational screw). | Pure subcapital fractures in osteoporotic bone (high risk of head rotation during lag screw insertion). |
| Hemiarthroplasty | Elderly, low-demand patients with displaced Garden III/IV fractures; Poor bone stock. | Young, active patients; Pre-existing symptomatic acetabular arthritis. |
| Total Hip Arthroplasty (THA) | Elderly, active patients with displaced Garden III/IV fractures; Pre-existing hip osteoarthritis; Rheumatoid arthritis. | Non-ambulatory patients; Severe cognitive impairment with high dislocation risk; Active local infection. |
Pre-Operative Planning, Templating, and Patient Positioning
Success in femoral neck fracture fixation is largely dictated before the skin is incised. Meticulous preoperative planning, precise radiographic templating, and flawless patient positioning are non-negotiable prerequisites for a smooth intraoperative workflow and an optimal biomechanical construct.
Radiographic Evaluation and Templating
Our preoperative assessment begins with high-quality imaging. An AP pelvis, a cross-table lateral of the injured hip, and a full-length femur radiograph are mandatory. We meticulously evaluate the Garden and Pauwels classifications, assess for posterior comminution, and scrutinize the bone quality (e.g., Singh index). In young patients with high-energy trauma, a CT scan with 3D reconstructions is often highly beneficial to fully characterize comminution and rule out subtle concomitant acetabular or femoral head fractures.
Templating is performed using the AP radiograph of the uninjured, contralateral hip. We use digital templating software to determine the optimal screw trajectory, aiming for an angle of 130-135 degrees relative to the lateral cortex. We estimate the required screw lengths, ensuring the threads will fully bypass the fracture site and engage the dense subchondral bone of the femoral head without penetrating the articular cartilage. We plan for a three-screw construct in an inverted triangle configuration, which biomechanical studies have proven offers superior torsional and bending stiffness compared to other arrays.
Fluoroscopy and Operating Room Setup
For percutaneous fixation, the C-arm fluoroscope serves as our intraoperative eyes. The C-arm is positioned on the contralateral side of the patient, entering at a 45-degree angle to the operating table. It must be able to swing freely between a true AP and a true lateral projection of the proximal femur without striking the table or the uninjured leg.
The C-arm monitor should be positioned directly in the surgeon's line of sight. The machine must be draped sterilely to allow the surgeon to manipulate it if necessary, though a skilled radiologic technologist is an invaluable asset. Before prepping the patient, we perform a "dry run" with the C-arm to confirm that crisp, unobstructed AP and lateral images can be obtained. Image optimization, including adjusting brightness and contrast to visualize the trabecular patterns, is critical.
Patient Positioning on the Fracture Table
The patient is placed supine on a specialized orthopedic fracture table. This apparatus is essential for applying controlled traction and maintaining the reduction throughout the procedure. A well-padded perineal post is inserted to provide counter-traction. It is imperative that the post rests against the perineum and is completely clear of the genitalia to prevent catastrophic pudendal nerve neuropraxia or soft-tissue necrosis.
The uninjured leg is placed in a well-padded boot and positioned in a "hemilithotomy" position—flexed, abducted, and externally rotated—and secured to a specialized holder. This removes the leg from the trajectory of the C-arm for the lateral view. The injured leg is placed in the traction boot. We apply gentle, sustained longitudinal traction to disimpact the fracture fragments and restore anatomical leg length. The torso must be perfectly aligned, and the pelvis must be level to ensure accurate radiographic interpretation.
Neurological Precautions During Positioning
Positioning on a fracture table carries inherent risks of iatrogenic nerve injury. Meticulous padding of all bony prominences is mandatory. The heels, sacrum, and elbows must be protected. Pay particular attention to the fibular head of the injured leg within the traction boot; inadequate padding here will compress the common peroneal nerve. Similarly, excessive longitudinal traction or extreme internal rotation can stretch the sciatic nerve. The surgical team must systematically verify the padding and limb tension before the sterile prep begins.
Step-by-Step Surgical Approach and Fixation Technique
With the patient optimally positioned and prepped, we transition to the execution phase. We will detail the Closed Reduction and Percutaneous Fixation (CRPF) using three cannulated screws, which is the workhorse procedure for this pathology.
Closed Reduction Maneuvers
"Alright team, the cornerstone of this procedure is an anatomical reduction. We cannot fix what is not reduced." The assistant applies firm, steady longitudinal traction via the table mechanism to overcome muscle spasm and disimpact the fracture. We then employ a modification of the Leadbetter maneuver: traction, internal rotation, and slight abduction.
The distal fragment is typically externally rotated due to the pull of the iliopsoas and short external rotators. We slowly internally rotate the leg via the traction boot—often 15 to 25 degrees—to match the anteversion of the proximal fragment. A slight degree of abduction (10-15 degrees) helps to lock the fracture fragments together and correct any varus deformity. The reduction must be gentle; forceful manipulations can further damage the tenuous retinacular blood supply.
Fluoroscopic Confirmation of Reduction
We immediately evaluate the reduction fluoroscopically. On the AP view, we assess the neck-shaft angle, aiming for restoration of the patient's native anatomy (typically 130 degrees). We trace the medial cortex; the calcar femorale must show a smooth, continuous line without step-off. We evaluate the Garden Alignment Index—the angle formed by the primary compressive trabeculae of the head relative to the medial cortex of the shaft—which should be between 160 and 180 degrees.
The C-arm is then rotated to a true lateral view. This is achieved when the femoral neck is perfectly superimposed on the shaft, and the lesser trochanter is completely obscured. On this view, the anterior and posterior cortices of the head and neck must be co-linear. Any posterior sag or anterior angulation is unacceptable and indicates a malreduction that will inevitably lead to failure. If closed reduction fails to achieve anatomical alignment, we must promptly abandon percutaneous efforts and proceed to an open reduction via a Watson-Jones approach.
Guide Wire Placement Strategy
Once reduction is confirmed, we plan our incisions. We utilize three 1-cm stab incisions along the lateral thigh, corresponding to our planned inverted triangle configuration. The incisions are carried down through the iliotibial band to the vastus lateralis ridge.
We place the first guide wire inferiorly, aiming to rest it directly upon the dense bone of the calcar femorale. "This inferior screw is our primary structural strut." The trocar-tipped guide wire is placed on the lateral cortex, approximately at the level of the lesser trochanter. Under live fluoroscopy, it is advanced parallel to the femoral neck axis on the AP view, hugging the inferior cortex, and perfectly centered in the neck on the lateral view. It is advanced until the tip is exactly 5 mm from the subchondral bone of the femoral head.
The second and third wires are placed superiorly—one anterior and one posterior—creating the inverted triangle. They are advanced parallel to the inferior wire. We must ensure a minimum distance of 5-10 mm between the screws and the cortices to prevent stress risers and subsequent subtrochanteric fractures.
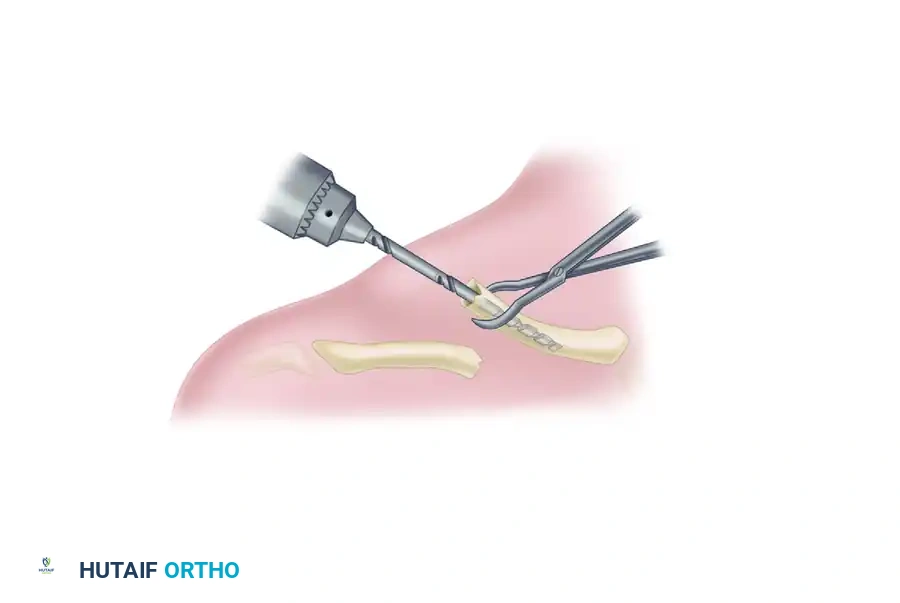
Drilling, Measurement, and Screw Insertion
With all three guide wires perfectly positioned in the "safe zone" of the femoral head, we proceed to definitive fixation. A depth gauge is placed over each wire to determine the required screw length. We typically subtract 5 mm from the measured length to account for intraoperative compression and prevent joint penetration.
A cannulated drill bit is passed over the wire to open the lateral cortex. In young, dense bone, we may drill over the entire length of the wire; in osteoporotic bone, we only drill the lateral cortex to maximize screw purchase in the cancellous bone.
We utilize 6.5 mm or 7.0 mm partially threaded cannulated screws. It is imperative that the threads completely bypass the fracture line and reside entirely within the femoral head; if threads span the fracture, compression cannot be achieved, and the fracture will be held distracted. Washers are routinely used on the lateral cortex to prevent the screw heads from burying into the bone, particularly in osteoporotic patients. The screws are advanced sequentially, tightening them in an alternating fashion to provide uniform, dynamic compression across the fracture site. Final fluoroscopic images are taken in multiple planes to confirm fracture compression, screw length, and the absolute absence of intra-articular hardware penetration.
Complications, Incidence Rates, and Salvage Management
Despite flawless surgical execution, the intrinsic biology of intracapsular femoral neck fractures predisposes patients to a high rate of severe complications. The surgeon must be intimately familiar with these risks, counsel the patient appropriately preoperatively, and possess the surgical repertoire to manage the inevitable failures.
Avascular Necrosis (AVN) is the most feared biological complication, resulting from the disruption of the medial femoral circumflex artery. The incidence is directly proportional to the degree of initial displacement and the time to surgical reduction. AVN typically presents with insidious groin pain 6 to 24 months postoperatively. Radiographically, it manifests as subchondral sclerosis, cystic changes, and eventual crescent sign indicating subchondral collapse.
Nonunion is the primary mechanical complication, occurring when the fracture fails to consolidate. It is driven by inadequate reduction (particularly residual varus), poor bone quality, or lack of mechanical compression. Nonunion often presents earlier than AVN, with persistent pain and radiographic evidence of hardware failure, such as screw back-out or "cut-out" through the superior femoral head.
Systemic complications, particularly in the elderly, are a major source of morbidity. Deep Vein Thrombosis (DVT) and Pulmonary Embolism (PE) are constant threats due to endothelial injury, venous stasis, and hypercoagulability. Postoperative delirium, pneumonia, and urinary tract infections further complicate the recovery of the geriatric patient.
| Complication | Estimated Incidence | Etiology / Risk Factors | Salvage Management / Treatment |
|---|---|---|---|
| Avascular Necrosis (AVN) | 10-15% (Non-displaced); 30-45% (Displaced) | Disruption of MFCA; Delayed reduction; Poor initial reduction. | Total Hip Arthroplasty (THA); Core decompression (rarely effective in post-traumatic AVN). |
| Nonunion | 5-10% (Non-displaced); 20-30% (Displaced) | Varus malreduction; Lack of compression; Threads crossing fracture site. | Valgus producing intertrochanteric osteotomy (young patients); THA (older patients). |
| Hardware Cut-Out | 5-15% | Osteoporosis; Superior screw placement; Unrecognized varus collapse. | Hardware removal and conversion to THA or Hemiarthroplasty. |
| Subtrochanteric Fracture | 1-3% | Stress riser from multiple drill holes; Screws placed distal to lesser trochanter. | Cephalomedullary nailing or fixed-angle plate construct. |
| Venous Thromboembolism | 2-5% (Symptomatic) | Virchow's triad; Prolonged immobility; Pelvic trauma. | Anticoagulation (LMWH, DOACs); IVC filter if anticoagulation contraindicated. |
Phased Post-Operative Rehabilitation Protocols
The surgical fixation of the fracture is merely the first phase of treatment; rigorous, protocol-driven postoperative rehabilitation is essential to restore function and mitigate systemic complications. The primary immediate goal is rapid mobilization to prevent atelectasis, pressure ulcers, and deep vein thrombosis.
Weight-bearing protocols remain a subject of debate and must be tailored to the individual patient and the stability of the construct. In young patients with high-energy fractures or those with questionable bone quality, we typically restrict weight-bearing to "Toe-Touch Weight Bearing" (TTWB) or "Flat Foot Weight Bearing" (FFWB) for the first 6 to 8 weeks. This protects the delicate fixation from excessive shear forces while allowing for proprioceptive feedback and balance training. Conversely, in elderly patients where internal fixation was deemed appropriate (e.g., Garden I), many surgeons advocate for "Weight Bearing As Tolerated" (WBAT) immediately, recognizing that the physiological risks of immobility far outweigh the mechanical risks to the fracture.
Phase I rehabilitation (0-2 weeks) focuses on pain control, DVT prophylaxis, and early mobilization. Patients are instructed in isometric quadriceps and gluteal sets. Active-assisted range of motion (ROM) of the hip and knee is initiated, avoiding extremes of internal rotation and flexion that might stress the fracture.
Phase II (2-6 weeks) advances to active ROM and progressive strengthening. Abductor strengthening is critical, as weakness in the gluteus medius leads to a persistent Trendelenburg gait. Closed kinetic chain exercises, such as mini-squats and weight-shifting, are introduced as weight-bearing restrictions are lifted.
Phase III (6 weeks to 6 months) focuses on normalizing gait mechanics, improving proprioception, and returning to baseline activities. Radiographic surveillance is paramount during this period. We obtain AP and lateral radiographs at 2, 6, 12, and 24 weeks to monitor for fracture consolidation, varus collapse, or early signs of avascular necrosis. Patients must be educated that the risk of AVN persists for up to two years post-injury.
Summary of Landmark Literature and Clinical Guidelines
Modern orthopedic surgery is deeply rooted in evidence-based medicine. Our approach to femoral neck fractures is guided by several landmark trials and consensus guidelines that every practicing surgeon must know intimately.
The FAITH Trial (Fixation using Alternative Implants for the Treatment of Hip fractures) was a monumental international, multicenter randomized controlled trial comparing sliding hip screws (SHS) to cancellous screws for the treatment of femoral neck fractures. The trial demonstrated that for the general population, there was no significant difference in reoperation rates between the two implants. However, subgroup analysis suggested that the SHS might offer a lower risk of reoperation in patients with displaced fractures or those who are current smokers, highlighting the need for individualized implant selection.
The HEALTH Trial (Hip fracture Evaluation with ALternatives of Total Hip arthroplasty versus Hemiarthroplasty) addressed the management of displaced fractures in the elderly. It compared total hip arthroplasty (THA) to hemiarthroplasty. The study found no significant difference in the incidence of secondary procedures at 24 months. However, THA provided a modest, though statistically significant, improvement in functional outcomes and quality of life, albeit with a slightly higher risk of joint dislocation. This supports the use of THA in active, independent elderly patients, while hemiarthroplasty remains an excellent choice for lower-demand individuals.
Finally, the American Academy of Orthopaedic Surgeons (AAOS) Clinical Practice Guidelines provide robust recommendations for the management of hip fractures in the elderly. A critical, strong recommendation is the timing of surgery: operative intervention should ideally occur within 24 to 48 hours of admission. Delays beyond 48 hours are associated with significantly increased rates of mortality, major complications, and prolonged hospital stays. The guidelines also strongly advocate for coordinated, multidisciplinary orthogeriatric care models, which have been proven to optimize preoperative medical optimization and accelerate postoperative rehabilitation, ultimately improving patient survivability in this vulnerable population.
