First Metatarsal Lengthening for Revision Hallux Valgus: An Intraoperative Masterclass

Key Takeaway
Join us in the OR for a masterclass on first metatarsal lengthening. We'll meticulously cover the surgical anatomy, preoperative planning, and step-by-step intraoperative execution, focusing on external fixator application and corticotomy. Learn critical pearls and pitfalls to manage revision hallux valgus with debilitating transfer metatarsalgia, ensuring optimal outcomes and patient recovery.
Comprehensive Introduction and Patho-Epidemiology
Fellows and esteemed colleagues, welcome to the operating theater. Today, we are addressing one of the most challenging, yet profoundly rewarding, problems in forefoot reconstruction: revision hallux valgus surgery complicated by symptomatic first metatarsal shortening and recalcitrant transfer metatarsalgia. This pathology is rarely just an aesthetic concern; it represents a fundamental collapse of forefoot biomechanics that severely debilitates the patient, altering their gait cycle and significantly diminishing their quality of life. Our objective today transcends cosmetic correction; it is a meticulous restoration of the physiological weight-bearing cascade across the metatarsal parabola.
The underlying pathology of "Short First Metatarsal Syndrome" is frequently iatrogenic. In the pursuit of correcting severe hallux valgus, aggressive osteotomies—such as the Scarf, Ludloff, or poorly executed distal chevron procedures—can result in unintended shortening of the first ray. Even basilar closing wedge osteotomies or Lapidus arthrodeses, if over-resected, precipitate this complication. This seemingly minor osseous deficit has profound biomechanical ramifications. The first metatarsal is designed to bear approximately 40% to 50% of the body's weight during the propulsive phase of gait. When its length is compromised, its load-bearing capacity is drastically reduced, forcing the adjacent lesser metatarsals to absorb forces they were never evolutionarily designed to withstand.
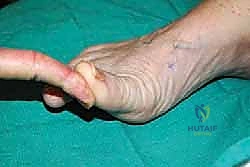
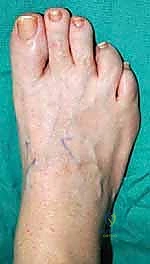
Clinically, this manifests as painful transfer metatarsalgia. Patients typically present with intractable plantar keratoses (IPKs) beneath the second and occasionally the third metatarsal heads. This localized overload is exacerbated by the relative dorsiflexion malunion that often accompanies the shortening, further elevating the first metatarsal head away from the weight-bearing surface. The patient will describe a sensation analogous to walking on shards of glass or hot pebbles, a pain that is relentless and refractory to conservative measures like orthotics or metatarsal pads. On physical examination, the great toe appears visibly shortened, the first metatarsophalangeal (MTP) joint may exhibit restricted and painful motion, and profound tenderness is elicited upon palpation of the lesser metatarsal heads.
Detailed Surgical Anatomy and Biomechanics
Before we make a single incision, an exhaustive understanding of the regional anatomy and the biomechanical interplay of the first ray is mandatory. The success of distraction osteogenesis relies heavily on preserving the biological envelope while manipulating the mechanical axis.
Osteology of the First Ray
The first metatarsal is the cornerstone of the medial column of the foot. Unlike the lesser metatarsals, it possesses a robust, thick cortical diaphysis and a relatively narrow medullary canal, which is highly relevant when planning a corticotomy and selecting external fixator pin diameters. Our primary focus is the diaphyseal region, avoiding the metaphyseal flares where the bone is more cancellous but less amenable to the controlled, linear distraction required for callotasis. The blood supply to the metatarsal is dual: an endosteal supply via the principal nutrient artery (entering laterally in the middle third) and a rich periosteal network. Preserving this periosteal sleeve during the corticotomy is the single most critical factor in ensuring robust regenerate bone formation.
The articulation of the first metatarsal with the medial cuneiform proximally (the tarsometatarsal or TMT joint) and the proximal phalanx distally (the MTP joint) must be rigorously protected. The first MTP joint is an intricate complex involving the sesamoid apparatus. The medial and lateral sesamoids are embedded within the flexor hallucis brevis tendons and articulate with the plantar aspect of the metatarsal head. When the metatarsal is iatrogenically shortened, the normal tracking of these sesamoids is disrupted, often leading to sesamoiditis or accelerated arthrosis. Restoring length not only addresses the lesser metatarsal overload but also re-establishes the crucial windlass mechanism, allowing the plantar fascia to effectively elevate the longitudinal arch during toe-off.
Neurovascular Considerations
The dorsal surgical approach exposes several critical neurovascular structures that demand meticulous handling. The medial dorsal cutaneous nerve (a branch of the superficial peroneal nerve) and the dorsal digital nerve to the medial hallux course superficially along the dorsomedial aspect of the foot. Laceration or entrapment of these nerves within scar tissue or external fixator pins will result in agonizing neuromas or permanent paresthesias, potentially ruining an otherwise mechanically successful surgery. Dissection must be blunt and deliberate once the dermis is breached.
Vascularly, the dorsal venous arch is a prominent, superficial network that lies immediately deep to the skin. Careful subfascial dissection and gentle retraction are essential to minimize venous bleeding, which not only obscures the surgical field but can lead to postoperative hematoma formation, increasing the risk of infection and wound dehiscence. Deeper in the first intermetatarsal space lies the dorsalis pedis artery and the deep peroneal nerve. While our medial approach generally avoids these structures, any lateral extension of the dissection or errant pin placement poses a significant risk to this vital neurovascular bundle.
Musculotendinous and Capsuloligamentous Structures
The extensor hallucis longus (EHL) tendon is the most prominent tendinous structure in our operative field, running directly dorsal to the first metatarsal. Our incision will typically be placed just medial to the EHL tendon to avoid direct friction against the hardware. The tendon must be retracted gently; aggressive handling can lead to postoperative tenosynovitis or adhesions that severely limit plantarflexion of the hallux.
The periosteum, as previously mentioned, is a fibrous, highly vascularized, and richly innervated layer enveloping the bone. In the context of distraction osteogenesis, the periosteum is the primary engine of bone regeneration. Our surgical technique must employ a "low-energy" corticotomy, utilizing sharp osteotomes and minimal periosteal stripping. We aim to divide the bone while leaving the periosteal tube as intact as possible, effectively creating a biological chamber within which the new bone (regenerate) will form during the distraction phase.
Exhaustive Indications and Contraindications
Patient selection is paramount. Distraction osteogenesis is a demanding process requiring immense patient compliance and psychological resilience. It is not a procedure to be undertaken lightly.
| Category | Specific Criteria | Clinical Rationale |
|---|---|---|
| Indications | Symptomatic first metatarsal shortening > 5mm | Shortening less than 5mm can often be managed with orthotics or lesser metatarsal shortening osteotomies (Weil). |
| Indications | Intractable transfer metatarsalgia | The primary symptom driving the need for biomechanical restoration. |
| Indications | Failed conservative management | Exhaustion of custom orthoses, metatarsal pads, and activity modification. |
| Indications | Concomitant dorsiflexion malunion | The external fixator can correct both length and angular deformity simultaneously if applied correctly. |
| Contraindications | Active local or systemic infection | Absolute contraindication due to the risk of pin tract infections progressing to deep osteomyelitis. |
| Contraindications | Severe peripheral vascular disease (PVD) | Poor vascularity precludes adequate bone regeneration and soft tissue healing. |
| Contraindications | Non-compliant patient | The patient must manage daily pin care and precise distraction schedules for months. |
| Contraindications | End-stage first MTP joint arthrosis | Lengthening will exacerbate arthritic pain; an arthrodesis with structural bone grafting is the preferred alternative. |
Pre-Operative Planning, Templating, and Patient Positioning
The adage "measure twice, cut once" is never more applicable than in reconstructive foot surgery utilizing distraction osteogenesis. Meticulous preoperative planning dictates the intraoperative workflow and the ultimate clinical outcome.
Radiographic Analysis and Templating
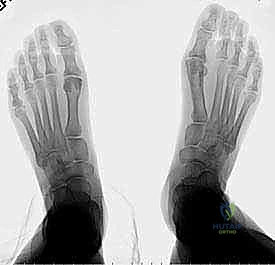
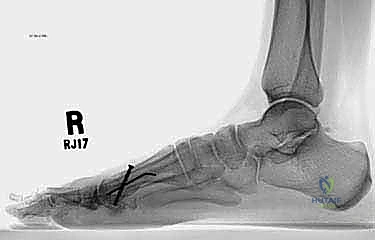
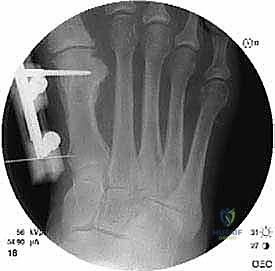
Weight-bearing plain radiographs of both feet are absolutely mandatory. We require standard anteroposterior (AP), lateral, and oblique projections. The contralateral, unoperated foot serves as our physiological blueprint. By comparing the relative lengths of the first and second metatarsals on the normal foot, we can accurately calculate the target length for the operative side, accounting for radiographic magnification.
On the AP view, we quantify the absolute shortening of the first metatarsal and assess the relationship between the metatarsal head and the sesamoid apparatus. We also evaluate the bone stock, the presence of retained hardware from previous surgeries, and any residual angular deformity.
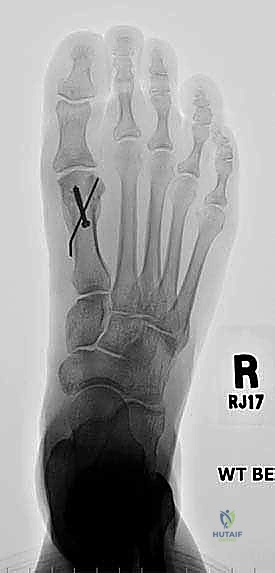
The lateral view is critical for identifying any sagittal plane deformity. A dorsiflexed first metatarsal head is a common culprit in transfer metatarsalgia and must be addressed. If a dorsal malunion exists, the external fixator can be mounted with a slight plantarward trajectory to gradually correct the apex-dorsal angulation during distraction.
Finally, we must scrutinize the first MTP joint. Joint space narrowing, subchondral sclerosis, and osteophyte formation indicate pre-existing arthrosis. If the joint is severely degenerated, lengthening alone will likely result in a stiff, painful toe, and a first MTP arthrodesis utilizing a structural intercalary bone graft should be strongly considered instead.
Patient Positioning and Operating Room Setup
The patient is positioned supine on the operating table. A critical pearl here: do not place a bump under the ipsilateral hip. While a bump is standard for lateral approaches, we want the leg to naturally externally rotate. This provides unimpeded, ergonomic access to the medial aspect of the foot, which is the precise location where our unilateral monorail external fixator will be applied.
The fluoroscopy unit (C-arm) must be draped sterilely and positioned to enter from the contralateral side of the table, allowing for seamless transition between AP and lateral views without compromising the sterile field. The foot should be positioned at the very edge of the radiolucent table extension to ensure the C-arm can rotate freely.
A pneumatic thigh tourniquet is applied. Following exsanguination with an Esmarch bandage, the tourniquet is inflated to 250-300 mmHg. A bloodless field is not a luxury here; it is a necessity for identifying fine cutaneous nerves, preserving the periosteum, and executing a precise corticotomy without thermal necrosis.
Step-by-Step Surgical Approach and Fixation Technique
We are now scrubbed, the patient is prepped, and the surgical field is optimized. The execution of this procedure requires a delicate balance of rigid mechanical fixation and profound respect for bone biology.
Incision Planning and Soft Tissue Dissection
Our initial step is careful evaluation of the soft tissue envelope. In a revision setting, the medial border of the foot is often marred by previous surgical scars. Whenever feasible, we incorporate these existing scars into our approach to minimize the risk of devascularizing narrow skin bridges, which could lead to catastrophic wound breakdown.
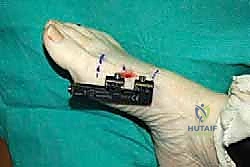
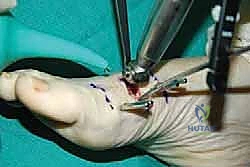
We plan a concise, longitudinal dorsal incision, approximately 2 to 3 centimeters in length, centered over the middle third of the first metatarsal diaphysis. This is our designated corticotomy site. The incision is carried down through the dermis. Using blunt dissection with tenotomy scissors or a hemostat, we carefully spread the subcutaneous tissues, remaining vigilant for the medial dorsal cutaneous nerve and superficial veins. Once the extensor hallucis longus tendon is identified, we retract it laterally, exposing the dorsal periosteum of the metatarsal.
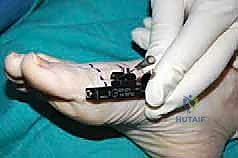
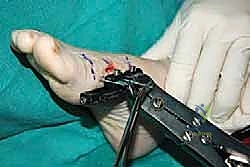
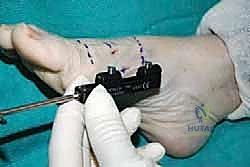
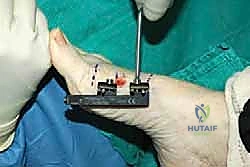
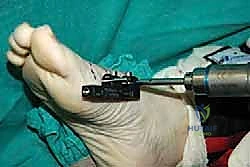
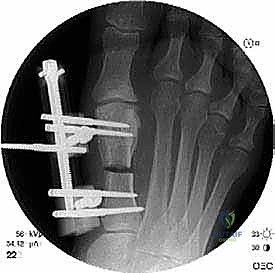
Application of the External Fixator
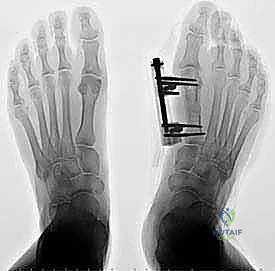
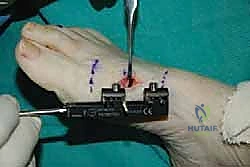
The stability of the external fixator dictates the quality of the regenerate bone. A unilateral, single-plane monorail fixator is the gold standard for this application. Before drilling, we mark the planned corticotomy site with a surgical pen. The fixator is kept in a slightly compressed state during application to allow for initial compression of the corticotomy, which aids in hemostasis and stabilizes the bone ends prior to the latency phase.
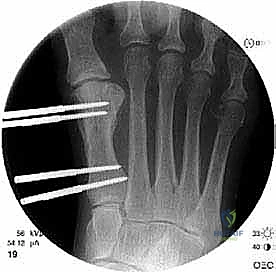
We utilize the fixator body itself as a drill guide to ensure absolute parallelism of the pins. The sequence of pin placement is critical. I advocate placing the most distal pin first. Using a wire driver, a 1.5-mm or 2.0-mm threaded half-pin is inserted percutaneously into the medial aspect of the distal metaphysis, ensuring it is proximal to the MTP joint capsule.
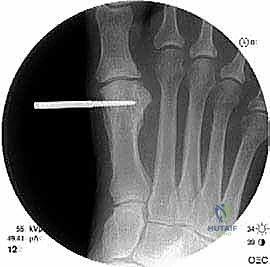
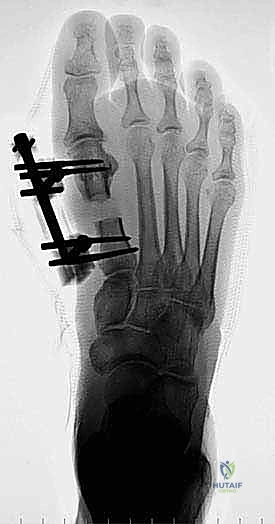
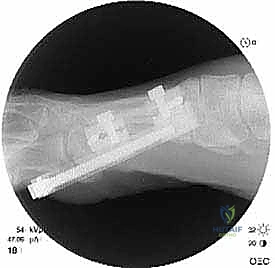
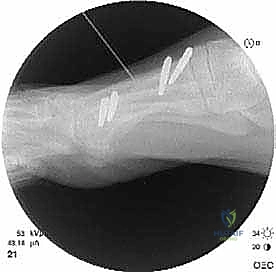
Fluoroscopy in both AP and lateral planes is utilized immediately to confirm trajectory and depth. The pin must engage both the medial and lateral cortices (bicortical purchase) without protruding excessively into the intermetatarsal space, where it could tether the soft tissues or irritate the deep neurovascular bundle.
Next, we place the most proximal pin. By securing the two outermost pins first, we lock the trajectory of the monorail parallel to the long axis of the metatarsal.
Once the proximal and distal pins are confirmed on fluoroscopy, the two inner pins are placed through the remaining guide holes. This four-pin construct provides exceptional rigidity, resisting the strong bending moments exerted by the Achilles tendon and the intrinsic foot musculature during weight-bearing.
The Corticotomy: Techniques for Preserving Osteogenic Potential
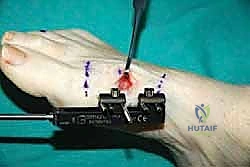
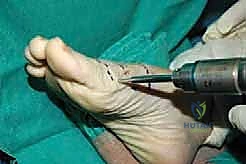
The corticotomy is the most biologically demanding step of the procedure. We must sever the mechanical continuity of the bone while preserving its biological vitality. A high-speed oscillating saw generates excessive heat, causing thermal necrosis of the bone ends and destroying the osteogenic potential. Therefore, a low-energy technique is mandatory.
Through our small dorsal incision, we make a longitudinal slit in the periosteum and gently elevate it medially and laterally by only a few millimeters—just enough to accommodate our instruments. We do not circumferentially strip the periosteum.
Using a 1.5-mm or 2.0-mm drill bit, we create a series of contiguous, bicortical drill holes directly across the diaphysis, between the two central fixator pins. Copious cold saline irrigation is used continuously during drilling to mitigate any thermal damage.
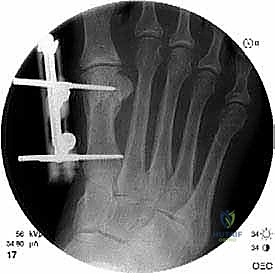
Once the cortex is perforated circumferentially, a sharp, narrow osteotome (typically 4mm or 6mm) is introduced into the drill holes.
With gentle taps of a mallet, the osteotome is advanced to connect the drill holes. Crucially, the osteotome should be twisted slightly to complete the fracture, rather than levering heavily, which can cause uncontrolled propagation of the fracture line into the pin sites.
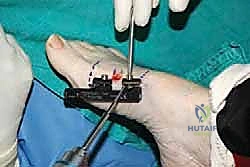

Completion of the corticotomy is confirmed both tactilely (a sudden loss of resistance) and visually.
Latency Phase and Distraction Osteogenesis Initiation
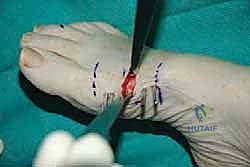
Once the corticotomy is complete, we temporarily loosen the fixator clamps and manually distract the bone ends by 1 to 2 millimeters to ensure complete separation. We then compress the bone ends back together under direct vision and fluoroscopic guidance, locking the fixator tightly. This initial compression provides absolute stability, minimizing micromotion and allowing the initial hematoma to organize into a fibrous scaffold.
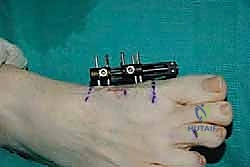
The surgical site is thoroughly irrigated, and the periosteum and subcutaneous tissues are closed meticulously with absorbable sutures. The skin is closed with non-absorbable nylon or prolene. Sterile dressings are applied, and a compression wrap is placed around the foot.
The patient now enters the "latency phase," which typically lasts 7 to 10 days. During this period, no distraction occurs. This allows the inflammatory phase of bone healing to subside and the initial soft callus to form. Premature distraction will tear this fragile vascular network, leading to a non-union.
Complications, Incidence Rates, and
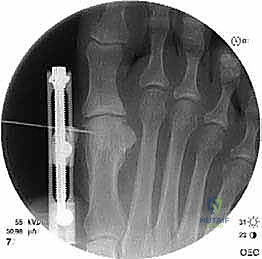
Clinical & Radiographic Imaging Archive