Extensor Tendon Reconstruction: A Masterclass in Tendon Transfer and Grafting
Key Takeaway
This masterclass provides an exhaustive, real-time guide to extensor tendon reconstruction through transfer and grafting for traumatic injuries. We meticulously cover surgical anatomy, preoperative planning, and granular intraoperative techniques for EIP-EPL, EIP-EDC, FCU-EDC, and FCR-EDC transfers. Fellows will gain critical insights into precision, tensioning, and complication management, ensuring optimal functional outcomes for complex extensor disruptions.
Comprehensive Introduction and Patho-Epidemiology
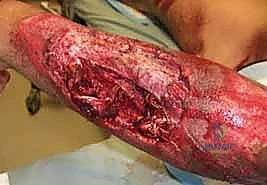
Welcome, colleagues, to the operating theater. Today, we delve into a challenging but immensely rewarding aspect of reconstructive hand surgery: the restoration of traumatic and attritional extensor tendon disruptions. These are rarely your straightforward primary repairs encountered in the acute trauma bay. Instead, we are frequently confronted with late presentations, significant soft tissue loss, segmental tendon deficits, and hostile tissue beds. Our overarching objective is to restore active wrist and digital extension, a biomechanical prerequisite for grip strength, fine motor coordination, and ultimately, the patient's independence in daily living.
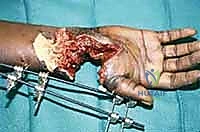
The pathophysiology of extensor tendon loss is multifaceted. While acute lacerations from penetrating trauma are common, we frequently encounter attritional ruptures. These are classically seen following distal radius fractures, where the Extensor Pollicis Longus (EPL) tendon undergoes ischemic necrosis or mechanical abrasion as it courses around a prominent Lister’s tubercle or protruding hardware. Furthermore, inflammatory arthropathies, particularly rheumatoid arthritis, predispose the extensor tendons to spontaneous rupture due to invasive tenosynovitis and subsequent biomechanical degradation of the tendon matrix. The caput ulnae syndrome, characterized by dorsal subluxation of the distal ulna, notoriously leads to sequential ruptures of the ulnar-sided extensor tendons (Vaughan-Jackson syndrome).
Epidemiologically, extensor tendon injuries are highly prevalent, representing a significant proportion of hand trauma presentations. The incidence of EPL rupture following non-operatively managed distal radius fractures is estimated to be between 0.3% and 3%, often occurring weeks to months post-injury. When dealing with these delayed presentations or massive defects, end-to-end repair is impossible due to myostatic contracture of the proximal muscle belly and retraction of the tendon ends. Thus, the surgeon must possess a masterful command of tendon transfer and grafting techniques.
Mastering these reconstructive procedures requires a paradigm shift from simple anatomical repair to functional restitution. The surgeon must become a biomechanical architect, redistributing available muscle-tendon units to replace lost functions without creating unacceptable donor site morbidity. This requires an intimate understanding of tissue equilibrium, excursion, line of pull, and the delicate interplay between the extrinsic and intrinsic extensor systems. The ensuing chapter provides an exhaustive, definitive guide to executing these complex reconstructions.
Detailed Surgical Anatomy and Biomechanics
Before a scalpel touches skin, a profound, three-dimensional understanding of extensor anatomy and biomechanics is paramount. The extrinsic extensor tendons are organized into superficial and deep groups within the posterior forearm, each with distinct roles in hand and wrist kinematics. The functional capacity of a muscle is dictated by its physiological cross-sectional area (determining force) and its fiber length (determining excursion).
Superficial Extensors
The superficial group originates primarily from the lateral epicondyle and the posterior aspect of the forearm, serving as the primary extensors of the wrist and the metacarpophalangeal (MP) joints.
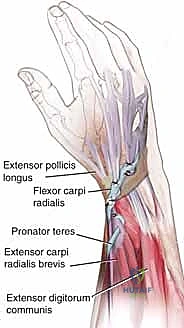
The Extensor Carpi Radialis Longus (ECRL) originates from the lateral supracondylar ridge, inserting into the base of the second metacarpal. It is a powerful wrist extensor and radial deviator, boasting an excursion of approximately 33 mm. The Extensor Carpi Radialis Brevis (ECRB), originating from the lateral epicondyle and inserting into the third metacarpal base, acts as the primary, most central wrist extensor. Its centralized insertion makes it the most critical muscle for stabilizing the wrist during power grip.
The Extensor Digitorum Communis (EDC) originates from the lateral epicondyle and divides into four tendons for the medial four digits. It extends the MP joints with an excursion of approximately 50 mm. The Extensor Digiti Minimi (EDM) provides independent extension to the small finger, typically lying ulnar to the EDC tendon of the fifth digit within the fifth dorsal compartment. The Extensor Carpi Ulnaris (ECU) originates from the lateral epicondyle and posterior ulna, inserting into the fifth metacarpal base, providing wrist extension and ulnar deviation. Finally, the Anconeus, a small muscle assisting in elbow extension and dynamic stabilization of the proximal radioulnar joint, completes this superficial layer.
Deep Extensors
The deep extensor muscles typically originate from the posterior surfaces of the radius, ulna, and the intervening interosseous membrane. This group is critical for thumb kinematics and independent index finger function.
The Abductor Pollicis Longus (APL) originates from the posterior ulna, radius, and interosseous membrane, inserting into the base of the first metacarpal to abduct and extend the thumb carpometacarpal (CMC) joint. The Extensor Pollicis Brevis (EPB) originates from the posterior radius, inserting into the base of the thumb proximal phalanx to extend the thumb MP joint.
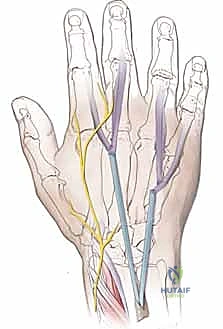
The Extensor Pollicis Longus (EPL) is a critical structure originating from the posterior ulna. It takes a sharp, 45-degree radial turn around Lister's tubercle, utilizing it as a fulcrum to insert into the base of the thumb distal phalanx. This unique pathway allows the EPL to extend the thumb interphalangeal (IP) and MP joints, while also acting as a strong adductor. The Extensor Indicis Proprius (EIP) originates from the distal posterior ulna, inserting into the dorsal hood of the index finger, predictably ulnar to the EDC II. This ulnar position is a critical anatomical landmark during donor harvest.
Innervation, Vascularity, and the Retinaculum
All extrinsic extensor muscles are innervated by the radial nerve. Crucially, the radial nerve's deep motor branch becomes the posterior interosseous nerve (PIN) as it dives between the two heads of the supinator muscle. The PIN is highly vulnerable during proximal forearm dissection and its iatrogenic injury is a devastating complication that perfectly mimics extensor tendon rupture.
Tendon vascularity is precarious. In the forearm, nutrition is derived from segmental arterial branches within the surrounding fascia. At the wrist, beneath the retinaculum, nutrition relies heavily on diffusion and the mesotenon. Compromise to these delicate vascular networks, particularly in the watershed zones of the EPL and the distal EDC, leads to attritional ruptures.
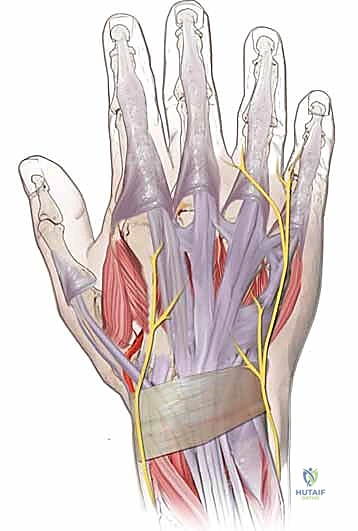
At the wrist, the extensor retinaculum forms six distinct fibro-osseous dorsal compartments. Compartment I houses the APL and EPB. Compartment II contains the ECRL and ECRB. Compartment III exclusively houses the EPL. Compartment IV contains the EDC and EIP. Compartment V houses the EDM, and Compartment VI contains the ECU. Understanding these compartments is essential for accurately identifying retracted tendon stumps and routing transfers.
The Intrinsic System and Tendon Zones
Distal to the MP joint, the dorsal extensor apparatus is a complex confluence of extrinsic and intrinsic contributions. The central slip, a continuation of the extrinsic extensor, inserts into the dorsal base of the middle phalanx. The intrinsic muscles (lumbricals and interossei) form the lateral bands, which bypass the PIP joint to coalesce dorsally over the middle phalanx, forming the terminal extensor tendon that inserts on the distal phalanx.
We classify extensor tendon injuries by zones (Verdan's classification) to standardize communication and guide treatment. Odd-numbered zones overlie joints, while even-numbered zones overlie bone. For the fingers: Zone I (DIP joint), Zone II (middle phalanx), Zone III (PIP joint), Zone IV (proximal phalanx), Zone V (MP joint), Zone VI (metacarpals), Zone VII (extensor retinaculum), Zone VIII (distal forearm), and Zone IX (proximal forearm). The thumb is classified similarly from T-I to T-V.
Exhaustive Indications and Contraindications
The decision to proceed with tendon transfer or grafting is highly nuanced and requires a comprehensive evaluation of the patient's functional deficits, anatomical constraints, and physiological capacity for rehabilitation. Tendon transfers are indicated when a primary repair is impossible due to tendon retraction, segmental loss, or irreversible muscle fibrosis, provided that a suitable, expendable donor muscle is available.
Specific indications include delayed presentation of traumatic lacerations (typically beyond 3-4 weeks), attritional ruptures secondary to distal radius fractures or rheumatoid arthritis, and irreparable nerve injuries (e.g., radial nerve palsy requiring a pronator teres to ECRB transfer). Segmental defects resulting from tumor extirpation, severe crush injuries, or extensive infections also necessitate interpositional tendon grafting, utilizing donors such as the palmaris longus, plantaris, or extensor digitorum longus from the foot.
Contraindications must be strictly respected to avoid catastrophic failures. A stiff, contracted joint is an absolute contraindication to tendon transfer; the recipient joint must possess full, passive range of motion prior to surgery. A transfer cannot overcome a fixed mechanical block. Furthermore, the soft tissue bed must be supple and well-vascularized. Attempting a transfer through dense scar tissue or an open wound will inevitably lead to restrictive adhesions or infection.
| Factor | Indications for Tendon Transfer/Grafting | Contraindications (Absolute & Relative) |
|---|---|---|
| Tissue Status | Segmental tendon defect, retracted myostatic muscle | Inadequate soft tissue coverage, active infection |
| Joint Mobility | Full passive range of motion at target joints | Fixed joint contractures, severe arthritis |
| Donor Availability | Expendable donor with synergistic/similar excursion | Lack of suitable donor, generalized neuromuscular disease |
| Patient Factors | Compliant, motivated for extensive rehabilitation | Severe cognitive impairment, inability to comply with rehab |
| Neurological | Irreversible peripheral nerve palsy (e.g., radial nerve) | Progressive neurological disorders (e.g., ALS) |
Pre-Operative Planning, Templating, and Patient Positioning
Effective preoperative planning is the bedrock of reconstructive success. The surgeon must act as a tactician, meticulously strategizing the reallocation of biomechanical assets. This begins with a rigorous clinical examination. We must precisely document the loss of active extension at the wrist, MP, and IP joints. The tenodesis test is invaluable; passive wrist flexion should normally induce passive digital extension. An absent tenodesis effect strongly indicates extensor tendon discontinuity.
A comprehensive neurovascular examination is mandatory before any anesthetic is administered. The surgeon must differentiate between a true tendon rupture and a posterior interosseous nerve (PIN) palsy. In a PIN palsy, the wrist will typically extend with radial deviation (due to preserved ECRL function innervated proximal to the PIN), but active MP extension of the digits and thumb will be absent. Furthermore, joint contractures must be identified and aggressively managed with preoperative hand therapy and dynamic splinting.
Donor tendon selection is governed by "Smith's Rules of Tendon Transfer." The chosen donor must be expendable, meaning its original function can be adequately compensated for by remaining musculature. It must possess adequate excursion (amplitude) to achieve the desired movement, and its power (cross-sectional area) must be sufficient to overcome resistance. The line of pull should be as straight as possible, and ideally, one donor tendon should be tasked with only one primary function to simplify cortical re-education.
The patient is positioned supine on the operating table with the affected extremity resting on a radiolucent hand table. The arm is abducted, and the elbow is draped free to allow for dynamic intraoperative assessment of tensioning through a full range of motion. A pneumatic tourniquet is applied to the proximal arm to ensure a bloodless surgical field, which is critical for identifying delicate structures and preserving the paratenon. Fluoroscopy should be readily available to assess joint alignment, verify hardware placement if concurrent bony work is required, and confirm the exact location of Lister's tubercle or other bony landmarks.
Step-by-Step Surgical Approach and Fixation Technique
The surgical execution of tendon transfers and grafts demands meticulous tissue handling, precise routing, and biomechanically sound fixation. Incisions must be carefully designed to allow broad exposure while respecting venous and lymphatic drainage patterns. We utilize multiple, strategically placed longitudinal or curvilinear incisions, avoiding straight lines across flexion creases.

The Pulvertaft End-Weave Technique
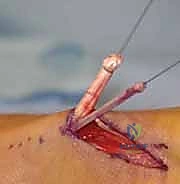
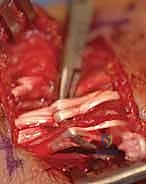
The gold standard for tendon junctures in transfers and grafts is the Pulvertaft end-weave technique. This creates a robust, mechanically superior interface that resists gapping during early active motion rehabilitation. The recipient tendon is debrided to healthy, parallel collagen bundles. Using a specialized tendon passer or a curved hemostat, three to four perpendicular passes are made through the substance of the larger recipient tendon.
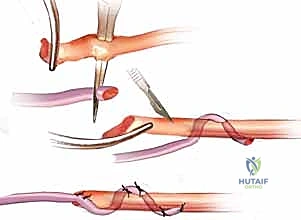
The smaller donor tendon is woven through these apertures. The weave is then secured with multiple interrupted, non-absorbable, braided sutures (e.g., 3-0 or 4-0 Ethibond or FiberWire). We employ a locking stitch technique, placing the sutures at the exact points where the donor tendon enters and exits the recipient tendon to maximize pull-out strength. The surgeon must ensure the weave is tight enough to prevent slippage but not so constrictive that it strangulates the tendon's intrinsic microvasculature.
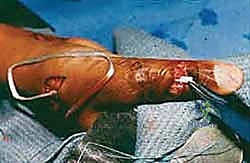
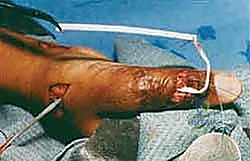
EIP to EPL Transfer: A Detailed Walkthrough
The transfer of the Extensor Indicis Proprius (EIP) to the Extensor Pollicis Longus (EPL) is the quintessential reconstructive procedure for isolated EPL ruptures.
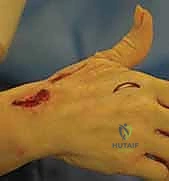
Donor Harvest: A 1.5 cm transverse or longitudinal incision is made over the index finger MP joint. The extensor hood is exposed, and the EIP is identified consistently ulnar to the EDC II. The EIP is transected proximal to the sagittal band to preserve the integrity of the intrinsic mechanism. The distal stump of the EIP is often repaired to the EDC II to prevent an extensor lag of the index finger, though this step is debated.

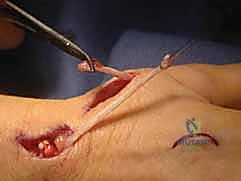
Recipient Site and Tunneling: A second incision is made over the dorsal wrist, centered over the extensor retinaculum. The proximal EIP is identified and withdrawn into this wrist incision. The distal stump of the ruptured EPL is identified, typically retracted distally toward the thumb CMC joint. A wide, generous subcutaneous tunnel is bluntly created from the wrist incision to the thumb incision. The tunnel must be superficial to the extensor retinaculum to establish a straight line of pull, avoiding the third dorsal compartment which would create an unfavorable angle and increase friction.
Tensioning the Transfer: The EIP tendon is passed through the subcutaneous tunnel and woven into the EPL stump using the Pulvertaft technique. Tensioning is the most critical and subjective step of the operation. The "Goldilocks" tension must be achieved. With the wrist in neutral, the thumb should rest in full extension and slight abduction. When the wrist is passively flexed, the thumb should fall into further extension (the tenodesis effect). If the transfer is too tight, the patient will lose thumb flexion; if too loose, an extensor lag will persist.

Interpositional Tendon Grafting
When multiple tendons are deficient, or the gap is too large for a local transfer, interpositional grafting is required. The Palmaris Longus is the premier donor, offering up to 15 cm of graft material. If absent, the plantaris or extensor digitorum longus from the foot are excellent alternatives.
The graft is harvested using a tendon stripper. The scarred recipient bed is aggressively excised to healthy, bleeding tissue. The graft is then woven into the proximal muscle-tendon unit and the distal tendon stump. Tensioning here is exceptionally difficult, as the surgeon must account for the resting tone of the proximal muscle belly. We typically tension grafts slightly tighter than normal resting posture, anticipating some degree of viscoelastic stretch during the rehabilitation phase.
Complications, Incidence Rates, and Salvage Management
Despite meticulous surgical technique, extensor tendon reconstructions are fraught with potential complications. The biological reality of healing a tendon within a scarred bed makes these procedures inherently risky. The surgeon must be prepared to identify, manage, and salvage these adverse outcomes.
The most ubiquitous complication is the formation of restrictive peritendinous adhesions. Because the transfer or graft must glide through a surgically traumatized bed, scar tissue frequently tethers the tendon to surrounding fascia or bone, severely limiting excursion. Adhesions are the primary reason patients fail to regain full active motion, occurring in up to 30-40% of complex reconstructions. If intensive hand therapy plateaus after 4-6 months and a significant discrepancy between active and passive motion persists, a surgical tenolysis is indicated.
Tendon rupture or attenuation of the transfer is a catastrophic complication, occurring in 2-5% of cases. This typically results from a technically deficient weave (inadequate number of passes or poor suture purchase), over-aggressive early rehabilitation, or patient non-compliance with splinting protocols. If a rupture is identified acutely, immediate re-exploration and revision of the weave are mandatory. If identified late, a secondary transfer or a two-stage reconstruction with a silicone rod (Hunter rod) may be necessary to recreate a pseudo-sheath.
Donor site morbidity must also be respected. Following an EIP harvest, patients may experience an extensor lag of the index finger, though this is usually mild (less than 10-15 degrees) and functionally insignificant. However, harvesting the ECRB for a transfer can lead to a profound loss of wrist extension power and a destabilized power grip. Careful donor selection and precise surgical technique are the best prophylaxis against donor site deficits.
| Complication | Estimated Incidence | Etiology / Risk Factors | Salvage Management Strategy |
|---|---|---|---|
| Peritendinous Adhesions | 30% - 40% | Hostile tissue bed, delayed mobilization, severe initial trauma | Intensive hand therapy; surgical tenolysis at 4-6 months if therapy plateaus |
| Transfer Rupture/Pull-out | 2% - 5% | Inadequate Pulvertaft weave, early excessive loading, non-compliance | Acute: Re-exploration and repair. Late: Secondary transfer or 2-stage grafting |
| Attenuation / Stretching | 10% - 15% | Transfer tensioned too loosely, viscoelastic creep of graft | Revision surgery to shorten and re-tension the transfer |
| Donor Site Morbidity (Extensor Lag) | 5% - 10% (EIP harvest) | Failure to repair sagittal band, damage to EDC tendon | Usually conservative; rarely requires surgical tethering of distal stump |
| Infection | < 2% | Poor soft tissue envelope, hematoma, prolonged operative time | Aggressive I&D, targeted IV antibiotics, possible graft removal if uncontrolled |
Phased Post-Operative Rehabilitation Protocols
The surgery is merely the first half of the reconstructive battle; the second half is fought in the hand therapy clinic. Post-operative rehabilitation protocols must strike a delicate, perilous balance: the tendon juncture must be protected from excessive tensile forces that could cause rupture, while simultaneously being subjected to enough controlled glide to prevent restrictive adhesions.
Phase I: Protection and Controlled Motion (Weeks 0-4)
Historically, extensor transfers were strictly immobilized for 4 weeks. However, modern protocols favor Early Active Motion (EAM) to optimize gliding. For an EIP to EPL transfer, the patient is placed in a forearm-based thumb spica splint with the wrist in 20-30 degrees of extension and the thumb in full extension and slight abduction. Within the first week, a dynamic outrigger or a Relative Motion Extension (RME) splinting protocol is initiated. The patient performs active IP and MP flexion against the resistance of a rubber band, followed by passive, rubber-band-assisted extension. True active extension is strictly prohibited to protect the weave.
Phase II: Intermediate Mobilization (Weeks 4-8)
At 4 weeks, the tensile strength of the healing weave has increased sufficiently to begin weaning the static splint during the day. Gentle, gravity-eliminated active extension exercises are initiated. The therapist focuses on isolated joint blocking exercises to ensure the transfer is gliding through its entire excursion pathway. If an extensor lag is present, dynamic extension splinting is continued. Gentle scar massage and modalities (e.g., ultrasound, silicone sheeting) are employed to soften the surgical bed.
Phase III: Strengthening and Return to Function (Weeks 8-12+)
By 8 weeks, the tendon juncture is robust enough to withstand physiological loads. Progressive resistive exercises are introduced, starting with light putty and advancing to free weights. Work-specific or sport-specific simulations are incorporated. Splinting is typically discontinued entirely unless required for high-risk activities. Patients must be counseled that maximal functional recovery, particularly regarding cortical re-education of the transferred muscle, can take up to 12-18 months.
Summary of Landmark Literature and Clinical Guidelines
The principles of tendon transfer and grafting we utilize today are built upon the foundational work of surgical pioneers. Boyes and Brand established the critical biomechanical parameters of muscle excursion and physiological cross-sectional area, demonstrating that a donor muscle must closely match the biomechanical profile of the paralyzed or absent muscle. Pulvertaft's introduction of the end-weave technique revolutionized the field by providing a juncture strong enough to withstand early mobilization, drastically reducing adhesion rates.
Modern clinical literature has continually refined these techniques. Comparative studies consistently demonstrate the superiority of the EIP as a donor for EPL reconstruction. A landmark systematic review by Gelinas et al. confirmed that EIP to EPL transfers yield excellent functional outcomes with minimal donor site morbidity compared to alternatives like the palmaris longus graft or the extensor carpi radialis longus transfer. The EIP's independent innervation, synergistic phase of firing, and matching excursion make it the undisputed gold standard.
Furthermore, the evolution of post-operative rehabilitation has been heavily influenced by clinical trials comparing static immobilization to early active motion (EAM). Studies by Evans and others have conclusively shown that EAM protocols, particularly for zones V-VII, result in significantly less total active motion loss and lower rates of required tenolysis compared to traditional 4-week immobilization.
In conclusion, extensor tendon reconstruction is an exacting discipline requiring a synthesis of profound anatomical knowledge, meticulous surgical technique, and rigorous post-operative rehabilitation. By adhering to the biomechanical principles of tendon transfer, executing flawless Pulvertaft weaves, and partnering closely with skilled hand therapists, the orthopedic surgeon can predictably restore function and dramatically improve the quality of life for patients suffering from devastating extensor tendon deficits.
