Distal Humerus Anterolateral Approach: Surgical Anatomy, Techniques, & Fracture Management
Key Takeaway
The distal humerus anterolateral approach is a vital orthopedic surgical option for fractures of the distal fourth of the humerus, including Holstein-Lewis fractures. It provides excellent exposure for reduction and internal fixation, facilitating direct visualization and protection of the radial nerve. This approach is favored for its advantages in extensive distal and proximal exposure while minimizing ulnar nerve risk.
Introduction and Epidemiology
Fractures of the distal humerus represent approximately 2% of all adult fractures and a significant portion of upper extremity trauma. While intra-articular distal humeral fractures are well-recognized entities, fractures of the distal diaphyseal segment, often extending into the metaphysis or articular region, present unique challenges. The anterolateral approach to the distal humerus is a valuable surgical option for addressing these fractures, particularly those involving the distal fourth of the humerus, including the classic Holstein-Lewis fracture, distal humeral shaft fractures, and select supracondylar fractures with diaphyseal extension.
The incidence of distal humeral fractures demonstrates a bimodal distribution, affecting younger males due to high-energy trauma and older osteoporotic females from low-energy falls. The increasing life expectancy and prevalence of osteoporosis suggest a rising trend in these injuries. Open reduction and internal fixation (ORIF) is the preferred treatment for most displaced, unstable, or irreducible distal humeral fractures, aiming for anatomical reduction, stable fixation, and early mobilization to restore elbow function and prevent long-term disability.
The choice of surgical approach is critical for optimal exposure, minimal soft tissue disruption, and safe management of neurovascular structures. The anterolateral approach offers distinct advantages over alternative approaches, such as the direct anterior or posterior triceps-splitting approaches, especially when extensive distal and proximal exposure of the humerus is required, while minimizing the risk of iatrogenic ulnar nerve injury inherent in posterior exposures. This approach facilitates direct visualization of the fracture site and the radial nerve, enabling precise reduction and stable fixation, particularly for anterolaterally placed plates.
Surgical Anatomy and Biomechanics
A thorough understanding of the regional anatomy is paramount for safe and effective utilization of the anterolateral approach. The distal fourth of the humerus is characterized by several key muscular and neurovascular structures that dictate the surgical windows and internervous planes.
Muscular Anatomy
The primary muscles encountered or related to this approach include:
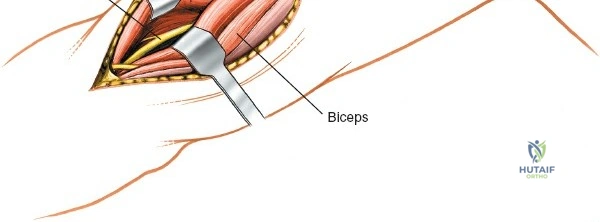
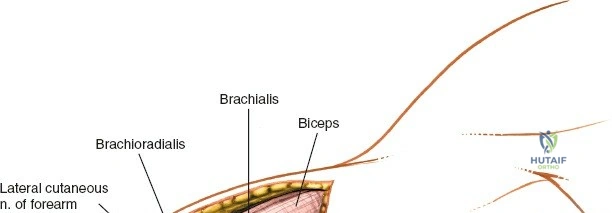
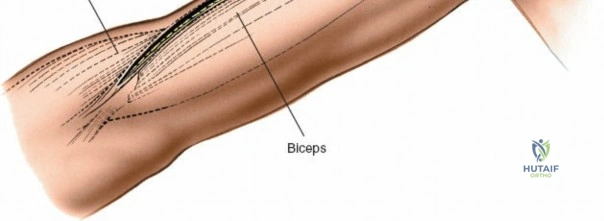
- Biceps Brachii: Located anteriorly, its lateral border serves as a key superficial landmark for the incision.
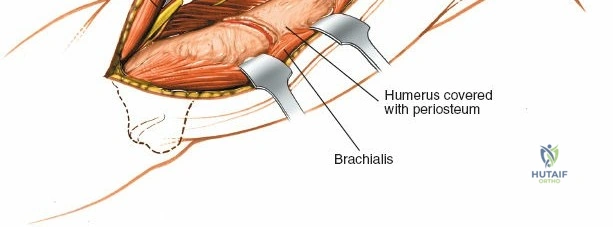
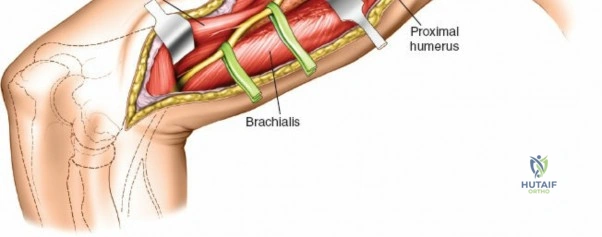
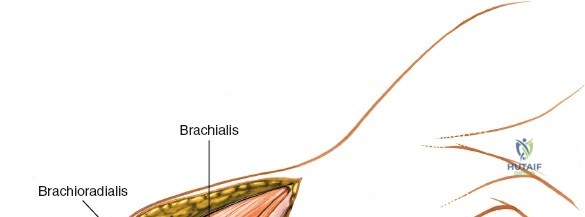
- Brachialis: Lying deep to the biceps, directly investing the anterior surface of the distal humerus. The anterolateral approach typically involves incising the fascia lateral to the biceps and then retracting the biceps and brachialis medially, or dissecting through the lateral aspect of the brachialis muscle to expose the bone.
- Triceps Brachii: Forms the posterior compartment. While not directly entered, its lateral head and fascia may be encountered if posterior extension is required or when identifying the lateral intermuscular septum.
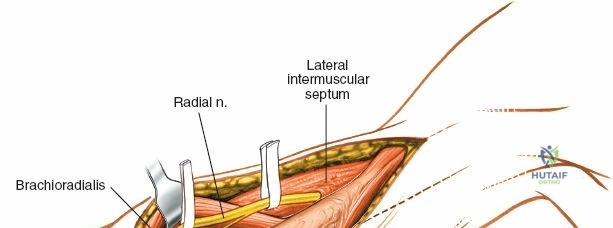
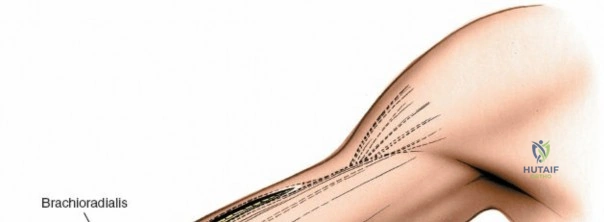
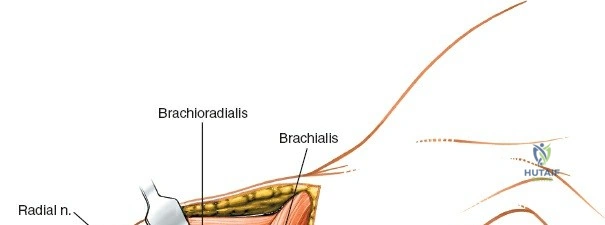
- Brachioradialis: Originates from the lateral supracondylar ridge of the humerus and forms the lateral border of the forearm proximally.
Neurovascular Anatomy
The principal neurovascular structures at risk or to be protected include:
- Radial Nerve: This is the most critical structure in this approach. It courses obliquely from posterior to anterior around the humeral shaft in the spiral groove, penetrating the lateral intermuscular septum approximately 10-12 cm proximal to the lateral epicondyle. After piercing the septum, it lies in the anterior compartment, nestled between the brachialis and brachioradialis muscles, before dividing into its superficial (sensory) and deep (motor, posterior interosseous nerve) branches anterior to the lateral epicondyle. The anterolateral approach provides excellent access for identification and protection of the radial nerve in its distal humeral course, facilitating its exploration if injury is suspected.
- Brachial Artery and Median Nerve: These structures lie medial to the biceps and brachialis muscles. While not routinely exposed during the anterolateral approach, their proximity necessitates careful medial retraction to prevent iatrogenic traction injuries. The median nerve crosses anterior to the brachial artery in the middle third of the arm and lies medial to it at the level of the cubital fossa.
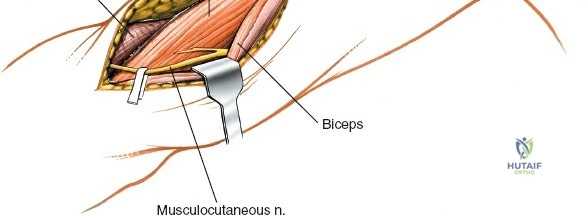
- Lateral Antebrachial Cutaneous Nerve: The terminal sensory branch of the musculocutaneous nerve, it emerges lateral to the biceps tendon in the distal arm and must be identified and protected during the superficial dissection to prevent painful neuromas or lateral forearm numbness.
Internervous Planes
The anterolateral approach utilizes true internervous planes, which minimizes denervation of the regional musculature.
- Proximal Internervous Plane: The dissection proceeds between the brachialis muscle (innervated predominantly by the musculocutaneous nerve, with a small lateral contribution from the radial nerve) and the lateral head of the triceps (innervated by the radial nerve).
- Distal Internervous Plane: The dissection continues between the brachialis (musculocutaneous nerve) and the brachioradialis (radial nerve). This plane leads directly to the radial nerve, which must be identified before proceeding to the periosteum.
Biomechanical Considerations
The distal humerus is subjected to complex torsional, bending, and axial loading forces. Plating on the anterolateral surface provides a biomechanically sound construct for distal diaphyseal and extra-articular metaphyseal fractures. When the fracture apex is directed anterolaterally, an anterolateral plate functions as a tension band. In spiral or oblique fractures, the plate functions in a neutralization mode, protecting interfragmentary lag screws. The anterolateral surface of the distal humerus is relatively flat, allowing for excellent plate-to-bone contact without the need for excessive contouring, compared to the complex topography of the posterior distal humerus.
Indications and Contraindications
Patient selection and critical evaluation of fracture morphology are essential when determining the utility of the anterolateral approach. This approach is highly versatile for extra-articular pathology but has distinct limitations when addressing complex, multi-fragmentary articular involvement.

Operative vs Non Operative Management
| Parameter | Operative Indications (Anterolateral Approach) | Non-Operative Indications / Contraindications |
|---|---|---|
| Fracture Pattern | Distal third humeral shaft fractures (AO 12A-C) | Undisplaced or minimally displaced shaft fractures |
| Specific Eponyms | Holstein-Lewis fractures | Isolated, stable radial head fractures |
| Articular Involvement | Extra-articular distal humerus (AO 13A) | Complex bicolumnar intra-articular fractures (AO 13C) requiring posterior dual plating |
| Neurological Status | Secondary radial nerve palsy (post-reduction) or open fractures with palsy | Primary radial nerve palsy in closed, acceptable alignment (relative contraindication for immediate exploration) |
| Soft Tissue | Adequate anterior/anterolateral soft tissue envelope | Active anterior infection, severe anterior soft tissue compromise, or burns |
| Pathology | Distal humerus nonunions and malunions | Medial epicondyle fractures (requires medial approach) |
Pre Operative Planning and Patient Positioning
Thorough preoperative planning is mandatory to ensure appropriate implant availability, anticipate the required extent of dissection, and facilitate a smooth surgical workflow.
Imaging and Templating
Standard anteroposterior (AP) and lateral radiographs of the humerus, including the shoulder and elbow joints, are required. In cases of metaphyseal extension or suspected occult articular involvement, a computed tomography (CT) scan with 2D and 3D reconstructions is highly recommended. Digital templating should be performed to estimate plate length and screw sizes. For anterolateral plating, extra-articular distal humerus plates or narrow locking compression plates (LCP) are typically selected. The plate must be long enough to allow for at least three to four bicortical screws (or their biomechanical equivalent in locking screws) in the proximal and distal fragments.
Patient Positioning
The patient is positioned supine on a radiolucent operating table. The operative arm is extended on a radiolucent hand table or arm board. This position allows for excellent access to the anterior and lateral aspects of the arm and facilitates intraoperative fluoroscopy.
A non-sterile tourniquet can be applied high on the arm, although many surgeons prefer to operate without a tourniquet to allow for proximal extension of the incision if necessary, and to avoid tethering the triceps and biceps, which can limit mobility during reduction. If a tourniquet is omitted, meticulous hemostasis using electrocautery is critical. The entire arm, from the axilla to the fingertips, is prepped and draped free to allow for full manipulation of the limb and assessment of fracture reduction through a range of motion.
Detailed Surgical Approach and Technique
The anterolateral approach requires meticulous dissection to safely navigate the neurovascular structures, particularly the radial nerve. The procedure can be divided into systematic steps.
Incision and Superficial Dissection
The skin incision is centered over the lateral border of the biceps brachii muscle. It begins proximally in the middle third of the arm and extends distally, following the contour of the biceps belly, and curves gently across the elbow crease toward the lateral border of the brachioradialis.
Subcutaneous tissues are divided in line with the incision. During this superficial dissection, careful attention must be paid to identifying and protecting the lateral antebrachial cutaneous nerve, which typically emerges from the deep fascia lateral to the biceps tendon in the distal third of the arm. Retracting this nerve with the medial skin flap prevents iatrogenic injury.
Deep Dissection and Radial Nerve Identification
The deep fascia is incised along the lateral border of the biceps muscle. The biceps is then retracted medially, exposing the underlying brachialis muscle. Distally, the interval between the brachialis and the brachioradialis is identified. This is the critical internervous plane.
The radial nerve is reliably found deep in the interval between the brachialis and brachioradialis. A consistent anatomical landmark is a thin stripe of yellow fat that lies directly over the nerve in this intermuscular septum. Blunt dissection with a right-angle clamp or a peanut sponge should be used to gently separate the muscles and identify the nerve. Once identified, the radial nerve is meticulously mobilized and protected with a vessel loop. It is imperative to avoid excessive traction on the nerve to prevent neuropraxia.
Fracture Exposure
With the radial nerve identified and protected, the dissection proceeds to the humeral shaft. Proximally, the radial nerve can be traced back to where it pierces the lateral intermuscular septum. If proximal extension is required, the lateral intermuscular septum can be divided, taking care to identify and ligate the radial collateral artery, which accompanies the nerve.
To expose the anterior surface of the distal humerus, the brachialis muscle can be handled in two ways. The classic approach involves retracting the entire brachialis medially along with the biceps, and the radial nerve laterally. Alternatively, a trans-brachialis split can be utilized. In this technique, the brachialis muscle is split longitudinally, leaving a lateral cuff of muscle to protect the radial nerve while the medial portion is retracted medially. This split provides direct access to the anterior humeral cortex and often requires less retraction force.

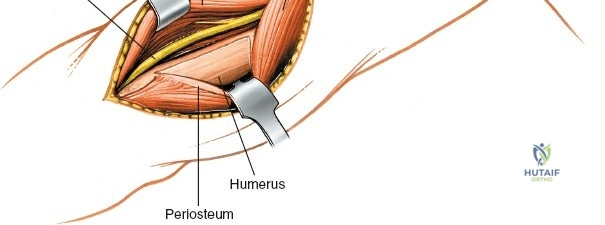
The periosteum is incised longitudinally and elevated only as much as necessary to visualize the fracture and apply the plate. Excessive periosteal stripping must be avoided to preserve the blood supply to the fracture fragments, adhering to the principles of biological osteosynthesis.
Fracture Reduction and Plate Fixation
Fracture reduction is achieved using direct manipulation, bone reduction forceps, or provisional Kirschner wires. For simple fracture patterns (e.g., oblique or spiral), anatomical reduction and absolute stability are the goals. Interfragmentary lag screws are placed perpendicular to the fracture plane to provide compression.
Following lag screw insertion, a neutralization plate is applied to the anterolateral surface of the humerus. The plate is contoured to match the slight anterior bow of the distal humerus. Pre-contoured anatomical extra-articular distal humerus plates are highly beneficial in this region, as they accommodate the widening of the metaphysis and the lateral column.
For comminuted fracture patterns where anatomical reduction of every fragment is impossible or biologically detrimental, a bridge plating technique is employed. The plate spans the zone of comminution, providing relative stability and maintaining length, alignment, and rotation while preserving the soft tissue attachments to the intermediate fragments. Locking screws are particularly advantageous in osteoporotic bone or short distal segments to enhance pull-out strength and construct rigidity.
Throughout the fixation process, the radial nerve must be continuously monitored. The plate should be positioned such that it does not impinge upon or stretch the nerve. In some cases, the nerve may need to be carefully transposed over the plate, ensuring there are no sharp edges or prominent screw heads that could cause irritation.
Complications and Management
Surgical management of distal humerus fractures via the anterolateral approach carries inherent risks. Anticipation, meticulous technique, and prompt recognition are vital for managing these complications.
Common Complications and Salvage Strategies
| Complication | Incidence / Risk Factors | Prevention and Management Strategies |
|---|---|---|
| Radial Nerve Palsy | 5-15% (Iatrogenic or traumatic). Higher in Holstein-Lewis patterns. | Prevention: Meticulous identification, vessel loop protection, avoid excessive traction. Trans-brachialis split reduces retraction tension. Management: If iatrogenic and nerve was visualized intact, observe (EMG at 6 weeks if no recovery). If nerve was transected, primary microsurgical repair or grafting. Tendon transfers for late failures. |
| Nonunion | 2-10%. Risk factors: smoking, severe comminution, excessive periosteal stripping, inadequate fixation. | Prevention: Preserve soft tissue attachments, achieve adequate construct stability (absolute vs relative). Management: Revision ORIF with rigid plating, autologous bone grafting, and optimization of host biological factors. |
| Infection | 1-3%. Higher in open fractures, prolonged operative times, diabetic patients. | Prevention: Preoperative antibiotics, meticulous hemostasis, dead space management. Management: Superficial: Oral/IV antibiotics. Deep: Surgical debridement, implant retention (if stable) vs removal (if loose), culture-directed antibiotics. |
| Malunion | Varies. Often varus/valgus or rotational deformity. | Prevention: Careful intraoperative fluoroscopic assessment of alignment, comparison to uninjured limb parameters. Management: Corrective osteotomy if functionally limiting or causing adjacent joint arthrosis. |
| Heterotopic Ossification | 3-10%. Associated with head trauma, delayed surgery, extensive muscle trauma. | Prevention: Gentle tissue handling, copious irrigation. Prophylactic Indomethacin or single-dose radiation in high-risk patients. Management: Surgical excision only after maturation (typically >6-12 months) and if causing severe mechanical block. |
Post Operative Rehabilitation Protocols
The ultimate goal of surgical fixation is to allow for early, safe mobilization of the elbow and adjacent joints to prevent stiffness, a common and debilitating sequela of distal humerus trauma. Rehabilitation must be tailored to the stability of the fixation and the patient's compliance.

Phase 1: Immediate Post Operative (Days 1 to 14)
The arm is initially placed in a well-padded posterior splint with the elbow at approximately 60 to 90 degrees of flexion to minimize swelling and protect the soft tissues. The arm should be elevated to reduce edema. Finger, wrist, and shoulder active range of motion (ROM) exercises are initiated immediately to prevent dependent edema and stiffness.
If absolute stability was achieved during surgery, the splint can be removed within 3 to 5 days, and active-assisted ROM of the elbow is commenced under the guidance of a physical therapist. Extension is often more difficult to regain than flexion, so early focus on terminal extension is critical. If fixation relies on relative stability (bridge plating), a longer period of intermittent splinting (up to 2 weeks) may be utilized, though early passive motion is still encouraged to nourish the articular cartilage and prevent capsular contracture.
Phase 2: Intermediate Rehabilitation (Weeks 2 to 6)
Sutures or staples are removed at approximately 14 days. The focus shifts to maximizing active and active-assisted ROM. Strengthening exercises are generally avoided during this phase to prevent displacement of the fracture before clinical callus formation. Night splinting in maximum extension may be employed if the patient is developing a flexion contracture.
Phase 3: Late Rehabilitation and Strengthening (Weeks 6 and Beyond)
At 6 weeks, radiographic evaluation is performed to assess for callus formation and fracture consolidation. Once clinical and radiographic signs of healing are present, progressive resistance exercises for the biceps, triceps, and forearm musculature are initiated. Dynamic splinting can be considered for recalcitrant stiffness. Full return to heavy labor or contact sports is typically restricted until complete radiographic union is achieved, often between 3 to 6 months postoperatively.
Summary of Key Literature and Guidelines
The evolution of the anterolateral approach and the management of distal humerus diaphyseal fractures have been heavily influenced by foundational literature and established surgical guidelines.
The classic paper by Holstein and Lewis (1945) first detailed the specific fracture pattern of the distal third of the humerus associated with radial nerve entrapment. Their work underscored the anatomical vulnerability of the radial nerve as it passes through the lateral intermuscular septum, establishing the rationale for surgical exploration in specific scenarios.
More recently, meta-analyses, such as those by Shao et al., have clarified the management of radial nerve palsy associated with humeral shaft fractures. The current consensus suggests that secondary (post-reduction) palsies or those associated with open fractures warrant early surgical exploration, for which the anterolateral approach provides unparalleled access. Conversely, primary palsies in closed fractures with acceptable alignment are generally observed, with an expectation of spontaneous recovery in the majority of cases.
The AO Foundation Surgery Reference provides comprehensive guidelines for the application of osteosynthesis principles in the distal humerus. The AO emphasizes the critical distinction between absolute stability for simple fracture patterns and relative stability for comminuted patterns. Furthermore, the development and biomechanical validation of anatomically contoured, locking extra-articular distal humerus plates have significantly expanded the indications for anterolateral plating, providing robust fixation in osteoporotic bone and complex fracture morphologies where traditional non-locking plates previously failed. Mastery of the anterolateral approach, combined with adherence to these biomechanical principles, ensures optimal outcomes for patients sustaining these challenging injuries.
