Mastering Linkable Total Elbow Arthroplasty for Primary Degenerative Arthritis

Key Takeaway
This masterclass provides an exhaustive, intraoperative guide to linkable total elbow arthroplasty for primary degenerative arthritis. Fellows will learn intricate surgical anatomy, meticulous preoperative planning, and granular, real-time execution from incision to implant. We'll cover critical pearls, potential pitfalls, and comprehensive postoperative management, ensuring a deep understanding of this complex procedure.
Comprehensive Introduction and Patho-Epidemiology
Welcome to the operating theater, colleagues and fellows. Today, we embark on an exhaustive masterclass concerning a uniquely challenging orthopedic pathology: primary degenerative arthritis of the elbow, managed via a linkable total elbow arthroplasty (TEA). Historically, inflammatory arthritides, most notably rheumatoid arthritis, dominated the clinical indications for TEA due to the profound symmetric joint destruction and osteopenia they caused. However, the modern orthopedic surgeon must be exquisitely prepared to address primary osteoarthritis. This is an uncommon but mechanically devastating condition, often affecting younger, highly active, or heavy-laboring patients. The inherent contradiction between the patient’s high physical demands and the mechanical limitations of elbow arthroplasty makes our implant choice, preoperative templating, and precise surgical execution absolutely critical to long-term survivorship.
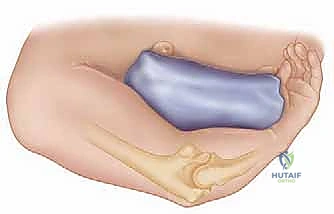
Before we even consider making an incision, it is paramount to thoroughly review the underlying patho-epidemiology of this specific disease state. Primary degenerative arthritis of the elbow is starkly distinct from typical age-related articular wear seen in weight-bearing joints like the hip or knee. It is characterized by a progressive, mechanically induced loss and fragmentation of hyaline cartilage, culminating in severe joint distortion, subchondral cyst formation, and profound bone sclerosis. Unlike the osteopenic, bone-depleting nature of rheumatoid arthritis, primary osteoarthritis is a fundamentally hypertrophic process. We observe extensive, dense osteophyte formation that obliterates the normal olecranon and coronoid fossae, thereby dramatically restricting the physiologic arc of motion and creating rigid mechanical blocks to terminal extension and flexion.
Epidemiologically, this condition is remarkably rare, affecting less than 2% of the general population. It predominantly strikes middle-aged men, typically in their fourth to sixth decades of life, and almost universally involves the dominant upper extremity. A detailed clinical history often reveals a lifetime of heavy manual labor, repetitive microtrauma, pneumatic tool operation, or intense weightlifting. The radiocapitellar joint is frequently the earliest and most severely affected compartment. This localized predilection is due to the immense axial, shearing, and rotational stresses transmitted across the radial head during pronation and supination under heavy load. This relentless stress leads to a characteristic oblique "shaving" or flattening of the capitellum, accompanied by hypertrophic, collar-like callus formation encircling the radial neck.
While the ulnohumeral joint typically becomes more heavily involved in the advanced stages of the disease, the central aspect of the trochlear notch is paradoxically often spared during the initial onset. Patients typically present with a progressive, unyielding loss of motion, particularly at the extreme arcs of flexion and extension, where massive osteophytes mechanically impinge within the corresponding fossae. Mechanical symptoms, such as sudden locking and catching from cartilaginous or osseous loose bodies, are reported in approximately 10% to 15% of patients. Crucially, the astute surgeon must always evaluate for concomitant ulnar nerve symptoms. Up to 20% of these patients develop secondary ulnar neuropathy due to direct mechanical compression, tethering, or ischemia resulting from expanding synovitis and medial osteophyte proliferation in the posteromedial gutter of the ulnohumeral joint. Medial joint pain radiating to the ulnar digits can often be the sentinel sign of this impending neuropathy, dictating the need for simultaneous nerve management during arthroplasty.
Detailed Surgical Anatomy and Biomechanics
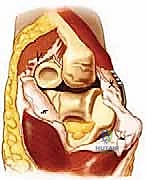
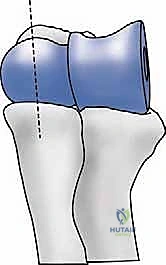
To master total elbow arthroplasty, one must possess an intimate, three-dimensional understanding of elbow anatomy and its complex, highly constrained biomechanics. The elbow is not a simple hinge; it is a highly constrained, complex trochoginglymoid joint featuring three distinct articulations functioning in concert: the ulnohumeral, radiocapitellar, and proximal radioulnar joints. The primary axis of flexion and extension passes through the center of the trochlea and the capitellum, being collinear with the anteroinferior aspect of the medial epicondyle and the center of the lateral epicondyle. Understanding and perfectly recreating this axis is the absolute cornerstone of successful implant positioning; malalignment of the prosthetic axis relative to the anatomic axis will lead to eccentric loading, accelerated polyethylene bushing wear, and premature aseptic loosening of the components.
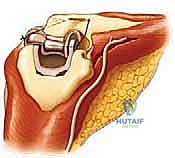
The osseous architecture of the distal humerus is defined by two divergent structural columns—the medial and lateral columns—which form a rigid triangular construct terminating in the articular spool. Between these columns lie the coronoid fossa anteriorly and the olecranon fossa posteriorly, separated only by a thin wafer of bone. In primary osteoarthritis, these fossae are typically obliterated by dense sclerotic bone, which must be meticulously cleared to restore terminal extension and flexion without impinging the prosthetic components. The proximal ulna features the greater sigmoid notch, which articulates with the trochlea. The structural integrity of the coronoid process anteriorly and the olecranon posteriorly provides the primary osseous stability against posterior and anterior subluxation, respectively, and preserving these structures when possible aids in overall construct stability.
Soft tissue constraints are equally vital to the biomechanical harmony of the native elbow. The medial collateral ligament (MCL) complex, specifically the anterior bundle, is the primary restraint to valgus stress. The lateral collateral ligament (LCL) complex, notably the lateral ulnar collateral ligament (LUCL), is the primary restraint to varus and posterolateral rotatory instability. In unlinked or resurfacing arthroplasty, the preservation and precise isometric balancing of these ligamentous complexes are mandatory. However, in the setting of severe primary osteoarthritis with massive deformity, achieving perfect ligamentous balance is often surgically impossible, thereby necessitating the use of a linked or semiconstrained implant design that reliably substitutes for these deficient soft tissue constraints.
Finally, the neurovascular anatomy dictates our surgical approach and dictates our complication profile. The ulnar nerve, coursing posterior to the medial epicondyle through the cubital tunnel, is the structure most at risk during standard posterior approaches to the elbow. Its blood supply, derived from the superior ulnar collateral artery and the posterior ulnar recurrent artery, forms a delicate extrinsic plexus. Overzealous skeletonization during neurolysis or transposition can devascularize the nerve, leading to devastating postoperative ischemic neuropathy. The radial nerve, traversing the lateral intermuscular septum anteriorly, is generally safe during a standard posterior approach but must be deeply respected during extensive lateral soft tissue releases or if the humeral canal preparation extends significantly proximal into the diaphyseal bone.
Exhaustive Indications and Contraindications
Patient selection is arguably the single most critical determinant of success in total elbow arthroplasty for primary degenerative arthritis. Unlike total hip or knee arthroplasty, TEA is not a universally applicable panacea for all patients presenting with end-stage joint disease. The mechanical limitations of current elbow prostheses, specifically the vulnerability of the cement-bone interface and the polyethylene bushings to catastrophic failure under high cyclic loads, mandate incredibly strict patient selection criteria. The ideal candidate is an older, low-demand individual with severe, unrelenting pain and functional limitation that has proven definitively refractory to exhaustive non-operative measures, including physical therapy, intra-articular corticosteroid injections, and prolonged bracing.
In the context of primary osteoarthritis, we are frequently faced with a distinct clinical conundrum: the patient is often a younger, highly active male with significant functional demands. In these specific cases, TEA is generally considered a salvage procedure, entertained only after joint-preserving options—such as arthroscopic debridement, open comprehensive ulnohumeral arthroplasty (the Outerbridge-Kashiwagi procedure), aggressive osteophyte excision, and loose body removal—have definitively failed or are deemed anatomically impossible due to the sheer magnitude of joint destruction. The patient must explicitly understand and formally agree to a strict lifetime lifting restriction (typically no more than 5 to 10 pounds repetitively, and a single-event maximum of 15 pounds) to prevent catastrophic mechanical implant failure.
Contraindications must be rigorously respected to avoid devastating postoperative disasters. Active or recent intra-articular infection is an absolute contraindication, requiring no further debate. A history of remote infection requires an exhaustive preoperative workup, including serum inflammatory markers (CRP, ESR) and potentially fluoroscopically guided joint aspiration, before proceeding. Profound neurologic deficit, such as a flail upper extremity secondary to brachial plexopathy, renders the procedure useless, as active motor control across the joint is required for any functional gain. Severe soft tissue compromise, inadequate bone stock for robust component fixation, and anticipated patient non-compliance with postoperative lifting restrictions are strong relative, if not absolute, contraindications.
Careful consideration of the patient's psychiatric and social history is also mandatory. Patients with severe cognitive impairment or substance abuse disorders who cannot reliably adhere to the strict postoperative rehabilitation protocols and lifelong lifting limitations are at an exceptionally high risk for early implant failure, periprosthetic fracture, or catastrophic dislocation. In such scenarios, arthrodesis or resection arthroplasty, while functionally limiting, may represent a safer, more definitive salvage option than a doomed arthroplasty.
| Category | Indications for Linkable TEA | Absolute Contraindications | Relative Contraindications |
|---|---|---|---|
| Clinical | End-stage primary OA refractory to conservative care; Severe pain at rest | Active local or systemic infection | Patient age < 60 years (requires strict counseling) |
| Functional | Profound loss of ROM limiting ADLs; Failed prior joint-preserving surgery | Paralysis or flail upper extremity (e.g., severe brachial plexopathy) | High physical demands, heavy manual labor, or non-compliance |
| Anatomical | Massive osteophyte burden precluding unlinked designs; Instability | Inadequate bone stock precluding implant fixation | Severe soft tissue or skin compromise over the posterior elbow |
| Neurological | Concomitant severe ulnar neuropathy requiring decompression | Neuropathic (Charcot) arthropathy | History of extensive prior elbow surgeries compromising local vascularity |
Pre-Operative Planning, Templating, and Patient Positioning
Advanced Imaging and Pre-Surgical Templating
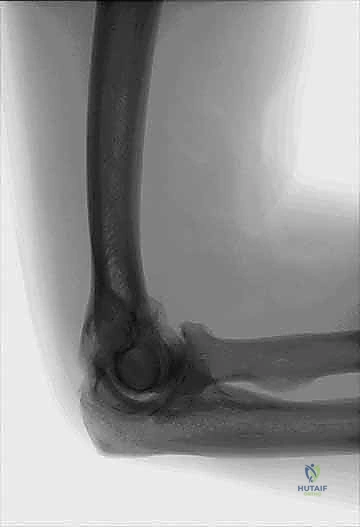
Meticulous preoperative planning is the absolute blueprint for a successful surgical outcome in total elbow arthroplasty. Standard anteroposterior (AP) and lateral radiographs are the starting point, revealing the classic hallmarks of primary osteoarthritis: asymmetric joint space narrowing, dense subchondral sclerosis, and the formation of prominent, often massive, osteophytes within the coronoid, capitellar, and olecranon fossae. However, plain radiographs inevitably underestimate the true three-dimensional volume, precise anatomical location, and mechanical impingement of these osteophytes, particularly in the hypertrophic variant of the disease.
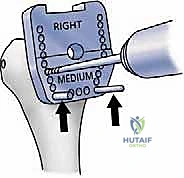
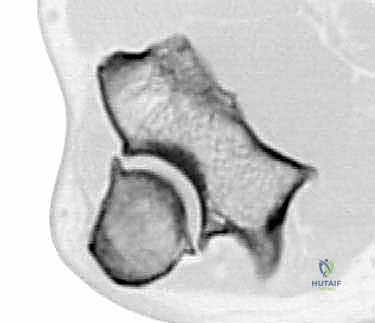
For definitive surgical planning, a high-resolution Computed Tomography (CT) scan is indispensable and should be considered the standard of care for complex primary OA. The CT scan provides granular detail of the structural anatomy, allowing us to accurately map the osteophyte burden, identify occult intra-articular loose bodies that plain films miss, and precisely assess the medullary canal diameter of both the humerus and the ulna. Three-dimensional (3D) reconstructions generated from the CT data are particularly valuable for the operating surgeon. They allow the surgeon to mentally rehearse the resection of impinging bone and anticipate the precise trajectory required for safe medullary canal preparation without cortical breach.
Digital templating is then performed meticulously using both the radiographic and CT data. We must determine the optimal size of the humeral and ulnar stems, ensuring adequate fill of the medullary canals while deliberately leaving a uniform 1 to 2 mm mantle for polymethylmethacrylate (PMMA) bone cement to interdigitate. Templating also helps establish the correct depth of insertion for the humeral component to accurately restore the anatomical joint line. Restoring this joint line is critical for optimizing the resting tension of the myofascial sleeve, maximizing the postoperative arc of motion, and preventing excessive stress on the triceps mechanism.
Furthermore, templating allows the surgeon to anticipate the need for specialized equipment, such as longer stems to bypass areas of cortical thinning or prior hardware, or the necessity for structural bone grafting in areas of severe cystic degeneration. In cases of profound deformity, custom cutting guides or patient-specific instrumentation (PSI) derived from the 3D CT data can be pre-ordered to ensure flawless execution of the osseous resections and precise restoration of the native axis of rotation.
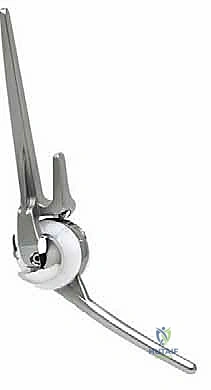
Implant Selection Rationale: The Linkable Paradigm
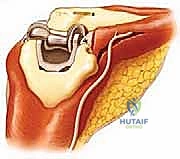
For primary degenerative arthritis, particularly in the demographic we typically treat, we strongly favor linked (semiconstrained) or linkable implant designs over purely unlinked systems. While unlinked (resurfacing) implants boast the theoretical advantages of preserving greater bone stock and transferring physiological stresses to the native collateral ligaments rather than the implant-cement interface, their Achilles' heel is postoperative instability. Given the extensive soft tissue releases and radical capsulectomies often required to mobilize a profoundly stiff, osteoarthritic elbow, relying on compromised native ligaments for joint stability is a perilous gamble.
We have strategically chosen a linkable system for this procedure, representing the pinnacle of modern implant evolution. The genius of the linkable design lies in its intraoperative versatility. It allows the surgeon to initially implant the humeral and ulnar components in an unlinked fashion. We can then trial the joint through a full arc of motion, dynamically assessing the intrinsic stability provided by the remaining soft tissue envelope. If adequate stability is present, the implant can theoretically be left unlinked. However, if instability is detected intraoperatively—or if the patient develops instability years down the line—the unlinked articulation can be seamlessly converted to a linked, semiconstrained hinge by capturing the ulnohumeral articulation with an ulnar cap and a locking pin.
This "sloppy hinge" design of the linked configuration is a biomechanical triumph that revolutionized TEA survivorship. It permits approximately 7 to 10 degrees of varus-valgus laxity and several degrees of rotational play within the articulation itself. This built-in "slop" is critical; it selectively dissipates peak mechanical stresses into the surrounding soft tissues, thereby shielding the rigid cement-bone interface from the catastrophic torque and shear forces that historically plagued early, rigidly constrained hinge designs and led to rapid aseptic loosening.
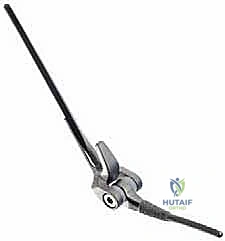
By utilizing a linkable system, we provide the patient with immediate, rigid stability against dislocation while minimizing the long-term risk of mechanical interface failure. The high-molecular-weight polyethylene bushings within the hinge mechanism act as sacrificial wear components, absorbing the brunt of the kinetic energy. While these bushings may eventually require isolated revision due to wear, this is a vastly preferable scenario to revising a catastrophically loose or fractured humeral or ulnar stem.
Optimal Patient Positioning and Operating Room Setup
Patient positioning must be executed with absolute precision to afford unimpeded, 360-degree access to the posterior elbow while maintaining strict sterility throughout a potentially lengthy procedure. The setup dictates the flow of the entire operation.
- Supine Positioning: The patient is positioned supine on a standard operating room table. Ensure the patient is shifted as close to the operative edge of the table as safely possible to prevent the surgeon from having to lean uncomfortably over the field.
- Scapular Protraction: A small, firm bump or rolled blanket is placed securely beneath the ipsilateral scapula. This subtly protracts the scapulothoracic articulation, bringing the shoulder forward and significantly improving posterior access to the elbow joint, particularly when the arm is brought across the chest.
- Arm Positioning: The affected arm is adducted, internally rotated, and draped across the patient's chest. This position naturally exposes the olecranon and the triceps mechanism directly to the overhead surgical lights and the primary surgeon's line of sight.
- Bolster Support: The entire arm is supported on a sterile, padded bolster or specialized elbow positioner. This setup provides a stable platform and maintains the elbow in approximately 90 degrees of flexion, which is the optimal position for surgical exposure, joint subluxation, and medullary canal preparation. The bolster must be firm enough to resist significant downward pressure during aggressive reaming but allow for rapid mobilization of the arm to test range of motion.
- Tourniquet Application: A sterile pneumatic tourniquet is applied as proximal on the upper arm as anatomically possible. The use of a sterile tourniquet over the drapes is a critical technical pearl. It maximizes our sterile field, allowing for proximal extension of the incision if a complex humeral reconstruction, extensive triceps mobilization, or unexpected proximal fracture management becomes necessary, without compromising the sterile boundary.
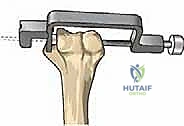
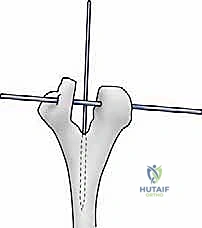
- Fluoroscopy Integration: The C-arm fluoroscopy unit must be positioned on the contralateral side of the table, ready to swing in perpendicular to the surgical field. Real-time imaging is crucial during canal preparation to ensure the reamers remain perfectly centralized within the medullary canals, avoiding catastrophic cortical perforation.
Step-by-Step Surgical Approach and Fixation Technique
Posterior Extensile Exposure and Ulnar Nerve Management
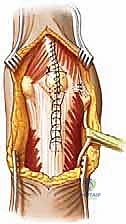
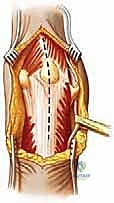
The surgical approach dictates the safety and efficacy of the entire procedure. A straight posterior longitudinal incision is utilized, beginning approximately 10 cm proximal to the tip of the olecranon, curving slightly laterally around the olecranon tip to avoid placing the scar directly over the bony prominence, and extending 5 to 7 cm distally along the subcutaneous border of the ulna. Full-thickness fasciocutaneous flaps are elevated both medially and laterally. It is imperative to maintain thick flaps to preserve the fragile subdermal vascular plexus, minimizing the risk of postoperative wound necrosis, which is a devastating complication in elbow arthroplasty.

The very first deep structure addressed must be the ulnar nerve. It is identified proximally in the posterior compartment of the arm and traced distally as it enters the cubital tunnel posterior to the medial epicondyle. In primary osteoarthritis, the nerve is often tethered by thick fascial bands or compressed by medial osteophytes. A meticulous neurolysis is performed, releasing the arcade of Struthers, the cubital tunnel retinaculum, and the deep flexor-pronator aponeurosis. Whether to leave the nerve in situ or perform an anterior transposition depends on the degree of preoperative neuropathy and
Clinical & Radiographic Imaging Archive