Subtalar Arthroscopy Masterclass: Comprehensive Approach to Hindfoot Pathology
Key Takeaway
This masterclass guides fellows through subtalar arthroscopy, covering detailed anatomy, patient positioning, and step-by-step intraoperative techniques. We emphasize precise portal placement, meticulous dissection, and comprehensive joint visualization from both anterior and posterior approaches. Learn to diagnose and treat chronic hindfoot pain, impingement, and osteochondral lesions, minimizing complications for optimal patient outcomes.
Comprehensive Introduction and Patho-Epidemiology
Welcome, colleagues and fellows, to the operating theater. Today, we are delving into the intricacies of subtalar arthroscopy—a powerful, minimally invasive diagnostic and therapeutic tool for addressing a broad spectrum of hindfoot pathologies. Historically, the subtalar joint was considered a "black box" of the foot, often approached via extensile open incisions that carried significant morbidity, including wound healing complications, profound arthrofibrosis, and prolonged recovery times. However, with the advent of advanced small-joint arthroscopic instrumentation and a more nuanced understanding of hindfoot microanatomy, subtalar arthroscopy has evolved from a nascent diagnostic adjunct into a primary therapeutic modality.
The epidemiology of subtalar pathology is heavily skewed toward post-traumatic sequelae. The vast majority of patients presenting with chronic hindfoot pain have a history of inversion ankle sprains, calcaneal fractures, or talar injuries. What was historically relegated to the wastebasket diagnosis of "sinus tarsi syndrome" is now recognized as a complex interplay of specific pathoanatomical lesions: interosseous ligament tears, localized synovitis, osteochondral defects, and impingement from post-traumatic fibrosis. Subtalar arthroscopy allows the orthopedic surgeon to directly visualize these discrete lesions, offering targeted interventions that preserve the delicate biomechanical envelope of the hindfoot.
This procedure demands meticulous anatomical understanding, precise portal placement, and advanced triangulation skills. The joint space is notoriously tight, the capsular recesses are complex, and the surrounding neurovascular structures are unforgiving. In this masterclass, we will walk through the procedure step-by-step, from preoperative templating to advanced intra-articular reconstruction, as if you are scrubbed in right beside me. Mastery of this technique is not merely an addition to your surgical armamentarium; it is a paradigm shift in the management of chronic hindfoot disability.
Detailed Surgical Anatomy and Biomechanics
The Subtalar Articulations
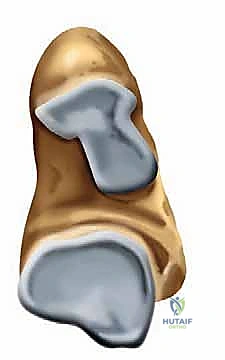
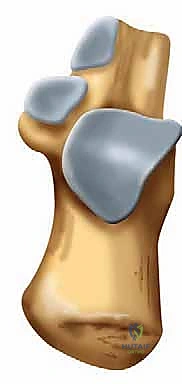
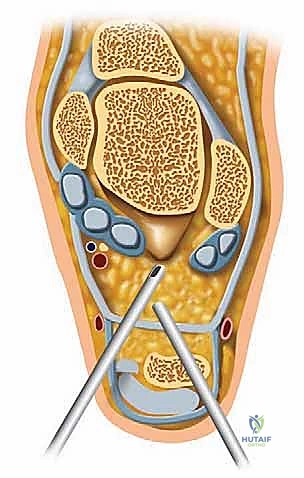
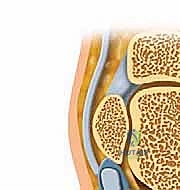
The subtalar joint, or talocalcaneal joint, is a critical component of lower extremity biomechanics, primarily responsible for the complex coupled motions of inversion and eversion of the foot. It acts functionally as a mitered hinge, translating transverse plane rotation of the tibia into frontal plane motion of the foot (pronation and supination). It is a synovial joint, characterized by a posterior capsular pouch and small lateral, medial, and anterior recesses. Anatomically and functionally, it is divided into two distinct articulations separated by the tarsal canal.
The anterior articulation (talocalcaneonavicular joint) is a complex, multi-axial joint involving the anterior and middle facets of the calcaneus articulating with the talar head, supported inferiorly by the spring ligament (plantar calcaneonavicular ligament). The posterior articulation (talocalcaneal joint) is formed by the concave posterior facet of the talus and the convex posterior facet of the calcaneus. This posterior chamber is the primary focus of most standard lateral arthroscopic interventions.
These two distinct articular chambers are strictly separated by the tarsal canal, an obliquely oriented funnel-shaped space that runs from posteromedial to anterolateral. The prominent lateral opening of this canal is the sinus tarsi, which serves as the primary anatomical landmark for lateral portal placement. Understanding the spatial relationship between the posterior facet, the tarsal canal, and the sinus tarsi is the absolute foundation of safe arthroscopic navigation.
Ligamentous Anatomy of the Sinus Tarsi and Tarsal Canal
Within the confines of the tarsal canal and sinus tarsi, we find a dense, highly innervated network of soft tissue structures that provide crucial proprioceptive feedback and mechanical stability. The interosseous talocalcaneal ligament (ITCL) is a robust, bilobed stabilizer lying strictly within the tarsal canal. It is the primary restraint to subtalar joint separation and excessive supination. Just lateral to the ITCL, within the sinus tarsi proper, lies the cervical ligament, another key stabilizer that resists excessive inversion.
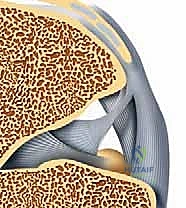
In addition to these primary intrinsic ligaments, the sinus tarsi contains the medial, intermediate, and lateral roots of the inferior extensor retinaculum, which tether the extensor tendons and provide secondary stability to the lateral hindfoot. The space is also packed with highly vascularized adipose tissue (the Hoke tonsil) and a rich arterial anastomosis derived from branches of the dorsalis pedis and peroneal arteries. Pathologic fibrosis or hypertrophy of this adipose tissue following trauma is a primary driver of lateral hindfoot impingement.
The lateral ligamentous support of the subtalar joint extends beyond the sinus tarsi. It comprises the lateral talocalcaneal ligament, the posterior talocalcaneal ligament, and crucially, the calcaneofibular ligament (CFL). While the CFL is formally part of the lateral ankle ligament complex, it spans both the tibiotalar and subtalar joints, acting as an essential lateral stabilizer for both. Pathological laxity of the CFL frequently results in combined ankle and subtalar instability, a condition that must be recognized during dynamic arthroscopic evaluation.
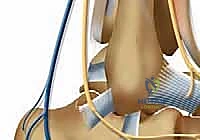
Neurovascular Topography
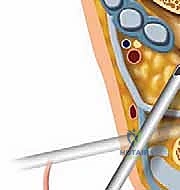
Safe portal placement requires an intimate knowledge of the superficial neurovascular topography. The superficial peroneal nerve (SPN) and its branches course anteriorly over the lateral hindfoot. The intermediate dorsal cutaneous branch of the SPN is particularly vulnerable during the establishment of the anterior portal. It typically lies subcutaneously and can be easily transsected or entrapped if blunt dissection techniques are not strictly adhered to.
Posterolaterally, the sural nerve and the lesser saphenous vein represent the primary structures at risk. The sural nerve courses posterior to the peroneal tendons and lateral to the Achilles tendon. During the creation of the posterior or posterolateral portals, the surgeon must remain acutely aware of its trajectory. The peroneal tendons (peroneus longus and brevis) themselves run directly posterior to the lateral malleolus and anterior to the posterior portal zone. Iatrogenic injury to the peroneal tendon sheath during arthroscopy can lead to postoperative tenosynovitis or tendon subluxation.
Exhaustive Indications and Contraindications
Diagnostic and Therapeutic Indications
Subtalar arthroscopy serves both profound diagnostic and therapeutic purposes. While MRI has drastically improved our non-invasive diagnostic capabilities, direct arthroscopic visualization remains the gold standard for assessing articular cartilage integrity and dynamic ligamentous competence. The indications for this procedure have expanded significantly as instrumentation has improved.

Common indications include the treatment of chronic pain in the sinus tarsi. Historically termed "sinus tarsi syndrome," we now aim for a more specific pathoanatomical diagnosis, utilizing arthroscopy to debride torn interosseous ligaments, resect arthrofibrotic tissue, or remove impinging synovitis. Chondromalacia and focal osteochondral lesions (OCLs) of the talus or calcaneus are also prime indications. Arthroscopic debridement, microfracture, or even marrow stimulation techniques can be effectively executed through standard portals.
Furthermore, subtalar arthroscopy is highly effective for the lysis of post-traumatic adhesions, extensive synovectomy for inflammatory arthropathies, and the removal of intra-articular loose bodies. In cases of subtalar instability, arthroscopy allows for diagnostic confirmation and potentially therapeutic thermal capsulorrhaphy or stabilization. More advanced indications include the evaluation and excision of symptomatic os trigonum pathology via a posterior endoscopic approach, the management of subtle fractures of the anterior process of the calcaneus or lateral process of the talus, and arthroscopically assisted subtalar arthrodesis for advanced degenerative joint disease.
Contraindications and Patient Selection Limitations
Despite its minimally invasive nature, subtalar arthroscopy is not universally applicable. Strict adherence to contraindications is necessary to prevent catastrophic complications. Absolute contraindications include the presence of localized soft tissue infection or a septic joint. Introducing arthroscopic fluid into an infected field risks disseminating the pathogen throughout the fascial planes of the foot and lower leg. Advanced degenerative joint disease with severe, rigid varus or valgus deformity is another absolute contraindication; in these scenarios, the joint space is too narrow to admit the arthroscope without causing iatrogenic cartilage damage, and an open corrective fusion is biomechanically requisite.
Relative contraindications require careful surgical judgment. Severe localized edema can distort anatomical landmarks, making portal placement hazardous and increasing the risk of neurovascular injury. Poor skin quality, such as that seen in chronic venous stasis or severe diabetic dermopathy, significantly increases the risk of wound dehiscence and superficial infection at the portal sites. Similarly, patients with severe peripheral arterial disease may lack the vascular reserve necessary to heal even small arthroscopic incisions, predisposing them to chronic sinus tracts or necrosis.
| Category | Specific Conditions | Clinical Rationale |
|---|---|---|
| Absolute Indications | Symptomatic Loose Bodies, Focal Osteochondral Lesions, Sinus Tarsi Arthrofibrosis | Direct visualization allows for precise removal/debridement with minimal morbidity. |
| Advanced Indications | Arthroscopic Subtalar Arthrodesis, Os Trigonum Excision (Posterior Approach) | Reduces soft tissue stripping, preserves vascular supply to the talus, accelerates fusion rates. |
| Absolute Contraindications | Active Local Infection, Septic Arthritis, Severe Rigid Deformity | High risk of systemic dissemination; physical inability to navigate the contracted joint space. |
| Relative Contraindications | Severe Edema, Poor Skin Envelope, Advanced Peripheral Vascular Disease | Increased risk of neurovascular injury, portal necrosis, and delayed wound healing. |
Pre-Operative Planning, Advanced Imaging, and Patient Positioning
Clinical Evaluation and Diagnostic Injections
Effective preoperative planning is the cornerstone of any successful surgical intervention. Patients typically present with chronic lateral hindfoot pain, often exacerbated by standing, walking, and particularly navigating uneven terrain, which heavily loads the subtalar joint's inversion/eversion mechanics. They may describe a subjective feeling of giving way or instability, which must be differentiated from true mechanical ankle instability.
On physical examination, localized pain on firm palpation directly over the lateral opening of the sinus tarsi is the hallmark sign. Subtalar stiffness and deep aching pain during passive manipulation strongly indicate intra-articular pathology. Because subtalar motion is a complex triplanar movement, it is difficult to measure precisely with a goniometer. We test it clinically by stabilizing the distal tibia and calcaneus, then moving the heel into maximum inversion and eversion. This motion should be smooth; crepitus or a hard end-feel suggests advanced arthrosis or coalition.
The diagnostic injection is arguably the most critical component of the preoperative workup. A highly targeted injection of local anesthetic (e.g., 1-2 cc of 1% lidocaine) directly into the sinus tarsi or posterior subtalar facet should yield near-complete, albeit temporary, relief of the patient's primary pain. This confirms the subtalar joint as the pain generator and differentiates it from adjacent pathologies such as peroneal tendinopathy, sural neuritis, or true tibiotalar joint pain.
Advanced Imaging Modalities
Standard weight-bearing radiographs are mandatory. Anteroposterior (AP), lateral, and mortise views of the ankle, alongside AP, lateral, and oblique views of the foot, provide a baseline assessment of joint architecture, alignment, and the presence of gross osteophytes or trauma sequelae. Borden’s view is particularly crucial for evaluating the posterior facet of the subtalar joint. This specialized view is obtained by rotating the foot medially 45 degrees with slight dorsiflexion, directing the x-ray beam at the lateral malleolus, angled 10 to 40 degrees cephalad.
Computed Tomography (CT) is the modality of choice for characterizing osseous anatomy. Coronal and sagittal reconstructions are invaluable for assessing the size and location of osteochondral cysts, evaluating the congruency of the posterior facet following calcaneal fractures, and definitively diagnosing fibrous or osseous tarsal coalitions. For preoperative templating of an arthroscopic subtalar fusion, a CT scan is non-negotiable to assess bone stock.
Magnetic Resonance Imaging (MRI) excels in soft tissue evaluation. It is highly sensitive for detecting chronic inflammation, sinus tarsi fibrosis, interosseous ligament tears, bone marrow edema patterns, and chondral injuries. However, the surgeon must remember that MRI tends to underestimate the true extent of articular cartilage damage. Arthroscopy frequently reveals higher-grade chondromalacia than was interpreted on the preoperative MRI.
Anesthesia and Patient Positioning Strategies
We have several options for anesthesia, including local with deep sedation, regional (spinal or epidural), or general anesthesia. For comprehensive subtalar arthroscopy, I strongly prefer general anesthesia combined with a preoperative regional block (such as a popliteal sciatic nerve block). This ensures complete muscle relaxation, which is essential for joint distraction, and provides excellent postoperative pain control.
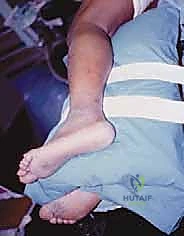
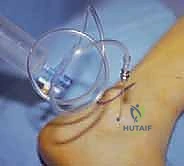
For the standard lateral approach to the posterior subtalar joint, the patient is positioned in the lateral decubitus position. The patient is rolled onto their non-operative side with the operative extremity draped free. Meticulous padding is paramount; place a gel pad or axillary roll under the dependent thorax, and heavily pad the contralateral fibular head to protect the common peroneal nerve from compression neuropraxia. The operative limb is supported on a dedicated leg holder or heavily padded blankets to allow full, unobstructed range of motion of the ankle and subtalar joint. A well-padded thigh tourniquet is applied and inflated only after exsanguination to ensure a pristine, bloodless visual field.
Conversely, if addressing posterior pathology (e.g., os trigonum, posterior process fractures) utilizing a two-portal hindfoot endoscopic technique, the patient must be placed in the prone position. The feet are allowed to hang slightly over the edge of the operating table. Again, meticulous padding of all bony prominences—particularly the anterior superior iliac spines, patellae, and anterior ankles—is critical to prevent pressure necrosis during the procedure.
Step-by-Step Surgical Approach and Operative Technique
Portal Placement and Safe Zones
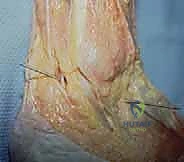
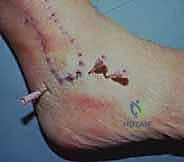
We utilize three standard lateral portals for visualization and instrumentation: the anterior, middle, and posterior portals. Proper placement is the difference between a successful procedure and an iatrogenic disaster.
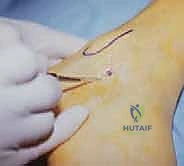
First, carefully palpate and mark the bony landmarks: the tip of the lateral malleolus, the base of the 4th metatarsal, and the lateral border of the Achilles tendon. The anterior portal is located approximately 1 cm distal and 2 cm anterior to the tip of the fibula, aligning with the calcaneocuboid joint line. A superficial skin incision is made, followed by blunt dissection with a mosquito hemostat down to the capsule to avoid the superficial peroneal nerve branches.
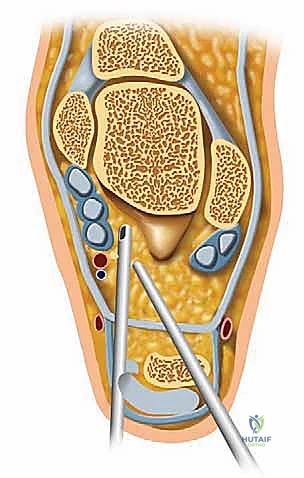
The middle portal is established just anterior to the tip of the fibula, directly over the soft spot of the sinus tarsi. This is typically our primary viewing portal. A spinal needle is introduced first to confirm the correct trajectory into the posterior facet. Once confirmed, a #11 blade is used to incise the skin, and a blunt trocar is used to enter the joint to protect the articular cartilage.
The posterior portal is located approximately one finger width proximal to the fibular tip and 1 to 2 cm posterior to the lateral malleolus, anterior to the Achilles tendon. This portal must be placed with extreme caution to avoid the sural nerve and lesser saphenous vein, utilizing a strict 'nick and spread' technique. A hemostat is used to spread the subcutaneous tissues down to the joint capsule before introducing the cannula.
The Diagnostic Sweep and Intra-Articular Navigation
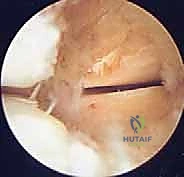
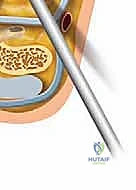
Once the portals are established, a 2.7-mm or 4.0-mm 30-degree arthroscope is introduced through the middle portal. The choice of scope depends on patient size and joint tightness; while the 4.0-mm scope offers superior optics and light transmission, the 2.7-mm scope is often necessary to navigate the tight confines of the posterior facet without causing iatrogenic scuffing of the chondral surfaces. Fluid management is typically maintained via gravity or a low-pressure pump system (set to 30-40 mmHg) to minimize the risk of fluid extravasation and compartment syndrome.
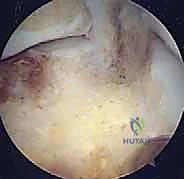
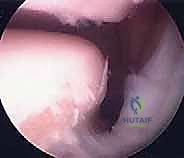
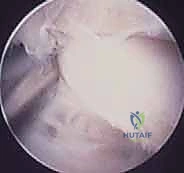
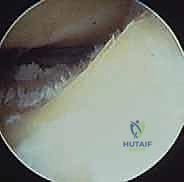
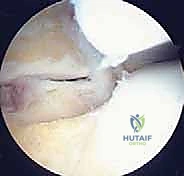
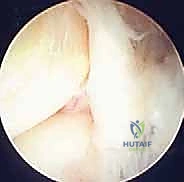
The diagnostic sweep must be systematic. Begin by visualizing the sinus tarsi. You will immediately encounter the interosseous talocalcaneal ligament and the cervical ligament. Assess these for tears, laxity, or reactive fibrosis. Next, direct the scope posteriorly to enter the posterior talocalcaneal articulation. Evaluate the concave talar facet and the convex calcaneal facet. Probe the cartilage for softening, fibrillation, or full-thickness defects.
Sweep the arthroscope laterally to inspect the lateral gutter, looking for impinging synovitis, loose bodies, or osteophytes extending from the lateral process of the talus. Finally, attempt to visualize the anterior capsular reflection. The use of a non-invasive joint distractor or manual traction applied by an assistant is often imperative to open the joint space sufficiently for a comprehensive evaluation.

Therapeutic Interventions and Arthroscopic Arthrodesis
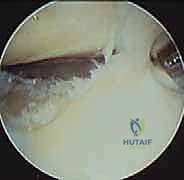
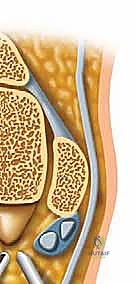
Once the diagnostic sweep is complete, therapeutic interventions commence. For sinus tarsi impingement, a 2.9-mm or 3.5-mm full-radius shaver is introduced via the anterior or posterior portal to perform a meticulous synovectomy and resect fibrotic tissue, taking care not to aggressively debride the vital intrinsic ligaments unless they are irreparably torn.
For osteochondral lesions, the unstable cartilage is debrided back to stable, vertical margins using a combination of arthroscopic curettes and shavers. If the subchondral bone is exposed, marrow stimulation (microfracture) is performed using arthroscopic awls to penetrate the subchondral plate, releasing marrow elements to promote the formation of a fibrocartilaginous repair tissue.
In cases of end-stage subtalar arthritis, arthroscopic subtalar arthrodesis is an elegant, highly effective procedure. Through the standard portals, aggressive shavers, curettes, and motorized burrs are utilized to completely denude the articular cartilage from the posterior facet down to bleeding subchondral bone. It is critical to maintain the congruent contour of the joint surfaces to ensure maximum bony apposition. Once the joint is adequately prepared, it is positioned in 5 degrees of valgus. Under fluoroscopic guidance, two large-diameter (6.5 mm or 7.0 mm) cannulated compression screws are placed percutaneously, typically from the calcaneal tuberosity directed anteriorly and superiorly into the talar body, achieving rigid internal fixation.
Complications, Incidence Rates, and Salvage Management
Neurological and Soft Tissue Complications
While subtalar arthroscopy is minimally invasive, it is not without risk. The most common complications are neurological, specifically neuropraxia or transection of the superficial peroneal nerve (SPN) or the sural nerve. The SPN is at highest risk during anterior portal placement, while the sural nerve is jeopardized during posterior portal creation. Incidence of transient neuropraxia ranges from 2% to 5% in the literature. Meticulous "nick and spread" techniques and avoiding excessive use of suction near the portals are critical preventative measures. If a nerve is sharply transected, immediate microsurgical repair or targeted nerve burying into muscle should be
Clinical & Radiographic Imaging Archive