Distal Tibial Supramalleolar Osteotomy: An Intraoperative Masterclass for Complex Ankle Deformity Correction
Key Takeaway
Welcome, fellows, to a deep dive into distal tibial supramalleolar osteotomy. We'll meticulously cover the correction of complex ankle varus or valgus deformities. This masterclass emphasizes precise preoperative planning, comprehensive anatomical understanding, and granular intraoperative execution, including specific osteotomy techniques, neurovascular protection, and strategies to prevent secondary deformities. Our goal is to achieve optimal mechanical axis alignment and long-term functional success for our patients.
Comprehensive Introduction and Patho-Epidemiology
Welcome, colleagues, to the operating theater. Today, we are tackling a crucial and technically demanding procedure within the realm of reconstructive lower extremity surgery: the distal tibial supramalleolar osteotomy (SMO). This intervention represents an incredibly rewarding surgical strategy designed to correct angular, rotational, and translational deformities of the distal tibia. If left unaddressed, these complex malalignments inevitably lead to asymmetrical loading of the tibiotalar joint, culminating in significant pain, functional limitations, and premature, end-stage osteoarthritis of the ankle. Our primary objective with the SMO is joint preservation. By meticulously restoring a neutral mechanical axis and normal joint orientation, we offload the degenerating cartilage, thereby preserving the native joint, delaying or eliminating the need for arthrodesis or arthroplasty, and profoundly improving the patient's quality of life.
Etiology and Pathogenesis of Distal Tibial Deformity
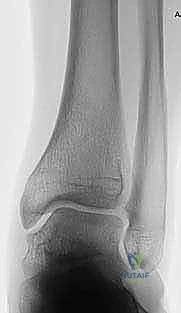
Angular deformities of the distal tibia, manifesting clinically as varus or valgus malalignment of the ankle joint, are frequently encountered in both pediatric and adult reconstructive practices. These deformities arise from a highly diverse multitude of etiologies, requiring the surgeon to act as both diagnostician and biomechanical engineer. Traumatic insults represent the most common culprit. A history of remote or recent trauma, particularly physeal injuries in the skeletally immature patient, often initiates the cascade. For instance, a Salter-Harris fracture affecting the medial aspect of the distal tibial physis can lead to premature asymmetric closure. This results in the relative overgrowth of the lateral physis and the adjacent fibula, thereby creating a progressive varus deformity as the child grows.

Beyond trauma, infectious etiologies such as neonatal osteomyelitis or septic arthritis affecting the distal tibial growth plate can similarly cause asymmetric growth arrest and devastating three-dimensional deformities. Congenital conditions present an equally complex challenge. Valgus deformities, for example, are frequently associated with fibular shortening or hypoplasia. This can stem from premature distal fibular physeal closure, fibular nonunion, malunion, or congenital pseudarthrosis of the fibula. We also frequently observe progressive ankle valgus with lateral wedging of the distal tibial epiphysis in neurogenic conditions like myelodysplasia or cerebral palsy. Furthermore, iatrogenic causes must be considered; the previous harvest of a portion of the fibula for vascularized bone grafting can lead to progressive valgus drift of the ankle mortise due to the loss of the lateral buttress.
Natural History and Biomechanical Consequences
The natural history of these deformities, especially those secondary to physeal injuries or uncorrected congenital anomalies, is almost universally progressive. As the patient grows or ages, the limb's malalignment worsens, leading to a cascade of deleterious biomechanical consequences. The abnormal mechanical axis shifts the center of pressure within the ankle mortise. In a varus deformity, the medial joint space experiences exponentially increased contact stresses, rapidly depleting the articular cartilage. Conversely, a valgus deformity overloads the lateral compartment and places severe tension on the medial deltoid ligament complex, often leading to medial instability and lateral impingement.
Clinically, this altered biomechanics leads to increased soft tissue pressure, adventitial bursa formation, and a significant risk of skin ulceration over prominent bony landmarks like the medial malleolus, lateral malleolus, or talonavicular region. Long-term, this abnormal loading stresses not just the ankle, but the entire kinetic chain. The hindfoot attempts to compensate—a varus tibia often drives the subtalar joint into compensatory valgus. When the limits of subtalar compensation are reached, the abnormal forces are transmitted to the midfoot and forefoot, frequently culminating in secondary deformities such as a rigid planovalgus foot, hallux valgus, and ultimately, premature, debilitating osteoarthritis of the ankle and peritalar joints.
Detailed Surgical Anatomy and Biomechanics
Before we make a single incision, a profound, three-dimensional understanding of the regional pathology, anatomy, and biomechanics is paramount. We are not merely cutting and realigning bone; we are restoring a highly complex kinetic chain that dictates the functional capacity of the entire lower extremity.
Osteology and Articular Geometry
The distal tibia is a complex, metaphyseal-epiphyseal region characterized by a transition from dense cortical diaphyseal bone to a broad, cancellous metaphyseal flare. The tibiotalar joint is normally in a highly specific neutral alignment, which is critical for even load distribution. We assess this radiographically by measuring the Lateral Distal Tibial Angle (LDTA), which is the medial angle formed between the mechanical axis of the tibia and the articular surface of the tibial plafond. The normal LDTA value is approximately 90 degrees (range, 88 to 95 degrees). Sagittal alignment is equally critical and is assessed by the Anterior Distal Tibial Angle (ADTA), which normally measures 80 degrees (range, 78 to 81 degrees).
Any deviation from these normative angular values alters the contact mechanics of the talus within the mortise. Furthermore, the syndesmotic articulation between the distal tibia and fibula must be respected. The fibula acts as a crucial lateral buttress and bears approximately 15% to 17% of the axial load. When planning a supramalleolar osteotomy, the surgeon must decide whether the fibula requires a concomitant osteotomy to allow for tibial correction without tethering the lateral compartment or increasing pressure within the syndesmosis. In pediatric cases, the physis, located mere millimeters from the ankle joint capsule, serves as a critical landmark that must be meticulously protected during hardware placement and osteotomy execution.
Neurovascular and Soft Tissue Considerations
Navigating the distal tibia requires strict adherence to anatomical planes to protect vital neurovascular and tendinous structures. When utilizing a medial approach—often preferred for opening wedge osteotomies to correct varus deformities—the primary structures at risk are the great saphenous vein and the saphenous nerve. These structures course superficially along the medial aspect of the ankle, typically lying just anterior to the medial malleolus. Meticulous blunt dissection and careful, tension-free retraction are crucial to prevent iatrogenic injury, which can lead to frustrating sensory deficits, neuroma formation, or chronic regional pain syndromes.
Conversely, the anteromedial or anterolateral approaches require navigation through more complex anatomical territory. The anterior tibial artery and the deep peroneal nerve lie deep within the anterior compartment, coursing distally over the anterior capsule of the ankle joint. Injury to the deep peroneal nerve can lead to devastating foot drop or sensory deficits in the first dorsal web space. The anterior tibialis tendon serves as our primary superficial landmark; deep dissection should generally proceed lateral to it, carefully elevating the neurovascular bundle along with the extensor hallucis longus (EHL) and extensor digitorum longus (EDL) muscles. Regardless of the approach, strict subperiosteal dissection is mandatory. This technique minimizes soft tissue stripping, thereby preserving the delicate extraosseous blood supply to the metaphyseal bone fragments, which is an absolute biological prerequisite for timely osteotomy consolidation and the prevention of nonunion.
Exhaustive Indications and Contraindications
Patient selection is arguably the most critical determinant of success in deformity correction surgery. The supramalleolar osteotomy is a powerful tool, but it must be applied to the correct pathology in an optimized host.
Patient Selection Criteria
The ideal candidate for a distal tibial supramalleolar osteotomy is a symptomatic patient with an identifiable, symptomatic angular deformity of the distal tibia (varus, valgus, recurvatum, or procurvatum) that is driving asymmetric joint loading or causing adjacent joint compensation. The patient should ideally have preserved, functional range of motion in the tibiotalar and subtalar joints. Early to mid-stage asymmetric osteoarthritis (e.g., Takakura Stage 2 or 3a) is a prime indication, as realigning the mechanical axis can offload the damaged compartment and halt disease progression.
Crucially, the surgeon must assess the flexibility of the hindfoot and forefoot. A rigid, uncompensated hindfoot deformity will not spontaneously correct once the tibia is realigned, necessitating concomitant procedures such as a calcaneal osteotomy or midfoot fusion. Advanced age is not an absolute contraindication, but bone quality (osteoporosis) must be carefully evaluated, as it dictates the choice of fixation construct. Patients with significant leg-length discrepancies (LLD) may require a specialized approach, such as an opening wedge osteotomy to gain length, or the use of a circular external fixator for gradual correction and lengthening.
| Category | Indications for Supramalleolar Osteotomy | Contraindications for Supramalleolar Osteotomy |
|---|---|---|
| Pathology | Asymmetric distal tibial deformity (Varus/Valgus) | End-stage, pan-articular ankle osteoarthritis (Takakura Stage 4) |
| Joint Status | Early/Mid-stage asymmetric ankle OA | Severe restriction of ankle range of motion / Ankylosis |
| Soft Tissue | Intact, healthy soft tissue envelope | Active local or systemic infection; Severe peripheral vascular disease |
| Neurological | Intact protective sensation | Charcot neuroarthropathy; Severe untreated neuropathy |
| Patient Factors | Motivated patient, compliant with NWB protocols | Uncontrolled diabetes mellitus; Active heavy smoking (relative) |
Pre-Operative Planning, Templating, and Patient Positioning
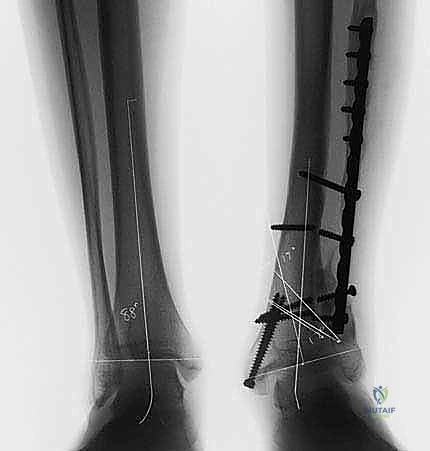
"Failing to plan is planning to fail." This surgical adage holds especially true in reconstructive foot and ankle surgery. Deformity correction is a mathematical and geometric exercise executed in biological tissue. Our ultimate goal is to achieve an LDTA of approximately 90 degrees and an ADTA of 80 degrees, ensuring the tibial mechanical axis passes precisely through the center of the talar dome, perpendicular to the joint surface.
Advanced Imaging Modalities
The foundation of our surgical blueprint relies on high-quality, standardized imaging. Standing, full-length, weight-bearing anteroposterior (AP) and mortise views of both lower extremities are our primary tools. The LDTA is meticulously measured from the intersection of a line parallel to the long mechanical axis of the tibia and a second line drawn across the subchondral dome of the talus. The magnitude of the deformity is simply the difference between the measured angle and the normative 90 degrees.
Lateral weight-bearing radiographs of both ankles are equally crucial for detecting sagittal plane deformities (procurvatum or recurvatum). The ADTA is measured from the anterior side, with an average target of 80 degrees. Furthermore, standing AP, lateral, and oblique foot radiographs are utilized to evaluate hindfoot alignment and midfoot compensation, helping us avoid over- or under-correction. A standing AP view of the pelvis is essential to evaluate for leg-length discrepancy (LLD). If the LLD exceeds 2 cm, a concomitant lengthening or shortening procedure should be integrated into the global surgical plan. Finally, in pediatric cases with suspected physeal injuries, Computed Tomography (CT) with 3D reconstruction is invaluable for assessing the presence, location, and cross-sectional area of physeal bars, which dictates the need for bar resection versus osteotomy.
Deformity Analysis and CORA Methodology
Translating two-dimensional images into a precise surgical plan requires the rigorous application of deformity analysis, utilizing the principles established by Paley and Tetsworth. We must define the magnitude and plane of the deformity, identify any rotational component, and assess limb length. The cornerstone of this analysis is identifying the Center of Rotation of Angulation (CORA). The CORA is defined as the point of intersection between the proximal and distal mechanical (or anatomic) axis lines of the deformed bone segment.
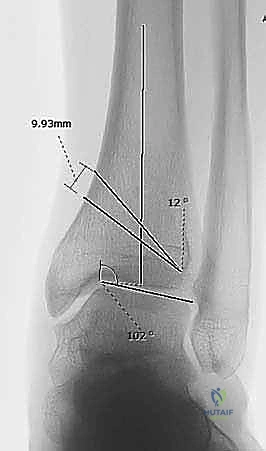
Ideally, our osteotomy cut and the subsequent hinge point (Axis of Correction of Angulation, or ACA) should be placed exactly at the CORA. When the osteotomy and the ACA are collinear with the CORA, the deformity corrects purely through angulation without inducing secondary translation. Most commonly in distal tibial deformities, the CORA is located very distally, near the physis and articular surface. If anatomical constraints force us to perform the osteotomy at a level different from the CORA, we must mathematically anticipate and purposefully induce a translational shift at the osteotomy site to ensure the final mechanical axis remains perfectly aligned.
Wedge Selection and Osteotomy Design
Once the CORA and magnitude of correction are defined, we select the optimal osteotomy geometry. For a varus deformity, we typically plan a medial opening wedge osteotomy. This technique preserves the lateral cortical hinge, maintains or slightly increases limb length, and avoids the need for a fibular osteotomy if the deformity is mild to moderate. For instance, a 12-degree varus deformity might require a 12-degree opening wedge, correlating to a 10-mm opening at the medial cortical base.
Conversely, for a valgus deformity, a medial closing wedge or a lateral opening wedge osteotomy is indicated. A medial closing wedge is powerful and inherently stable, but it slightly shortens the limb. A 17-degree valgus deformity might require a 17-degree closing wedge, with a 14-mm base resected along the medial tibial cortex. Dome osteotomies are another advanced option, allowing for correction in multiple planes without altering limb length, though they are technically more demanding to execute and stabilize.
Anesthesia, Positioning, and Fluoroscopic Setup
The procedure is typically performed under regional anesthesia (spinal or epidural) combined with a peripheral nerve block (e.g., popliteal block) for extended postoperative pain control. The patient is positioned supine on a radiolucent operating table. A bump is placed under the ipsilateral hip to internally rotate the leg until the patella points directly toward the ceiling, ensuring a true AP fluoroscopic view of the ankle mortise.
A well-padded thigh tourniquet is applied to provide a bloodless surgical field, though it should be deflated prior to final closure to ensure meticulous hemostasis. The fluoroscopy unit (C-arm) is brought in from the contralateral side. It is imperative to confirm that perfect AP, mortise, and lateral views of the distal tibia and ankle joint can be obtained without obstruction before prepping and draping the limb.
Step-by-Step Surgical Approach and Fixation Technique
The execution of the supramalleolar osteotomy demands surgical precision, respect for soft tissues, and an uncompromising adherence to the preoperative blueprint.
Incision and Soft Tissue Dissection
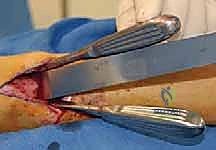
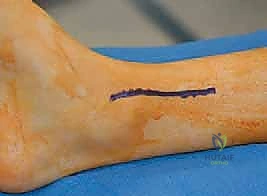
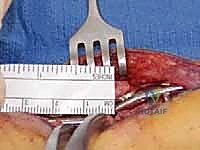
For a standard medial opening wedge osteotomy, a longitudinal incision is made over the medial aspect of the distal tibia, extending from the medial malleolus proximally for approximately 8 to 10 centimeters. The incision is carefully deepened through the subcutaneous tissues. The surgeon must remain hyper-vigilant to identify, mobilize, and protect the great saphenous vein and the saphenous nerve, utilizing vessel loops for gentle retraction.
Once the medial tibial crest is reached, the periosteum is incised longitudinally. Using a Cobb elevator, a meticulous subperiosteal dissection is performed anteriorly and posteriorly. Anteriorly, the dissection extends to the anterior tibial crest; posteriorly, it sweeps around the posteromedial border. Hohmann retractors are carefully placed subperiosteally to protect the anterior neurovascular bundle and the posterior tibial neurovascular bundle and flexor tendons. Excessive periosteal stripping must be strictly avoided to preserve the vital blood supply to the metaphyseal bone, which is critical for rapid osteotomy healing.
Osteotomy Execution and Deformity Correction
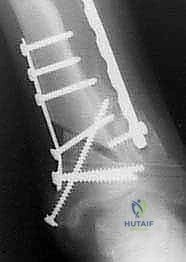
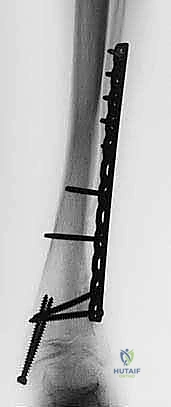
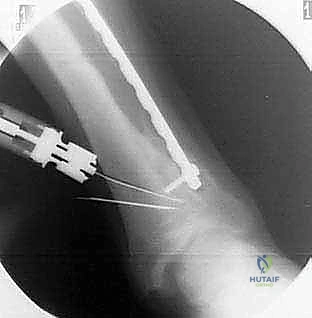
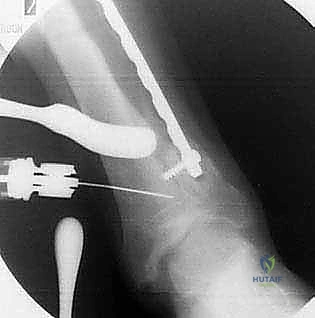
Under direct fluoroscopic guidance, a smooth Kirschner wire (K-wire) is inserted from medial to lateral to mark the planned trajectory of the osteotomy. This wire must be perfectly parallel to the tibiotalar joint line in the AP plane and orthogonal to the tibial shaft in the sagittal plane. The osteotomy is typically initiated 1.5 to 2.0 centimeters proximal to the joint line to ensure adequate distal bone stock for subsequent screw fixation.
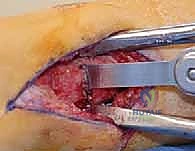
Using an oscillating saw with copious cold saline irrigation to prevent thermal necrosis of the bone, the osteotomy is carefully created along the K-wire guide. The saw blade is advanced through the medial, anterior, and posterior cortices. Crucially, the lateral cortex is left intact to serve as a biological and mechanical hinge.
Once the cut is nearly complete, broad osteotomes are inserted into the medial osteotomy site. By gently and sequentially levering the osteotomes, the medial gap is opened, relying on the plastic deformation of the intact lateral cortical hinge. The opening is expanded until the predetermined wedge size (e.g., 10 mm) is achieved, and the mechanical axis is visually and fluoroscopically confirmed to be restored. A calibrated lamina spreader or a specialized opening wedge jack can be utilized to maintain the correction.
Internal Fixation Strategies and Bone Grafting
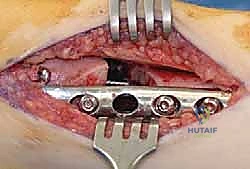
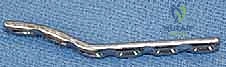
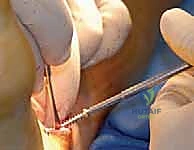
With the deformity corrected and the gap maintained, rigid internal fixation is applied. A pre-contoured, anatomically designed distal tibial locking plate is typically utilized. The plate is slid subperiosteally and provisionally fixed with K-wires.
Screws are then inserted. It is critical to place at least three, and preferably four, locking screws into the distal metaphyseal block to ensure angular stability against the powerful deforming forces of the Achilles tendon and the ground reaction force. Cortical or locking screws are then placed in the proximal diaphyseal segment.
Once the construct is mechanically stable, the resulting medial bone void must be managed. For small gaps (less than 5-7 mm), local bone marrow aspirate or synthetic bone substitutes may suffice. For larger structural gaps, an autologous tricortical iliac crest bone graft, or a structural allograft wedge, is meticulously fashioned to fit the defect precisely. The graft is impacted into the osteotomy site, providing immediate structural support and a robust osteoconductive scaffold.

Final multi-planar fluoroscopic images are obtained to confirm the restoration of the LDTA and ADTA, the perfect positioning of the hardware, and the congruency of the ankle mortise.
The tourniquet is deflated, meticulous hemostasis is achieved, and the periosteum and soft tissues are closed in layers over a closed suction drain to prevent hematoma formation.
Complications, Incidence Rates, and Salvage Management
Despite meticulous planning and execution, distal tibial supramalleolar osteotomies carry a distinct risk profile. Recognizing and managing these complications promptly is the hallmark of an expert reconstructive surgeon.
Intraoperative and Early Postoperative Complications
The most common intraoperative complication is an inadvertent fracture of the intended cortical hinge (e.g., the lateral cortex during a medial opening wedge). If the hinge fractures, the osteotomy becomes inherently unstable and is prone to translation. This must be immediately recognized on fluoroscopy. Salvage requires abandoning the simple wedge concept and treating the site as an unstable fracture; this usually necessitates the application of a longer, more robust neutralization plate, or occasionally, the addition of a supplementary lateral plate to restore stability.
Early postoperative complications include wound dehiscence and superficial infection, particularly over the medial malleolus where the soft tissue envelope is notoriously thin. Deep space infections are rare but devastating, requiring emergent surgical debridement, hardware removal if loose, and intravenous antibiotic therapy. Iatrogenic nerve injury (saphenous or deep peroneal) can occur due to aggressive retraction or direct laceration, leading to painful neuromas or motor deficits.
Late Complications and Long-Term Outcomes
Delayed union and nonunion are significant concerns, particularly in patients who smoke, have diabetes, or when inadequate bone grafting techniques are employed. Nonunion typically presents with persistent pain and hardware failure (plate breakage or screw pullout) several months postoperatively.
Salvage of a nonunion requires a revision surgery involving hardware removal, aggressive debridement of the nonunion site down to bleeding bone, application of robust autogenous bone graft (e.g., reamer-irrigator-aspirator graft from the femur), and revision rigid internal fixation. Malunion, resulting from under-correction, over-correction, or loss of fixation, may require a revision osteotomy if symptomatic.
| Complication Type | Estimated Incidence | Salvage / Management Strategy |
|---|---|---|
| Intraoperative Hinge Fracture | 10% - 15% | Convert to rigid neutralization plating; Add contralateral plate if highly unstable. |
| Wound Dehiscence / Necrosis | 5% - 8% | Local wound care; Vacuum-assisted closure (VAC); Rarely requires local rotational flap. |
| Delayed Union / Nonunion | 3% - 7% | Optimization of biology (Vitamin D, smoking cessation); Revision ORIF with autogenous bone grafting. |
| Hardware Irritation | 15% - 20% | Routine hardware removal after complete radiographic consolidation (typically >12-18 months). |
| Progression of Osteoarthritis | Variable (Time-dependent) | Ankle arthrodesis or Total Ankle Arthroplasty (TAA) once joint preservation fails. |
Phased Post-Operative Rehabilitation Protocols
The biological healing of the osteotomy dictates the pace of our rehabilitation protocol. A perfectly executed surgery can be easily undone by premature weight-bearing or patient non-compliance.
Acute Phase and Immobilization
Immediately postoperatively, the limb is placed in a well-padded, bulky Jones splint to accommodate expected soft tissue swelling. The limb is strictly elevated above the level of the heart for the first 48 to 72 hours. Deep vein thrombosis (DVT) prophylaxis is initiated according to institutional protocols, typically utilizing low-molecular-weight heparin or oral anticoagulants, especially given the mandated period of non-weight-bearing (NWB).
At the two-week mark, the splint and sutures are removed. Clinical and radiographic evaluations are performed to ensure wound healing and maintenance of alignment. The patient is then transitioned into a rigid, removable controlled ankle motion (CAM) boot or a short
Clinical & Radiographic Imaging Archive