DRUJ Stabilization: Masterclass in Intra-Articular Radioulnar Ligament Reconstruction
Key Takeaway
This masterclass guides fellows through intra-articular radioulnar ligament reconstruction, a critical procedure for chronic distal radioulnar joint instability. We cover comprehensive anatomy, meticulous preoperative planning, precise graft harvest, and detailed intraoperative execution, emphasizing optimal bone tunnel placement and graft tensioning. Learn to restore stability and achieve excellent functional outcomes, while identifying and mitigating potential pitfalls.
Comprehensive Introduction and Patho-Epidemiology
Chronic instability of the distal radioulnar joint (DRUJ) remains one of the most formidable challenges in reconstructive hand and wrist surgery. The DRUJ is a highly complex, diarthrodial pivot joint that, in conjunction with the proximal radioulnar joint (PRUJ), facilitates the vital forearm kinematics of pronation and supination. When the intricate balance of osseous architecture and soft-tissue restraints is disrupted, patients experience profound functional impairment. This manifests not merely as pain, but as a debilitating loss of grip strength, a mechanical "clunk" during rotation, and an inability to perform basic activities of daily living that require torque, such as turning a key or opening a jar. Addressing this pathology requires a paradigm shift from historical extra-articular tenodesis procedures—which often failed due to non-isometric kinematics—to anatomically precise intra-articular reconstructions.
The pathogenesis of DRUJ instability is multifaceted, most frequently originating from traumatic insults that disrupt the triangular fibrocartilage complex (TFCC) and its primary stabilizing ligaments. Distal radius fractures are the most common instigators. When a distal radius fracture heals with significant malunion—specifically radial shortening exceeding 5 millimeters, dorsal angulation greater than 20 degrees, or substantial translational deformity—the kinematics of the DRUJ are fundamentally altered. This osseous distortion places insurmountable stress on the native radioulnar ligaments, leading to attenuation, rupture, and subsequent chronic subluxation or dislocation of the ulnar head relative to the sigmoid notch. Fractures involving the base of the ulnar styloid are particularly highly correlated with DRUJ instability, as this region serves as the critical insertion footprint for the superficial limbs of the radioulnar ligaments.
Isolated DRUJ dislocations, occurring in the absence of a concomitant fracture, represent a distinct epidemiological subset. These are typically high-energy injuries resulting from an extreme rotational torque applied to a loaded wrist. Dorsal dislocations of the ulnar head are the most prevalent, classically occurring when a forceful hyperpronation and wrist extension moment is applied—such as bracing for a fall on an outstretched hand or sustaining a direct blow during contact sports. Volar dislocations, conversely, are exceedingly rare and generally result from forced hypersupination. Furthermore, one must always maintain a high index of suspicion for longitudinal radioulnar dissociation, the Essex-Lopresti lesion, where a radial head fracture is coupled with interosseous membrane rupture and DRUJ disruption, leading to proximal migration of the radius.
The evolution of surgical management for chronic DRUJ instability has been driven by a deeper understanding of these patho-epidemiological factors. Historically, extra-articular reconstructions tethered the ulna to the radius or carpus outside the joint's axis of rotation, invariably leading to restricted motion, progressive joint stiffness, and eventual failure due to graft stretching. The modern masterclass approach, pioneered by Adams and Berger, recognizes that true stability can only be restored by recreating the specific, isometric intra-articular anatomy of the volar and dorsal radioulnar ligaments. This chapter provides an exhaustive, step-by-step technical guide to executing this definitive intra-articular radioulnar ligament reconstruction, ensuring the restoration of both stability and a functional, pain-free arc of motion.
Detailed Surgical Anatomy and Biomechanics
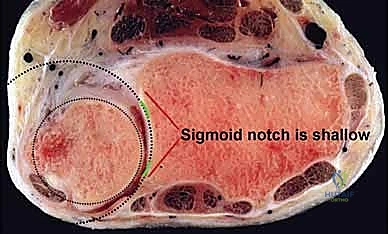
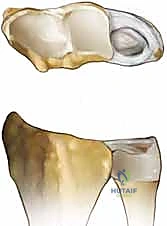
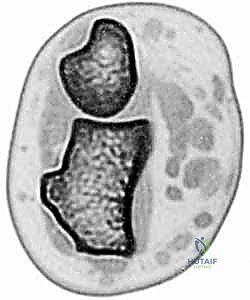
To master intra-articular reconstruction, the orthopedic surgeon must possess an uncompromising, three-dimensional understanding of DRUJ anatomy and biomechanics. The DRUJ is inherently an incongruent joint. The articular surface of the ulnar head forms a semi-cylinder with a radius of curvature of approximately 10 millimeters, whereas the corresponding sigmoid notch of the distal radius is significantly shallower, possessing a radius of curvature of roughly 15 millimeters. Because of this profound geometrical mismatch, the osseous architecture provides a mere 20% of the joint's intrinsic stability. The remaining 80% of stability is entirely reliant upon the integrity of the surrounding soft-tissue envelope, making anatomical reconstruction paramount when these tissues fail.
The undisputed primary stabilizers of the DRUJ are the volar (palmar) and dorsal radioulnar ligaments, which form the robust margins of the TFCC. These ligaments are not merely isolated bands of tissue; they are complex, biphasic structures that arise from the dorsal and volar rims of the sigmoid notch and converge as they course ulnarly. Crucially, as they approach the ulna, both ligaments bifurcate into distinct superficial and deep limbs. The superficial limbs insert onto the base and mid-substance of the ulnar styloid. However, it is the deep limbs—also known as the ligamentum subcruentum—that are biomechanically paramount. These deep fibers insert directly into the fovea at the base of the ulnar styloid, which represents the precise isometric axis of forearm rotation.
Biomechanically, the tension within these ligaments changes dynamically throughout the arc of forearm rotation. During pronation, the ulnar head translates dorsally within the sigmoid notch. In this position, the dorsal radioulnar ligament becomes taut, preventing dorsal subluxation, while the volar ligament relaxes. Conversely, during supination, the ulnar head translates volarly; the volar radioulnar ligament tightens to prevent volar subluxation, and the dorsal ligament becomes lax. The foveal attachment is the only point that maintains relatively constant tension—isometry—throughout this entire rotational arc. Therefore, any surgical reconstruction must accurately recreate this foveal insertion to prevent the graft from stretching out or severely restricting forearm motion.
Beyond the primary radioulnar ligaments, secondary dynamic and static stabilizers play crucial supportive roles that must be respected during surgical exposure. The pronator quadratus muscle acts as a dynamic stabilizer, compressing the ulnar head into the sigmoid notch during active pronation. The extensor carpi ulnaris (ECU) tendon and its robust subsheath provide vital dynamic dorsal stability; iatrogenic injury to the ECU subsheath during the surgical approach can result in secondary ECU snapping or subluxation, severely compromising the surgical outcome. Additionally, the interosseous membrane, specifically its distal oblique bundle (DOB), provides significant longitudinal and transverse stability. A comprehensive understanding of this complex interplay dictates that successful DRUJ reconstruction requires not only accurate graft placement but also meticulous handling of the secondary stabilizing structures.
Exhaustive Indications and Contraindications
The decision to proceed with an intra-articular radioulnar ligament reconstruction is highly specific and should be reserved for cases where primary repair is biologically or mechanically impossible. The primary indication is chronic, symptomatic DRUJ instability that has proven refractory to a comprehensive trial of nonoperative management. This typically involves patients with a history of trauma occurring more than 3 to 6 months prior, presenting with persistent ulnar-sided wrist pain, a mechanical "clunk," subjective weakness, and a clinically demonstrable increase in anteroposterior translation of the ulnar head compared to the contralateral wrist. Intra-articular reconstruction is the procedure of choice when the native TFCC remnants are too attenuated, retracted, or degenerated to support a direct foveal reattachment (e.g., an open or arthroscopic TFCC repair).
A non-negotiable prerequisite for this procedure is the presence of a competent sigmoid notch and a relatively well-aligned distal radius. The sigmoid notch must possess intact dorsal and volar rims to contain the ulnar head once the soft tissues are reconstructed. If preoperative imaging reveals a developmentally flat sigmoid notch or a post-traumatic deficiency of the osseous rims, the soft-tissue reconstruction will inevitably fail due to sheer mechanical overload. In such scenarios, a concurrent or staged sigmoid notch osteoplasty is absolutely mandatory. Furthermore, any significant extra-articular malunion of the distal radius (e.g., severe radial shortening or dorsal tilt) must be corrected via a corrective osteotomy prior to, or simultaneously with, the ligamentous reconstruction. Soft tissue cannot overcome gross bony deformity.
Contraindications to this procedure are strict and must be actively ruled out during preoperative evaluation. The most absolute contraindication is the presence of established osteoarthritis within the DRUJ. Re-stabilizing an arthritic joint will only exacerbate the patient's pain by increasing joint contact pressures during rotation. In the presence of significant cartilage wear, salvage procedures such as the Sauvé-Kapandji procedure, a Darrach resection, or ulnar head arthroplasty are the appropriate surgical avenues. Active local or systemic infection, severe medical comorbidities precluding prolonged anesthesia, and an inability or unwillingness of the patient to comply with a rigorous, months-long postoperative rehabilitation protocol are also absolute contraindications.
| Clinical Parameter | Indications for Intra-Articular Reconstruction | Contraindications (Absolute & Relative) |
|---|---|---|
| Chronicity | Chronic instability (>3-6 months post-injury). | Acute injuries amenable to primary repair. |
| TFCC Status | Attenuated, irreparable native ligaments. | Robust tissue allowing direct foveal repair. |
| Osseous Alignment | Anatomic or near-anatomic distal radius. | Uncorrected severe distal radius malunion. |
| Sigmoid Notch | Competent dorsal and volar osseous rims. | Flat or deficient notch (requires osteoplasty). |
| Articular Cartilage | Intact, healthy articular surfaces (Grade 0-1). | Advanced DRUJ osteoarthritis (Grade 3-4). |
| Patient Factors | High functional demand, compliant with rehab. | Non-compliant, active infection, low demand. |
Pre-Operative Planning, Templating, and Patient Positioning
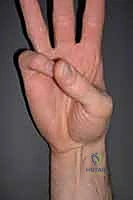
Meticulous preoperative planning is the cornerstone of a successful intra-articular DRUJ reconstruction. The clinical examination must be exhaustive. The surgeon must quantify the degree of instability using the "piano key" test (ballottement of the ulnar head in neutral, pronation, and supination) and compare it strictly to the contralateral, uninjured wrist. A positive modified press test—where the patient experiences pain and the ulnar head depresses significantly when pushing up from a chair—further localizes the pathology. The surgeon must also carefully assess the integrity of the ECU tendon to ensure that the patient's symptoms are not merely a result of ECU subluxation, which mimics DRUJ instability but requires a vastly different surgical intervention.
Imaging protocols must be rigid and standardized. Standard radiographs are often insufficient for complex planning but are necessary for baseline assessment. A strict zero-rotation posteroanterior (PA) view must be obtained to evaluate ulnar variance and identify any subtle styloid base fractures. A true lateral radiograph is critical; even 10 to 15 degrees of forearm rotation can project a false appearance of DRUJ subluxation. The gold standard for preoperative templating is a bilateral, high-resolution Computed Tomography (CT) scan. The CT must be performed with both wrists in identical positions—typically neutral rotation, full pronation, and full supination. This allows the surgeon to definitively quantify the subluxation utilizing the epicenter method or radioulnar line method, and critically, to assess the three-dimensional morphology of the sigmoid notch to rule out osseous deficiency.
Graft selection must be finalized preoperatively, with a clear primary choice and a secondary backup. The palmaris longus (PL) tendon autograft is the gold standard due to its ideal length, robust tensile strength, and negligible donor-site morbidity. However, the PL is congenitally absent in 10% to 15% of the population. The surgeon must verify the presence of the PL clinically prior to anesthesia. If the PL is absent, the preferred alternative is a harvested strip of the flexor carpi ulnaris (FCU) tendon, or alternatively, a plantaris tendon graft or a strip of the extensor digitorum longus from the foot. The surgical team must be prepared with the appropriate tendon strippers and instrumentation for whichever graft source is utilized.
Patient positioning in the operating theater requires careful attention to detail to optimize surgical flow and fluoroscopic access. The patient is placed supine with the operative extremity extended onto a radiolucent hand table. A well-padded pneumatic tourniquet is applied to the proximal arm. The arm is prepped and draped to allow exposure from the elbow to the fingertips, ensuring full, unrestricted passive range of motion of the elbow and wrist during the procedure. The fluoroscopy unit (C-arm) should be positioned to enter from the foot of the hand table or parallel to the patient, allowing for seamless intraoperative AP and lateral imaging without compromising the sterile field or the surgeon's working space.
Step-by-Step Surgical Approach and Fixation Technique
Autograft Harvest and Preparation
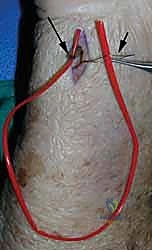
The procedure commences with the harvest of the tendon autograft, typically the palmaris longus (PL). With the patient under anesthesia, the presence of the PL is confirmed by palpation at the volar wrist crease. A 1- to 1.5-centimeter transverse incision is made directly over the tendon at the proximal wrist crease.
Blunt dissection is utilized to separate the subcutaneous fat and identify the glistening white fibers of the tendon. It is imperative to positively identify the PL and differentiate it from the underlying median nerve, which lies deeper and slightly radial.
Once isolated, a small hemostat is passed beneath the tendon. The tendon is sharply transected distally. A Brand or Carrell tendon stripper is then passed over the free distal end of the tendon. While maintaining firm, longitudinal traction on the tendon with a Kocher clamp, the stripper is advanced proximally into the proximal forearm with a steady, twisting motion. The muscle belly is sheared off proximally, yielding a graft of approximately 12 to 15 centimeters in length.
The graft is placed on the back table, cleared of any adherent muscle tissue, and a running locking suture (e.g., 2-0 non-absorbable braided suture) is placed in both ends using a Krackow or whipstitch technique to facilitate later passage through the osseous tunnels.
Dorsal Surgical Exposure
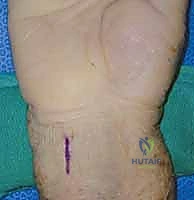
Attention is then directed to the dorsal aspect of the wrist. A 5- to 6-centimeter longitudinal incision is made, centered directly over the DRUJ.
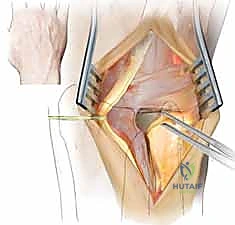
The dissection is carried down through the subcutaneous tissue, meticulously identifying and protecting the dorsal sensory branches of the ulnar nerve, which cross the operative field obliquely from volar-ulnar to dorsal-radial. Retraction of these nerve branches must be gentle to prevent postoperative neuromas or debilitating dysesthesias. The extensor retinaculum is identified, and the interval between the fifth extensor compartment (extensor digiti minimi, EDM) and the sixth extensor compartment (ECU) is developed.
The fifth compartment is opened longitudinally, and the EDM is retracted radially. The floor of the fifth compartment is then incised, and subperiosteal dissection is utilized to elevate the retinacular flap ulnarly, exposing the dorsal capsule of the DRUJ without violating the ECU subsheath.
A longitudinally oriented, L-shaped or T-shaped capsulotomy is performed to expose the ulnar head and the sigmoid notch. The joint is inspected, any intra-articular debris or degenerative TFCC remnants are debrided, and the articular surfaces are assessed to confirm the preoperative absence of advanced chondromalacia.
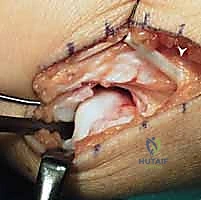
Osseous Tunnel Creation
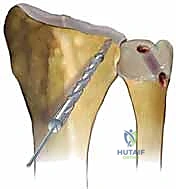
The critical phase of the Adams-Berger reconstruction is the precise creation of the osseous tunnels. Beginning with the ulna, a 1.5-mm K-wire is introduced precisely at the fovea—the anatomical isometric point located at the base of the ulnar styloid. The wire is driven obliquely, exiting the ulnar cortex proximally at the ulnar neck, approximately 2 to 3 centimeters proximal to the articular surface.
Fluoroscopy is utilized to confirm that the starting point is perfectly foveal and that the trajectory does not violate the articular surface of the ulnar head. Once confirmed, a 3.5-mm or 4.0-mm cannulated drill is passed over the K-wire to create the ulnar tunnel.
Next, the radial tunnels are established. Two K-wires are placed into the distal radius. The first wire is positioned at the extreme dorsal rim of the sigmoid notch, and the second wire is placed at the extreme volar rim. Both wires are angled to converge proximally, exiting the radius at the dorsal metaphysis, approximately 2 centimeters proximal to the radiocarpal joint, in the floor of the fourth extensor compartment.
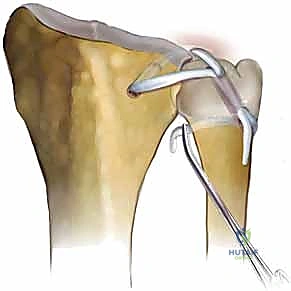
It is crucial that the intra-articular starting points are exactly at the margins of the sigmoid notch to recreate the anatomic origins of the dorsal and volar radioulnar ligaments. These wires are over-drilled with a 3.0-mm or 3.5-mm cannulated drill, creating a V-shaped tunnel configuration within the distal radius.
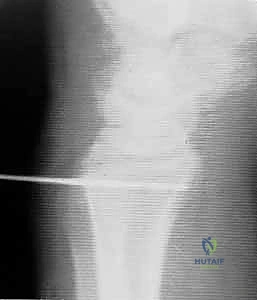
Graft Passage, Tensioning, and Fixation
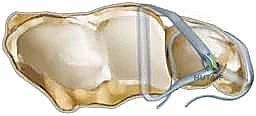
With the tunnels prepared, a wire loop or suture shuttle is used to pass the prepared autograft. The graft is first passed through the ulnar tunnel, entering at the proximal ulnar neck and exiting at the fovea. At the fovea, the graft bifurcates. One limb of the graft is passed volarly across the joint space and shuttled into the volar radial tunnel, exiting dorsally at the radial metaphysis. The other limb is passed dorsally across the joint space and shuttled into the dorsal radial tunnel, exiting adjacent to the first limb.

Tensioning the graft is the most technically demanding step and dictates the functional outcome. The forearm must be held in strict neutral rotation. The ulnar head is manually reduced into the sigmoid notch, ensuring anatomic alignment. While an assistant maintains this reduction, the surgeon applies firm, equal tension to both limbs of the graft exiting the radial metaphysis. The graft must be tight enough to eliminate the "piano key" instability but not so tight as to restrict passive pronation and supination. The surgeon actively ranges the forearm to confirm smooth, isometric motion without subluxation.
Once optimal tension is achieved, the graft is secured. This can be accomplished by tying the two limbs of the graft over the intervening bony bridge on the dorsal radius, or increasingly, by utilizing small bio-tenodesis screws (e.g., 3.0-mm or 4.0-mm PEEK screws) within the radial and ulnar tunnels to provide rigid, aperture fixation. Following fixation, the dorsal capsule is meticulously repaired, ensuring the ECU tendon remains stable within its subsheath. The extensor retinaculum is repaired, leaving the EDM transposed subcutaneously if necessary to prevent bowstringing, and the skin is closed in layers.

