Osteochondral Autograft Transfer for Talar Dome Lesions: An Operative Masterclass
Key Takeaway
Welcome to the OR, fellows. Today, we're performing an osteochondral transfer for a medium-sized talar dome lesion. This masterclass will guide you through meticulous preoperative planning, exact patient positioning, comprehensive surgical anatomy, and a granular, step-by-step intraoperative execution of both medial and lateral approaches. We'll cover critical pearls, potential pitfalls, and essential postoperative care, ensuring you master this complex procedure.
Comprehensive Introduction and Patho-Epidemiology
The Evolution of Talar Dome Lesion Management
Osteochondral lesions of the talus (OLTs) represent a formidable challenge in foot and ankle surgery, historically plagued by unpredictable outcomes and progressive joint degeneration. The evolution of our understanding of these lesions—from the early descriptions by Monro in 1756 to the landmark staging system proposed by Berndt and Harty in 1959—has fundamentally shifted our treatment paradigms. Initially termed "osteochondritis dissecans," it is now universally recognized that the vast majority of these defects are traumatic in origin, resulting from shear and compressive forces across the ankle mortise. While primary marrow stimulation techniques such as arthroscopic microfracture remain the gold standard for small, primary lesions, they often fail in the setting of larger defects or those with significant subchondral bone loss.
The transition toward structural restoration techniques, specifically Osteochondral Autograft Transfer (OAT), marks a critical juncture in joint preservation surgery. OAT addresses the fundamental biomechanical failure of microfracture in large or cystic lesions: the inability of fibrocartilage to withstand the immense contact pressures of the ankle joint without a competent subchondral bone plate. By transferring a mature, architecturally sound cylindrical plug of hyaline cartilage and vital subchondral bone from a non-weight-bearing portion of the knee to the talar defect, we re-establish both the articular congruity and the structural integrity of the talar dome. This procedure is a masterclass in precision, requiring meticulous preoperative planning, flawless surgical execution, and a deep understanding of ankle biomechanics.
Fellows must recognize that this is not merely a "plug and play" operation. The success of an osteochondral transfer hinges entirely on the biological incorporation of the graft and the mechanical stability of the construct. The recipient defect in the native talus must be strictly contained, possessing a robust circumferential rim of healthy cartilage and subchondral bone. This anatomical prerequisite allows for a precise interference fit, converting physiological compressive loads across the ankle into stabilizing forces that promote osseous integration via creeping substitution, rather than shear forces that lead to graft subsidence or failure.
Pathogenesis and Biomechanical Considerations
The precise pathogenesis of OLTs involves a complex interplay of acute mechanical trauma, repetitive microtrauma, and localized vascular compromise. The classic mechanism involves an inversion injury to the ankle, where the talus forcefully impacts the tibial plafond or the medial/lateral malleoli. Lateral lesions are typically anterior, shallow, and strongly associated with a specific traumatic event involving inversion and dorsiflexion. Conversely, medial lesions are often posterior, deeper, cup-shaped, and may present without a clear history of a single traumatic incident, suggesting a more insidious etiology involving repetitive microtrauma and inversion with plantarflexion.
Once the initial osteochondral insult occurs, a deleterious cascade ensues. If the overlying articular cartilage is breached, synovial fluid is driven into the subchondral bone during the loading phase of the gait cycle. This pressurized fluid intrusion leads to focal osteolysis, trabecular necrosis, and the formation of subchondral cysts—a hallmark of chronic, unhealed OLTs. The presence of a subchondral cyst dramatically alters the biomechanical environment, depriving the adjacent articular cartilage of its necessary mechanical support, leading to further cartilage delamination and defect expansion. This is precisely why marrow stimulation fails in cystic lesions; the fibrocartilage repair tissue simply collapses into the osseous void.
Large-volume OLTs represent a critical threat to the longevity of the ankle joint. The ankle is a highly congruent joint with a relatively small surface area compared to the knee or hip, meaning it relies heavily on perfect anatomical alignment to distribute contact stresses evenly. A massive osteochondral defect disrupts this load distribution, creating areas of focal stress concentration that accelerate adjacent cartilage wear. If left untreated, these large lesions inevitably lead to subchondral collapse, varus or valgus talar tilt, and rapid progression to end-stage tibiotalar osteoarthritis. The primary objective of osteochondral autograft transfer is to halt this degenerative cascade by completely excising the necrotic tissue and restoring a biologically active, mechanically competent articular surface.
Detailed Surgical Anatomy and Biomechanics
Osteology and Articular Geometry of the Talus
Navigating the ankle mortise requires a profound respect for the unique osteology of the talus. It is an intercalary bone, entirely devoid of tendinous or muscular attachments, functioning as a complex universal joint that transmits the entire weight of the body from the leg to the foot. Approximately sixty percent of the talar surface area is covered by highly specialized articular cartilage. This extensive cartilaginous envelope makes the talus exceptionally vulnerable to chondral injury and severely limits the available surface area for vascular penetration.
The articular geometry of the talus is intricately designed for stability. The superior talar dome, which articulates with the tibial plafond, is wider anteriorly than posteriorly. This trapezoidal shape wedges the talus securely into the mortise during dorsiflexion, conferring maximum osseous stability. The medial dome articulates with the medial malleolus, forming a relatively straight, comma-shaped facet. The lateral dome articulates with the lateral malleolus, presenting a larger, triangular facet that accommodates the complex rotational and translational movements of the fibula during the gait cycle. The "talar shoulder" refers to the transitional zone where the superior dome cartilage curves to meet the medial or lateral facets. Lesions involving the shoulder are particularly challenging to reconstruct, as the graft must perfectly match this complex, dual-radius curvature.
Understanding the spatial orientation of these lesions is paramount for surgical access. Because the ankle mortise tightly encloses the talus, direct perpendicular access to the talar dome—an absolute requirement for proper graft harvesting and insertion—is virtually impossible without an osteotomy. Medial lesions typically require a medial malleolar osteotomy, while lateral lesions may necessitate a fibular osteotomy or extensive ligamentous release. The surgeon must meticulously plan the trajectory of these osteotomies to maximize exposure of the defect while preserving the structural integrity of the malleoli and minimizing the risk of postoperative nonunion.
Tenuous Vascularity and Risk of Avascular Necrosis
The vascular anatomy of the talus is notoriously precarious, dictating every aspect of our surgical approach. The blood supply is derived from an extraosseous anastomotic ring formed by branches of the posterior tibial, anterior tibial, and peroneal arteries. The posterior tibial artery provides the most critical contribution via the artery of the tarsal canal, which supplies the vast majority of the talar body. Additionally, delicate deltoid ligament branches supply the medial aspect of the talar body. The peroneal artery contributes via the artery of the tarsal sinus, supplying the lateral talar body, while the dorsalis pedis artery primarily perfuses the talar neck and head.
Intraosseously, the anastomoses between these vascular territories are relatively sparse. This architectural vulnerability makes the talus highly susceptible to avascular necrosis (AVN) following trauma or overly aggressive surgical dissection. During our approach, we must operate with surgical paranoia regarding the soft tissue envelope. Excessive stripping of the capsule, periosteum, or ligaments around the talar neck and body can catastrophically compromise this tenuous blood supply.
When performing a medial malleolar osteotomy, for instance, the deltoid ligament must remain attached to the osteotomized fragment to preserve its blood supply and the vascular contributions to the medial talus. Similarly, when addressing lateral lesions, indiscriminate release of the lateral ligamentous complex can disrupt the artery of the tarsal sinus. The overarching surgical principle is to achieve adequate perpendicular access to the OLT while maintaining the absolute maximum amount of vascularized soft tissue attachment to the talus.
Neurovascular Topography for Surgical Approaches
The surgical approaches to the ankle are fraught with potential neurovascular landmines that demand meticulous identification and protection. For medial approaches, the incision is typically centered over the medial malleolus. Immediately in the subcutaneous plane, the saphenous nerve and the great saphenous vein are at risk and must be gently mobilized anteriorly. Deeper dissection reveals the flexor retinaculum, which roofs the tarsal tunnel. The posterior tibial tendon (PTT) is the most anterior structure within this tunnel, lying in a distinct groove on the posterior aspect of the tibia. During a medial malleolar osteotomy, it is absolutely critical to identify and retract the PTT to prevent iatrogenic laceration by the oscillating saw.
Lateral approaches carry their own unique set of hazards. The sural nerve courses posterior to the lateral malleolus and is highly vulnerable during the initial skin incision and superficial dissection. More anteriorly, the lateral branch of the superficial peroneal nerve (SPN) crosses the ankle joint and is at risk during anterior arthrotomies or when extending incisions distally. The peroneal tendons (peroneus longus and brevis) run in the retromalleolar groove and must be protected throughout the procedure, particularly if a transfibular osteotomy is planned.
Furthermore, the lateral ligamentous complex—comprising the anterior talofibular ligament (ATFL), calcaneofibular ligament (CFL), and posterior talofibular ligament (PTFL)—must be managed strategically. In some cases of lateral OLTs, instead of a fibular osteotomy, a "trapdoor" approach can be utilized by taking down the ATFL and CFL to allow subluxation of the talus, providing access to the lesion. If this technique is chosen, anatomical repair of these ligaments at the conclusion of the procedure is mandatory to prevent chronic postoperative ankle instability, utilizing the inferior extensor retinaculum for augmentation if the native tissue is attenuated.
Exhaustive Indications and Contraindications
Patient Selection and Diagnostic Workup
Thorough preoperative assessment is the bedrock of a successful osteochondral autograft transfer. The typical patient presents with a deep, aching pain in the ankle, exacerbated by weight-bearing activities and relieved by rest. An antalgic gait is common, and physical examination often reveals localized tenderness, mild effusion, and variable degrees of ankle stiffness. It is imperative to assess for concomitant pathology, such as chronic lateral ankle instability, hindfoot varus or valgus malalignment, and Achilles tendon contracture, as failure to address these mechanical derangements will inevitably lead to graft failure.
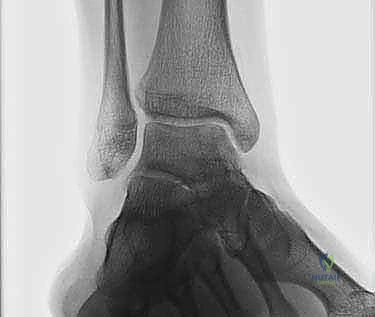
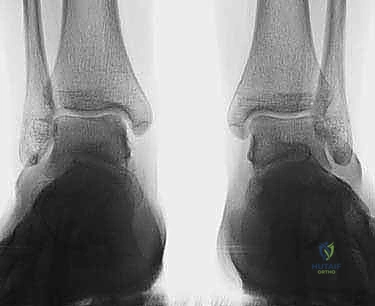
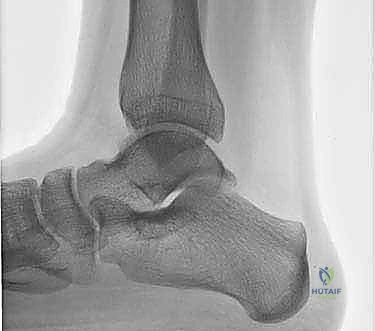
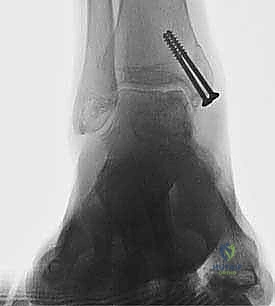
Our diagnostic imaging protocol is exhaustive. We begin with weight-bearing plain radiographs (AP, Mortise, Lateral) to evaluate overall joint congruity, assess for malalignment, and identify large cystic lesions. However, plain films drastically underestimate the true extent of chondral damage.
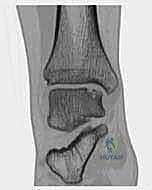
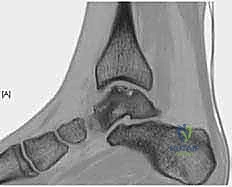
Magnetic Resonance Imaging (MRI) is highly sensitive for detecting OLTs and evaluating the integrity of the surrounding soft tissues, ligaments, and tendons. While excellent for screening, MRI often overestimates the true size of the osseous defect due to surrounding bone marrow edema. Therefore, a fine-cut Computed Tomography (CT) scan without contrast is our gold standard for preoperative templating. CT precisely delineates the bony architecture, the exact dimensions of the defect, and the morphology of any subchondral cysts, allowing the surgeon to accurately determine the required graft size and orientation.
A diagnostic intra-articular injection of a local anesthetic can be an invaluable tool in complex cases where the source of pain is ambiguous. Complete relief of symptoms following the injection confirms the intra-articular nature of the pathology and strongly implicates the OLT as the primary pain generator.
Definitive Surgical Indications
The decision to proceed with an osteochondral autograft transfer is based on a strict set of clinical and radiographic criteria. The primary indication is a symptomatic, medium-to-large full-thickness osteochondral defect of the talus, typically ranging from 1.0 cm² to 2.5 cm² in surface area. OAT is particularly indicated for lesions associated with substantial subchondral bone loss or deep subchondral cysts, where marrow stimulation techniques are biologically and mechanically destined to fail. Furthermore, OAT is the procedure of choice for patients who have previously failed arthroscopic debridement and microfracture.
A non-negotiable prerequisite for OAT is that the recipient defect must be "contained." This means there must be a completely intact, circumferential rim of healthy native articular cartilage and dense subchondral bone surrounding the lesion. This containment is essential to achieve the tight interference fit required for initial mechanical stability of the cylindrical graft. If the defect is uncontained (e.g., a massive shoulder lesion with complete loss of the lateral wall), an isolated cylindrical autograft will lack support and is at high risk for subsidence or displacement. In such uncontained scenarios, structural bulk allograft reconstruction or alternative joint-salvage procedures must be considered.
| Category | Parameters for Osteochondral Autograft Transfer (OAT) |
|---|---|
| Primary Indications | Symptomatic OLTs > 1.5 cm²; Lesions with deep subchondral cysts; Failed prior microfracture; High-demand patients requiring structural restoration. |
| Absolute Contraindications | Active joint infection; Diffuse tibiotalar osteoarthritis; Uncorrected severe hindfoot malalignment; Uncontained defects lacking a circumferential bony rim; Advanced patient age with low functional demand. |
| Relative Contraindications | Pre-existing symptomatic patellofemoral or tibiofemoral arthritis in the donor knee; Significant osteopenia/osteoporosis compromising graft press-fit; Unmanaged chronic regional pain syndrome (CRPS). |
| Concomitant Procedures Required | Ligamentous reconstruction for chronic instability; Calcaneal or supramalleolar osteotomy for malalignment; Achilles lengthening for equinus contracture. |
Pre-Operative Planning, Templating, and Patient Positioning
Advanced Imaging and Pre-Operative Templating
Preoperative planning for an osteochondral transfer is an exacting science. The surgeon must transition from a qualitative assessment of the imaging to a quantitative, three-dimensional surgical blueprint. Utilizing the fine-cut CT scans, we employ multiplanar reconstruction software to measure the exact length, width, and depth of the osseous defect. This allows us to determine the precise diameter of the tubular reamer required to excise the lesion completely while minimizing damage to the surrounding healthy cartilage.
Templating also involves pre-determining the trajectory of the surgical approach. By overlaying the tibial plafond onto the talar dome in the sagittal and coronal planes, we can calculate the exact angle of approach necessary to achieve perpendicularity to the lesion. If a medial malleolar osteotomy is required, the level and angle of the osteotomy cut (e.g., a chevron or step-cut) are mapped out to ensure the screws for subsequent fixation will not intersect the path of the osteochondral graft.
Furthermore, we must plan the donor site harvest. The ipsilateral knee is the standard donor site, specifically the non-weight-bearing periphery of the superolateral or superomedial femoral condyle, or the intercondylar notch. The surgeon must evaluate preoperative knee MRIs to ensure the donor cartilage is healthy and of sufficient thickness. The radius of curvature of the donor site must closely match the radius of curvature of the recipient talar dome to restore joint congruity and prevent abnormal contact stresses.
Anesthesia, Positioning, and Operating Room Setup
The procedure is typically performed under general anesthesia or a robust regional block (spinal or epidural), supplemented with a popliteal sciatic and saphenous nerve block for optimal postoperative pain control. A well-padded thigh tourniquet is applied to provide a bloodless surgical field, which is absolutely critical for precise visualization of the articular cartilage interfaces during graft insertion.
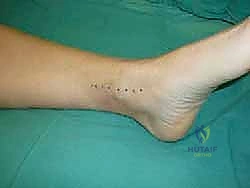
Patient positioning is dictated by the location of the lesion and the planned approach. For medial lesions requiring a medial malleolar osteotomy, the patient is positioned supine with a bump under the ipsilateral hip to allow external rotation of the leg, bringing the medial malleolus directly superior. The ipsilateral knee must be prepped and draped into the sterile field to allow for simultaneous access for graft harvesting.
For lateral lesions, a lateral decubitus position or a supine position with a large bump under the ipsilateral hip (to internally rotate the leg) may be utilized. A radiolucent operating table is mandatory, and the C-arm fluoroscopy unit must be positioned to allow unobstructed AP, mortise, and lateral views of the ankle, as well as views of the knee during graft harvest. The surgical team must ensure that all specialized osteochondral transfer instrumentation (OATS sets, tubular reamers, tampers, and sizing guides) are sterilized, organized, and readily available before the first incision is made.
Step-by-Step Surgical Approach and Fixation Technique
Medial Malleolar Osteotomy and Joint Exposure
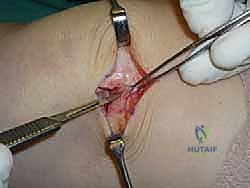
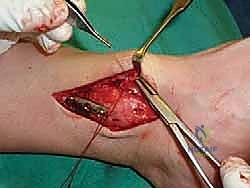
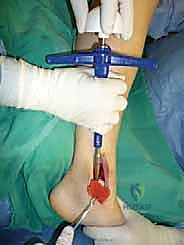
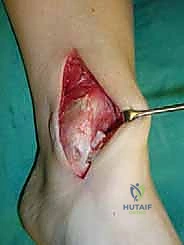
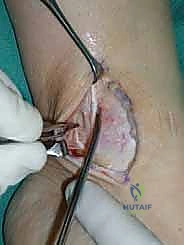
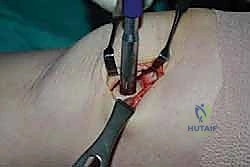
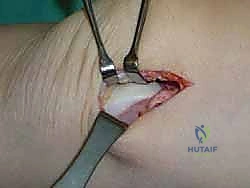
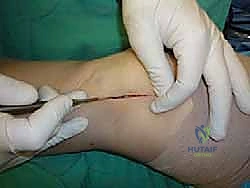
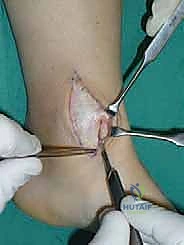
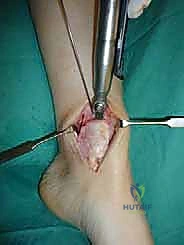
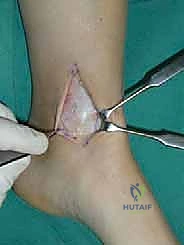
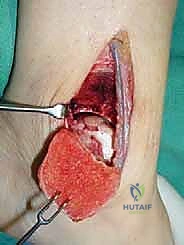
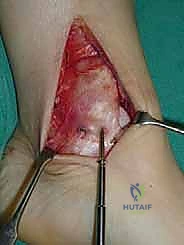
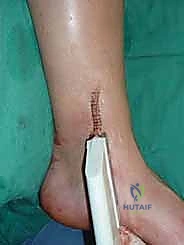
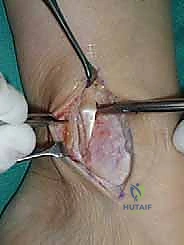
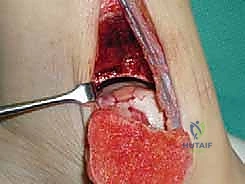
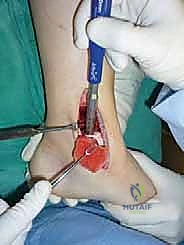
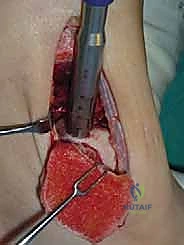
For access to central and posterior medial OLTs, a medial malleolar osteotomy is the workhorse approach. An longitudinal incision is made centered over the medial malleolus, curving slightly anteriorly at its distal extent. Meticulous hemostasis is achieved, and the saphenous nerve and vein are protected. The periosteum over the medial malleolus is incised longitudinally, and the anterior capsule of the ankle joint is opened to visualize the medial corner of the talar dome.
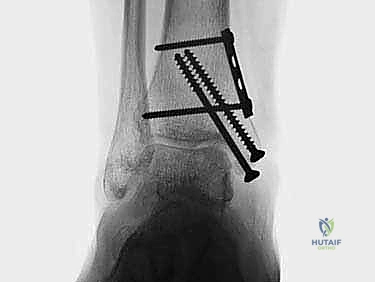
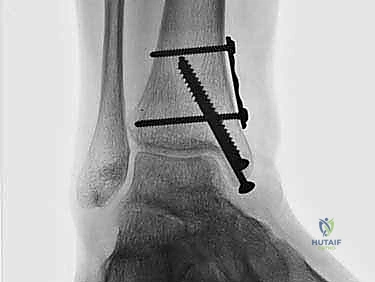
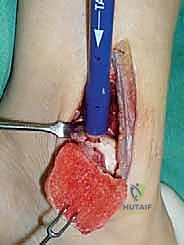
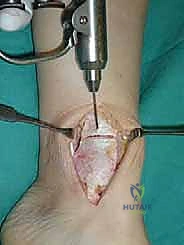
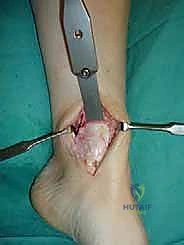
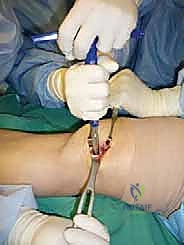
Crucially, before making the osteotomy cut, the malleolus must be pre-drilled. We place two parallel 0.062-inch K-wires from the tip of the medial malleolus, directing them proximally and laterally into the tibial metaphysis. These are over-drilled with a 2.5mm drill bit and tapped for 4.0mm partially threaded cancellous screws. The screws are inserted and then removed. This pre-drilling step guarantees perfect anatomic reduction of the osteotomy at the conclusion of the procedure.
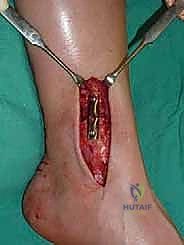
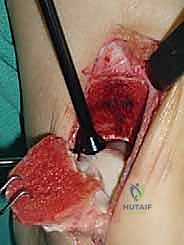
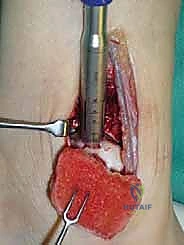
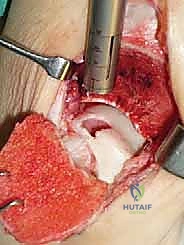
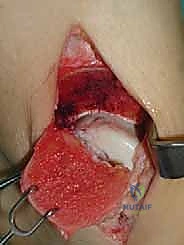
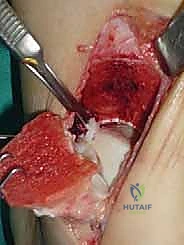
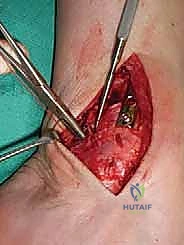
The osteotomy itself is typically a chevron-type cut with the apex directed proximally. This inherently stable geometry resists shear forces during postoperative weight-bearing. Using an oscillating saw, the cuts are made through the bone but stopped just short of the articular cartilage. The final millimeter of subchondral bone and articular cartilage is cracked using a broad, sharp osteotome. This "controlled fracture" technique preserves the delicate articular cartilage and creates an interdigitating surface that facilitates rapid osseous union. The medial malleolar fragment, with the deltoid ligament carefully preserved and attached, is then reflected inferiorly, exposing the medial talar dome and the OLT.
Lateral Approach and Fibular Osteotomy Considerations
Accessing lateral talar dome lesions presents distinct challenges. For anterior-lateral lesions, an anterolateral arthrotomy combined with plantarflexion of the ankle may provide sufficient exposure. However, for central or posterior-lateral lesions, a more aggressive approach is required. The surgeon must choose between a transfibular osteotomy or an ATFL/CFL release (the "trapdoor" approach).
If a fibular osteotomy is selected, a longitudinal incision is made over the distal fibula. The superficial peroneal nerve and sural nerve are protected. The fibula is pre-drilled and plated prior to the osteotomy to ensure perfect reduction later. A step-cut or oblique osteotomy is performed from proximal-lateral to distal-medial, exiting at the level of the tibial plafond. The distal fibular fragment is retracted inferiorly, taking immense care to protect the peroneal tendons and the artery of the tarsal sinus.
Alternatively, the lateral ligamentous release involves meticulously dissecting and detaching the ATFL and CFL from their fibular origins. This allows the talus to be manually subluxated medially out of the mortise, exposing the lateral dome. While this avoids a bone cut, it demands a robust, anatomic ligamentous reconstruction at the end of the case to prevent chronic instability. Regardless of the approach, absolute perpendicular access to the lesion is the critical endpoint.
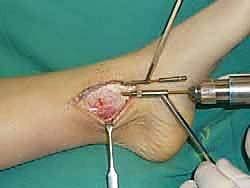
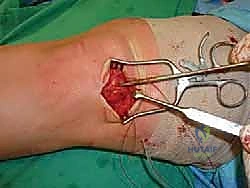
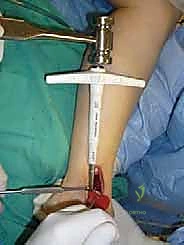
Lesion Preparation and Recipient Socket Creation
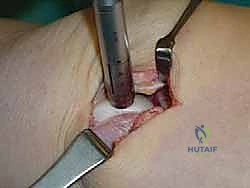
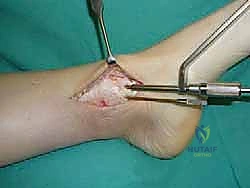
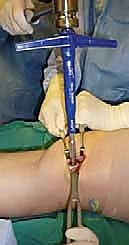
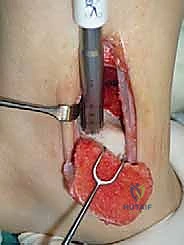
Once the OLT is fully visualized, the preparation of the recipient socket begins. The lesion is sized using a specialized circular sizing guide. The goal is to encompass the entire necrotic defect and cystic cavity within the diameter of the reamer. A central guide pin is driven perfectly perpendicular to the articular surface, directly into the center of the lesion. I cannot overstate the importance of perpendicularity; an angled socket will result in a proud or sunken graft, leading to catastrophic failure.
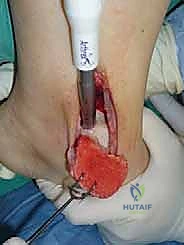
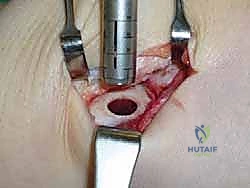
A cannulated, calibrated tubular reamer is then passed over the guide pin. The reamer is advanced under power, cutting through the articular cartilage and subchondral bone to a predetermined depth, typically 12 to 15 millimeters, ensuring all cystic and sclerotic bone is excised down to healthy, bleeding cancellous bone. The core of necrotic tissue is removed, leaving a perfectly cylindrical, contained recipient socket. The depth of the socket is meticulously measured at four quadrants (anterior, posterior, medial, lateral) using a depth gauge. These measurements dictate the exact length of the autograft to be harvested.
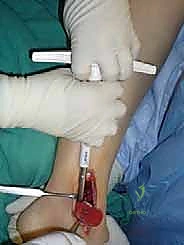
Donor Site Harvest and Autograft Transfer
Attention is then turned to the ipsilateral knee. A mini-arthrotomy is performed to expose the chosen donor site, usually the extreme periphery of the lateral femoral condyle, proximal to the sulcus terminalis. A tubular harvest chisel, matched precisely to the diameter of the recipient reamer, is positioned over the donor cartilage. The chisel is driven perpendicularly into the condyle to a depth slightly greater than the measured depth of the recipient socket (e.g., 15-18 mm).
The graft is extracted using a twisting motion to break the cancellous bone at the base. The harvested osteochondral plug is then inspected. The bone must be firm and vital, and the cartilage cap intact. The osseous base of the graft is carefully trimmed with a rongeur to match the exact depth measurements of the recipient socket.
The autograft is then transferred to the ankle. It is aligned so that its radius of curvature matches the contour of the talar dome. Using a specialized, oversized tamp, the graft is gently press-fit into the recipient socket. It is tapped into place until the cartilage cap is perfectly flush with the surrounding native talar cartilage. A proud graft will act as a mechanical block and undergo rapid degeneration, while a sunken graft will fail to bear load and lead to fibrocartilage infill. Once flush, the joint is taken through a full range of motion to confirm stability and absence of impingement. The osteotomy is then reduced and rigidly fixed with the previously placed screws, and the wounds are closed in layers.