Corrective Osteotomy for Metacarpal and Phalangeal Malunion: An Intraoperative Masterclass
Key Takeaway
Master the art of corrective osteotomy for metacarpal and phalangeal malunions. This immersive guide covers comprehensive surgical anatomy, meticulous preoperative planning, and granular, real-time intraoperative execution. Learn to prevent pitfalls, manage complications, and ensure optimal patient outcomes from a master surgeon's perspective in the operating theater.
Comprehensive Introduction and Patho-Epidemiology
Corrective osteotomy for metacarpal and phalangeal malunions represents one of the most intellectually demanding and technically unforgiving frontiers in reconstructive hand surgery. While the primary fracture management of the hand often yields excellent outcomes, a subset of patients will inevitably progress to malunion due to initial fracture displacement, loss of reduction, inadequate immobilization, or patient non-compliance. These deformities, which are frequently multiplanar in nature, profoundly disrupt the delicate kinematic balance of the hand. The ultimate surgical goal is not merely the restoration of radiographic anatomical alignment, but the critical recuperation of functional capacity, grip strength, and unhindered digital motion.
The epidemiology of hand malunions closely tracks the incidence of primary hand trauma, which accounts for nearly 20% of all emergency department visits for musculoskeletal injuries. Metacarpal fractures, particularly those of the metacarpal neck (the ubiquitous "boxer's fracture") and spiral oblique fractures of the metacarpal shaft, are highly susceptible to apex dorsal angulation and rotational malalignment, respectively. Phalangeal fractures, especially those involving the proximal phalanx, frequently succumb to apex volar angulation driven by the deforming forces of the intrinsic musculature and the extensor mechanism. When these fractures heal in non-anatomic positions, the resulting architectural distortion alters the moment arms of crossing tendons, leading to profound functional deficits.
Pathophysiologically, the impact of a malunion is almost always magnified distally, creating a cascading effect of biomechanical failure. The classic paradigm dictates that a mere one degree of rotational malalignment at the metacarpal or proximal phalangeal level translates to approximately five degrees of deviation at the fingertip. During digital flexion, this seemingly trivial rotational error can result in a functionally devastating 1.5 cm of digital overlap. This phenomenon, clinically recognized as "scissoring," creates severe functional impairment, compromising grasp, fine motor dexterity, and overall hand utility, while simultaneously generating significant patient frustration.
Furthermore, the distinction between extra-articular malunions (EAMs) and intra-articular malunions (IAMs) is paramount in understanding the patho-epidemiology. EAMs primarily disrupt the resting tension of the musculotendinous units, leading to phenomena such as the "pseudoclaw" deformity—an extension lag at the proximal interphalangeal (PIP) joint caused by relative lengthening of the extensor mechanism in the setting of a shortened, apex-volar proximal phalanx malunion. Conversely, IAMs introduce immediate joint incongruity. Even an articular step-off of 0.5 mm or a gap of 1 mm can drastically alter joint contact pressures, precipitating localized cartilage necrosis, reactive synovitis, capsular contracture, and an accelerated progression toward painful, debilitating post-traumatic arthrosis.
Detailed Surgical Anatomy and Biomechanics
A profound mastery of the osseous and soft-tissue anatomy of the hand is the absolute prerequisite for executing a successful corrective osteotomy. The metacarpals, while generally classified as tubular bones, possess a distinctively triangular cross-section in their diaphyseal regions. The medial and lateral cortical surfaces converge volarly to form a prominent volar ridge. This ridge is not merely an anatomical curiosity; it serves as the critical longitudinal attachment point for the intrinsic interossei muscles. Proximally, at the carpometacarpal articulations, and distally via the deep transverse metacarpal ligaments, the metacarpals are tethered together. This inherent ligamentous and architectural stability explains why functionally significant malunions of the central (long and ring) metacarpals are less common and better tolerated than those involving the highly mobile border digits (index and small).
When navigating the metacarpals surgically, the neurovascular risks must be meticulously managed. Dorsally, the sensory branches of the radial and ulnar nerves arborize superficially in the subcutaneous tissues and are exquisitely vulnerable to transverse incisions or aggressive retraction. Deep to the metacarpal shafts, the proper digital neurovascular bundles course longitudinally, intimately associated with the lateral aspects of the flexor tendon sheaths. While they are somewhat shielded by the interosseous musculature, stray drill bits, over-penetrating screws, or careless placement of retractors can easily precipitate devastating iatrogenic injury. The standard dorsal approach to the second through fourth metacarpals exploits the intermetacarpal muscular intervals, requiring precise elevation and retraction of the extensor tendons and their stabilizing sagittal bands to expose the dorsal cortex.
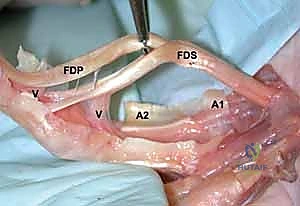
In stark contrast to the triangular metacarpals, the phalanges present a distinct bean-shaped cross-section. The volar cortices of the proximal and middle phalanges are flat to slightly concave, creating an intimate, unyielding relationship with the flexor digitorum profundus (FDP) and flexor digitorum superficialis (FDS) tendons. This relationship is further constrained by the complex retinacular system of the annular pulleys (A1 through A5) and cruciate pulleys. The proximity of the flexor apparatus to the volar bone is a critical surgical pitfall: any drill bit or screw inserted in a dorsovolar direction that breaches the volar cortex by even a millimeter risks immediate laceration or chronic attritional rupture of the flexor tendons.
The neurovascular topography of the phalanges further complicates surgical exposure. The digital neurovascular bundles run strictly along the mid-axial lines of the digits, enveloped in Cleland’s and Grayson’s ligaments. During a mid-axial approach—often preferred to avoid the dorsal extensor mechanism—these bundles are highly exposed. The surgeon must meticulously identify, mobilize, and protect the bundle, typically retracting it volarly to access the lateral aspect of the phalanx. Dorsally, the extensor mechanism, comprising the central slip, lateral bands, and terminal tendon, drapes over the bone. Elevating the lateral bands for exposure must be executed with extreme judiciousness to prevent postoperative extensor lag or boutonnière deformities.
Exhaustive Indications and Contraindications
The decision to proceed with a corrective osteotomy requires a highly nuanced evaluation of the patient's functional deficits, radiographic parameters, and physiological capacity for rehabilitation. Surgery is rarely indicated for purely radiographic abnormalities in the absence of functional compromise. The primary indication for intervention is a symptomatic malunion that significantly impairs hand function. This typically manifests as digital scissoring during active flexion, a profound reduction in grip or pinch strength due to altered tendon moment arms, or the presence of a debilitating extension lag (the pseudoclaw deformity) secondary to bony shortening and apex-volar angulation.
For intra-articular malunions (IAMs), the threshold for surgical intervention is significantly lower. Because the articular cartilage has a negligible capacity for regeneration, any intra-articular step-off exceeding 0.5 mm to 1.0 mm is generally considered an absolute indication for corrective osteotomy, provided the joint has not already progressed to end-stage arthrosis. Early intervention in IAMs is critical to restore joint congruity, normalize contact pressures, and halt the rapid progression of post-traumatic osteoarthritis. In extra-articular malunions (EAMs), rotational deformities are the least tolerated by the patient, as the aforementioned "1 degree to 5 degree" amplification leads to immediate functional clashing of the digits.
Contraindications to corrective osteotomy must be strictly respected to avoid catastrophic outcomes. Absolute contraindications include the presence of active, untreated local or systemic infection, severe vascular compromise to the affected digit, or an uncooperative patient who cannot adhere to the rigorous, month-long postoperative rehabilitation protocols. Performing a complex osteotomy on a patient with profound cognitive impairment or active substance abuse issues is a recipe for hardware failure and catastrophic stiffness. Relative contraindications include profound osteopenia, which may preclude rigid internal fixation, and end-stage joint arthrosis, where an arthrodesis or arthroplasty would be the more appropriate salvage procedure.
Furthermore, the surgeon must account for coexisting soft tissue pathology. Malunions rarely exist in a vacuum; they are often accompanied by severe joint contractures, dense tendon adhesions, and compromised soft tissue envelopes. If a patient presents with a stiff malunited digit devoid of passive motion, correcting the bone alone will yield a straight, but entirely useless, finger. In these scenarios, the indication for osteotomy must be coupled with planned, extensive soft tissue reconstruction, including tenolysis, capsulotomy, or flap coverage, and the patient must be counseled that outcomes in combined bone-and-soft-tissue reconstructions are historically inferior to isolated osseous corrections.
| Category | Indications | Contraindications (Absolute & Relative) |
|---|---|---|
| Extra-Articular (EAM) | Symptomatic digital scissoring/overlap Significant grip/pinch weakness Painful impingement Extension lag (Pseudoclaw) |
Absolute: Active local/systemic infection Absolute: Non-compliant patient Absolute: Severe vascular insufficiency |
| Intra-Articular (IAM) | Articular step-off > 0.5 mm Articular gap > 1.0 mm Joint subluxation/instability |
Relative: End-stage post-traumatic arthrosis (favor arthrodesis/arthroplasty) Relative: Severe osteopenia precluding fixation |
| Combined Deformity | Rotational + Angular malalignment impairing activities of daily living (ADLs) | Absolute: Lack of passive ROM (unless concurrent tenolysis/capsulotomy is planned) Relative: Severe Complex Regional Pain Syndrome (CRPS) |
Pre-Operative Planning, Templating, and Patient Positioning
The success of a corrective osteotomy is inextricably linked to the meticulousness of the preoperative planning. The clinical evaluation serves as the foundation. A detailed history must elucidate the mechanism of the original injury, previous interventions, and the exact nature of the patient's functional limitations. The physical examination must be exhaustive, quantifying active and passive range of motion of all joints in the affected and adjacent digits. The natural digital cascade must be observed; any disruption suggests a rotational component. The surgeon must assess grip strength using a dynamometer, evaluate the integrity of the soft tissue envelope, and meticulously document baseline neurovascular status.
Radiographic evaluation demands absolute precision. Standard anteroposterior, true lateral, and oblique radiographs of the affected digit are mandatory. However, the critical, non-negotiable step in planning is obtaining identical radiographic views of the contralateral, uninjured hand. These contralateral images serve as the definitive anatomical template for restoring the patient's unique osseous architecture. For complex, multiplanar extra-articular malunions, or any intra-articular deformity, a high-resolution CT scan with 3-dimensional surface-rendered reconstructions is invaluable. The 3D CT allows the surgeon to visualize the deformity in space, precisely quantify angular and rotational deviations, and virtually map the osteotomy planes.
Surgical templating is where the theoretical correction becomes a tangible blueprint. Using digital templating software or traditional acetate overlays, the surgeon traces the proximal and distal fragments of the malunited bone and superimposes them over the normal contralateral template. This process determines the exact location of the osteotomy (ideally at the apex of the deformity), the geometry of the correction (closing wedge, opening wedge, derotational transverse, or step-cut), and the precise dimensions of any required bone graft. Furthermore, templating dictates the hardware selection: the size, length, and profile of the plate, and the exact trajectory of the screws, aiming for a minimum of six cortices of purchase proximal and distal to the osteotomy site.
Patient positioning and operating room setup must facilitate unobstructed access and flawless intraoperative imaging. The patient is positioned supine with the affected upper extremity extended onto a radiolucent hand table. The shoulder is abducted to 90 degrees. A non-sterile pneumatic tourniquet is applied to the proximal brachium to ensure the bloodless field required for microsurgical precision. If the preoperative template indicates the need for a substantial corticocancellous structural graft, the ipsilateral iliac crest is prepped and draped simultaneously. Prior to the first incision, a thorough Examination Under Anesthesia (EUA) is performed to assess true passive joint mobility and ligamentous stability without the masking effect of patient guarding.
Step-by-Step Surgical Approach and Fixation Technique
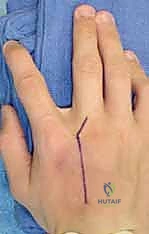
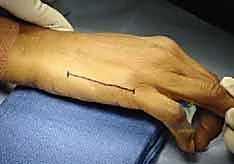
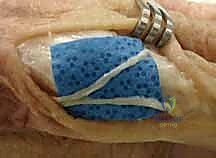
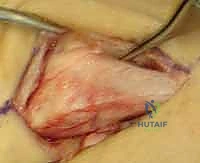
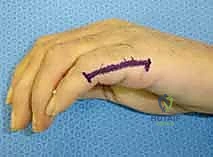
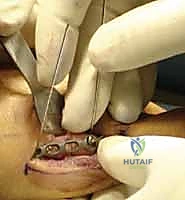
The surgical approach must be tailored to the specific bone and the geometry of the planned osteotomy, balancing adequate exposure with the preservation of soft tissue gliding planes. For metacarpal malunions, a dorsal longitudinal incision is standard. The incision is placed strategically over the intermetacarpal interval adjacent to the affected bone to avoid placing the skin scar directly over the hardware. The dorsal sensory nerve branches are meticulously identified and protected via gentle retraction. The extensor tendons are mobilized, and the sagittal bands are either retracted or longitudinally incised to expose the dorsal periosteum. Subperiosteal dissection is kept to the absolute minimum required to accommodate the plate, preserving the vital periosteal blood supply.
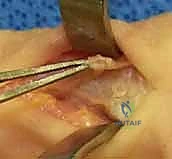
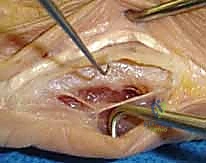
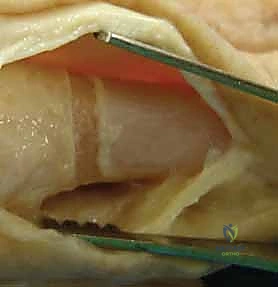
For phalangeal malunions, the approach is highly consequential. Dorsal approaches to the proximal and middle phalanges carry an unacceptably high risk of postoperative extensor tendon adhesions, which can obliterate digital motion. Therefore, a mid-axial approach is strongly preferred. The incision connects the apices of the flexion creases on the lateral aspect of the digit. Dissection proceeds bluntly to the neurovascular bundle, which is mobilized and retracted volarly. The transverse retinacular ligament is incised, and the lateral band of the extensor mechanism is elevated dorsally, exposing the lateral aspect of the phalanx. This provides a safe corridor for osteotomy and lateral plate placement, entirely avoiding the dorsal extensor apparatus and the volar flexor tendons.
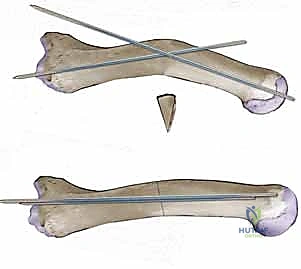
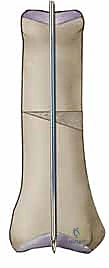
Execution of the osteotomy demands extreme technical precision. Depending on the templated plan, an opening wedge, closing wedge, or derotational osteotomy is performed using an oscillating microsaw under continuous cold saline irrigation to prevent thermal necrosis of the bone. For a closing wedge osteotomy, the pre-calculated wedge is excised, and the bone ends are reduced. For an opening wedge osteotomy—often utilized to correct shortening and extension lags—the osteotomy is distracted, and a precisely contoured structural bone graft (harvested from the distal radius or iliac crest) is impacted into the defect. Rotational deformities require a complete transverse or step-cut osteotomy, followed by derotation of the distal fragment to restore the normal digital cascade.
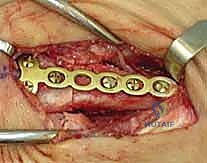
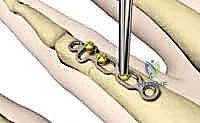
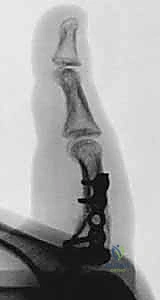
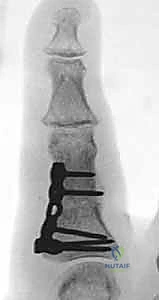
Rigid internal fixation is the cornerstone of modern corrective osteotomy, allowing for early active mobilization. Plate osteosynthesis is generally preferred over K-wires. For metacarpals, dorsal low-profile locking or non-locking plates are utilized. For phalanges, lateral buttress plating is the gold standard. The plate is applied to the lateral cortex (exposed via the mid-axial approach). When drilling, a drill guide must be used, and the surgeon must exercise extreme caution to avoid over-penetrating the far cortex, which could tether or lacerate the flexor tendons. Screws are inserted, ensuring adequate purchase (typically 3 screws proximal and 3 distal to the osteotomy). Intraoperative fluoroscopy confirms hardware placement, anatomical alignment, and the restoration of the normal digital cascade prior to closure.
Complications, Incidence Rates, and Salvage Management
Despite meticulous planning and flawless execution, corrective osteotomies of the hand carry a significant complication profile. Nonunion and delayed union are primary concerns, particularly in cases involving extensive subperiosteal stripping, thermal necrosis from the saw blade, or inadequate mechanical stability of the fixation construct. The incidence of nonunion in phalangeal osteotomies can approach 5-8%. Management of an established nonunion requires a return to the operating room, debridement of the atrophic or hypertrophic nonunion site, rigid revision internal fixation, and the mandatory application of autologous cancellous bone graft to stimulate osteogenesis.
Hardware-related complications are arguably the most frequent source of postoperative morbidity. Tendon irritation, adhesion, or frank rupture can occur if hardware principles are violated. Dorsal plates on the proximal phalanx have historically resulted in extensor tenosynovitis and severe loss of flexion in up to 30% of cases, cementing the preference for lateral plating. Volar screw over-penetration is catastrophic, leading to immediate attritional wear of the flexor digitorum profundus. If hardware impingement is suspected clinically (e.g., triggering, localized pain, new-onset lag), immediate radiographic evaluation is required, followed by prompt hardware removal and potential tendon exploration once clinical union is achieved.
Infection, while relatively rare in elective hand surgery (incidence < 2%), can be devastating when hardware and bone grafts are present. Superficial surgical site infections can often be managed with targeted oral antibiotics and local wound care. However, deep infections involving the osteosynthesis site require aggressive surgical debridement, hardware removal (if stability is compromised or if the infection is recalcitrant), placement of antibiotic spacers, and prolonged intravenous antimicrobial therapy. Soft tissue necrosis, often a result of poor incision planning or excessive tourniquet time, may necessitate salvage with local rotational flaps or cross-finger flaps to achieve definitive coverage over exposed bone or hardware.

Recurrence of deformity and profound postoperative stiffness are the most common causes of functional failure. Stiffness is almost universally present to some degree, driven by the trauma of the initial injury compounded by the surgical insult. If rigid fixation was achieved, stiffness is mitigated by aggressive early therapy. However, if dense capsular contractures or tendon adhesions develop, salvage management involves a secondary surgery for tenolysis and capsulotomy, typically performed 6 months post-osteotomy, once the bone is fully consolidated and the soft tissues have reached maximum medical improvement.
| Complication | Estimated Incidence | Etiology / Risk Factors | Salvage Management Strategy |
|---|---|---|---|
| Nonunion / Delayed Union | 2% - 8% | Thermal necrosis, inadequate fixation, smoking, poor soft tissue envelope | Revision ORIF, autologous bone grafting (iliac crest or distal radius), bone stimulation |
| Extensor Tendon Adhesions | 15% - 30% (with dorsal phalangeal plates) | Dorsal hardware placement, excessive periosteal stripping, delayed mobilization | Hardware removal, surgical tenolysis, aggressive postoperative hand therapy |
| Flexor Tendon Rupture | < 1% | Volar over-penetration of screws, drill bit injury during osteosynthesis | Hardware removal, tendon reconstruction (grafting or transfer) |
| Deep Infection | 1% - 2% | Prolonged OR time, compromised soft tissues, hematoma formation | I&D, hardware removal (if unstable/recalcitrant), IV antibiotics, delayed reconstruction |
| Postoperative Stiffness | 20% - 40% (varying severity) | Prolonged immobilization, joint contracture, lack of patient compliance | Dynamic splinting, secondary capsulotomy/tenolysis at 6 months post-op |
Phased Post-Operative Rehabilitation Protocols
The surgical intervention is merely the first step; the ultimate functional outcome is dictated by the rigor and execution of the postoperative rehabilitation protocol. Because corrective osteotomies involve both bone healing and complex soft tissue gliding planes, therapy must be meticulously phased. Phase I (0 to 2 weeks postoperatively) focuses on wound healing, edema control, and protection of the fixation construct. The hand is immobilized in a bulky, non-compressive dressing, transitioning to a custom orthoplast splint in the "intrinsic-plus" or "safe" position: wrist extended 20-30 degrees, metacarpophalangeal (MCP) joints flexed 70-9
