
Comprehensive Introduction and Patho-Epidemiology
Welcome to the operating theater. Today, we are undertaking a highly complex, technically demanding, yet profoundly rewarding procedure: the Total Ankle Osteochondral Shell Allograft Reconstruction. This surgical technique represents a critical paradigm shift and offers a highly viable, joint-preserving alternative for a very specific demographic: young, high-demand, active patients suffering from end-stage tibiotalar arthrosis. In this population, traditional ankle arthrodesis or total ankle arthroplasty (TAA) present significant, well-documented long-term limitations. Our primary surgical objectives are to definitively alleviate mechanical and inflammatory pain, meticulously restore congruent articular surfaces, maintain crucial periarticular bone stock, and preserve functional kinematics and motion in the tibiotalar and adjacent hindfoot joints.
Ankle arthritis possesses a distinct patho-epidemiology that sharply contrasts with arthropathy of the hip and knee. Primary osteoarthritis of the ankle is an exceedingly rare clinical entity. Instead, tibiotalar arthrosis is overwhelmingly secondary to trauma—most notably high-energy pilon fractures, severe talus fractures, or chronic, unaddressed ligamentous instability that insidiously alters ankle biomechanics over time. These traumatic events impart massive shear and compressive forces that irreversibly damage the delicate tibiotalar chondral surfaces. Hyaline cartilage, with its notoriously limited vascularity and poor intrinsic reparative potential, struggles to mount an adequate healing response. Radiographically, this manifests as asymmetric joint space narrowing, massive anterior and posterior osteophyte formation, subchondral bone sclerosis, and subchondral cyst formation.
While ankle arthrodesis remains the gold standard for reliable pain relief, it sacrifices the tibiotalar articulation. This loss of range of motion inevitably alters the biomechanical loading of the foot, leading to a high incidence of secondary, progressive osteoarthritis in the adjacent subtalar, talonavicular, and calcaneocuboid joints over the ensuing decades. Conversely, while Total Ankle Arthroplasty (TAA) is an excellent motion-preserving option, extensive registry data and longitudinal studies suggest that young patient age (typically under 50 years) significantly and adversely affects implant survivorship, leading to unacceptable failure and complex reoperation rates.
This clinical conundrum is precisely where fresh, size-matched osteochondral shell allografts provide immense utility. By utilizing fresh allograft tissue, we transplant mature, structurally intact hyaline cartilage supported by a thin shell of subchondral bone, complete with a matrix of viable chondrocytes capable of maintaining the extracellular matrix. For our younger demographic, this biologic reconstruction offers profound pain relief and motion preservation, effectively bridging the gap and delaying or entirely preventing the long-term sequelae of fusion or the catastrophic, age-related mechanical failures of prosthetic implants.
Detailed Surgical Anatomy and Biomechanics
Before initiating any surgical incision, a meticulous, three-dimensional understanding of the ankle joint anatomy and its surrounding neurovascular corridors is paramount. The tibiotalar joint is a highly congruent, complex modified hinge joint. It is often conceptually simplified as a single-axis joint oriented obliquely—downward and backward from medial to lateral—but its true kinematics involve a rolling and sliding mechanism. The primary arc of motion dictates dorsiflexion and plantarflexion, coupled with subtle, obligatory internal and external rotation due to the truncated cone shape of the talar dome.
The bony architecture is comprised of the distal tibia (the tibial plafond), the distal fibula (lateral malleolus), and the talus. The tibial plafond is uniquely concave in both the anteroposterior and mediolateral planes, forming a highly constrained superior articulating surface. The talus is an anatomical anomaly: approximately 60% of its surface area is enveloped by articular cartilage, and critically, it possesses absolutely no muscular or tendinous attachments. This unique characteristic renders its extraosseous and intraosseous blood supply—derived primarily from the artery of the tarsal canal, the sinus tarsi plexus, and branches of the anterior tibial artery—exceedingly precarious. This tenuous vascularity explains why talar neck fractures and extensive surgical dissections are highly prone to avascular necrosis (AVN).
Our standard anterior surgical approach necessitates navigating a critical, high-risk anatomical corridor. We operate precisely within the internervous and intertendinous interval between the tibialis anterior tendon medially and the extensor hallucis longus (EHL) tendon laterally. During the superficial dissection, the superficial peroneal nerve (SPN) must be identified and protected. The SPN typically crosses the anterior ankle from lateral to medial within the subcutaneous tissue; excessive traction or inadvertent transection can result in debilitating, intractable dysesthesias or painful neuroma formation over the dorsum of the foot.
Deep to the extensor retinaculum lies the deep neurovascular bundle, situated immediately lateral to the EHL tendon. This bundle contains the deep peroneal nerve (DPN), the anterior tibial artery (ATA), and its distal continuation, the dorsalis pedis artery, accompanied by venae comitantes. We must meticulously mobilize and retract this entire bundle laterally to prevent catastrophic injury. Iatrogenic damage to the DPN results in a profound foot drop and sensory deficits in the first dorsal web space, while injury to the ATA can severely compromise distal foot perfusion, particularly in patients with pre-existing microvascular disease. Furthermore, while our approach is primarily anterior, the surgeon must maintain acute spatial awareness of the posterior tibial neurovascular bundle located at the posteromedial corner of the ankle, which is highly vulnerable during deep posterior capsular releases and bone resections.
Exhaustive Indications and Contraindications
Patient selection is the single most critical determinant of success in osteochondral shell allograft reconstruction. This procedure is not a panacea for all ankle arthritis; rather, it is a highly targeted intervention. The ideal candidate is a young (typically under 50 years of age), active, non-obese patient with post-traumatic end-stage tibiotalar arthrosis who possesses a strong desire to maintain ankle range of motion and participate in low-impact physical activities. The patient must have an adequate soft tissue envelope anteriorly to allow for the surgical approach and subsequent wound healing without tension.
A thorough assessment of periarticular bone stock and global lower extremity alignment is mandatory. The success of the allograft relies heavily on a mechanically sound foundation. Patients with massive cystic degeneration of the talus that compromises more than 50% of the talar body, or those with severe avascular necrosis, are at an exceptionally high risk for graft subsidence and catastrophic mechanical failure. Similarly, the mechanical axis of the lower extremity must be evaluated. Any coronal plane malalignment (varus or valgus) greater than 10 degrees must be corrected, either via staged or concomitant supramalleolar or calcaneal osteotomies, to prevent asymmetric edge-loading and rapid destruction of the transplanted allograft cartilage.

Absolute contraindications must be strictly respected. Diminished peripheral pulses or an abnormal Ankle-Brachial Index (ABI) preclude this surgery, as adequate vascularity is required for soft tissue healing and subchondral bone incorporation. Active or recent intra-articular infection, severe peripheral neuropathy (e.g., Charcot arthropathy), and chronic, uncorrectable ligamentous instability are absolute contraindications. Inflammatory arthropathies (such as Rheumatoid Arthritis) are generally considered relative contraindications due to the systemic nature of the disease and the potential for ongoing immune-mediated destruction of the allograft, though highly selected patients with quiescent disease may be considered.
| Category | Specific Clinical Condition | Rationale / Implication |
|---|---|---|
| Ideal Indications | Young age (< 50 yrs), high-demand | Avoids TAA failure and adjacent joint disease from arthrodesis. |
| Ideal Indications | Post-traumatic tibiotalar arthrosis | Localized mechanical wear with otherwise healthy systemic biology. |
| Relative Contraindications | Inflammatory arthropathy (RA) | Risk of systemic immune attack on the transplanted hyaline cartilage. |
| Relative Contraindications | Coronal malalignment > 10 degrees | Requires concomitant corrective osteotomy to prevent asymmetric graft loading. |
| Absolute Contraindications | Active local or systemic infection | High risk of deep allograft infection requiring catastrophic explantation. |
| Absolute Contraindications | Charcot neuroarthropathy | Lack of protective sensation leads to rapid, painless allograft destruction. |
| Absolute Contraindications | Severe talar AVN (>50% body) | Inadequate vascularized bone bed for host-graft incorporation; risk of subsidence. |
| Absolute Contraindications | Diminished peripheral pulses | Poor wound healing potential and inability to support subchondral bone integration. |
Pre-Operative Planning, Templating, and Patient Positioning
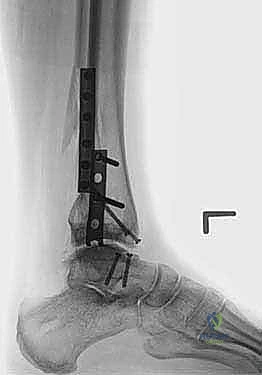
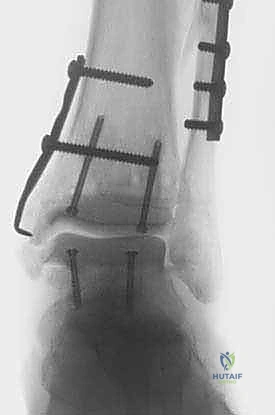
Meticulous, exhaustive preoperative planning forms the bedrock of a successful complex reconstruction. Standard imaging must include bilateral, weight-bearing anteroposterior (AP), lateral, and mortise radiographs of the ankle. These views are scrutinized to assess the degree of joint space narrowing, the presence and location of osteophytes, subchondral sclerosis, and the overall mechanical alignment of the tibiotalar joint in relation to the mechanical axis of the tibia. Furthermore, if any degree of ligamentous instability is suspected clinically, dynamic stress radiographs (anterior drawer and talar tilt views) are mandatory to quantify the instability, which must be addressed concurrently to protect the graft.
Advanced cross-sectional imaging is indispensable. A fine-cut Computed Tomography (CT) scan without contrast is obtained to map the three-dimensional bony architecture, precisely quantify the size and location of subchondral cysts, and evaluate the integrity of the remaining bone stock. Magnetic Resonance Imaging (MRI) is equally critical for assessing the viability of the talar body, ruling out extensive avascular necrosis, and evaluating the surrounding soft tissue envelope, including the integrity of the collateral ligaments and surrounding tendinous structures.
Allograft procurement requires seamless coordination with a certified tissue bank. We utilize fresh, un-frozen, size-matched osteochondral allografts. The "fresh" status is critical; freezing destroys chondrocyte viability. The grafts must be transplanted within an optimal window—typically between 14 and 28 days post-harvest—to ensure maximum chondrocyte viability while allowing sufficient time for rigorous infectious disease screening. Radiographic matching is performed to ensure the radius of curvature of the donor talus and plafond closely mimics the host. Crucially, the surgical plan must account for the graft thickness; the bone shell must be resected to a minimum thickness of 7 mm. Thinner grafts lack the structural rigidity necessary to withstand physiologic loading and are prone to early fragmentation and collapse.
In the operating theater, the patient is positioned supine on a fully radiolucent operating table. This specific table selection is non-negotiable, as it permits unobstructed, multi-planar intraoperative fluoroscopy, which is vital for assessing alignment and hardware placement. The entire lower extremity, from the proximal thigh to the tips of the toes, is meticulously prepped and draped freely to allow for dynamic assessment of range of motion and ligamentous tension throughout the procedure. A pneumatic tourniquet is applied to the proximal thigh but is purposely not inflated until after the initial skin incision and superficial dissection. This delayed inflation technique allows for the visual identification of superficial venous structures and the precise location of the anterior tibial artery via active pulsation, significantly reducing the risk of iatrogenic vascular injury. A small bump is placed under the ipsilateral hip to correct the natural external rotation of the lower limb, bringing the foot into a neutral, strictly vertical position to optimize the anterior surgical approach.
Step-by-Step Surgical Approach and Fixation Technique
The Anterior Surgical Corridor
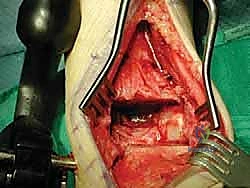
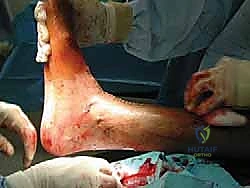
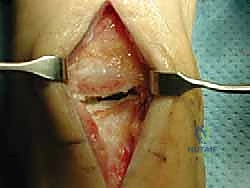
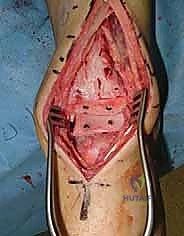
The operation commences with a precise, longitudinal anterior incision. Using a #15 scalpel, an 8 to 12 cm incision is made, centered exactly over the tibiotalar joint line, extending from the distal metaphysis of the tibia down to the talonavicular joint. Superficial dissection must be meticulous. The surgeon must actively anticipate the superficial peroneal nerve (SPN) branches, which frequently cross the surgical field from lateral to medial. Using blunt dissection and small Senn retractors, these sensory branches are carefully mobilized and retracted laterally.
Once the extensor retinaculum is incised, the deep fascial intervals are identified. The primary surgical window lies between the tibialis anterior (TA) tendon medially and the extensor hallucis longus (EHL) tendon laterally. The EHL is retracted laterally, exposing the deep neurovascular bundle (DPN and ATA). This entire bundle must be meticulously freed from the underlying joint capsule using a pen-tip electrocautery or blunt elevator. A narrow Hohmann or malleable retractor is then placed lateral to the bundle, sweeping it safely out of the operative field. The anterior joint capsule is then incised longitudinally, exposing the arthritic tibiotalar articulation.
Joint Preparation and Distraction
With the joint exposed, a comprehensive anterior synovectomy and debridement are performed. Hypertrophic, inflamed synovium is excised using a combination of rongeurs and electrocautery. Large, impinging anterior osteophytes on both the distal tibia and the talar neck are resected using a sharp osteotome and mallet, taking care not to violate the structural integrity of the anterior talar neck.
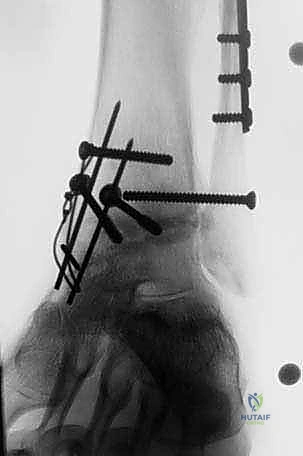
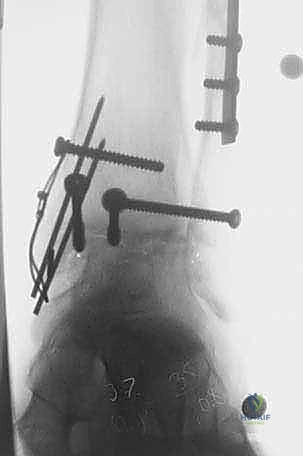
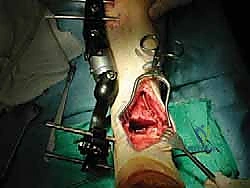
To gain adequate access to the posterior aspect of the joint and to facilitate the precise bone cuts, a joint distractor or external fixator must be applied. Two 4.0 mm or 5.0 mm half-pins are placed in the anterior tibial diaphysis, well proximal to the planned resection level. Two corresponding pins are placed in the talar neck or, if more distraction is required, in the calcaneal tuberosity. The distraction device is applied, and the joint is symmetrically distracted by 5 to 8 mm. This distraction is paramount; it protects the posterior neurovascular structures from the oscillating saw and allows for complete visualization of the entire anterior-to-posterior depth of the tibial plafond and talar dome.
Osteotomy and Graft Preparation
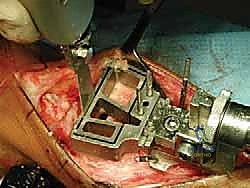
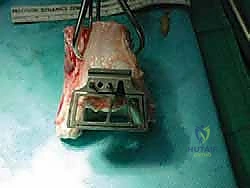
We routinely utilize a modified total ankle arthroplasty cutting block system (such as the DePuy Agility or similar modern instrumentation) to ensure perfectly parallel and planar bone resections. The tibial cutting block is pinned in place, ensuring neutral coronal alignment and matching the patient's native sagittal slope. An oscillating saw is used to resect the diseased tibial plafond. The talar cut is subsequently performed, ensuring the resection removes the sclerotic subchondral bone while preserving maximum talar body bone stock.
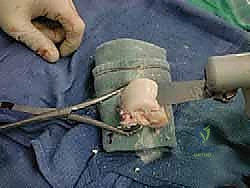
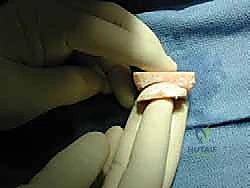
Simultaneously, on the back table, the fresh osteochondral allograft is prepared. The donor talus and distal tibia are secured. Using the exact same cutting blocks and measured resection depths, the allograft shells are harvested. It is a critical, uncompromising rule that the bony portion of the allograft shell must be at least 7 mm thick to prevent catastrophic mechanical failure. Once cut, the allograft shells are subjected to high-pressure pulsatile lavage. This crucial step removes immunogenic marrow elements, lipids, and cellular debris from the cancellous bone, significantly reducing the host's immune response and facilitating rapid osseous integration.
Allograft Insertion and Rigid Fixation
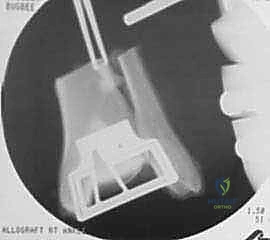
The prepared allograft shells are carefully transported to the surgical field. The tibial shell is inserted first, followed by the talar shell. The distraction is slowly released, allowing the joint to compress the grafts. The fit must be highly congruous and inherently stable; a "press-fit" is ideal.
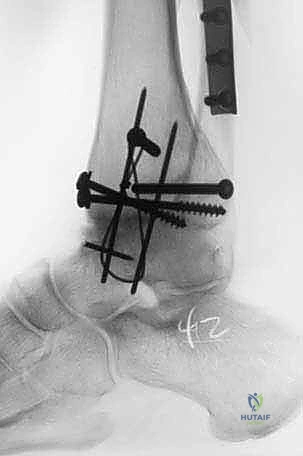
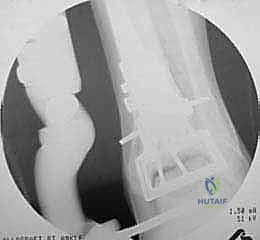
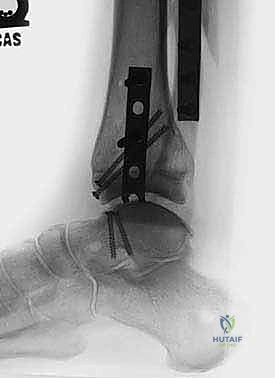
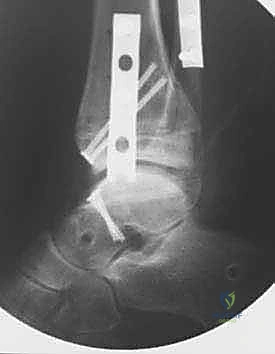
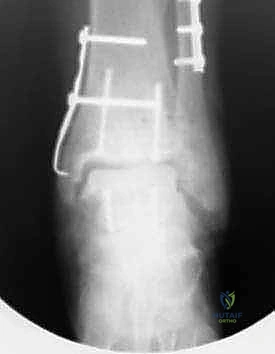
Rigid internal fixation is mandatory to prevent micro-motion, which inhibits bone healing and leads to nonunion. We utilize multiple 3.0 mm or 4.0 mm headless compression screws or bioabsorbable pins. These are placed from the non-articular surfaces (e.g., from the anterior talar neck directed posteriorly into the talar body, and from the anterior distal tibia directed superiorly). The screw heads must be deeply countersunk to prevent any impingement during range of motion. Multi-planar fluoroscopy is utilized to confirm perfect seating of the grafts, restoration of the mechanical axis, and appropriate length and trajectory of all hardware. The capsule is then meticulously closed over a closed-suction drain, followed by layered closure of the extensor retinaculum, subcutaneous tissue, and skin.
Complications, Incidence Rates, and Salvage Management
Despite meticulous surgical technique, total ankle osteochondral shell allograft reconstruction is fraught with potential complications, stemming from both mechanical failures and complex biologic responses. The most devastating complication is massive graft collapse or subsidence. This typically occurs due to inadequate thickness of the allograft bone shell (less than 7 mm), unrecognized preoperative avascular necrosis of the host talus, or premature weight-bearing by a non-compliant patient. When the subchondral bone fails, the overlying hyaline cartilage rapidly degrades, leading to an immediate return of severe, debilitating arthritic pain.
Nonunion or delayed union at the host-graft interface is another significant hurdle, occurring in approximately 10-15% of cases. This is often the result of inadequate rigid fixation, thermal necrosis during the bone cuts, or an aggressive host immune response against the remaining donor marrow elements. Management of nonunion typically requires a return to the operating room for revision fixation, aggressive decortication of the nonunion site, and the application of autologous bone graft or orthobiologics (such as Bone Morphogenetic Protein, BMP) to stimulate osteogenesis.
Infection, while rare (incidence < 3%), is catastrophic when it involves massive allograft tissue. Superficial infections can often be managed with aggressive local wound care and targeted oral antibiotics. However, deep acute infections necessitate immediate surgical debridement, copious pulsatile lavage, and intravenous antibiotics. If the infection cannot be eradicated, or if chronic osteomyelitis develops, the entire allograft must be completely explanted.
Salvage options for a failed shell allograft—whether due to collapse, nonunion, or infection—are highly complex. If sufficient bone stock remains after graft removal, conversion to a Total Ankle Arthroplasty (TAA) utilizing a revision, stemmed implant with bulk metal augments may be attempted. However, in many cases, the loss of talar and distal tibial bone stock is so profound that a complex tibiotalocalcaneal (TTC) arthrodesis, utilizing a retrograde intramedullary nail and massive structural autograft or allograft, becomes the only viable salvage pathway to provide a stable, plantigrade, and painless foot.
| Complication | Estimated Incidence | Etiology / Risk Factors | Salvage / Management Strategy |
|---|---|---|---|
| Graft Collapse / Subsidence | 15 - 25% | Graft thickness <7mm, host AVN, premature weight-bearing. | Conversion to TAA (if bone stock permits) or complex TTC Arthrodesis. |
| Host-Graft Nonunion | 10 - 15% | Inadequate fixation, thermal necrosis, immunologic rejection. | Revision rigid fixation, autologous bone grafting, application of orthobiologics (BMP). |
| Deep Joint Infection | 1 - 3% | Contaminated allograft, poor host soft tissue envelope, hematogenous spread. | Aggressive I&D, IV antibiotics; likely requires total allograft explantation and staged fusion. |
| Nerve Injury (SPN/DPN) | 5 - 10% | Iatrogenic traction or transection during the anterior approach. | Gabapentinoids, targeted nerve blocks; surgical neuroma excision and burying in muscle if intractable. |
Phased Post-Operative Rehabilitation Protocols
The postoperative rehabilitation protocol is as critical to the ultimate success of the procedure as the surgical execution itself. The transplanted allograft requires a highly protected environment to allow for creeping substitution and rigid osseous integration at the host-graft interface, while simultaneously demanding early, controlled motion to nourish the transplanted hyaline cartilage via synovial fluid diffusion.
Phase I of rehabilitation encompasses weeks 0 through 6. Immediately postoperatively, the patient is placed in a well-padded, short-leg splint in neutral dorsiflexion. The patient is strictly non-weight-bearing (NWB) on the operative extremity. Crutches, a walker, or a knee scooter are mandatory. During this phase, strict elevation is enforced to control edema, which helps mitigate wound healing complications. At the two-week mark, sutures are removed, and the patient is transitioned to a removable Controlled Ankle Motion (CAM) boot. While remaining strictly NWB, the patient is encouraged to remove the boot multiple times daily to perform active and active-assisted range of motion (ROM) exercises in the sagittal plane (dorsiflexion and plantarflexion) to prevent capsular contracture and nourish the cartilage.
Phase II spans weeks 6 through 12. At the 6-week postoperative visit, new weight-bearing radiographs are obtained to assess the initial stages of bony incorporation and ensure the hardware remains stable. If radiographic progression is satisfactory, the patient begins a graduated weight-bearing protocol. This
Clinical & Radiographic Imaging Archive
Detailed Chapters & Topics
Dive deeper into specialized chapters regarding total-ankle-shell-allograft-reconstruction