Posterior Ankle Arthroscopy & Hindfoot Endoscopy: An Intraoperative Masterclass
Key Takeaway
This masterclass provides an immersive, step-by-step guide to posterior ankle arthroscopy and hindfoot endoscopy. Fellows will learn critical surgical anatomy, meticulous portal creation, advanced intraoperative techniques for os trigonum excision, FHL tenosynovitis, and osteochondral lesions, alongside essential pearls, pitfalls, and postoperative management strategies.
Comprehensive Introduction and Patho-Epidemiology
Posterior ankle arthroscopy and hindfoot endoscopy represent a profound paradigm shift in the management of deep posterior ankle and subtalar pathology. Historically, accessing the posterior compartment required extensive, morbid open exposures that inherently placed critical neurovascular structures at risk and routinely resulted in significant postoperative stiffness and prolonged rehabilitation. The advent of the two-portal endoscopic technique, pioneered and popularized by C. Niek van Dijk in the late 1990s, revolutionized our approach. This minimally invasive technique provides unparalleled, magnified visualization of a deeply located, anatomically complex region, transforming previously daunting diagnostic and therapeutic dilemmas into routinely manageable outpatient procedures. Mastery of this technique is now considered an essential competency for the modern foot and ankle surgeon.
The patho-epidemiology of the posterior ankle is heavily influenced by its unique biomechanical environment, which is frequently subjected to extreme, repetitive axial and sheer forces. Overuse injuries, particularly in athletic populations such as ballet dancers, gymnasts, and soccer players, play a dominant role in the genesis of posterior ankle pain. The classic mechanism involves repetitive forced plantarflexion, which induces a "nutcracker" effect, compressing the posterior osseous and soft tissue structures between the posterior lip of the distal tibia and the superior surface of the calcaneus. This repetitive mechanical impingement leads to a cascade of localized inflammation, capsular hypertrophy, and reactive osteophyte formation, culminating in Posterior Ankle Impingement Syndrome (PAIS).
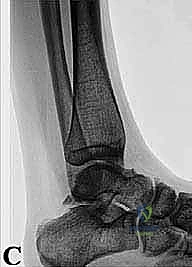
FIG 1A • Standard AP ankle view. Note that this projection typically fails to demonstrate abnormalities associated with posterior ankle impingement, highlighting the need for specialized imaging.
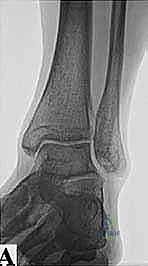
FIG 1B • Standard lateral view. While occasionally helpful, the critical posterior structures are often obscured by the superimposition of the medial and lateral talar tubercles.
Within the spectrum of PAIS, the os trigonum—an unfused secondary ossification center of the posterolateral talus—is the most frequent osseous culprit. Present in approximately 7% to 10% of the general population, it typically remains asymptomatic until a traumatic event (such as a severe hyper-plantarflexion injury or a supination sprain) disrupts its synchondrosis with the main body of the talus. Once destabilized, the os trigonum becomes a mobile, irritating fragment within the posterior joint space. Furthermore, soft tissue impingement is equally prevalent, often involving a hypertrophic posterior intermalleolar ligament, a thickened posterior joint capsule, or post-traumatic scar tissue interposing within the tibiotalar or subtalar articulations.
Beyond isolated impingement, the posterior compartment is a frequent site for complex tendinopathies and intra-articular derangements. The flexor hallucis longus (FHL) tendon, often referred to as the "dancer's tendon," is highly susceptible to stenosing tenosynovitis as it courses through its rigid fibro-osseous tunnel posterior to the talus. This can present as isolated pathology or concomitantly with PAIS. Additionally, the posterior endoscopic approach has become the gold standard for addressing deeply situated osteochondral lesions (OCLs) of the posterior talar dome and the posterior facet of the subtalar joint, as well as for the retrieval of elusive posterior loose bodies and the management of localized post-traumatic arthrosis.
Detailed Surgical Anatomy and Biomechanics
A profound, three-dimensional spatial awareness of the posterior ankle anatomy is the absolute prerequisite for safe and effective endoscopic navigation. The posterior compartment is essentially a confined anatomical box. The anterior boundary is formed by the posterior aspect of the distal tibia, the posterior capsule of the tibiotalar joint, the posterior talus, and the posterior facet of the subtalar joint. The posterior boundary is defined by the Achilles tendon and the deep fascia of the leg. This space is heavily populated by critical ligamentous restraints, complex tendinous pathways, and vital neurovascular structures that demand meticulous respect during portal placement and instrument manipulation.
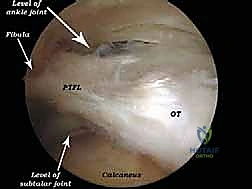
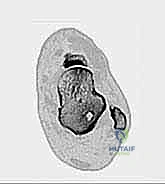
FIG 1D • Sagittal CT scan clearly delineating a large os trigonum with irregular, sclerotic borders indicative of chronic mechanical irritation and non-union.
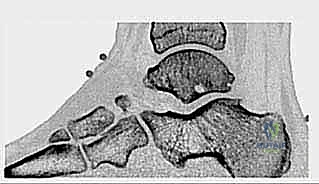
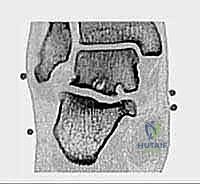
FIG 2A • Coronal CT image utilized for precise preoperative planning of a deep subtalar osteochondral cyst, demonstrating the utility of advanced cross-sectional imaging.
The osseous anatomy is dominated by the posterior process of the talus, which is divided into a medial and a lateral tubercle by the sulcus for the FHL tendon. The lateral tubercle is typically larger and projects further posteriorly; when enlarged, it is termed a Stieda process. If this process exists as a separate ossicle, it is the os trigonum. Biomechanically, during forced plantarflexion, the posterior talar process or os trigonum acts as a fulcrum, impacting the posterior tibial plafond superiorly and the calcaneus inferiorly. This repetitive impaction not only causes direct osseous contusion but also severe compression of the intervening capsular and ligamentous tissues, leading to the classic posterior impingement pain.
FIG 2B • Sagittal CT image detailing a complex subtalar osteochondral defect and secondary cyst lesion, accessible primarily via the posterior endoscopic approach.
The ligamentous anatomy of the posterior ankle is frequently implicated in soft tissue impingement. The posterior intermalleolar ligament (PIML), sometimes referred to as the tibial slip or "marsupial meniscus," is a variably present structure that courses obliquely from the medial malleolus to the lateral malleolus, superficial to the posterior talofibular ligament (PTFL). When hypertrophic, it can become entrapped in the tibiotalar joint during plantarflexion. Similarly, the posterior inferior tibiofibular ligament (PITFL), a crucial component of the syndesmosis, can become thickened following recurrent inversion sprains, contributing to the impingement complex.
The neurovascular topography dictates the entire surgical approach and defines the absolute "danger zone" of the procedure. The posteromedial neurovascular bundle, comprising the tibial nerve and the posterior tibial artery, courses distally behind the medial malleolus. Crucially, this bundle lies consistently medial to the FHL tendon at the level of the posterior ankle joint. Therefore, the FHL tendon serves as the paramount intraoperative landmark—the "sentinel" of the posterior compartment. All endoscopic dissection and instrument manipulation must remain strictly lateral to the FHL tendon. Straying medial to the FHL risks catastrophic injury to the tibial nerve and posterior tibial artery. Conversely, the sural nerve and lesser saphenous vein course along the posterolateral aspect of the ankle, placing them at risk during the establishment of the posterolateral portal; thus, meticulous blunt dissection techniques are mandatory during portal creation.
Exhaustive Indications and Contraindications
The indications for posterior ankle arthroscopy and hindfoot endoscopy have expanded significantly over the past two decades. What began primarily as a technique for os trigonum excision has evolved into a versatile approach for a myriad of complex pathologies. The primary indication remains Posterior Ankle Impingement Syndrome (PAIS) that has proven refractory to a comprehensive trial of conservative management, which should include rest, targeted physical therapy, non-steroidal anti-inflammatory drugs (NSAIDs), and image-guided corticosteroid injections. A positive response to a diagnostic local anesthetic injection into the posterior compartment is considered a highly reliable predictor of surgical success.
Beyond PAIS, the technique is highly indicated for the management of flexor hallucis longus (FHL) pathology. Stenosing tenosynovitis of the FHL at the level of the fibro-osseous tunnel, often presenting with posteromedial pain and pseudo-hallux rigidus, can be definitively treated with endoscopic release of the retinaculum and tenosynovectomy. Furthermore, the posterior approach provides the most direct and perpendicular access to osteochondral lesions (OCLs) located in the posterior one-third of the talar dome or the posterior facet of the subtalar joint. It is also the approach of choice for the removal of posterior loose bodies, debridement of posterior compartment arthrofibrosis, and endoscopically assisted subtalar or posterior tibiotalar arthrodesis.
Contraindications must be carefully evaluated to prevent devastating complications. Absolute contraindications include active local or systemic infection, severe peripheral vascular disease compromising the healing potential of the surgical portals, and profound anatomical distortion (e.g., severe post-traumatic deformity or massive heterotopic ossification) that precludes safe identification of the FHL tendon and the posteromedial neurovascular bundle. Relative contraindications include severe, end-stage osteoarthritis where isolated debridement is unlikely to yield long-term symptomatic relief, and extensive prior open posterior surgeries that may have altered the normal neurovascular topography and created dense, impenetrable scar tissue.
| Category | Specific Conditions |
|---|---|
| Primary Indications | Refractory Posterior Ankle Impingement Syndrome (PAIS); Symptomatic Os Trigonum; Stieda Process fracture/hypertrophy; Soft tissue impingement (hypertrophic PIML, PITFL). |
| Secondary Indications | FHL stenosing tenosynovitis; Posterior tibiotalar or subtalar loose bodies; Osteochondral lesions of the posterior talar dome/subtalar joint; Posterior compartment arthrofibrosis. |
| Advanced Indications | Endoscopically assisted subtalar arthrodesis; Endoscopically assisted posterior tibiotalar arthrodesis; Excision of posterior talar cysts. |
| Absolute Contraindications | Active local or systemic infection; Severe peripheral vascular disease; Eradicated anatomical landmarks preventing safe neurovascular identification. |
| Relative Contraindications | End-stage global ankle osteoarthritis (unless performing arthrodesis); Extensive prior open posterior ankle surgery (altered anatomy); Severe uncorrected coagulopathy. |
Pre-Operative Planning, Templating, and Patient Positioning
Meticulous preoperative planning begins with a highly specific clinical examination. The hallmark of posterior impingement is deep posterior ankle pain localized anterior to the Achilles tendon, reliably reproduced by the passive forced plantarflexion test (the "nutcracker" or "grinding" test). During this maneuver, the examiner rapidly plantarflexes the ankle while applying a slight internal and external rotation force; sharp, localized pain indicates a positive test. Evaluation of the FHL is equally critical. The FHL stretch test, performed by forcibly dorsiflexing the hallux while the ankle is held in maximal dorsiflexion, will elicit pain in the posteromedial ankle if FHL tenosynovitis is present. The presence of "pseudo hallux rigidus"—where great toe dorsiflexion is restricted when the ankle is dorsiflexed but normalizes when the ankle is plantarflexed—is highly suggestive of a nodular FHL tethered within its sheath.
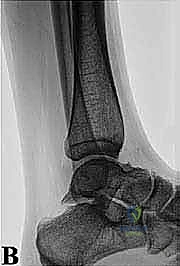
FIG 1C • Lateral radiograph with the foot in 25 degrees of external rotation. This specific view is critical as it profiles the posterolateral structures, unmasking an otherwise hidden os trigonum.
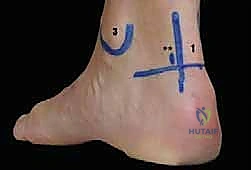
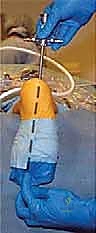
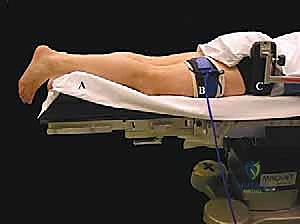
FIG 3A • Preoperative clinical photograph demonstrating the standard prone positioning. Note the careful padding of all bony prominences and the free-draping of the operative foot.
Advanced imaging is mandatory for surgical mapping. While standard anteroposterior (AP) and lateral radiographs are often unremarkable, a lateral radiograph taken with the foot in 25 degrees of external rotation is highly sensitive for profiling the posterolateral talus and identifying an os trigonum. Computed Tomography (CT) is the gold standard for defining osseous anatomy, precisely sizing osteophytes, mapping osteochondral lesions, and identifying intra-articular loose bodies. Magnetic Resonance Imaging (MRI) is indispensable for evaluating soft tissue pathology, including FHL tenosynovitis, ligamentous hypertrophy, bone marrow edema patterns within the talus or calcaneus, and the integrity of the articular cartilage.
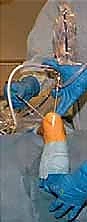
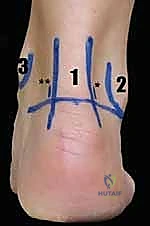
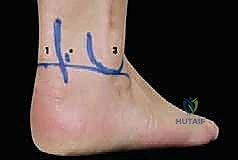
FIG 3B • Close-up view of the posterior ankle with surface landmarks outlined. The Achilles tendon, lateral malleolus, and planned portal sites are clearly demarcated prior to incision.
Patient positioning is critical for optimal access and surgeon ergonomics. The procedure is universally performed with the patient in the prone position. General anesthesia or regional anesthesia (spinal or epidural) combined with a popliteal block is utilized. A thigh tourniquet is applied to ensure a bloodless surgical field. The operative leg is supported on a well-padded bump placed under the distal tibia, allowing the foot to hang freely over the edge of the operating table. This positioning permits unimpeded, full range of motion of the ankle and subtalar joints during the procedure, which is essential for dynamic assessment of impingement and for maneuvering instruments within the tight posterior compartment. A standard 4.0-mm, 30-degree arthroscope is typically preferred for its superior field of view and light transmission, though a 2.7-mm scope may be utilized in smaller patients or exceptionally tight joints.
Step-by-Step Surgical Approach and Fixation Technique
The surgical approach relies on the classic two-portal technique, utilizing a posterolateral and a posteromedial portal. Accurate portal placement is the foundation of a safe procedure. Surface landmarks, including the medial and lateral borders of the Achilles tendon, the tip of the lateral malleolus, and the tip of the medial malleolus, are meticulously outlined. The posterolateral portal is established first. A vertical incision is made just lateral to the Achilles tendon, at the level of the tip of the lateral malleolus. To protect the sural nerve, the skin is incised superficially, followed by blunt dissection using a mosquito hemostat down to the crural fascia. The hemostat is directed anteriorly, aiming for the intermalleolar axis, until the posterior capsule is palpated.
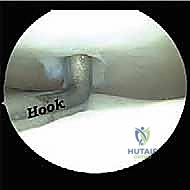
FIG 4A • Initial arthroscopic view from the posterolateral portal. The camera is introduced, and the initial sweep begins to clear the pre-Achilles fat pad.
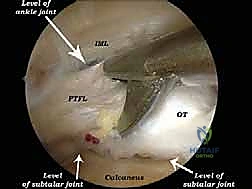
FIG 4B • Introduction of the shaver via the posteromedial portal. The shaver blade is kept facing laterally, away from the neurovascular bundle, to safely debride the soft tissue.
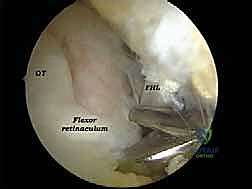
The arthroscope with a blunt trocar is introduced through the posterolateral portal and directed toward the first web space. The posteromedial portal is then created under direct or trans-illumination visualization. The incision is made just medial to the Achilles tendon, at the same horizontal level as the lateral portal. Again, superficial skin incision followed by blunt dissection is paramount to avoid injury to the medial calcaneal branches of the tibial nerve. A 4.5-mm full-radius shaver is introduced through the posteromedial portal. The initial phase of the operation involves clearing the abundant pre-Achilles adipose tissue to establish a working cavity. The shaver blade must continuously face lateral or anterior; it must never be directed medially.
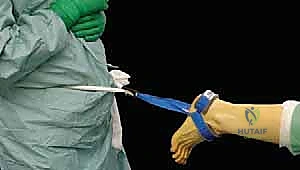
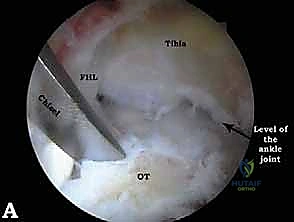
FIG 5A • Arthroscopic identification of the Flexor Hallucis Longus (FHL) tendon. This is the most critical landmark; all dissection must remain lateral to this structure.
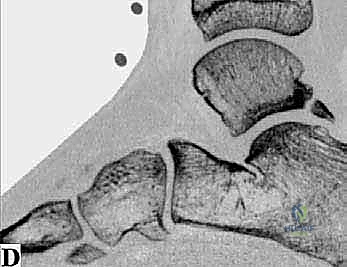
FIG 5B • Dynamic assessment of the FHL tendon. The hallux is passively flexed and extended to confirm the identity and excursion of the tendon.
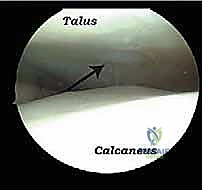
The absolute most critical step of the procedure is the definitive identification of the Flexor Hallucis Longus (FHL) tendon. As the fatty tissue is cleared, the muscle belly and tendon of the FHL will come into view, coursing obliquely from proximal-lateral to distal-medial. Its identity is confirmed dynamically by an assistant passively flexing and extending the great toe, observing the corresponding excursion of the tendon within the endoscopic field. Once the FHL is identified, the "safe zone" is established. The surgeon now knows that the tibial nerve and posterior tibial artery reside safely medial to this tendon.
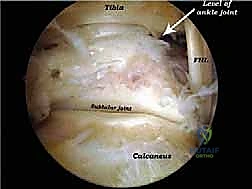
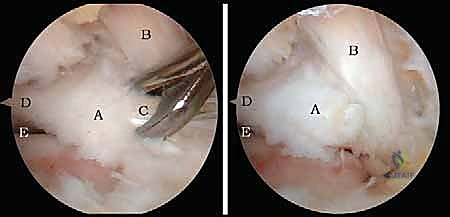
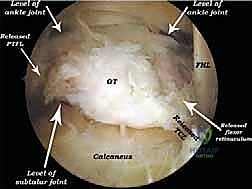
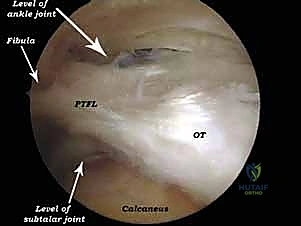
FIG 6A • Visualization of an impingement lesion. The hypertrophic posterior capsule and an os trigonum are identified deep within the posterior compartment.
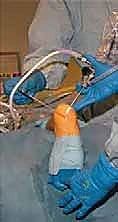
FIG 6B • Resection of the os trigonum begins. A combination of a shaver and a radiofrequency wand is used to carefully detach the soft tissue attachments.
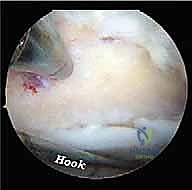
FIG 7A • Further delineation of the os trigonum. The synchondrosis between the ossicle and the main body of the talus is identified and disrupted.
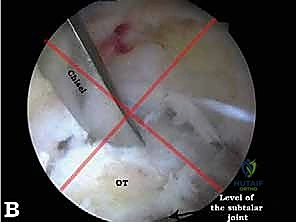
For the treatment of PAIS, the focus shifts to the posterior talus. If an os trigonum is present, its soft tissue attachments, primarily the posterior talofibular ligament (PTFL), must be meticulously released. This is achieved using a combination of a radiofrequency wand and a shaver. Once mobilized, the os trigonum is grasped with a sturdy grasper and extracted through one of the portals, which may need to be slightly enlarged. Following removal, the posterior aspect of the talus is smoothed with a motorized burr to ensure no residual bony prominences remain to cause recurrent impingement during dynamic plantarflexion testing.
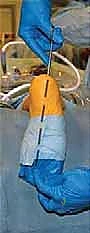
FIG 7B • Extraction of the os trigonum. A heavy grasper is utilized to securely hold and remove the mobilized ossicle through the enlarged portal.

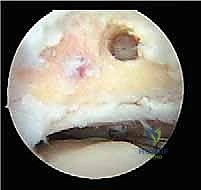
FIG 8A • Post-resection view. The bed of the excised os trigonum is inspected, and any remaining sharp osseous edges are contoured with a motorized burr.
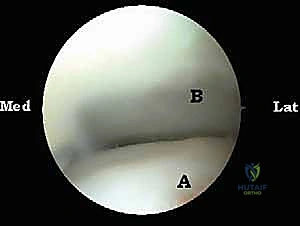
*FIG 8B • Dynamic testing post-resection. The ankle
Clinical & Radiographic Imaging Archive