Posterior Ankle Impingement Syndrome: An Operative Masterclass in Diagnosis and Surgical Management
Key Takeaway
Join us in the OR for a masterclass on Posterior Ankle Impingement Syndrome (PAIS) surgery. We'll meticulously cover surgical anatomy, detailed preoperative planning, precise intraoperative techniques (open and endoscopic), and critical pearls and pitfalls. Learn comprehensive postoperative care, ensuring optimal patient outcomes for this challenging condition.
Comprehensive Introduction and Patho-Epidemiology
Welcome, colleagues, to this definitive masterclass on the diagnosis and surgical management of Posterior Ankle Impingement Syndrome (PAIS). This clinical entity represents a challenging yet highly rewarding pathology within the realm of foot and ankle surgery. PAIS is an overarching clinical disorder characterized by chronic, debilitating posterior ankle pain that is classically exacerbated by forced plantarflexion. It is predominantly observed in athletic populations whose disciplines demand extreme, repetitive plantarflexion—most notably ballet dancers, gymnasts, fast bowlers in cricket, and elite soccer players. The pathophysiology is best conceptualized as a "nut in a nutcracker" phenomenon. During maximal plantarflexion, the posterior anatomical structures—whether osseous, capsuloligamentous, or tendinous—are pathologically compressed between the posterior lip of the tibial plafond and the superior surface of the calcaneus.

The etiology of PAIS is multifactorial and often involves a combination of osseous and soft-tissue derangements. The most frequent culprit is pathology of the trigonal process—the posterolateral process of the talus. Injuries to this region span a spectrum from acute fractures to chronic stress injuries, disruption of a pre-existing synchondrosis, or direct mechanical abutment. When this posterolateral process fails to fuse with the main body of the talus during skeletal maturation (typically between ages 7 and 13), it remains as an independent accessory ossicle known as an os trigonum. While an os trigonum is present in approximately 10% to 15% of the general population and is often asymptomatic, it becomes a potent source of impingement when subjected to the repetitive microtrauma inherent in athletic endeavors.
Beyond osseous anomalies, soft-tissue elements play a critical role in the pathogenesis of PAIS. Flexor Hallucis Longus (FHL) tendon dysfunction is a frequent co-pathology, manifesting as stenosing tenosynovitis or direct mechanical impingement as the tendon glides through its fibro-osseous tunnel between the medial and lateral talar tubercles. Furthermore, intrinsic tibiotalar or subtalar joint pathology, including post-traumatic hypertrophic synovitis, capsular thickening, osteochondral lesions, or loose bodies, can significantly reduce the posterior joint space, precipitating impingement. Subtalar arthritis, particularly involving the posterior facet, can also generate analogous pain patterns and must be meticulously evaluated.
It is paramount to recognize that isolated pathologies in PAIS are the exception rather than the rule. Ballet dancers, for instance, frequently present with a triad of trigonal process abutment, FHL stenosing tenosynovitis, and posterior capsular hypertrophy. As these athletes attempt to compensate for the loss of terminal plantarflexion, they often adopt antalgic biomechanical adaptations, such as an inverted en pointe position. This compensatory cascade invariably leads to secondary pathologies, including anterior talofibular ligament (ATFL) sprains, chronic calf strains, and insidious plantar midfoot pain. Understanding this interconnected patho-epidemiology is the fundamental first step in formulating a comprehensive surgical strategy.
Detailed Surgical Anatomy and Biomechanics
A profound mastery of posterior ankle anatomy is non-negotiable for the orthopedic surgeon undertaking these procedures. The posterior ankle region is anatomically bounded superiorly by a horizontal line drawn 4 cm proximal to the tip of the lateral malleolus, and inferiorly by a curved line 4 cm distal to it. The central organizing axis of this operative field is the Achilles tendon. Flanking the Achilles tendon are the medial and lateral retromalleolar sulci, which house the critical neurovascular bundles and musculotendinous units that dictate our surgical approaches.
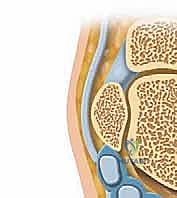
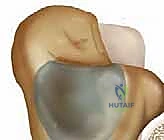
The osseous foundation of the posterior ankle is dominated by the posterior talar process, which projects posteriorly from the talar body. This process is bifurcated into two distinct projections: the posteromedial tubercle and the posterolateral tubercle (the trigonal process). Separating these two tubercles is a deep, distinct sulcus that serves as the proximal pulley for the FHL tendon. When the posterolateral tubercle exists as a separate ossicle, the os trigonum, it is tethered to the talus by a fibrocartilaginous synchondrosis. During extreme plantarflexion, the posterior capsuloligamentous complex—including the posterior talofibular ligament (PTFL) and the posterior intermalleolar ligament—relaxes and folds into the joint space. If an os trigonum or hypertrophic process is present, these soft tissues become trapped, leading to a cycle of inflammation, fibrosis, and further space reduction.
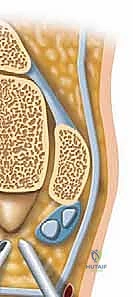
The neurovascular and tendinous topography is unforgiving. In the medial retromalleolar sulcus, structures are arranged from anterior to posterior. Immediately posterior to the medial malleolus lies the posterior tibial tendon, followed by the flexor digitorum longus (FDL) tendon. The posterior tibial artery and accompanying venae comitantes sit between the FDL and the FHL. Crucially, the posterior tibial nerve is the most posterior structure of the main neurovascular bundle, often lying in intimate proximity to the FHL tendon sheath. The FHL itself is the most posterior structure within the tarsal tunnel, running in its rigid fibro-osseous sheath. Its spatial relationship—flanked medially by the neurovascular bundle and laterally by the trigonal process—makes it the absolute key anatomical landmark during posterior approaches.
In the lateral retromalleolar sulcus, the peroneal tendons (longus and brevis) course posterior to the lateral malleolus. The primary structure at risk laterally is the sural nerve. This purely sensory nerve runs superficially in the posterolateral ankle, typically coursing just anterior to the lateral border of the Achilles tendon and posterior to the peroneal tendons, accompanied by the small saphenous vein. The sural nerve exhibits significant anatomical variability in its branching pattern, making it highly susceptible to iatrogenic transection or traction neuropraxia during posterolateral open approaches or portal placement for posterior ankle endoscopy. Misidentification of the FHL or careless dissection in these sulci can result in catastrophic, career-ending neurovascular complications for the patient.
Exhaustive Indications and Contraindications
The decision to proceed with operative intervention for Posterior Ankle Impingement Syndrome must be predicated on a rigorous, evidence-based evaluation. Surgery is rarely the first-line treatment. A comprehensive non-operative regimen—encompassing activity modification, targeted physical therapy focusing on eccentric strengthening and proprioception, NSAIDs, and judicious use of image-guided corticosteroid injections—must be exhausted over a period of 3 to 6 months. Surgical intervention is indicated when these conservative measures fail to provide durable relief, and the patient exhibits persistent functional limitations, particularly in their specific athletic or occupational demands.
A positive response to a diagnostic injection of local anesthetic into the posterior ankle or the FHL sheath is a powerful predictor of surgical success and is considered a relative prerequisite for operative planning. The injection confirms that the pain generator is localized to the posterior compartment and not referred from the subtalar joint, lumbar spine, or Achilles insertion. Furthermore, precise MRI findings correlating with the patient's clinical presentation—such as bone marrow edema within the os trigonum on STIR sequences, fluid within the FHL sheath, or posterior capsular thickening—solidify the operative indication.
Contraindications to surgical intervention must be carefully respected to avoid disastrous postoperative outcomes. Absolute contraindications include active local or systemic infection, severe peripheral vascular disease precluding adequate wound healing, and the presence of active Complex Regional Pain Syndrome (CRPS). Relative contraindications include a poorly defined pain generator, significant psychiatric overlays or unrealistic patient expectations, and severe, end-stage tibiotalar or subtalar osteoarthritis, where simple decompression will fail to address the global joint degeneration.
| Category | Indications for Surgery | Contraindications for Surgery |
|---|---|---|
| Absolute | Failure of 3-6 months of comprehensive conservative management. | Active local or systemic infection. |
| MRI-confirmed structural impingement (Os trigonum, hypertrophic process) with correlating clinical exam. | Active Complex Regional Pain Syndrome (CRPS). | |
| Severe, stenosing FHL tenosynovitis unresponsive to injections and therapy. | Severe peripheral arterial disease (inadequate perfusion). | |
| Relative | Positive diagnostic local anesthetic injection into the posterior ankle/FHL sheath. | Inadequate trial of conservative management (< 3 months). |
| Recurrent posterior capsular impingement affecting athletic performance. | Diffuse, unlocalized posterior ankle pain without imaging correlates. | |
| Concomitant intra-articular loose bodies in the posterior compartment. | End-stage subtalar or tibiotalar osteoarthritis (requires arthrodesis). |
Pre-Operative Planning, Templating, and Patient Positioning
Pre-operative planning is the foundation upon which surgical excellence is built. The clinical evaluation begins with a meticulous history, focusing on the mechanism of onset, duration of symptoms, and specific provocative activities. Physical examination must quantify tibiotalar, subtalar, and hallux range of motion (ROM). The hallmark clinical tests include the Forced Plantarflexion Test, which aims to reproduce the sharp, mechanical posterior pain, and the Maquirriain Test, performed in a closed kinetic chain to maximize impingement forces. The AOFAS Ankle-Hindfoot Score should be documented to establish a functional baseline for postoperative outcome tracking.
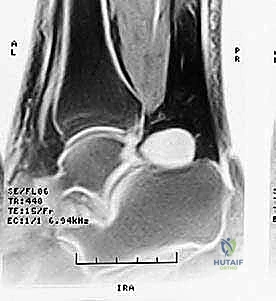
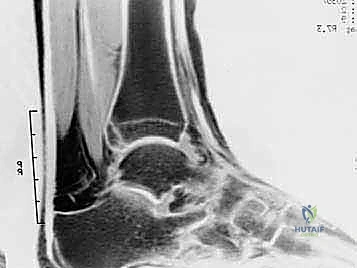
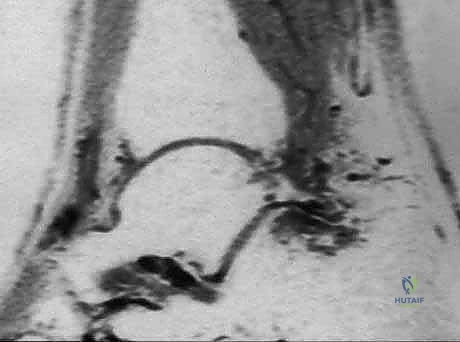
Imaging is paramount. Weight-bearing orthogonal radiographs are standard, with the lateral view being critical for delineating trigonal process anatomy, identifying an os trigonum, and assessing joint space narrowing. However, Magnetic Resonance Imaging (MRI) remains the gold standard diagnostic modality. MRI clearly defines both osseous and soft-tissue lesions, differentiating between acute fractures, synchondrosis disruptions (evidenced by fluid-sensitive STIR sequences showing bone marrow edema), and FHL tenosynovitis. Furthermore, MRI is essential for identifying occult pathologies such as synovial cysts, posterior tibial fractures, or localized pigmented villonodular synovitis (PVNS) that might mimic standard PAIS.
Patient positioning is critical for optimal access and visualization. For all posterior approaches—whether open or endoscopic—the patient is placed in the prone position. General anesthesia or regional anesthesia with a popliteal block is utilized. A well-padded pneumatic tourniquet is applied to the ipsilateral proximal thigh. Both lower extremities are allowed to hang freely off the end of the operating table, facilitating unrestricted ankle motion and dynamic intraoperative assessment. A triangular foam support is placed under the distal tibia, elevating the ankle slightly and preventing undue pressure on the patella.
The prone position carries inherent, potentially severe risks that demand the surgeon's direct oversight. Meticulous padding of all bony prominences, the face, eyes, and genitalia is mandatory. The upper extremities must be positioned carefully, typically on arm boards with shoulders abducted less than 90 degrees to prevent brachial plexus traction injuries. The ulnar nerve at the cubital tunnel must be free of compression. Prior to draping, the fluoroscopic C-arm is brought into the field to confirm unimpeded access for true lateral and oblique imaging of the ankle. Once prepped and draped, a final examination under anesthesia is performed to document the uninhibited passive range of motion.
Step-by-Step Surgical Approach and Fixation Technique
The surgical management of PAIS utilizes three primary corridors: the open posteromedial approach, the open posterolateral approach, and endoscopic posterior ankle decompression. The choice of approach is dictated by the specific pathology identified on MRI. The posterolateral approach is generally favored for isolated osseous impingement (e.g., an isolated os trigonum), whereas the posteromedial approach is mandatory when significant FHL pathology requires extensive decompression. Endoscopy is increasingly the standard of care for both, though it demands advanced arthroscopic proficiency.
Open Posteromedial Approach
The posteromedial approach is the workhorse for complex PAIS involving FHL stenosing tenosynovitis combined with osseous impingement. The incision is centered between the medial border of the Achilles tendon and the posteromedial border of the medial malleolus, extending approximately 4 to 6 cm longitudinally. The deep fascia is incised in line with the skin incision. The critical step here is the immediate identification and protection of the neurovascular bundle. The posterior tibial nerve and artery are meticulously mobilized and retracted anteriorly and medially using a blunt vessel loop.
Once the neurovascular bundle is safely retracted, the FHL muscle belly and tendon come into view. The FHL is the absolute key to the posterior ankle; it serves as the anatomical barrier protecting the medial structures. The fibro-osseous sheath of the FHL is incised longitudinally, releasing the tendon. The tendon is inspected for tears, nodularity, or low-lying muscle bellies, which are debrided as necessary. Retracting the FHL medially exposes the posterior talar process and the os trigonum. The os trigonum is sharply dissected from its capsular attachments and excised. The posterior talar process is then contoured with a rongeur or high-speed burr to ensure no residual impingement occurs during forced plantarflexion.
Open Posterolateral Approach
For isolated posterolateral pathology without medial FHL involvement, the posterolateral approach offers a more direct route with less risk to the posterior tibial nerve. A 4 cm longitudinal incision is made midway between the lateral border of the Achilles tendon and the posterior border of the lateral malleolus. Blunt dissection is utilized through the subcutaneous tissues to identify and protect the sural nerve and small saphenous vein, which are mobilized and retracted laterally. The deep fascia is incised, and the interval between the peroneal tendons (lateral) and the FHL (medial) is developed.
Deep dissection reveals the posterior capsuloligamentous complex and the os trigonum. The PTFL, which often attaches to the os trigonum, is carefully elevated. The synchondrosis between the os trigonum and the talus is identified and divided using a scalpel or small osteotome. The ossicle is grasped with a Kocher clamp and systematically freed from its remaining capsular and ligamentous tethers using electrocautery, taking extreme care to stay directly on bone to avoid inadvertent injury to the FHL medially or the subtalar joint inferiorly. Following excision, dynamic fluoroscopy confirms complete decompression during forced plantarflexion.
Endoscopic Posterior Ankle Decompression
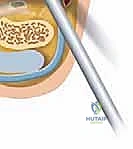
Posterior ankle endoscopy, pioneered by van Dijk, has revolutionized the treatment of PAIS, offering reduced morbidity, faster rehabilitation, and excellent visualization. This technique utilizes a two-portal approach. The posterolateral portal is established first, located just lateral to the Achilles tendon at the level of the tip of the lateral malleolus. A superficial skin incision is made, and a mosquito hemostat is used to bluntly spread the subcutaneous tissues, aiming anteriorly toward the fibula to avoid the sural nerve. A 4.0mm, 30-degree arthroscope is introduced.
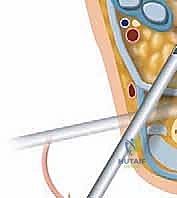
The posteromedial portal is then created under direct endoscopic visualization. A spinal needle is inserted just medial to the Achilles tendon at the same level, aiming toward the arthroscope shaft. Once the optimal trajectory is confirmed, the portal is established using the "nick and spread" technique to protect the posterior tibial neurovascular bundle. A motorized shaver is introduced through the medial portal to clear the posterior adipose tissue, gradually uncovering the FHL tendon. The FHL is the primary endoscopic landmark; all dissection must remain lateral to the FHL to ensure the safety of the neurovascular bundle. The os trigonum is identified lateral to the FHL, its soft tissue attachments are ablated with radiofrequency, and it is fragmented and removed using a burr and graspers. The FHL sheath can also be safely released endoscopically if tenosynovitis is present.
Complications, Incidence Rates, and Salvage Management
While surgical management of PAIS is highly successful, complications can occur and must be managed aggressively. The most devastating complications involve iatrogenic neurovascular injury. Sural nerve neuropraxia or transection is the most common nerve complication, particularly in posterolateral open and endoscopic approaches, occurring in up to 3-5% of cases. Posterior tibial nerve injury is less common but carries profound functional consequences, leading to plantar numbness and intrinsic muscle weakness. Meticulous blunt dissection and strict adherence to the "lateral to the FHL" rule during endoscopy are the primary preventative measures.
Postoperative stiffness and arthrofibrosis are significant concerns, especially in patients who undergo extensive open debridement or those who are immobilized for prolonged periods. Adhesions can form around the FHL tendon or the Achilles tendon, leading to restricted range of motion and persistent pain. Early, aggressive physical therapy is the cornerstone of prevention. If severe arthrofibrosis develops, salvage management may require a secondary endoscopic lysis of adhesions and manipulation under anesthesia.
Infection, both superficial and deep, is a risk with any surgical procedure, though the incidence in posterior ankle surgery is relatively low (< 2%). Deep infections may necessitate surgical irrigation and debridement alongside targeted intravenous antibiotic therapy. Complex Regional Pain Syndrome (CRPS) is a rare but debilitating complication characterized by disproportionate pain, autonomic dysfunction, and trophic changes. Early recognition is vital; treatment involves aggressive multimodal pain management, sympathetic nerve blocks, and intensive physical therapy.
| Complication | Estimated Incidence | Prevention & Salvage Management |
|---|---|---|
| Sural Nerve Injury | 3.0% - 5.0% | Prevention: Blunt "nick and spread" portal entry; avoid deep lateral dissection. Salvage: Gabapentinoids; neuromodulation; late surgical exploration/neurectomy for painful neuromas. |
| Posterior Tibial Nerve Injury | < 1.0% | Prevention: Direct visualization; strict adherence to dissecting strictly lateral to the FHL tendon. Salvage: Immediate microsurgical repair if transected; AFO bracing for intrinsic weakness. |
| FHL / Achilles Adhesions | 2.0% - 4.0% | Prevention: Early active ROM exercises; meticulous hemostasis to prevent hematoma. Salvage: Aggressive physical therapy; secondary endoscopic lysis of adhesions. |
| Infection (Superficial/Deep) | 1.0% - 2.0% | Prevention: Preoperative antibiotics; meticulous sterile technique. Salvage: Oral/IV antibiotics; surgical I&D for deep space infections. |
| CRPS | < 1.0% | Prevention: Adequate postoperative pain control; early mobilization; Vitamin C prophylaxis. Salvage: Multidisciplinary pain management; sympathetic blocks; intensive PT. |
Phased Post-Operative Rehabilitation Protocols
The postoperative rehabilitation protocol is as critical to the final outcome as the surgical execution itself. The protocol must be phased, balancing the biological necessity of tissue healing with the biomechanical requirement to prevent adhesions and restore functional range of motion. Rehabilitation is highly individualized, tailored to the specific surgical approach utilized (open versus endoscopic) and the patient's baseline athletic demands. Endoscopic procedures generally permit a more accelerated rehabilitation timeline due to minimized soft-tissue envelope disruption.
Phase 1: Protection and Wound Healing (Weeks 0-2)
Immediately postoperatively, the ankle is placed in a bulky, compressive Jones dressing or a removable controlled ankle motion (CAM) boot. The primary goals of this phase are edema control, pain management, and protection of the surgical incisions. Weight-bearing is typically restricted to touch-down or partial weight-bearing with crutches. Patients are instructed to perform active range of motion of the toes (specifically the hallux, to ensure FHL gliding) and the knee and hip to maintain proximal strength. Strict elevation and cryotherapy are mandatory to mitigate postoperative swelling.
Phase 2: Restoration of Mobility and Early Strengthening (Weeks 2-6)
At the two-week mark, sutures are removed, and the patient is transitioned to full weight-bearing in a supportive athletic shoe, often with a slight heel lift to reduce tension on the posterior structures. Formal physical therapy is initiated. The focus shifts to restoring full, symmetrical active and passive range of motion of the tibiotalar and subtalar joints. Gentle, pain-free plantarflexion stretching is introduced. Strengthening begins with isometric exercises, progressing to concentric and eccentric loading of the gastroc-soleus complex, tibialis posterior, and peroneal musculature. Proprioceptive training on a BAPS board or Bosu ball is integrated to restore neuromuscular control.
Phase 3: Advanced Strengthening and Return to Sport (Weeks 6-12+)
The final phase focuses on sport-specific or occupation-specific functional restoration. Patients progress to advanced plyometrics, agility drills, and dynamic balance exercises. For dancers, a gradual, highly supervised return to en pointe work is initiated, carefully monitoring for any recurrence of posterior impingement symptoms. Running programs are started on an anti-gravity treadmill or flat surfaces before progressing to uneven terrain or cutting maneuvers. Full return to elite athletic competition is typically achieved between 8 and 12 weeks for endoscopic procedures, and 12 to 16 weeks for open procedures, contingent upon the patient demonstrating symmetrical strength, full pain-free ROM, and psychological readiness.
Summary of Landmark Literature and Clinical Guidelines
The evolution of surgical management for Posterior Ankle Impingement Syndrome is deeply rooted in several landmark anatomical and clinical studies. The transition from open, highly morbid procedures to minimally invasive endoscopic techniques represents a paradigm shift in orthopedic foot and ankle surgery. A comprehensive understanding of this literature is essential for the academic surgeon to justify clinical decision-making and optimize patient outcomes.
The foundational anatomical work by Hamilton et al. in the late 20th century established the critical relationship between the os trigonum, the FHL tendon, and the unique biomechanical demands placed on classical ballet dancers. Their studies elucidated the "nutcracker" mechanism and validated the posteromedial open approach for complex, combined pathologies. Hamilton’s work remains a cornerstone for understanding the pathoanatomy of the dancer's ankle, emphasizing that failure to address concurrent FHL tenosynovitis inevitably leads to surgical failure.
The most transformative leap in the literature, however, belongs to C.N. van Dijk and his colleagues, who pioneered and popularized the two-portal posterior endoscopic approach. In their seminal 2000 publication in Arthroscopy, van Dijk et al. detailed the precise endoscopic anatomy and the crucial "lateral to the FHL" safety parameter. Subsequent prospective cohort studies and systematic reviews have consistently demonstrated that the endoscopic approach yields significantly lower complication rates, shorter hospital stays, and a more rapid return to elite sports compared to traditional open approaches. Current clinical guidelines from major orthopedic societies now strongly recommend the endoscopic approach as the gold standard for isolated osseous impingement and uncomplicated FHL pathology, reserving open approaches for massive anatomical variations, extensive tumors, or revision surgeries where anatomical landmarks are obliterated.
