Pediatric Femur Fracture: Closed Reduction & Spica Casting Masterclass
Key Takeaway
Welcome to the OR, fellows. Today, we're tackling pediatric femur fractures with closed reduction and spica casting. This masterclass covers critical anatomy, meticulous preoperative planning, and a step-by-step intraoperative execution. We'll delve into precise patient positioning, reduction maneuvers, and casting techniques for both traditional and walking spicas, emphasizing crucial pearls to avoid complications and ensure optimal outcomes for our young patients.
Comprehensive Introduction and Patho-Epidemiology
The closed reduction and spica casting of a pediatric femoral shaft fracture remains one of the most fundamental, historically rich, and technically demanding skills within the armamentarium of the pediatric orthopaedic surgeon. While the advent of flexible intramedullary nailing and submuscular plating has revolutionized the management of femur fractures in older children and adolescents, the spica cast remains the undisputed gold standard for the definitive management of diaphyseal femur fractures in children aged 6 months to 5 years. Mastering this technique requires far more than rudimentary plaster skills; it demands a profound three-dimensional understanding of pediatric musculoskeletal anatomy, a precise appreciation for muscular deforming forces, and a meticulous, unyielding attention to detail to prevent devastating iatrogenic complications.
Pediatric femoral shaft fractures represent approximately 2% of all pediatric fractures, with an annual incidence hovering around 20 per 100,000 children. The distribution is distinctly bimodal, with peaks occurring in early childhood (toddlers) and mid-adolescence. In the toddler cohort, the mechanism of injury is frequently low-energy, such as a twisting fall while running or playing. The inherent biomechanical properties of the immature femur, characterized by a highly cellular, thick periosteum and a relatively lower mineral-to-collagen ratio, make it susceptible to spiral or oblique fracture patterns under torsional stress. However, when evaluating any pediatric femur fracture, the surgeon must maintain a high index of suspicion for the patho-epidemiology of high-energy trauma and, crucially, non-accidental trauma (NAT).
Before any consideration of operative intervention, the initial clinical assessment must be exhaustive. When a non-ambulatory infant or a young child presents with a femoral shaft fracture, child abuse must be considered the primary differential diagnosis until definitively proven otherwise. A thorough skeletal survey and consultation with child protection teams are mandatory in these scenarios. Furthermore, metabolic bone diseases, most notably Osteogenesis Imperfecta (OI), must be ruled out, particularly in patients presenting with a history of recurrent fractures, blue sclerae, or dentinogenesis imperfecta. Misdiagnosing OI as NAT, or vice versa, carries profound medico-legal and psychosocial consequences.
The initial physical examination, typically conducted in the trauma bay or emergency department, requires meticulous palpation of the entire lower extremity. The surgeon must assess for bony crepitus, gross deformity, and the degree of clinical shortening. Crucially, the fascial compartments of the thigh must be palpated for tension. A tense, woody compartment is a harbinger of impending compartment syndrome, an absolute orthopaedic emergency that supersedes closed management. Neurovascular integrity must be documented with precision. Vascular assessment includes palpation of the femoral, popliteal, dorsalis pedis, and posterior tibial pulses; any asymmetry necessitates immediate Doppler ultrasonography or formal angiography. Neurological evaluation, though challenging in a guarding, terrified pediatric patient, must attempt to isolate motor function (ankle dorsiflexion for the deep peroneal nerve, plantarflexion for the tibial nerve) and sensory distribution across all dermatomes.
Detailed Surgical Anatomy and Biomechanics
A rigorous execution of a spica cast reduction requires an intimate understanding of the unique embryological, anatomical, and biomechanical characteristics of the pediatric femur. Embryologically, the femur develops from the mesenchymal limb bud at approximately four weeks of gestation. The femoral diaphysis serves as the primary ossification center, while the proximal and distal epiphyses remain cartilaginous at birth. The proximal ossification center typically appears by 6 months of age, and the distal center by 7 months. Throughout early childhood, the femoral diaphysis is composed of woven bone that is progressively remodeled into highly organized lamellar bone. This structural transition explains the susceptibility of toddlers to low-energy spiral fractures, whereas older children typically require significant kinetic energy transfer to sustain a diaphyseal fracture.
The vascular anatomy of the pediatric femur is profoundly robust, a physiological imperative that drives the exceptional healing potential and the phenomenon of post-traumatic overgrowth. The arterial supply is bipartite, comprising both endosteal and periosteal networks. The profunda femoris artery is the primary vascular conduit, giving rise to four perforating arteries that pierce the linea aspera posteromedially to supply the medullary canal. While the endosteal circulation dominates in the uninjured state, the periosteal circulation undergoes massive hypertrophy following a fracture, assuming the dominant role in callus formation. This intense localized hyperemia stimulates the contiguous physes—particularly the distal femoral physis—leading to accelerated longitudinal growth. Consequently, orthopaedic surgeons strategically accept, and indeed aim for, 1 to 2 centimeters of initial fracture shortening in the spica cast to compensate for this anticipated overgrowth, preventing a long-term leg length discrepancy.
Biomechanically, the displacement and angulation of a femoral shaft fracture are entirely dictated by the unyielding pull of the regional musculature. Understanding these deforming forces is the key to successful closed reduction. In proximal third fractures, the iliopsoas powerfully flexes the proximal fragment, while the gluteus medius and minimus abduct it, and the short external rotators externally rotate it. To achieve anatomical alignment, the distal fragment (controlled by the surgeon via the cast) must be brought into flexion, abduction, and external rotation to match the proximal fragment. In middle third fractures, the powerful adductor musculature (adductor longus, brevis, and magnus) exerts a strong medial pull on the distal fragment, creating a classic varus deformity. This necessitates a deliberate, well-molded valgus force during casting. In distal third fractures, the gastrocnemius exerts a flexion force on the distal fragment, often requiring specific knee positioning to neutralize the deformity.
Exhaustive Indications and Contraindications
The decision to proceed with closed reduction and spica casting must be based on a rigorous evaluation of patient age, fracture morphology, soft tissue envelope, and concomitant injuries. The "sweet spot" for this intervention is the child between 6 months and 5 years of age with an isolated, low-energy diaphyseal fracture. In this demographic, the thick periosteal sleeve is frequently intact on the concave side of the fracture, acting as a robust biological hinge that facilitates closed reduction and imparts immense stability once the cast is applied.
Fracture morphology plays a critical role in decision-making. Spiral and oblique fractures are highly amenable to spica casting because they possess a high surface area for rapid callus bridging and tend to shorten to a predictable, stable position. Transverse fractures, conversely, can be more challenging. If a transverse fracture is completely off-ended, it may be difficult to achieve and maintain length, sometimes necessitating a brief period of skin traction prior to casting, or in modern practice, consideration for flexible intramedullary nailing if the child is approaching the upper age limit. Acceptable radiographic parameters for spica casting in this age group are generally defined as less than 15-20 degrees of anterior/posterior angulation, less than 10-15 degrees of varus/valgus angulation, and between 1 to 2 centimeters of shortening.
The presence of polytrauma or significant soft tissue injury drastically alters the treatment algorithm. A child with severe head trauma requiring continuous intracranial pressure monitoring and supine positioning cannot tolerate a spica cast. Similarly, a massive degloving injury or a high-grade open fracture necessitates external fixation or internal fixation to allow for meticulous wound care. The table below outlines the strict indications and contraindications for this procedure.
| Category | Criteria | Rationale / Clinical Note |
|---|---|---|
| Absolute Indications | Isolated diaphyseal femur fracture in a child aged 6 months to 5 years. | Gold standard treatment; utilizes high remodeling potential and thick periosteum. |
| Absolute Indications | Fracture shortening of 1.0 cm to 2.0 cm. | Anticipates and neutralizes the predictable 1-2 cm of post-traumatic overgrowth driven by hyperemia. |
| Relative Indications | Age 5 to 6 years with low-energy spiral/oblique fracture. | Borderline age group; requires assessment of patient size/weight. Flexible nailing is an alternative. |
| Relative Indications | Transverse fracture with < 2cm shortening. | May require meticulous molding to prevent excessive overriding or loss of alignment. |
| Absolute Contraindications | Severe polytrauma requiring intensive care access. | Spica cast precludes necessary positioning (e.g., supine for elevated ICP) and limits access for resuscitation. |
| Absolute Contraindications | Massive thigh swelling or tense compartments. | High risk of iatrogenic compartment syndrome once enclosed in rigid casting material. |
| Absolute Contraindications | High-grade open fractures (Gustilo-Anderson II/III). | Requires serial debridement and soft tissue management impossible within a spica cast. |
| Relative Contraindications | Child weight exceeding 50 lbs (22.5 kg). | Cast becomes excessively heavy; nursing care and hygiene become unmanageable for caregivers. |
Pre-Operative Planning, Templating, and Patient Positioning
Pre-operative planning begins with a meticulous review of high-quality, orthogonal radiographs. The surgeon must evaluate Anteroposterior (AP) and Lateral views of the entire femur, strictly ensuring that both the hip and knee joints are visualized to rule out ipsilateral femoral neck fractures, slipped capital femoral epiphysis (SCFE), or distal physeal injuries.
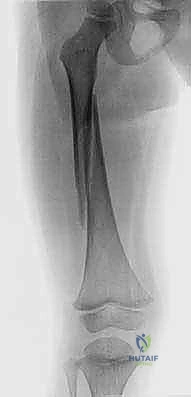
FIG 1 • AP and lateral radiographs of an oblique diaphyseal femur fracture in a child 4 years and 2 months of age. Note the degree of overriding and the deforming forces at play.
Upon reviewing the radiographs (as seen in FIG 1), the surgeon calculates the degree of shortening and angulation. In an oblique fracture pattern like the one presented, the periosteal hinge is typically intact on the side of the concavity. The surgeon must mentally rehearse the reduction maneuver: applying longitudinal traction to restore length, followed by recreating the deformity slightly to unlock the fragments, and finally utilizing the periosteal hinge to swing the distal fragment into anatomic alignment.
The procedure must be performed under general anesthesia in the operating room. Complete neuromuscular blockade is non-negotiable; attempting a spica reduction in a crying, spasming child under inadequate sedation is a recipe for malreduction, skin sloughing, and severe psychological trauma. Once the patient is anesthetized, a final, thorough neurovascular examination is performed and documented.
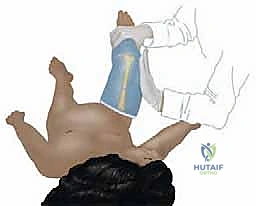
Patient positioning is arguably the most critical step in the entire procedure. The patient is carefully transferred to a specialized pediatric spica table. The perineal post must be heavily padded with soft roll or specialized foam to prevent pudendal nerve neurapraxia and perineal skin necrosis during the application of traction. The shoulders are supported by the upper table segment, and the sacrum rests on a small, radiolucent sacral rest. The C-arm fluoroscopy unit is brought into the field and positioned diagonally or transversely. It is imperative that the fluoroscopy technician demonstrates the ability to obtain perfect AP and lateral views of the fracture site without requiring the surgeon to move the patient's leg, as any movement during the critical setting phase of the cast will result in loss of reduction.
Step-by-Step Surgical Approach and Fixation Technique
With the patient anesthetized and optimally positioned, the skin of the torso and bilateral lower extremities is meticulously inspected and cleaned. A high-quality, breathable stockinette is applied from the nipple line down to the toes of the injured extremity, and down to the knee (or toes, depending on the spica type) of the contralateral extremity. Many academic centers advocate for the use of a Gore-Tex liner beneath the stockinette in the perineal and diaper regions to mitigate the risk of severe diaper dermatitis and skin maceration, which are the most common reasons for premature cast removal.
Phase 1: Preparing the Injured Extremity and the Popliteal Fossa
The application of soft roll padding requires an artisan's touch. Generous padding is applied over all bony prominences: the anterior superior iliac spines (ASIS), the sacrum, the patella, the fibular head (to protect the common peroneal nerve), and the malleoli.
CRITICAL SURGICAL PEARL: The popliteal fossa requires special attention. Excessive, unyielding padding here is mandatory to protect the popliteal artery and vein. However, the surgeon must be acutely aware that once this padding is applied, subsequent hyperflexion of the knee will compress the padding into the fossa, creating a devastating tourniquet effect. This is a primary mechanism for iatrogenic compartment syndrome in spica casting.
Phase 2: Application of the Initial Cylinder Cast and Valgus Molding
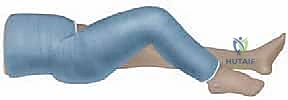
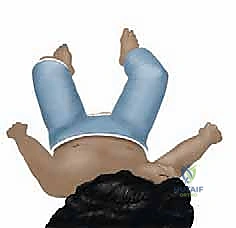
The procedure typically begins with the application of a long-leg cylinder cast on the injured extremity. We utilize a hybrid casting technique: an inner layer of plaster of Paris for superior conformability and molding, followed by an outer layer of fiberglass for structural rigidity and weight reduction. For a traditional spica, the knee is flexed.
TECH FIG 1 • A. Cylinder cast with 90 degrees of knee flexion for traditional spica casting.
While 90 degrees of knee flexion (as seen in TECH FIG 1A) has been the historical standard to control rotation and prevent the child from slipping out of the cast, modern literature has heavily scrutinized this practice due to the elevated risk of compartment syndrome. Many contemporary surgeons now advocate for 60 to 70 degrees of knee flexion, and increasingly, leaving the foot and ankle free (a "walking spica" modification) if the fracture pattern is stable enough.
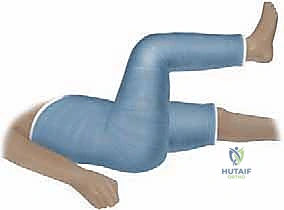
As the plaster begins its exothermic setting phase, the surgeon must execute the critical valgus mold. Because the adductor musculature relentlessly pulls the distal fragment medially, pediatric femur fractures have a strong propensity to heal in varus.
TECH FIG 1 • (continued) B. Valgus molding technique. The surgeon applies broad, well-distributed pressure to the medial thigh, directing force laterally to counteract the adductors.
The surgeon places the heel of one hand on the medial aspect of the thigh at the apex of the fracture, and the other hand on the lateral aspect of the distal femur/knee, applying a sustained, broad-based valgus force until the plaster sets completely. Point pressure must be strictly avoided to prevent pressure ulcers.
Phase 3: Transfer to Spica Table, Reduction, and Hip Positioning
Once the cylinder cast is rigid, the reduction is fine-tuned on the spica table. An assistant applies controlled, sustained longitudinal traction to the distal cast to overcome muscle spasm and achieve the desired 1-2 cm of overriding.
CRITICAL PITFALL: Excessive traction must be avoided. Over-distraction not only delays union but drastically increases the pressure against the perineal post, leading to labral/scrotal crush injuries and pudendal nerve palsy.
The hip is then brought into the optimal reduction position. For a traditional 1-1/2 spica cast, the injured hip is positioned in 90 degrees of flexion, 30 degrees of abduction, and 15 degrees of external rotation. This specific spatial orientation relaxes the iliopsoas and gluteal muscles, perfectly aligning the distal fragment with the proximal fragment.
TECH FIG 2 • Patient positioned on the spica table. Note the controlled traction and the precise positioning of the hip in flexion, abduction, and external rotation.
Phase 4: Torso Integration and Contralateral Leg
With the reduction confirmed via orthogonal fluoroscopy, the cast is extended proximally to encompass the torso. The plaster must be meticulously molded over the iliac crests (the "waist mold"). A poorly molded waist is the primary cause of the child "pistoning" or sliding proximally inside the cast, which inevitably leads to a loss of fracture reduction and severe perineal skin sloughing.

TECH FIG 3 • Integration of the torso and contralateral limb. The cast is meticulously molded around the ASIS and iliac crests to prevent pistoning.
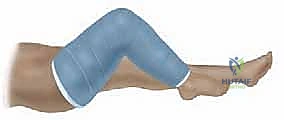
For a 1-1/2 spica, the cast is extended down the contralateral leg to just above the knee. A crossbar is frequently incorporated between the two legs using a fiberglass strut. This strut dramatically increases the torsional stability of the construct and provides a safe handle for parents to use when turning the child, preventing them from inappropriately using the casted legs as levers.
TECH FIG 4 • The completed 1-1/2 spica cast. Note the crossbar for added stability and the generous perineal cutout to facilitate hygiene.
Finally, the edges of the cast are trimmed and "petaled." A generous perineal cutout is essential to allow for diapering and hygiene. The cutout should be wide enough to prevent urine and feces from wicking into the cast padding, but not so wide that it compromises the structural integrity of the hip immobilization.
Complications, Incidence Rates, and Salvage Management
While closed reduction and spica casting is highly successful, it is not benign. The surgeon must be hyper-vigilant regarding potential complications, which range from easily managed skin issues to catastrophic limb-threatening events. The most feared complication is compartment syndrome, which, while rare, can occur if the initial trauma was severe, if excessive traction is applied, or if the knee is hyperflexed in the presence of massive thigh swelling.
Skin complications are by far the most common, occurring in up to 30% of patients. These range from mild contact dermatitis to deep, full-thickness pressure ulcers, typically located at the heel, sacrum, or perineum. Loss of reduction is another significant concern, usually occurring within the first two weeks as the initial thigh swelling subsides, leaving the cast loose.
| Complication | Estimated Incidence | Prevention Strategy | Salvage / Management Protocol |
|---|---|---|---|
| Skin Breakdown / Ulceration | 15% - 30% | Gore-Tex liners; meticulous padding of bony prominences; strict avoidance of point-pressure molding; proper perineal hygiene. | Windowing the cast for wound care; premature cast removal and transition to bracing if healing allows; dermatology consult for severe maceration. |
| Loss of Reduction / Malunion | 5% - 10% | Excellent initial molding (valgus mold, iliac crest mold); weekly radiographic follow-up for the first 2-3 weeks; avoiding excessive initial traction. | If discovered early (<2 weeks): Wedging the cast or taking the patient back to the OR for cast removal and re-reduction. If late: Observe (remodeling potential is massive in <5yo). |
| Leg Length Discrepancy (LLD) | 5% - 15% | Aiming for 1-2 cm of initial shortening to offset post-traumatic hyperemia-induced overgrowth. | Most resolve via remodeling. Discrepancies >2cm at skeletal maturity may require epiphysiodesis of the longer leg or lengthening procedures. |
| Compartment Syndrome | < 1% | Avoiding casting in the presence of tense thigh swelling; avoiding >90 degrees of knee flexion; avoiding excessive longitudinal traction. | Absolute emergency. Immediate bivalving of the cast down to the skin. If symptoms do not resolve instantly, emergent surgical fasciotomy of the thigh/leg. |
Phased Post-Operative Rehabilitation Protocols
The post-operative management of a child in a spica cast is heavily reliant on intense caregiver education. Before discharge, the parents must be thoroughly instructed on cast care, diapering techniques (often utilizing a double-diaper method to tuck the inner diaper into the cast edges), and safe lifting mechanics. Furthermore, standard child car seats are incompatible with a spica cast; the family must be provided with a specialized, crash-tested orthopaedic car seat or an ambulance transfer must be arranged.
The typical duration of spica cast immobilization is 4 to 6 weeks, heavily dependent on the child's age and the radiographic progression of the callus.
* Weeks 1-2: The primary focus is on pain control, monitoring for neurovascular compromise, and ensuring cast integrity. Radiographs (AP and Lateral) are obtained at 1 week and 2 weeks post-reduction to ensure the fracture has not slipped into unacceptable varus or shortened beyond 2 cm as the initial swelling subsides.
* Weeks 3-4: Clinical healing begins. The child is usually pain-free. Radiographs will demonstrate early, fluffy periosteal callus bridging the fracture site.
* Weeks 4-6: Definitive cast removal. The decision to remove the cast is clinical (absence of pain on palpation, no gross motion at the fracture site) and radiographic (bridging callus on at least three of four cortices on orthogonal views).
Following cast removal, formal physical therapy is rarely required for toddlers. The child is allowed to weight-bear as tolerated. It is highly typical for the child to refuse to walk for the first few days, followed by a pronounced limp that may persist for 4 to 8 weeks as joint stiffness resolves and muscle strength returns. Parents must be explicitly warned about this expected limp to prevent undue anxiety. Long-term follow-up is mandatory at 6 months and 1 year to clinically and radiographically assess for leg length discrepancy and ensure complete remodeling of any residual angulation.
Summary of Landmark Literature and Clinical Guidelines
The management of pediatric femur fractures is guided by robust literature and established clinical practice guidelines. The American Academy of Orthopaedic Surgeons (AAOS) Clinical Practice Guideline on the Treatment of Pediatric Diaphyseal Femur Fractures strongly recommends early spica casting for children aged 6 months to 5 years with isolated injuries.
Historically, the parameters for acceptable alignment were established by landmark studies, notably the work by Flynn et al., which quantified the massive remodeling potential of the pediatric femur. They demonstrated that in children under 5, up to 20 degrees of anterior/posterior angulation and 15 degrees of varus/valgus angulation will reliably remodel without long-term functional deficit.
More recently, the orthopaedic literature has seen a paradigm shift regarding the type of spica cast. Studies by Illgen and others have championed the "walking spica" or "single-leg spica" for stable fracture patterns. These modified casts, which often leave the ipsilateral foot free and require less hip and knee flexion, have been shown to drastically reduce the incidence of skin complications and iatrogenic compartment syndrome, while maintaining equivalent fracture union rates compared to the traditional 90/90 1-1/2 spica cast. Furthermore, while flexible intramedullary nailing has become the gold standard for children over the age of 5 or 6, the literature remains resolute: for the toddler, the beautifully molded, meticulously applied spica cast remains an unmatched, elegant, and definitive solution.
