First Metatarsophalangeal Joint Arthrodesis: An Intraoperative Masterclass in Hallux Fusion
Key Takeaway
This masterclass details First Metatarsophalangeal (MTP) Joint Arthrodesis, a vital technique for hallux fusion. We cover surgical anatomy, meticulous step-by-step execution, precise joint preparation, and optimal positioning. Learn to navigate neurovascular risks, apply fixation, and manage potential complications for successful patient outcomes, ensuring comprehensive understanding for fellows in the operating theater.
Comprehensive Introduction and Patho-Epidemiology
Welcome, colleagues and fellows, to the operating theater. Today, we are undertaking a detailed exploration of the First Metatarsophalangeal (MTP) Joint Arthrodesis. This procedure remains an absolute cornerstone in contemporary foot and ankle surgery, widely recognized as the gold standard for end-stage hallux rigidus and a highly reliable salvage operation for a multitude of complex forefoot deformities. It is a utilitarian technique, meaning its application effectively addresses a wide array of forefoot pathologies, ranging from severe degenerative joint disease to advanced rheumatoid arthritis, neuromuscular spasticity, and catastrophic failures of previous joint-sparing procedures. The overarching objective of this intervention is to achieve a rock-solid, pain-free, and functionally aligned hallux that restores the critical windlass mechanism of the foot during the terminal stance phase of gait.
The patho-epidemiology of first MTP joint arthritis is multifaceted, predominantly driven by altered biomechanics, repetitive microtrauma, and genetic predispositions. Hallux rigidus, the most common indication for this procedure, affects a significant portion of the adult population, leading to progressive cartilage degradation, subchondral sclerosis, and the formation of robust dorsal osteophytes. These osteoarthritic changes mechanically block dorsiflexion, resulting in an obligate shift in plantar pressures, lateral column overload, and a highly altered, antalgic gait pattern. When conservative measures—such as rigid morton's extensions, rocker-bottom shoe modifications, and intra-articular corticosteroid injections—fail to provide durable relief, surgical intervention becomes mandatory.
Unlike joint arthroplasty, which carries a notable risk of aseptic loosening, subsidence, and wear debris in the high-demand environment of the first ray, arthrodesis provides a definitive, durable solution. The success of this procedure, however, is not merely dependent on achieving bony union; it relies entirely on exquisite spatial alignment. A malpositioned fusion can be more disabling than the native arthritic joint, leading to profound transfer metatarsalgia, interphalangeal joint arthritis, and significant footwear restrictions. Therefore, mastering the nuances of joint preparation, triplanar alignment, and rigid osteosynthesis is paramount for any orthopedic surgeon operating on the foot and ankle.
Detailed Surgical Anatomy and Biomechanics
Before we make any skin incisions, we must meticulously review the complex surgical anatomy of the first MTP joint. A highly nuanced understanding of these osseous, ligamentous, and neurovascular structures is paramount to a successful outcome, facilitating adequate exposure while mitigating the risk of devastating iatrogenic complications.
Osteology and Articular Architecture
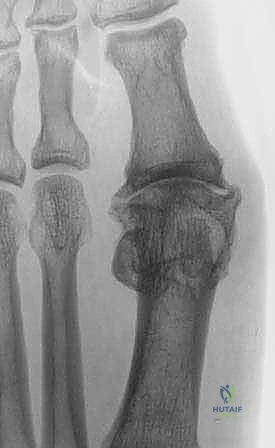
The bony architecture of the first MTP joint comprises the rounded, convex first metatarsal head articulating with the concave, elliptically shaped base of the proximal phalanx. The first metatarsal head is unique; on its plantar surface, one will find two distinct longitudinal grooves separated by a prominent central ridge known as the crista. These grooves are biomechanically crucial as they articulate directly with the tibial (medial) and fibular (lateral) sesamoid bones, forming the metatarsosesamoid articulation. The proximal phalanx base acts as the primary receptor, providing the shallow concave surface for the main MTP articulation.
In advanced pathologic conditions such as hallux rigidus, we typically observe profound chondral erosion or complete eburnation, particularly on the dorsal half of both the metatarsal head and the phalangeal base. This is accompanied by reactive subchondral sclerosis and the formation of bridging osteophytes. Our primary operative objective during the joint preparation phase of the arthrodesis is to radically resect these diseased articular surfaces, penetrate the sclerotic subchondral bone to access the vascular cancellous bed, and create a geometrically stable environment conducive to primary bone healing.
The vascular supply to the first metatarsal head is primarily derived from the first dorsal metatarsal artery and the first plantar metatarsal artery, which form an intricate extraosseous anastomotic ring. While avascular necrosis is a profound concern in distal metatarsal osteotomies, the extensive capsular stripping required for an arthrodesis is generally well-tolerated because the ultimate goal is fusion, not the preservation of a mobile articulation. Nonetheless, respecting the soft tissue envelope remains a fundamental principle of orthopedic surgery.
Ligamentous Stability and the Plantar Plate Complex
The static stability of the first MTP joint is maintained by a highly complex array of capsuloligamentous structures that must be systematically addressed during our surgical exposure. The primary stabilizers are the collateral ligaments, which are robust, fan-shaped fibrous bands originating from the medial and lateral epicondyles of the metatarsal head. They course distally and plantarward to insert into the medial and lateral tubercles of the proximal phalanx base. During our dorsal approach, we must meticulously and completely release these ligaments from their metatarsal origins to allow for adequate plantarflexion and joint distraction.
Distally and plantarly lies the plantar plate, a thick, fibrocartilaginous structure that is arguably the most critical stabilizing component of the first ray. It firmly attaches the two sesamoids to the plantar base of the proximal phalanx and intimately blends with the joint capsule and the plantar aponeurosis. The plantar plate provides immense resistance to dorsal translation of the phalanx. To adequately expose the plantar aspect of the metatarsal head for reaming, the plantar plate must be carefully released from the base of the proximal phalanx using a Freer elevator or a curved blade.
Furthermore, the metatarsosesamoid ligaments fan out in a plantar direction from the metatarsal head to the margins of the sesamoids. While these are less frequently the primary focus of release during a standard arthrodesis, severe contractures in cases of chronic hallux valgus or rigidus may necessitate their partial release to mobilize the sesamoid apparatus and allow the metatarsal head to be adequately prepared without tethering.
Tendinous Dynamics and Neurovascular Topography
Several powerful tendinous structures traverse or insert around the first MTP joint, dictating the dynamic forces acting upon our future fusion site. The Extensor Hallucis Longus (EHL) tendon is a massive dorsal structure that bypasses the MTP joint to insert onto the dorsal base of the distal phalanx. It is our primary anatomical landmark for the dorsal longitudinal incision and will be retracted laterally. Deep to the EHL lies the Extensor Hallucis Brevis (EHB) tendon, which inserts into the dorsal MTP capsule and the proximal phalanx; its capsular attachments are often excised during the arthrotomy.
On the plantar aspect, the Flexor Hallucis Longus (FHL) tendon courses between the two sesamoids to insert onto the plantar base of the distal phalanx. It is a critical flexor of the interphalangeal joint and is protected by the sesamoid complex and the plantar plate. The Flexor Hallucis Brevis (FHB) muscle divides into medial and lateral tendon slips, each encapsulating a sesamoid bone before inserting into the proximal phalanx. These structures exert immense plantarflexion forces, which our osteosynthesis construct must overcome during the healing phase.
The most critical neurovascular structure we must identify and protect during the dorsal approach is the dorsomedial cutaneous nerve. This is a terminal branch of the superficial peroneal nerve, providing vital sensation to the dorsomedial aspect of the hallux. It typically lies within the superficial subcutaneous fat, just medial to the EHL tendon, making it highly susceptible to iatrogenic transection, traction injury, or entrapment in scar tissue. Injury to this nerve can lead to devastating, painful neuromas or disabling paresthesias, which severely compromise patient satisfaction despite a radiographically perfect fusion.
Exhaustive Indications and Contraindications
The decision to proceed with a first MTP joint arthrodesis must be predicated on a rigorous clinical evaluation and a clear understanding of the procedure's capabilities and limitations. Patient selection is the ultimate determinant of postoperative success.
Patient Selection and Clinical Decision Making
The classic and most frequent indication for this procedure is advanced degenerative arthritis, primarily end-stage hallux rigidus (Coughlin and Shurnas Grade III and IV). These patients present with intractable pain throughout the range of motion, profound stiffness, and large, impinging dorsal osteophytes that preclude normal shoe wear. Post-traumatic arthritis following intra-articular fractures of the metatarsal head or phalangeal base is similarly well-addressed with arthrodesis, as the articular congruity is often irreversibly destroyed.
Inflammatory arthropathies, such as rheumatoid arthritis, gouty arthropathy, systemic lupus erythematosus, and seronegative spondyloarthropathies, represent another major indication cohort. In these systemic conditions, severe synovitis leads to rapid, global chondral loss, joint space collapse, and often profound multi-planar deformities. Arthrodesis in the rheumatoid forefoot not only eradicates pain but provides a stable medial column essential for the success of concurrent lesser toe reconstructions.
Furthermore, first MTP arthrodesis is the salvage procedure of choice for severe, recurrent, or rigid hallux valgus deformities, particularly in the elderly or those with underlying hypermobility of the first tarsometatarsal joint. It is also utilized to correct iatrogenic hallux varus, manage deformity secondary to neurologic spasticity (e.g., cerebral palsy, stroke), and rescue failed implant arthroplasties where bone stock is compromised.
| Category | Specific Clinical Scenarios |
|---|---|
| Primary Indications | End-stage Hallux Rigidus (Grade III/IV), Advanced Rheumatoid Arthritis, Severe/Rigid Hallux Valgus, Post-traumatic Osteoarthritis. |
| Salvage Indications | Failed Keller Arthroplasty, Failed Silastic/Metallic Implant Arthroplasty, Recurrent Hallux Valgus, Iatrogenic Hallux Varus. |
| Absolute Contraindications | Active localized or systemic infection, Critical limb ischemia (severe PVD), Inadequate soft tissue envelope for coverage. |
| Relative Contraindications | Severe ipsilateral Hallux Interphalangeal (IP) joint arthritis (may require concurrent IP fusion), Non-compliant patient, Heavy tobacco use (increases nonunion risk). |
Pre-Operative Planning, Templating, and Patient Positioning
Effective preoperative planning is the bedrock of a successful arthrodesis. It allows the surgical team to anticipate anatomical challenges, select appropriate hardware, and optimize the operative workflow, thereby minimizing tourniquet time and reducing the risk of intraoperative complications.
Radiographic Evaluation and Advanced Imaging
Our standard preoperative imaging protocol mandates weight-bearing anteroposterior (AP), lateral, and oblique radiographs of the foot. The weight-bearing AP view is absolutely crucial for assessing the overall alignment of the first ray, the degree of metatarsus primus varus, and the extent of arthritic involvement. We meticulously evaluate for joint space narrowing, subchondral sclerosis, cystic changes, and the presence of loose bodies. Crucially, we use this view to assess the length of the first metatarsal relative to the lesser metatarsals; excessive shortening during joint preparation must be avoided to prevent postoperative transfer metatarsalgia.
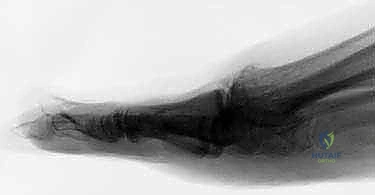
The lateral weight-bearing radiograph provides essential information regarding the sagittal plane alignment. It helps visualize the magnitude of dorsal metatarsal or phalangeal osteophytes and the degree of joint space collapse, particularly on the plantar aspect. It also reveals if the first metatarsal is abnormally elevated (metatarsus primus elevatus), a condition that must be corrected during the fusion to restore weight-bearing function to the first ray.
While advanced imaging modalities like Computed Tomography (CT) or Magnetic Resonance Imaging (MRI) are rarely necessary for primary degenerative cases, they become invaluable in specific salvage scenarios. For instance, in cases of failed implant arthroplasty or suspected avascular necrosis of the metatarsal head, a CT scan accurately quantifies the extent of bone loss and cystic destruction, dictating whether structural autograft or allograft will be required to bridge the defect and restore functional ray length.
Anesthetic Considerations and Tourniquet Management
In our institution, we strongly advocate for the use of regional anesthesia in conjunction with monitored anesthesia care (sedation) for first MTP arthrodesis. Specifically, a highly targeted ankle block provides excellent intraoperative operating conditions and profound, long-lasting postoperative analgesia, significantly reducing the need for systemic opioids. The block is administered using a 1:1 mixture of 2% lidocaine (for rapid onset) and 0.5% ropivacaine (for prolonged duration), meticulously targeting the deep peroneal, superficial peroneal, saphenous, posterior tibial, and sural nerves at the level of the malleoli.
To ensure a pristine, bloodless surgical field—which is an absolute prerequisite for meticulous neurovascular dissection and precise joint preparation—we utilize an Esmarch bandage applied as a tourniquet at the supramalleolar level of the ankle. This technique is highly effective and avoids the systemic hemodynamic shifts and severe thigh discomfort associated with proximal pneumatic tourniquets.
It is imperative that the Esmarch is applied over adequate layers of cast padding to prevent localized pressure necrosis or neuropraxia to the superficial nerves of the distal leg. The tourniquet time should be strictly monitored, though a standard primary arthrodesis typically requires well under the safe ischemic threshold of 120 minutes.
Patient Positioning and Operating Room Setup
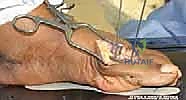
The patient is positioned supine on the operating table. A critical positioning nuance is the placement of a well-padded bump or roll under the ipsilateral hip. This serves to internally rotate the lower extremity slightly, counteracting the natural external rotation of the relaxed leg. This brings the foot into a true neutral position, pointing the toes directly toward the ceiling, which dramatically facilitates access to the medial aspect of the hallux and simplifies intraoperative fluoroscopic imaging.
The operating room setup must be optimized for efficiency and sterility. The mini C-arm fluoroscopy unit should be positioned on the contralateral side of the table, entering perpendicular to the surgical field. This configuration allows the surgeon to obtain true AP and true lateral views of the MTP joint with minimal manipulation of the draped extremity. The monitor should be placed directly in the surgeon's line of sight. All necessary power equipment, reamers, and the selected osteosynthesis tray (typically a dedicated forefoot reconstruction system) must be open and verified prior to inflation of the tourniquet.
Step-by-Step Surgical Approach and Fixation Technique
Now, we transition to the operative execution. Every maneuver in this masterclass requires exacting precision, a profound respect for the soft tissues, and a clear understanding of our biomechanical endpoints.
Incision, Exposure, and Neurovascular Protection
We utilize a standard dorsal longitudinal approach, which provides exceptional, expansile access to the entire first MTP joint complex. The skin incision is approximately 4 to 6 centimeters in length, centered directly over the MTP joint, and placed just medial to the palpable course of the Extensor Hallucis Longus (EHL) tendon. Using a #15 blade, a clean, single-pass incision is made through the epidermis and dermis to minimize skin edge trauma.
Immediately upon entering the subcutaneous fat layer, extreme vigilance is required. The dorsomedial cutaneous nerve—the terminal branch of the superficial peroneal nerve—frequently crosses the operative field in this exact location. Using blunt dissection with a small hemostat or Metzenbaum scissors, the subcutaneous tissues are gently spread longitudinally. Once identified, the nerve is carefully mobilized and retracted medially, often utilizing a vessel loop for safe, atraumatic handling throughout the duration of the case.
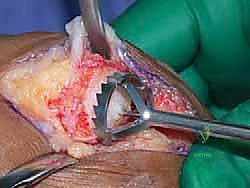
With the nerve secured, the deep dissection proceeds. The EHL tendon is identified within its sheath and retracted laterally using a Senn or narrow Hohmann retractor. This exposes the underlying dorsal joint capsule and the extensor hood mechanism. A robust dorsal arthrotomy is performed via a longitudinal incision directly through the capsule, extending from the distal third of the metatarsal to the mid-diaphysis of the proximal phalanx.
Subperiosteal dissection is then executed to achieve complete joint exposure. Using a sharp Freer elevator or a small periosteal elevator, full-thickness medial and lateral capsuloperiosteal flaps are elevated off both the metatarsal head and the phalangeal base. It is imperative to completely release the strong medial and lateral collateral ligaments from their metatarsal epicondylar origins. Following this, the elevator is passed plantarly to meticulously release the plantar plate from the base of the proximal phalanx, taking great care not to plunge deeply and injure the underlying FHL tendon. This circumferential release is the key to achieving the profound joint mobility required for the subsequent preparation and alignment phases.
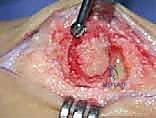
Joint Preparation and Hemispherical Reaming
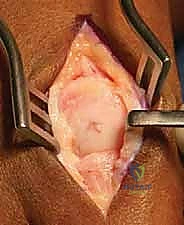
The biological imperative of joint preparation is to completely eradicate all remaining articular cartilage and expose bleeding, highly vascular subchondral and cancellous bone to facilitate robust osteogenesis. While flat cuts using a sagittal saw are an option, we strongly advocate for the hemispherical reaming technique (the "cup and cone" method). This technique is vastly superior as it maximizes the bony contact surface area and, critically, allows for infinite multi-planar micro-adjustments of the hallux position prior to definitive fixation without losing bone apposition.
The process begins with the metatarsal head. The proximal phalanx is forcefully plantarflexed to expose the entire metatarsal articular surface. A 2.0 mm Kirschner wire (K-wire) is driven axially into the exact center of the first metatarsal head, parallel to the shaft's longitudinal axis. This K-wire serves as the critical guide for the cannulated reamers. An appropriately sized concave reamer is passed over the wire. Using power on a slow, deliberate setting, the metatarsal head is reamed until the subchondral bone is completely penetrated and a bleeding, convex, spherical surface is achieved. Aggressive over-reaming must be strictly avoided to prevent devastating shortening of the first ray.
Attention is then turned to the proximal phalanx. The K-wire is removed from the metatarsal and inserted centrally into the base of the proximal phalanx, perfectly parallel to its diaphyseal axis. A matching convex reamer is utilized to create a congruent, concave "cup." The reaming process here is often quicker due to the thinner subchondral plate of the phalanx. Once both surfaces are prepared, they are vigorously fenestrated using a 2.0 mm drill bit or a small K-wire. This "fish-scaling" or subchondral drilling technique releases marrow elements, osteoprogenitor cells, and osteoinductive factors directly into the arthrodesis interface, significantly enhancing the biological healing potential.
Alignment, Provisional Fixation, and Biomechanical Optimization
Achieving the correct spatial alignment of the fused hallux is the single most critical step of the entire operation. A technically perfect bony union in a malaligned position is a clinical failure. The fusion must be set in three distinct planes: sagittal, coronal, and transverse.
In the sagittal plane, the hallux should be positioned in approximately 10 to 15 degrees of dorsiflexion relative to the floor, which generally equates to 20 to 25 degrees of dorsiflexion relative to the longitudinal axis of the first metatarsal. This specific angle allows the patient to roll smoothly over the hallux during the terminal stance phase of gait without jamming the interphalangeal joint. In the transverse plane, the hallux should be set in 10 to 15 degrees of valgus, ensuring it rests comfortably parallel to the second toe without impinging upon it. Finally, in the coronal plane, the toe must be in absolute neutral rotation; any pronation or supination will cause painful callosities on the medial or lateral borders of the interphalangeal joint.
Once this exact alignment is achieved, it is provisionally held in place using two crossed 0.062-inch K-wires driven from the phalanx into the metatarsal. The alignment is then rigorously checked clinically. We simulate weight-bearing by loading the foot with a flat rigid plate (like the lid of a surgical tray) pressed against the plantar aspect of the foot. The hallux pulp should rest lightly on the plate, and the surgeon should be able to slide a finger easily under the toe. Fluoroscopy is then utilized to confirm the alignment, verify joint congruency, and ensure no gapping is present at the arthrodesis site.
Definitive Osteosynthesis Strategies
For definitive fixation, the modern gold standard—and the technique providing the highest biomechanical stability—is a hybrid construct consisting of an interfragmentary lag screw combined with a dorsal neutralization plate. This construct provides immense compression across the fusion site while neutralizing detrimental bending, rotational, and shear forces.
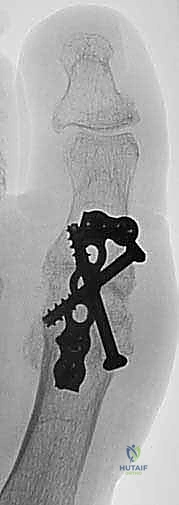
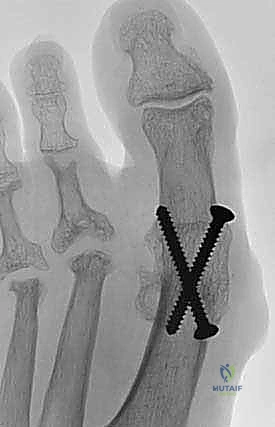
First, a solid or cannulated 3.5 mm or 4.0 mm lag screw is placed across the joint. The trajectory typically runs from the medial-plantar aspect of the proximal phalanx base, directed proximally and laterally into the dorsal-lateral metatarsal shaft. The hole is over-drilled proximally to create a glide hole, and under-drilled distally. As the screw is advanced, it generates massive compression across the prepared cancellous surfaces. Care must be taken not to split the phalangeal cortex or strip the threads in osteopenic bone.
Following lag screw insertion, a low-profile, anatomically pre-contoured dorsal titanium plate is applied. These plates are specifically designed with a built-in valgus and dorsiflexion angle. The plate is secured with a combination of non-locking and locking screws. Non-locking screws are initially placed to draw the plate flush against the bone, followed by locking screws to create a rigid, fixed-angle construct that is highly resistant to pull-out, even in poor bone stock.
Final fluoroscopic images are obtained in strict AP, lateral, and oblique planes to confirm perfect hardware placement, ensure no screws are violating the IP joint or extending excessively into the soft tissues, and verify the final alignment. The wound is then copiously irrigated, and the capsule is closed over the plate using an absorbable suture to provide a soft tissue buffer for the extensor tendons. The skin is closed meticulously with non-absorbable sutures or staples, and a bulky, compressive soft dressing is applied.
Complications, Incidence Rates, and Salvage Management
While first MTP arthrodesis is highly successful, it is a major reconstructive procedure with a distinct complication profile. A thorough understanding of these potential pitfalls is essential for prompt recognition and effective management.
Intraoperative and Early Postoperative Complications
Intraoperative complications are largely preventable with meticulous technique. Iatrogenic fracture of the metatarsal head or phalangeal base can occur during aggressive reaming or screw insertion, particularly in osteoporotic bone. If a fracture occurs, the fixation strategy must immediately pivot, often requiring longer plates, additional lag screws, or the utilization of locking technology to bypass the compromised bone segment. Nerve injury, specifically to the dorsomedial cutaneous nerve, is a devastating early complication leading to severe neuropathic pain; prevention via careful dissection is paramount, as salvage options (e.g., nerve burying) yield unpredictable results.
Early postoperative complications include wound dehiscence and superficial surgical site infections, occurring in roughly 2-5% of cases. These are typically managed successfully with local wound care and targeted oral antibiotics. Deep infections are exceedingly rare but catastrophic, necessitating immediate operative debridement, hardware removal, and placement of an antibiotic spacer, followed by a prolonged course of intravenous antibiotics and eventual revision arthrodesis with structural grafting.
| Complication Type | Estimated Incidence | Management Strategy |
|---|---|---|
| Nonunion (Asymptomatic) | 5% - 10% | Observation, supportive footwear. No surgical intervention required if painless. |
| Nonunion (Symptomatic) | 2% - 5% | Revision arthrodesis, hardware exchange, utilization of structural autograft/allograft, and biologic augmentation (e.g., BMP, bone marrow aspirate). |
| Malunion (Excessive Dorsiflexion) | 3% - 6% | Leads to shoe wear difficulty and dorsal impingement. May require closing wedge osteotomy for correction. |
| Malunion (Excessive Plantarflexion) | 2% - 4% | Leads to severe IP joint arthritis and apical ulcerations. Requires dorsal closing wedge osteotomy. |
| Hardware Irritation | 10% - 15% | Most common late complication. Managed with simple hardware removal once solid osseous union is confirmed via CT scan. |
Late Complications and Nonunion Management
Nonunion is the most significant late complication, historically reported at rates between 5% and 10%, though modern locked plating systems have driven this number lower. Patient factors such as active smoking, uncontrolled diabetes, and non-compliance with weight-bearing restrictions exponentially increase this risk. It is crucial to differentiate between an asymptomatic fibrous nonunion—which requires no treatment—and a symptomatic nonunion characterized by pain, swelling, and hardware failure. Symptomatic nonunions demand revision surgery, which involves aggressive debridement of the fibrous interface, correction of any underlying malalignment, robust structural bone grafting (often utilizing iliac crest autograft), and rigid revision osteosynthesis.
Malunion is arguably more detrimental to patient function than nonunion. Excessive dorsiflexion leads to the hallux rubbing against the toe box of shoes, causing painful dorsal keratoses. Conversely, excessive plantarflexion prevents the hallux from clearing the ground during the swing phase of gait, leading to massive stress transfer to the interphalangeal joint, rapid onset of IP joint arthritis, and potentially devastating plantar ulcerations at the IP joint level. Correction of symptomatic malunions requires complex corrective osteotomies through the fusion mass.
Phased Post-Operative Rehabilitation Protocols
The postoperative rehabilitation protocol is designed to protect the fragile osteosynthesis construct during the critical early phases of biological bone healing while preventing secondary stiffness in the adjacent joints.
Immediate Postoperative Phase and Weight-Bearing Progression
Immediately following surgery, the patient is placed in a bulky, compressive Jones dressing and a rigid, flat-bottom postoperative shoe or a controlled ankle motion (CAM) boot. For the first two weeks, strict elevation of the operative extremity above the level of the heart is absolutely mandated to control edema, mitigate throbbing pain, and promote primary wound healing. During this initial phase, patients are typically allowed to strictly heel-weight bear or touch-down weight bear with the assistance of crutches or a walker
