Mastering First MTP Joint Resurfacing: Arthrosurface HemiCAP Technique for Hallux Rigidus
Key Takeaway
This masterclass details the Arthrosurface HemiCAP resurfacing technique for advanced hallux rigidus. Fellows will learn comprehensive anatomy, meticulous preoperative planning, and a granular, step-by-step intraoperative execution. We'll cover precise instrument use, hardware application, critical pearls, and strategies for managing potential pitfalls and postoperative rehabilitation, ensuring optimal patient outcomes and motion preservation.
Comprehensive Introduction and Pathophysiology of Hallux Rigidus
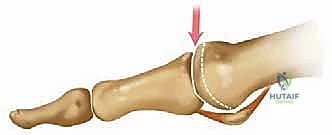
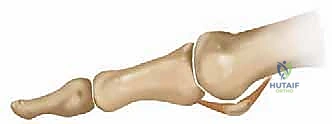
Hallux rigidus, characterized by progressive osteoarthritic degeneration of the first metatarsophalangeal (MTP) joint, represents the most prevalent arthritic condition affecting the foot and ankle. While historically dismissed as simple "big toe arthritis," the contemporary orthopedic surgeon recognizes this pathology as a complex biomechanical derangement that profoundly alters the propulsive phase of the gait cycle. In its nascent stages, the disease often presents with subtle, localized chondral degradation, primarily localized to the dorsal aspect of the first metatarsal head. As the natural history of the disease unfolds, this focal wear pattern relentlessly expands, eventually encompassing the central and plantar articular surfaces, leading to profound global joint destruction.
The pathophysiological cascade of hallux rigidus is driven by a combination of altered joint kinematics, repetitive microtrauma, and genetic predispositions. Biomechanically, the first MTP joint is subjected to immense compressive and shear forces during the terminal stance phase of gait. When anatomical variants such as a flattened metatarsal head, metatarsus elevatus, or an excessively long first ray are present, the dorsal aspect of the metatarsal head sustains disproportionate impaction against the proximal phalanx. This repetitive impingement initiates a cycle of cartilage fibrillation, subchondral sclerosis, and the hallmark formation of dorsal osteophytes, commonly referred to as a "dorsal bunion" or cheilectatic ridge.
As the dorsal osteophytes hypertrophy, they act as a mechanical block to dorsiflexion, effectively tethering the joint and exacerbating the destruction of the remaining articular cartilage. The surrounding soft tissue envelope, particularly the dorsal capsule and the collateral ligament complex, undergoes fibrotic contracture in response to chronic inflammation. This contracture further restricts the arc of motion, creating a self-perpetuating cycle of stiffness and progressive articular wear. It is estimated that up to 10% of the adult population will exhibit varying degrees of this condition, making it a critical area of mastery for any reconstructive foot and ankle surgeon.
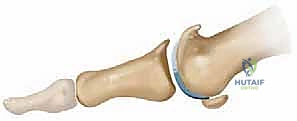
For decades, the gold standard for advanced hallux rigidus has been first MTP joint arthrodesis. While highly effective for pain relief, fusion permanently sacrifices joint kinematics and alters the windlass mechanism. The advent of the Arthrosurface HemiCAP (Contoured Articular Prosthetic) system revolutionized our approach by offering a motion-preserving alternative. By precisely resurfacing the damaged articular geometry of the metatarsal head while preserving the native proximal phalanx and sesamoid complex, the HemiCAP allows for the restoration of functional dorsiflexion, mitigating the transfer metatarsalgia and gait alterations frequently observed post-arthrodesis.
Detailed Surgical Anatomy and Biomechanics
Mastery of first MTP joint resurfacing demands an intimate, three-dimensional understanding of the local osteology, capsuloligamentous constraints, and neurovascular topography. The first metatarsal head is not a simple sphere; it possesses a complex, multi-radial geometry. Sagittally, the radius of curvature is shorter dorsally and elongates as it transitions to the plantar aspect, facilitating the necessary cam-effect during the propulsive phase of gait. Plantarly, the articular surface is divided by the crista into medial and lateral facets, which articulate with the respective sesamoids. Preserving the integrity of this metatarsosesamoid articulation is a critical intraoperative objective during hemiarthroplasty.
The neurovascular structures traversing the dorsal aspect of the first ray are highly vulnerable during the surgical approach. The medial dorsal cutaneous nerve, a terminal branch of the superficial peroneal nerve, frequently crosses the surgical field obliquely from lateral to medial. Additionally, terminal branches of the deep peroneal nerve supply the first web space and can be encountered laterally. Iatrogenic injury to these structures can result in debilitating neuromas or complex regional pain syndrome, which can completely overshadow an otherwise technically perfect joint resurfacing. Meticulous blunt dissection and the use of atraumatic retractors are mandatory.
Blood supply to the first metatarsal head is robust but relies heavily on the capsular attachments. The primary arterial inflow is derived from the first dorsal metatarsal artery and the first plantar metatarsal artery, which form an anastomotic ring around the anatomical neck. Extensive or aggressive capsular stripping, particularly along the plantar-lateral aspect, can compromise this vascular network, theoretically increasing the risk of avascular necrosis or implant subsidence. The surgeon must perform a precise, targeted capsulotomy, releasing only what is necessary to achieve adequate exposure and correct the soft tissue contracture.
Biomechanically, the first MTP joint is the linchpin of the windlass mechanism of Hicks. As the hallux dorsiflexes during terminal stance, the plantar fascia is wound around the metatarsal head, elevating the medial longitudinal arch and locking the midtarsal joints to create a rigid lever for propulsion. In advanced hallux rigidus, this mechanism is obliterated. The goal of the HemiCAP procedure is not merely pain relief, but the restoration of this vital biomechanical sequence. By re-establishing a smooth, congruent articular surface and decompressing the dorsal impingement, we aim to restore the minimum 60 to 65 degrees of dorsiflexion required for normal, unrestricted ambulation.
Exhaustive Indications and Contraindications
Patient selection is the absolute bedrock of success in first MTP joint resurfacing. The ideal candidate for the Arthrosurface HemiCAP procedure is a physiologically active patient presenting with Coughlin and Shurnas Grade 2 or Grade 3 hallux rigidus. These patients typically exhibit moderate to severe joint space narrowing, significant dorsal osteophyte formation, and a painful restriction in dorsiflexion, yet they maintain a strong desire to preserve joint mobility for occupational, athletic, or lifestyle reasons. It is critical that the patient has failed a comprehensive regimen of non-operative modalities, including rigid morton's extensions, rocker-bottom shoe modifications, and judicious intra-articular corticosteroid injections.
Conversely, Grade 4 hallux rigidus, characterized by complete obliteration of the joint space, profound stiffness (often less than 10 degrees of total motion), and severe pain at the mid-arc of motion, represents a relative to absolute contraindication for hemiarthroplasty. In these scenarios, the proximal phalangeal articular surface is typically too degraded to articulate smoothly with a metallic implant, leading to persistent pain and early failure. Furthermore, patients with significant metatarsosesamoid arthritis, identified by intractable plantar pain and severe sesamoid hypertrophy on axial CT imaging, are poor candidates, as resurfacing the dorsal metatarsal head will not address the plantar pathology.
Systemic factors must also be rigorously evaluated. Inflammatory arthropathies, such as rheumatoid arthritis or severe gouty arthropathy, are absolute contraindications due to the ongoing systemic destruction of the capsuloligamentous structures and the high risk of progressive bone loss and implant subsidence. Active infection, inadequate soft tissue coverage, and severe neurovascular compromise (such as advanced peripheral arterial disease or profound diabetic peripheral neuropathy) strictly preclude this intervention. Arthrodesis remains the most predictable and durable salvage in these high-risk populations.
| Category | Indications for HemiCAP Resurfacing | Contraindications for HemiCAP Resurfacing |
|---|---|---|
| Clinical Grade | Coughlin/Shurnas Grade 2 and 3 | Coughlin/Shurnas Grade 4 (Absolute) |
| Patient Profile | Active, desires motion preservation | Sedentary, severe neuropathy, non-compliant |
| Joint Status | Preserved proximal phalanx cartilage | Cystic changes >1cm, severe sesamoiditis |
| Systemic Factors | Primary osteoarthritis, post-traumatic | Active infection, Rheumatoid Arthritis, Charcot |
| Bone Stock | Adequate metaphyseal/epiphyseal bone | Severe osteopenia, prior extensive resection |
Pre-Operative Planning, Templating, and Patient Positioning
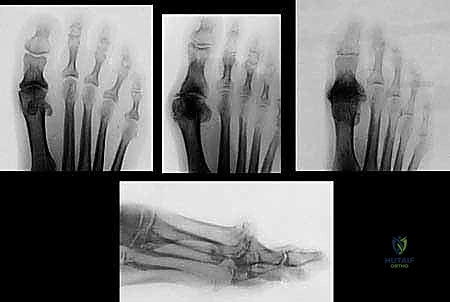
Thorough preoperative planning begins with high-quality, weight-bearing radiographic imaging. Standard anteroposterior (AP), lateral, and oblique views of the foot are mandatory. The surgeon must carefully scrutinize these images to assess the length of the first metatarsal relative to the second, the degree of joint space narrowing, the size and extent of dorsal osteophytes, and the presence of any subchondral cystic changes. Large subchondral cysts in the metatarsal head may compromise the fixation of the implant's central taper, necessitating bone grafting or pivoting the surgical plan entirely toward an arthrodesis.

While standard digital templating is useful for anticipating the approximate diameter of the metatarsal head, the true genius of the Arthrosurface system lies in its intraoperative 3D mapping capabilities. Nevertheless, the surgeon should mentally template the resection level to ensure adequate decompression of the joint. If the patient has a significantly elevated first ray (metatarsus elevatus) or a hypermobile first ray, concomitant procedures such as a plantarflexing proximal metatarsal osteotomy or a Lapidus arthrodesis may need to be staged or performed simultaneously to optimize the biomechanical environment for the resurfacing implant.
In the operating theater, precise patient positioning is critical for optimal surgical flow. The patient is placed in the supine position on a standard radiolucent operating table. A small bump is placed beneath the ipsilateral hip to correct the natural external rotation of the lower extremity, bringing the foot into a neutral, straight-up orientation. This ensures that intraoperative fluoroscopy can be obtained rapidly and accurately without requiring the surgeon to constantly internally rotate the limb. A well-padded pneumatic tourniquet is applied to either the calf or the thigh, depending on surgeon preference and the patient's vascular status.
Anesthesia typically consists of a regional popliteal or ankle block combined with monitored anesthesia care (MAC) or general anesthesia. The regional block is highly recommended as it provides excellent preemptive analgesia, minimizes the need for intraoperative narcotics, and facilitates a smooth transition to the postoperative recovery phase. Prior to inflation of the tourniquet, the limb is exsanguinated with an Esmarch bandage. The fluoroscopy C-arm should be positioned on the contralateral side of the table, entering perpendicular to the operative field, allowing for seamless AP and lateral imaging throughout the procedure.
Step-by-Step Surgical Approach and Fixation Technique
Incision and Deep Dissection
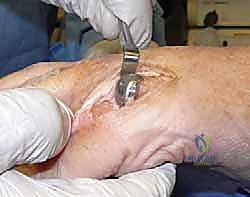
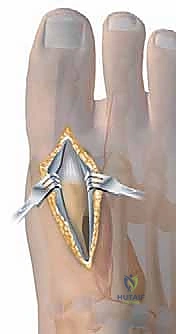
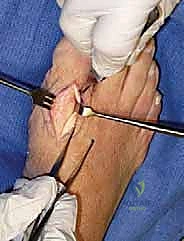
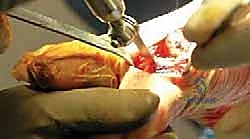
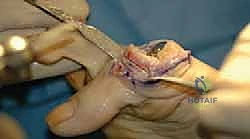
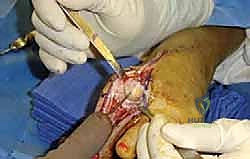
The surgical approach begins with a standard dorsal longitudinal incision, approximately 5 to 6 centimeters in length, centered directly over the first MTP joint. The incision extends from the mid-shaft of the first metatarsal to the mid-shaft of the proximal phalanx. Careful sharp dissection is carried through the epidermis and dermis. Subcutaneous dissection must be meticulous, utilizing blunt spreading techniques to identify and protect the dorsal cutaneous nerve branches. The extensor hallucis longus (EHL) tendon is identified within its sheath.
Once the EHL is isolated, it is typically retracted laterally, although medial retraction is acceptable depending on the specific anatomy and the location of the most prominent osteophytes. The extensor hallucis brevis (EHB) tendon is identified and protected. The dorsal joint capsule is now exposed. A linear capsulotomy is performed directly in the midline of the joint. In cases of severe contracture, a T-shaped or H-shaped capsulotomy may be required to achieve adequate exposure. The capsule is elevated off the dorsal metatarsal head and the base of the proximal phalanx via sharp subperiosteal dissection.
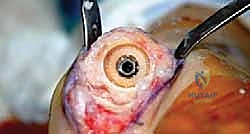
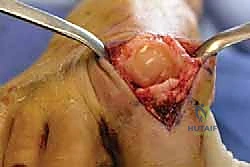
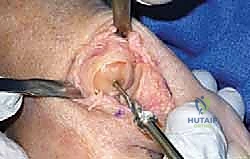
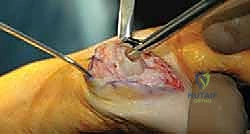
Collateral ligament release must be performed judiciously. The surgeon uses a McGlamry elevator or a curved periosteal elevator to release the dorsal and lateral capsular attachments, taking extreme care not to violate the plantar medial and lateral vascular structures. Plantar flexion of the proximal phalanx will now subluxate the joint, exposing the metatarsal head. A comprehensive inspection of the articular surfaces is performed, confirming the preoperative diagnosis and validating the decision to proceed with hemiarthroplasty rather than arthrodesis.
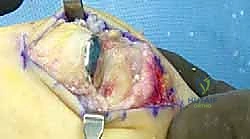
Joint Preparation and Cheilectomy
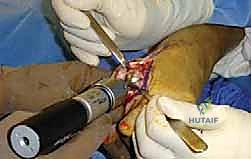
Before any instrumentation for the implant begins, a thorough cheilectomy and joint debridement must be executed. This step is arguably as important as the implant placement itself. Using a rongeur, osteotome, or an oscillating saw, the massive dorsal osteophytes on the metatarsal head are resected. The resection should be flush with the dorsal cortex of the metatarsal shaft. It is imperative to remove enough bone to eliminate any dorsal impingement during passive dorsiflexion, but the surgeon must avoid resecting too much structural bone, which could compromise the seating of the HemiCAP implant.

Attention is then turned to the base of the proximal phalanx. Any dorsal osteophytes or loose bodies here must also be meticulously excised. If the articular cartilage of the proximal phalanx is fibrillated but largely intact, it is left alone. If there are focal areas of full-thickness cartilage loss on the phalanx, some surgeons advocate for microfracture, though the efficacy of this in conjunction with a metallic hemiarthroplasty remains debated. The medial and lateral gutters are cleared of any hypertrophic synovium or loose osseous fragments.

Following the cheilectomy, the surgeon assesses the passive range of motion. The joint should now dorsiflex smoothly to at least 70 degrees without bony impingement. If mechanical block persists, further peripheral debridement is required. The metatarsal head is then evaluated to identify the central axis of the remaining articular surface. This central point is critical, as it will dictate the trajectory of the guide pin and the ultimate orientation of the resurfacing implant.
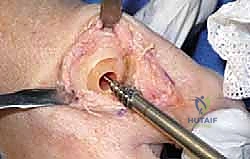
Guide Pin Placement and Axis Determination
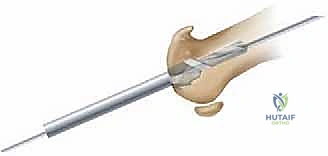
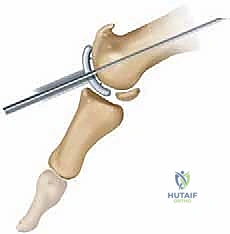
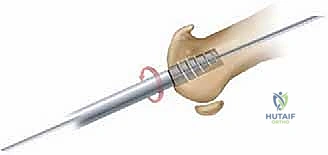
The precise placement of the central guide pin is the most critical technical step in the Arthrosurface HemiCAP procedure. The guide pin must be positioned perfectly perpendicular to the central articular surface in both the sagittal and coronal planes. A specialized drill guide is utilized to assist in achieving this trajectory. The surgeon places the guide over the center of the metatarsal head, ensuring it aligns with the anatomical axis of the first metatarsal shaft.
Under fluoroscopic guidance, the 2.0mm guide pin is advanced into the subchondral bone. An AP and lateral fluoroscopic view must be obtained to confirm that the pin is centrally located and parallel to the longitudinal axis of the metatarsal diaphysis. If the pin is placed too dorsally, the implant will sit proud plantarly, potentially altering sesamoid tracking. If placed in varus or valgus, the implant will not be congruent with the proximal phalanx, leading to edge loading and premature failure.
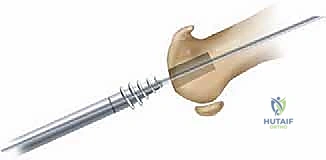
Once the guide pin position is deemed perfect, a step drill is passed over the pin to create the pilot hole for the central tapered post. This drilling must be done under power, with copious irrigation to prevent thermal necrosis of the surrounding bone. The step drill prepares the exact geometry required for the Morse taper fixation component. After drilling, the central taper post is inserted over the guide pin and screwed into the metatarsal head until it is flush with or slightly countersunk below the subchondral bone level.
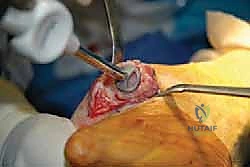
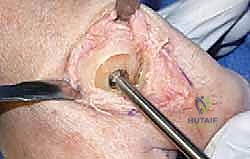
Surface Mapping and Reaming
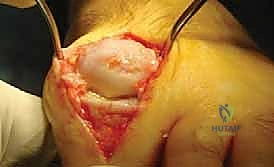
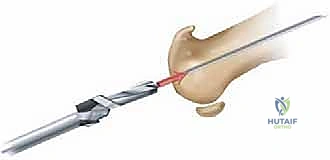
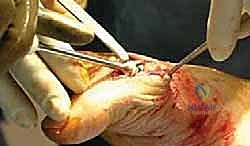
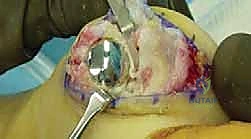
With the central taper post securely fixed, the unique surface mapping phase begins. The Arthrosurface system utilizes a 3D mapping instrument that locks into the central taper. This instrument features a dial that rotates around the articular surface, measuring the precise radii of curvature in multiple planes. The surgeon records these measurements, which dictate the specific size and curvature of the final articular component required to perfectly match the patient's native anatomy.
Based on the mapping data, the appropriate articular reamer is selected. The reamer is placed over the central guide and engaged into the taper post. The reaming process is performed manually or under low-speed power. It is paramount to ream only until the subchondral bone is exposed and a congruent bed is created. Over-reaming will result in the implant sitting too deeply (countersunk), which can lead to impingement of the proximal phalanx against the peripheral metatarsal bone. Under-reaming will leave the implant proud, causing excessive tension on the joint capsule and potentially restricting motion.
During reaming, the surgeon must frequently stop and clear the bony debris to assess the depth and congruency of the reamed bed. The goal is to remove the diseased cartilage and a minimal amount of subchondral bone, creating a perfectly matched hemisphere that aligns seamlessly with the unreamed peripheral bone. Copious irrigation is used to clear the field and ensure all osseous debris is removed from the joint space, as retained debris can act as a nidus for third-body wear or heterotopic ossification.
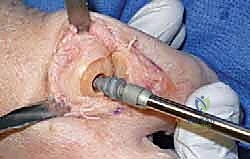
Implant Sizing, Trialing, and Final Seating
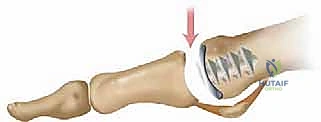
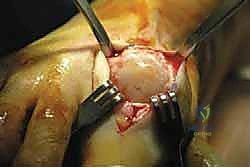
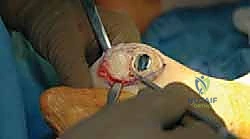
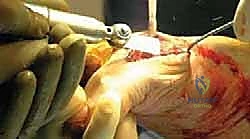
Following the preparation of the articular bed, a sizing trial is inserted into the central taper. The trial allows the surgeon to assess the fit, flushness, and congruency of the planned implant. The edges of the trial should transition smoothly to the surrounding native cartilage or bone, without any palpable step-off. A step-off greater than 1mm can lead to edge loading and accelerated wear of the opposing proximal phalanx. The joint is then taken through a full range of motion with the trial in place to ensure there is no impingement, subluxation, or excessive laxity.
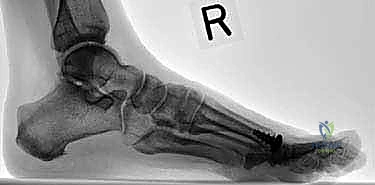

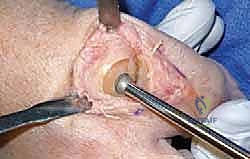
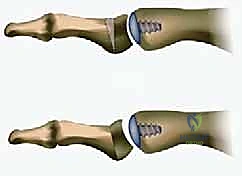
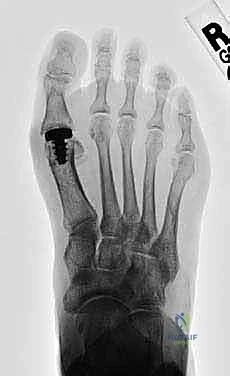
Once the correct size is confirmed, the final HemiCAP implant is opened onto the sterile field. The implant consists of a highly polished cobalt-chrome articular surface with a titanium plasma-sprayed undersurface to promote osteointegration. The implant is meticulously cleaned to ensure no debris is present on the Morse taper. It is then aligned over the central post. Using the specialized impaction tool and a mallet, the implant is driven into the taper post. A distinct change in pitch during impaction confirms that the Morse taper has locked securely.
The final construct is rigorously tested. The surgeon palpates the periphery of the implant to confirm a flush transition. Final fluoroscopic images in the AP and lateral planes are obtained to document the precise seating and alignment of the prosthesis. The joint is copiously irrigated. The capsulotomy
Clinical & Radiographic Imaging Archive