Flexor Hallucis Longus Tendon Transfer for Chronic Peroneal Tendon Tears: An Intraoperative Masterclass
Key Takeaway
This masterclass guides fellows through FHL transfer for chronic peroneal tendon tears. We cover patient selection, meticulous surgical anatomy, precise intraoperative steps including Hunter rod placement and FHL harvest, and the Pulvertaft weave. Critical pearls, complication avoidance, and structured postoperative rehabilitation are emphasized for optimal patient outcomes in complex cases.
Comprehensive Introduction and Patho-Epidemiology
Welcome, colleagues, to this definitive masterclass on the surgical reconstruction of chronic peroneal tendon tears utilizing a Flexor Hallucis Longus (FHL) tendon transfer. We are addressing a notoriously challenging clinical entity that frequently presents in active, middle-aged individuals who have endured debilitating lateral ankle pain, recurrent swelling, and a profound sense of hindfoot instability. These patients often arrive in our clinics after a protracted diagnostic odyssey, having failed extensive conservative management protocols, including prolonged immobilization, rigorous physical therapy, and occasionally, unsuccessful primary surgical interventions. Our definitive goal with this reconstructive procedure is to restore dynamic lateral stabilization to the ankle and hindfoot, re-establishing the critical eversion and plantarflexion forces that have been severely compromised by advanced tendinopathy.
The underlying pathophysiology in this patient demographic rarely involves an isolated, acute traumatic rupture. Instead, we are typically confronting a chronic, insidious process characterized by longitudinal fissuring, severe tenosynovitis, and advanced myxoid degeneration of both the peroneus brevis and peroneus longus tendons. Histological evaluation of these excised tendons routinely demonstrates disorganized collagen architecture, mucoid ground substance accumulation, and an absence of acute inflammatory cells, confirming a chronic degenerative tendinosis rather than a simple tendinitis. This advanced state of "spaghetti" degeneration renders primary end-to-end repair or side-to-side tenodesis biomechanically non-viable, as the remaining tissue lacks the structural integrity to hold suture or withstand physiological loads, thereby necessitating a robust tendon transfer.
Our preferred technique involves a two-stage reconstruction utilizing a silastic Hunter rod followed by an FHL tendon transfer. The FHL is the ideal motor for this transfer due to its synergistic in-phase muscle activity during the gait cycle, firing simultaneously with the peroneal musculature during the stance phase to stabilize the hindfoot. Furthermore, the FHL boasts a significantly greater cross-sectional area and tensile strength compared to the native peroneus brevis, providing a robust dynamic restraint against inversion stress. By routing the FHL through a biologically induced pseudosheath and securing it to the base of the fifth metatarsal or the robust residual stump of the peroneus brevis, we effectively bypass the irreparably scarred distal peroneal segments, offering the patient a durable, functional reconstruction that precludes the need for a motion-sacrificing hindfoot arthrodesis.
Detailed Surgical Anatomy and Biomechanics
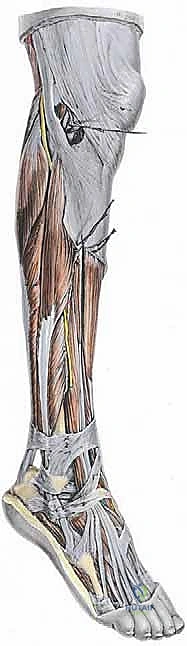
A profound, three-dimensional understanding of the lateral ankle and deep posterior compartment anatomy is paramount for executing this complex transfer safely and effectively. The peroneus brevis and longus tendons descend posterior to the lateral malleolus within the retromalleolar groove, a fibro-osseous tunnel that is critical to their mechanical advantage. The peroneus brevis, originating from the distal two-thirds of the lateral fibular shaft, lies anterior and medial to the longus within the groove, making it highly susceptible to mechanical attrition against the fibula. The peroneus longus originates more proximally and courses posterior to the brevis, eventually diving under the cuboid to insert onto the plantar aspect of the medial cuneiform and the base of the first metatarsal. Both tendons are firmly tethered within the retromalleolar groove by the superior peroneal retinaculum (SPR), a vital primary restraint against tendon subluxation.
The vascular supply to the peroneal tendons is precarious, featuring well-documented watershed zones that predispose them to degenerative tearing. The peroneus brevis has an avascular zone approximately 2 to 3 centimeters proximal to the tip of the lateral malleolus, precisely where longitudinal split tears most frequently occur. When addressing the lateral ankle, the surgeon must maintain hyper-vigilance regarding the sural nerve. This critical sensory nerve courses subcutaneously along the posterolateral aspect of the calf, traveling alongside the small saphenous vein, and passes an average of 1.5 centimeters posterior and inferior to the lateral malleolus. In the setting of chronic inflammation and prior surgical incisions, the sural nerve is frequently encased in dense perineural fibrosis, significantly increasing the risk of iatrogenic transection or traction neuritis during the surgical approach.
The Flexor Hallucis Longus, our chosen autograft, resides within the deep posterior compartment of the leg. It originates from the posterior surface of the lower two-thirds of the fibula, the interosseous membrane, and the posterior intermuscular septum. The FHL muscle belly is exceptionally low-lying, often extending distally to the level of the tibiotalar joint, which provides excellent vascularity and robust muscle bulk for the transfer. Biomechanically, the FHL contributes approximately 3.6% of the total cross-sectional work capacity of the foot and ankle, compared to the 2.6% contribution of the peroneus brevis. This favorable strength profile, combined with its synergistic firing pattern during the push-off phase of gait, allows the FHL to seamlessly assume the eversion and plantarflexion duties of the irreparably damaged peroneal complex without inducing significant donor site morbidity at the hallux interphalangeal joint.
Exhaustive Indications and Contraindications
Patient selection is the cornerstone of a successful outcome in complex tendon transfer surgery. The primary indication for an FHL to peroneal transfer is a massive, irreparable tear of both the peroneus brevis and peroneus longus tendons, typically classified as Grade IV pathology where less than 50% of viable tendon substance remains in either tendon. These patients present with intractable lateral ankle pain, recurrent effusions within the peroneal sheath, and subjective feelings of the ankle "giving way" on uneven terrain. Clinical examination consistently reveals profound weakness in active eversion against resistance, often accompanied by a positive single-heel rise test demonstrating hindfoot varus instability. The procedure is highly indicated for active, physiologically younger patients who require dynamic stabilization and wish to avoid the biomechanical limitations of a subtalar or triple arthrodesis.
Conversely, there are several absolute and relative contraindications that must be rigorously respected. An absolute contraindication is a rigid, uncorrectable hindfoot varus deformity. Transferring a healthy FHL tendon into an uncorrected cavovarus foot will inevitably lead to premature failure of the transfer due to excessive, non-physiological tension on the graft. If a flexible varus deformity is present, it must be addressed concurrently with a lateralizing calcaneal osteotomy or a dorsiflexion osteotomy of the first metatarsal. Furthermore, profound neurological deficits affecting the tibial nerve, which innervates the FHL, render the transfer useless. Active soft tissue infection, severe peripheral vascular disease compromising wound healing, and a patient's inability to comply with a strict, prolonged postoperative rehabilitation protocol are also absolute contraindications.
Before proceeding, the surgeon must perform a comprehensive differential diagnosis to rule out confounding sources of lateral ankle pain. Occult fractures of the anterior process of the calcaneus, lateral process of the talus, or the fifth metatarsal base must be excluded via advanced imaging. Chronic lateral ankle instability (ATFL/CFL incompetence) often coexists with peroneal pathology and must be addressed simultaneously, typically with a modified Broström-Gould procedure or a lateral ligament reconstruction, to protect the FHL transfer from excessive inversion stress. The table below delineates the critical indications and contraindications for this two-stage reconstructive procedure.
| Category | Specific Clinical Conditions | Management Implication |
|---|---|---|
| Absolute Indications | Massive, irreparable tears of both peroneus brevis and longus (>50% substance loss); Failure of prior primary repair or tenodesis; Chronic pain with profound eversion weakness. | Proceed with two-stage FHL tendon transfer reconstruction. |
| Relative Indications | Severe isolated peroneus brevis tear with a highly degenerated, non-functional peroneus longus; Active patient refusing bracing/fusion. | Consider FHL transfer versus allograft reconstruction depending on patient demands. |
| Absolute Contraindications | Rigid, uncorrectable hindfoot varus deformity; Tibial nerve palsy (paralyzed FHL); Active local infection; Severe peripheral arterial disease. | Contraindicated. Consider triple arthrodesis or conservative bracing. |
| Relative Contraindications | Flexible hindfoot varus; Concomitant severe lateral ligament instability; Poor patient compliance; Advanced age with low functional demands. | Must perform concurrent bony correction (calcaneal osteotomy) or ligamentous reconstruction. |
Pre-Operative Planning, Templating, and Patient Positioning
Preoperative planning for a two-stage FHL transfer requires meticulous attention to both advanced imaging and clinical biomechanics. Weight-bearing anteroposterior, lateral, and mortise radiographs of the ankle and foot are mandatory to assess global alignment, identify degenerative joint disease, and evaluate for any pre-existing hardware from prior interventions. A critical assessment of the Meary's line and the calcaneal pitch on the lateral view helps quantify any underlying cavovarus morphotype that may have predisposed the patient to peroneal attrition. If a varus malalignment is identified, the surgeon must template for a concomitant lateralizing calcaneal osteotomy, ensuring that the necessary hardware and fluoroscopic equipment are available in the operating theater.
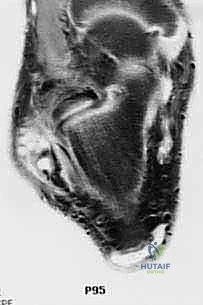
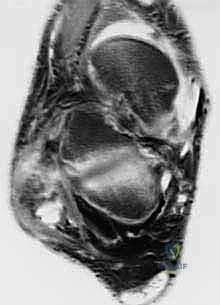
Magnetic Resonance Imaging (MRI) without contrast is the gold standard for evaluating the extent of peroneal tendinopathy and planning the resection. Axial T2-weighted fat-suppressed sequences are particularly invaluable for visualizing the cross-sectional morphology of the tendons within the retromalleolar groove. We look for the classic "C-sign" indicative of a peroneus brevis split, severe tendinosis manifesting as intratendinous hyperintense signal, and massive fluid accumulation within the common peroneal sheath. The MRI also allows us to evaluate the muscle bellies for fatty infiltration (Goutallier classification); severe fatty atrophy of the peroneal muscles confirms the chronicity of the tear and solidifies the indication for a tendon transfer over a primary repair. Additionally, the FHL muscle belly and tendon must be visualized on MRI to confirm its integrity and suitability as a donor graft.
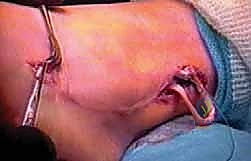
Patient positioning is a critical logistical step that facilitates seamless access to both the lateral and medial aspects of the foot and ankle, which is essential for FHL harvesting and routing. We utilize the "lazy lateral" decubitus position. The patient is placed supine, and a large beanbag or a stack of saline bags is placed beneath the ipsilateral hip and hemipelvis. This internally rotates the operative limb, bringing the lateral malleolus and peroneal compartment directly anterior for optimal visualization. Crucially, the table can be tilted away from the surgeon, or the hip bumped further, to allow access to the medial midfoot if a double-incision FHL harvest technique is required during the second stage. A well-padded pneumatic thigh tourniquet is applied to provide a pristine, bloodless surgical field, which is absolutely necessary for identifying the sural nerve amidst dense scar tissue. The limb is prepped and draped freely from the mid-thigh down, allowing full intraoperative range of motion testing.
Step-by-Step Surgical Approach and Fixation Technique
Stage 1: Radical Débridement and Hunter Rod Placement
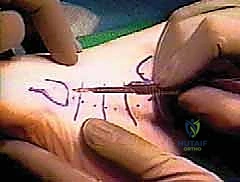
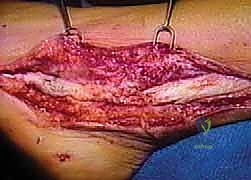
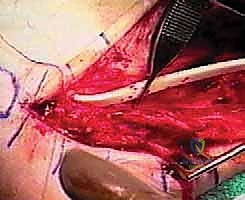
The first stage of this complex reconstruction focuses on the complete extirpation of the diseased tissue and the preparation of a biologically inert tunnel. We begin with a longitudinal incision centered over the course of the peroneal tendons, starting approximately 1 to 2 centimeters posterior and proximal to the tip of the lateral malleolus, and extending distally toward the base of the fifth metatarsal. In revision cases, it is imperative to utilize prior incisions where possible to avoid narrow skin bridges, while remaining hyper-vigilant of the sural nerve, which is often adhered to the undersurface of the dermal flaps. Dissection is carried down sharply through the subcutaneous tissues until the thickened, fibrotic superior peroneal retinaculum (SPR) is identified.
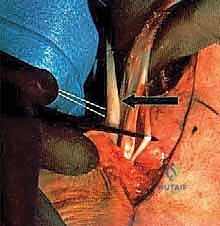
Once the SPR is incised, the extent of the pathology becomes visually apparent. The surgeon must perform a radical, aggressive débridement of all non-viable, mucinous, and fragmented portions of both the peroneus brevis and longus tendons. We resect the tendons proximally to the level of healthy, bleeding musculotendinous junction, and distally to a viable stump at the base of the fifth metatarsal (for the brevis) and as far as it can be traced under the cuboid (for the longus). The retromalleolar groove is inspected; if it is shallow or features sharp osteophytes that contributed to the initial attrition, a fibular groove deepening procedure is performed using a high-speed burr. The goal is to create a smooth, frictionless bony bed.
Following the radical débridement, a 5-mm or 6-mm silastic Hunter rod is introduced into the newly cleared peroneal sheath. The proximal end of the rod is left free-floating within the proximal muscle belly of the resected peroneals, allowing it to glide during ankle motion. The distal end of the Hunter rod is securely sutured to the robust residual stump of the peroneus brevis at the base of the fifth metatarsal using a heavy, non-absorbable braided suture (e.g., #2 FiberWire). This secures the rod and dictates the exact path of the future pseudosheath. The SPR, if viable, is loosely reapproximated over the rod to contain it within the retromalleolar groove. The patient is then closed, placed in a non-weight-bearing cast, and allowed to heal for 10 to 12 weeks, during which time a highly vascularized, synovial-like pseudosheath forms around the silastic implant.
Stage 2: FHL Harvest, Routing, and Final Fixation
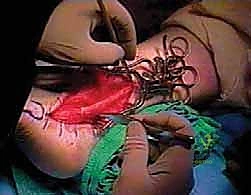
Approximately three months later, the patient returns for the second stage. The previous lateral incision is carefully reopened. The distal attachment of the Hunter rod at the fifth metatarsal is identified and detached. Attention is then turned to the harvest of the Flexor Hallucis Longus tendon. Depending on the required length, this can be done via a single posterolateral approach or a dual-incision technique involving a medial midfoot incision. For maximum length, a medial incision is made over the Master Knot of Henry. The FHL is identified crossing dorsal to the Flexor Digitorum Longus (FDL). The FHL is sharply transected as distally as possible, and the distal stump is tenodesed to the FDL to preserve some active hallux plantarflexion.
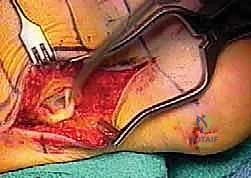
The proximal FHL tendon is then pulled into the posterior ankle wound. The muscle belly is carefully dissected off the tendon to maximize excursion, taking great care to protect the tibial neurovascular bundle lying immediately medial to the FHL in the deep posterior compartment. Once the graft is prepared, the proximal end of the Hunter rod is exposed in the lateral wound. The harvested FHL tendon is sutured to the proximal end of the Hunter rod. As the rod is pulled distally from the fifth metatarsal incision, it seamlessly tows the FHL tendon through the newly formed, biologically active pseudosheath, ensuring a perfect, frictionless routing behind the lateral malleolus.

The final and most critical step is tensioning and fixation. The foot is held in neutral dorsiflexion and slight eversion to maximize the mechanical advantage of the transfer. The FHL tendon is passed through a drill hole in the base of the fifth metatarsal or woven through the robust stump of the peroneus brevis using a Pulvertaft weave technique. If utilizing a bone tunnel, a bio-tenodesis interference screw provides excellent immediate pull-out strength. The tension must be set meticulously; an overly tight transfer will restrict inversion and cause lateral pain, while a loose transfer will fail to provide the necessary dynamic stability. Once secured, the ankle is put through a full range of motion to confirm stable tracking of the FHL within the retromalleolar groove without subluxation.
Complications, Incidence Rates, and Salvage Management
Despite meticulous surgical technique, the two-stage FHL transfer for chronic peroneal tears carries a distinct complication profile that the orthopedic surgeon must be prepared to manage. The most frequent complication is iatrogenic injury or traction neuritis of the sural nerve, given its intimate proximity to the surgical field and the extensive scarring typical of these revision cases. Sural neuritis can manifest as hyperesthesia, numbness, or a painful neuroma along the lateral border of the foot. Incidence rates in the literature range from 5% to 12%. Intraoperative protection is paramount, but if a neuroma develops postoperatively and fails conservative management (gabapentinoids, targeted steroid injections), surgical excision of the neuroma and proximal implantation of the nerve end into the soleus muscle belly may be required as a salvage procedure.
Donor site morbidity related to the FHL harvest is a common theoretical concern, though clinically, it is remarkably well-tolerated. Patients will inevitably experience a decrease in active plantarflexion power at the hallux interphalangeal (IP) joint. However, because the intrinsic musculature (flexor hallucis brevis) remains intact, metatarsophalangeal (MTP) joint push-off power is largely preserved. Studies utilizing isokinetic dynamometry show a measurable decrease in peak torque of the hallux, but fewer than 5% of patients report this as functionally limiting during normal gait or athletic activities. To mitigate this, tenodesis of the distal FHL stump to the FDL tendon during the harvest stage is routinely performed, which helps maintain digital cascade and prevents a cock-up deformity of the great toe.
Failure of the transfer to restore adequate eversion strength or recurrent lateral ankle instability represents a significant clinical failure. This is most frequently due to unrecognized and uncorrected bony malalignment, specifically a rigid hindfoot varus that places continuous, excessive strain on the transferred graft, leading to attenuation or rupture at the fixation site. If transfer failure occurs, the salvage options are severely limited. The patient will typically require a rigid orthosis (e.g., an Arizona brace) or, definitively, a subtalar or triple arthrodesis to mechanically realign and stabilize the hindfoot, sacrificing motion for stability and pain relief.
| Complication | Estimated Incidence | Prevention Strategy | Salvage / Management |
|---|---|---|---|
| Sural Nerve Injury/Neuroma | 5% - 12% | Meticulous sharp dissection; Avoid aggressive retraction; Identify nerve early. | Gabapentinoids; Ultrasound-guided blocks; Surgical excision and proximal muscle burying. |
| Hallux Weakness / Cock-up Deformity | >80% (Weakness), <5% (Deformity) | Tenodesis of distal FHL stump to FDL tendon during medial midfoot harvest. | Usually asymptomatic. If severe deformity occurs, IP joint arthrodesis may be required. |
| Transfer Attenuation / Failure | 3% - 8% | Correct all hindfoot varus deformities concurrently; Secure fixation (interference screw). | Prolonged bracing (AFO); Definitive salvage with subtalar or triple arthrodesis. |
| Deep Surgical Site Infection | 1% - 3% | Strict sterile technique; Optimize host factors (smoking cessation, glycemic control). | Aggressive I&D; Intravenous antibiotics; Hardware removal if necessary. |
Phased Post-Operative Rehabilitation Protocols
The postoperative rehabilitation following a two-stage FHL transfer is a rigorous, protracted process that requires immense patient compliance and close coordination with a skilled physical therapist. The protocol is designed to protect the integrity of the tendon-to-bone or tendon-to-tendon healing during the vulnerable early phases, while progressively loading the graft to promote collagen realignment and functional hypertrophy. Phase I (0 to 2 weeks post-Stage 2) is strictly focused on wound healing and edema control. The patient is placed in a well-padded, short-leg plaster splint in neutral dorsiflexion and slight eversion. Strict non-weight-bearing status is enforced using crutches or a knee scooter. Elevation of the limb above the level of the heart is critical to minimize postoperative swelling and prevent wound dehiscence at the lateral ankle incision.
Phase II (2 to 6 weeks) begins at the first postoperative visit, provided the incisions are fully healed and sutures are removed. The patient is transitioned into a controlled ankle motion (CAM) boot. Weight-bearing status is cautiously advanced, typically starting with touch-down weight-bearing and progressing to partial weight-bearing by week 4, depending on the security of the intraoperative fixation. Active range of motion exercises for the toes, knee, and hip are encouraged to maintain global limb strength. Gentle, active-assisted plantarflexion and dorsiflexion of the ankle are initiated out of the boot, but inversion and eversion are strictly prohibited to avoid placing premature tension on the healing FHL transfer.
Phase III (6 to 12 weeks) marks the transition to full weight-bearing and the initiation of active strengthening. The patient is weaned from the CAM boot into a supportive lace-up ankle brace (e.g., ASO brace) for ambulation. Physical therapy focuses on restoring full, symmetrical active and passive range of motion. Isotonic and isokinetic strengthening of the evertors is initiated, utilizing the FHL to actively evert the foot. The therapist will employ neuromuscular electrical stimulation (NMES) to facilitate FHL recruitment in its new biomechanical role. Proprioceptive training on a BAPS board or Bosu ball is crucial to retrain the sensorimotor pathways and restore dynamic balance. Return to high-impact sports or heavy manual labor is typically delayed until 4 to 6 months postoperatively, contingent upon the patient achieving at least 85% eversion strength compared to the contralateral limb and demonstrating pain-free, symmetric functional hop testing.
Summary of Landmark Literature and Clinical Guidelines
The evolution of the FHL transfer for chronic peroneal pathology is deeply rooted in robust clinical literature. Historically, primary repair or side-to-side tenodesis (peroneus brevis to longus) was the standard of care. However, landmark biomechanical and clinical studies in the late 1990s and early 2000s highlighted the high failure rates of tenodesis in the setting of massive, combined tears (>50% degeneration of both tendons). Wapner et al. were among the first to popularize the use of the FHL for severe peroneal tendinopathy, demonstrating excellent functional outcomes and pain relief, while definitively proving that the loss of the FHL did not result in significant ambulatory deficits or hallux dysfunction. Their work established the FHL as the autograft of choice due to its superior length, strength, and synergistic firing pattern compared to the Flexor Digitorum Longus (FDL).
Further refinement of the technique was documented by Coull and colleagues, who evaluated the isokinetic strength and functional outcomes of patients undergoing single-stage FHL transfers for irreparable peroneal tears. They reported that patients regained near-normal eversion strength and demonstrated significant improvements in American Orthopaedic Foot and Ankle Society (AOFAS) hindfoot scores. Importantly, their pedobarographic analysis confirmed that while peak pressure under the hallux decreased, the overall propulsive force of the foot during gait was not significantly compromised, alleviating fears of severe donor site morbidity. This literature solidified the FHL transfer as a biomechanically sound and clinically safe procedure.
More recently, the focus has shifted toward the two-stage reconstruction utilizing the Hunter rod, particularly in revision scenarios with massive scarring and obliterated tendon sheaths. Michels et al. published extensive outcome data on the two-stage technique, emphasizing that the induction of a biologically active pseudosheath dramatically improves the gliding excursion of the transferred FHL, reducing the incidence of postoperative adhesions and stiffness. Current clinical guidelines from major orthopedic foot and ankle societies strongly recommend the two-stage FHL transfer for Grade IV peroneal tears, provided the patient has a correctable hindfoot alignment. The consensus remains that addressing concomitant pathology, particularly lateral ligament instability and cavovarus morphotypes, is as critical to the long-term survivorship of the transfer as the surgical technique itself.
