Proximal Humerus Lateral Approach: Comprehensive Guide to Anatomy & Surgical Technique

Key Takeaway
The proximal humerus lateral approach, or deltoid-splitting approach, offers direct access to the greater tuberosity and surgical neck for managing displaced fractures. Critical considerations include precise anatomical knowledge, especially the axillary nerve's location, to prevent deltoid paralysis and restore function, minimizing risks like avascular necrosis.
Introduction and Epidemiology
Proximal humerus fractures represent a significant burden on orthopedic trauma services, accounting for approximately 5-6% of all fractures and 45% of all humeral fractures. Their incidence peaks in two distinct populations: younger, active individuals involved in high-energy trauma, and elderly patients, predominantly postmenopausal women, who sustain low-energy falls secondary to osteoporosis. The surgical management of these fractures is complex, given the intricate anatomy, variable fracture patterns, and potential for significant functional impairment. While non-operative treatment remains viable for many stable, minimally displaced fractures, surgical intervention is often indicated for displaced or unstable patterns to restore anatomy, preserve function, and prevent complications such as malunion, nonunion, or avascular necrosis (AVN).
The lateral approach to the proximal humerus, often colloquially referred to as the deltoid-splitting approach, offers direct access to the greater tuberosity and surgical neck, making it a valuable tool in the armamentarium of an orthopedic surgeon. Historically, its application was more limited due to concerns regarding axillary nerve injury and restricted visualization. However, advancements in surgical technique, anatomical understanding, and implant design have expanded its utility, particularly with the advent of percutaneous or minimally invasive techniques that leverage the principles of this approach. This detailed review will delineate the anatomical considerations, indications, technical nuances, potential complications, and rehabilitation strategies associated with the lateral approach, providing a comprehensive guide for orthopedic surgeons, residents, and medical students.
Surgical Anatomy and Biomechanics
A thorough understanding of the regional anatomy is paramount for safe and effective utilization of the lateral approach.
Bony Anatomy
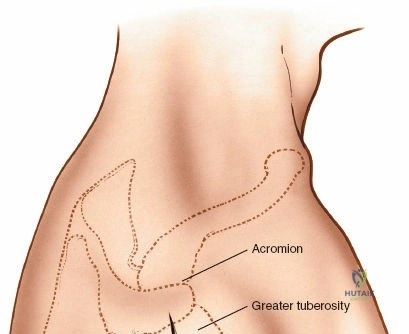
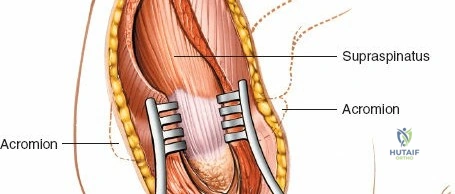
The proximal humerus comprises four key anatomical parts as per Neer's classification: the humeral head, greater tuberosity, lesser tuberosity, and surgical neck. The anatomical neck lies superior to the tuberosities, defining the articular surface. The surgical neck, distal to the tuberosities, is a common site for fracture. The greater tuberosity serves as the insertion site for the supraspinatus, infraspinatus, and teres minor tendons, while the lesser tuberosity accepts the subscapularis tendon. The bicipital groove separates the tuberosities anteriorly, housing the long head of the biceps tendon.
Neurovascular Structures
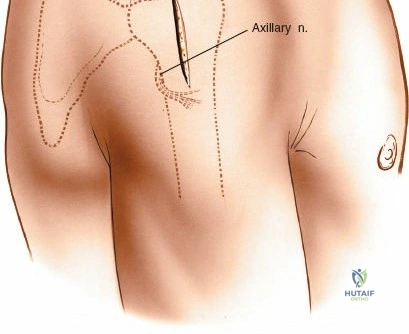
The most critical structure at risk during a lateral approach is the axillary nerve. This nerve originates from the posterior cord of the brachial plexus (C5-C6), courses inferior to the glenohumeral joint, passes through the quadrangular space, and then wraps around the surgical neck of the humerus. It typically lies approximately 5-7 cm distal to the lateral acromion, entering the deep surface of the deltoid muscle. It innervates the deltoid and teres minor muscles and provides sensory supply to the lateral shoulder via the superior lateral cutaneous nerve of the arm. Damage to the axillary nerve can lead to deltoid paralysis, significant abduction weakness, and sensory deficits.
The radial nerve courses posteriorly and obliquely across the humerus in the spiral groove, typically distal to the area of the surgical approach but can be at risk with extensive distal dissection or with intramedullary nailing.
The primary arterial supply to the humeral head is from branches of the anterior and posterior circumflex humeral arteries. The posterior circumflex humeral artery, often accompanying the axillary nerve, is the dominant blood supply. Its ascending branch gives rise to the intraosseous arcuate artery, which provides the critical blood supply to the major portion of the humeral head. Preservation of the medial hinge (calcar region) is vital, as the ascending branch of the anterior circumflex humeral artery (the anterolateral branch) courses along the lateral aspect of the bicipital groove and provides crucial anastomotic supply.
Muscular and Ligamentous Anatomy
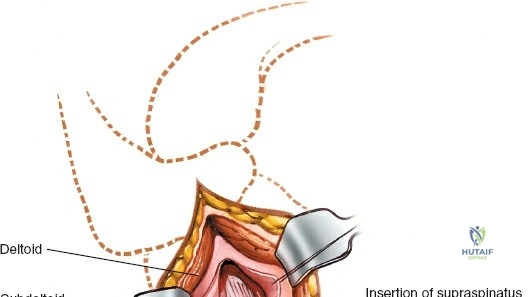
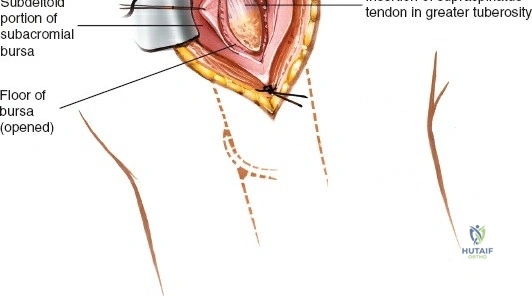
The deltoid muscle, the primary abductor of the shoulder, is the superficial muscular layer encountered in the lateral approach. It is divided into anterior, middle, and posterior thirds. The lateral approach typically utilizes a longitudinal split within the middle third of the deltoid or between the anterior and middle thirds. Deep to the deltoid lies the subdeltoid bursa, which must be excised to visualize the underlying rotator cuff and proximal humerus. The rotator cuff tendons (supraspinatus, infraspinatus, teres minor, and subscapularis) are critical for dynamic stabilization of the glenohumeral joint and dictate the displacement of fracture fragments.
Indications and Contraindications
The selection of the lateral approach over the traditional deltopectoral approach depends heavily on the specific fracture pattern, the planned implant, and surgeon familiarity. The lateral approach provides unparalleled direct, orthogonal access to the greater tuberosity and the lateral aspect of the surgical neck.
Favorable Indications for the Lateral Approach
- Isolated Greater Tuberosity Fractures: Direct lateral access allows for precise reduction and fixation (via screws or tension band wiring) without the extensive anterior retraction required in a deltopectoral approach.
- Valgus Impacted Two Part and Three Part Fractures: In these patterns, the humeral head is impacted into valgus, and the greater tuberosity is often displaced superiorly. The lateral approach allows direct access to elevate the head and reduce the tuberosity.
- Minimally Invasive Plate Osteosynthesis: The extended lateral approach allows for the insertion of a locking plate sliding submuscularly down the lateral humeral shaft, minimizing soft tissue stripping.
- Proximal Humeral Intramedullary Nailing: The superior extension of the lateral approach provides the necessary trajectory for antegrade nail insertion through the greater tuberosity or articular margin.
Contraindications
- Anterior Fracture Dislocations: The lateral approach provides poor visualization of the anterior glenoid rim and the subscapularis insertion, making it inappropriate for managing anterior dislocations or performing subscapularis repairs.
- Complex Four Part Fractures Requiring Arthroplasty: When hemiarthroplasty or reverse total shoulder arthroplasty is anticipated, the deltopectoral approach is mandatory for adequate joint exposure, humeral head extraction, and glenoid preparation.
- Medial Calcar Comminution: Extensive medial comminution requiring direct visualization and reduction is difficult to access from a strictly lateral window.
Operative Versus Non Operative Indications
| Parameter | Non-Operative Management | Operative Management (Lateral Approach preferred) |
|---|---|---|
| Displacement | < 1 cm displacement, < 45 degrees angulation | > 1 cm displacement, > 45 degrees angulation |
| Greater Tuberosity | < 5 mm superior displacement | > 5 mm superior displacement (risk of subacromial impingement) |
| Fracture Pattern | Stable, impacted, non-displaced 1-part or 2-part | Displaced 2-part, 3-part, valgus-impacted, or selected 4-part for MIPO |
| Patient Profile | Low demand, severe comorbidities, high surgical risk | Active, high demand, physiologically robust |
| Soft Tissue | Intact rotator cuff function | Rotator cuff dysfunction secondary to tuberosity displacement |
Pre Operative Planning and Patient Positioning
Meticulous preoperative planning is essential to anticipate the required reduction maneuvers and the appropriate implant configuration.
Imaging Requirements
Standard radiographic evaluation must include a true anteroposterior (Grashey) view, a scapular Y view, and an axillary lateral view. The axillary view is critical for assessing anterior or posterior translation of the humeral head and evaluating the lesser tuberosity.
In modern orthopedic trauma practice, a non-contrast Computed Tomography (CT) scan with 3D reconstructions is considered the gold standard for preoperative planning. CT imaging provides precise mapping of tuberosity comminution, articular surface involvement, and the integrity of the medial calcar hinge, which are vital parameters for predicting the risk of AVN and determining the feasibility of osteosynthesis.
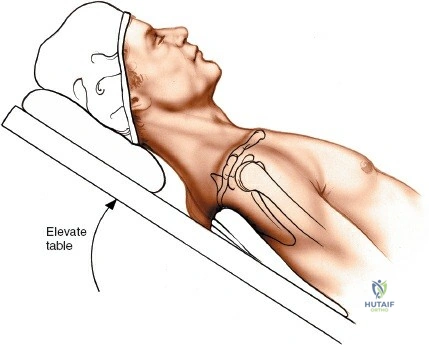
Patient Positioning and Operating Room Setup
The patient is typically placed in the beach chair position. The backrest is elevated to approximately 45 to 60 degrees, and the knees are slightly flexed to prevent sliding. The affected arm must be completely draped free to allow for full manipulation, including abduction, adduction, flexion, extension, and rotation, which are critical for both fracture reduction and fluoroscopic imaging.
The patient should be positioned close to the edge of the operating table to allow unimpeded extension of the shoulder. A specialized shoulder positioner or a sterile Mayo stand can be used to rest the arm during the procedure. The fluoroscopy unit (C-arm) is typically brought in from the head of the bed or from the contralateral side. It is imperative to confirm that adequate AP and axillary fluoroscopic views can be obtained prior to prepping and draping.
Detailed Surgical Approach and Technique
The lateral approach requires a meticulous, step-wise dissection to maximize exposure while strictly safeguarding the axillary nerve.
Surface Landmarks and Incision
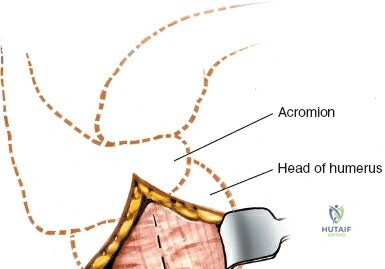
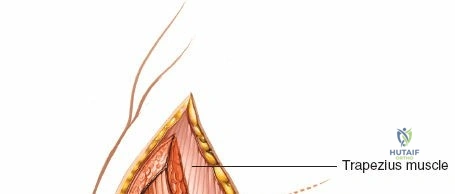
The primary bony landmarks are the lateral edge of the acromion, the coracoid process, and the palpable greater tuberosity. The standard incision for a limited lateral approach is longitudinal, starting at the anterolateral corner of the acromion and extending distally for approximately 4 to 5 cm.
If a Minimally Invasive Plate Osteosynthesis (MIPO) technique is planned, this proximal incision is utilized to access the joint and insert the plate, while a secondary distal incision (approximately 3 cm in length) is made over the lateral aspect of the humeral shaft, just proximal to the deltoid insertion, to secure the distal screws.
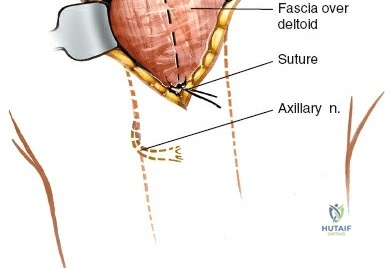
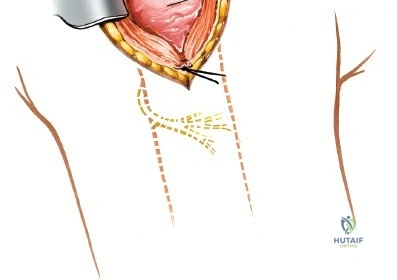
Superficial Dissection and Deltoid Split
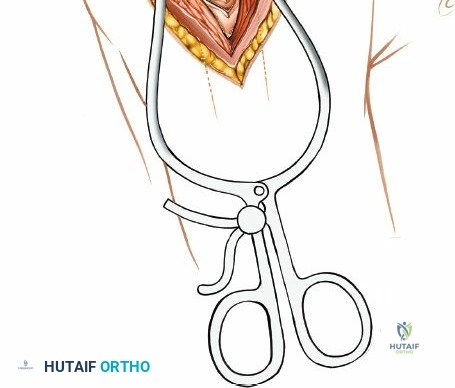
Following skin incision and division of the subcutaneous tissue, the fascia overlying the deltoid muscle is identified. The deltoid muscle fibers are split longitudinally. It is crucial to split the muscle strictly in line with its fibers to avoid denervating the anterior or posterior segments. The split is typically made within the middle third of the deltoid or exactly at the raphe between the anterior and middle thirds.
The split should not extend more than 4 to 5 cm distal to the lateral edge of the acromion to prevent iatrogenic injury to the axillary nerve. To prevent inadvertent distal propagation of the split during retraction, a heavy non-absorbable stay suture (e.g., #1 Vicryl or Ethibond) should be placed at the distal apex of the muscle split.
Axillary Nerve Management
The axillary nerve is the most critical structure in this approach. It crosses the surgical field transversely from posterior to anterior on the deep surface of the deltoid. While the traditional teaching places the nerve 5 to 7 cm distal to the acromion, this distance can vary based on patient height and the degree of arm abduction.
In the extended lateral approach or MIPO technique, the axillary nerve must be actively identified or palpated. By carefully sweeping a finger or a blunt instrument along the deep surface of the deltoid from distal to proximal, the neurovascular bundle can be felt. When sliding a locking plate distally, it is imperative that the plate passes deep to the axillary nerve, resting directly on the periosteum of the humeral shaft.
Fracture Reduction Strategies
Once the subdeltoid bursa is excised, the rotator cuff and the fracture fragments come into view. Hematoma is evacuated to allow clear visualization of the fracture lines.
Reduction of proximal humerus fractures often relies on indirect manipulation and the utilization of the rotator cuff. Heavy non-absorbable sutures (e.g., #2 or #5 FiberWire) are placed through the tendon-bone interface of the supraspinatus, infraspinatus, and subscapularis. These "stay sutures" act as joysticks, allowing the surgeon to manipulate the tuberosity fragments, pull them out of the subacromial space, and reduce them to the humeral shaft and head.
For valgus impacted fractures, an elevator or a Cobb periosteal elevator can be introduced carefully through the fracture site to elevate the articular segment. A K-wire can be inserted as a joystick into the humeral head to assist in correcting varus or valgus malalignment. Provisional fixation is achieved using multiple smooth K-wires, ensuring they do not impede the planned trajectory of the locking plate.
Implant Placement and Fixation
For plate osteosynthesis, a pre-contoured proximal humeral locking plate is utilized. The plate is inserted through the proximal window and carefully guided distally along the lateral aspect of the humeral shaft. As emphasized previously, the plate must pass deep to the axillary nerve.
Correct plate positioning is critical. It should sit approximately 5 to 8 mm distal to the superior tip of the greater tuberosity and slightly posterior to the bicipital groove (approximately 2 to 4 mm). Placing the plate too high risks subacromial impingement, while placing it too anteriorly risks injury to the long head of the biceps tendon and inadequate fixation of the greater tuberosity.
Once provisional K-wire fixation confirms appropriate plate height and alignment on fluoroscopy, the plate is secured to the shaft using a cortical screw in the elongated gliding hole to allow for final height adjustments. Locking screws are then systematically inserted into the humeral head. It is vital to obtain multi-planar fluoroscopic views to ensure no screws penetrate the articular surface. The previously placed rotator cuff stay sutures are then passed through the designated suture holes in the proximal plate and tied securely, neutralizing the deforming forces of the rotator cuff and significantly enhancing construct stability.
Complications and Management
Despite meticulous technique, proximal humerus fracture fixation via the lateral approach carries a distinct complication profile. Understanding these risks is essential for prompt recognition and management.
Common Complications and Salvage Strategies
| Complication | Estimated Incidence | Etiology / Risk Factors | Management and Salvage Strategies |
|---|---|---|---|
| Axillary Nerve Injury | 1% - 5% | Over-retraction, distal extension of deltoid split, direct trauma during plate insertion | Most are neuropraxias that resolve spontaneously within 3-6 months. Observe with EMG at 6 weeks if no improvement. Irreversible damage may require nerve grafting or tendon transfers. |
| Screw Cutout / Intra-articular Penetration | 5% - 15% | Unrecognized primary penetration, or secondary to fracture collapse/settling in osteoporotic bone | Prevention via meticulous intraoperative fluoroscopy (spinnaker view). If symptomatic post-operatively, requires screw removal or exchange. Severe collapse may necessitate conversion to arthroplasty. |
| Avascular Necrosis (AVN) | 4% - 30% | Disruption of anterior/posterior circumflex arteries, short calcar segment (<8mm), disrupted medial hinge | Asymptomatic AVN can be observed. Symptomatic AVN with head collapse requires conversion to hemiarthroplasty or reverse total shoulder arthroplasty (RTSA), depending on patient age and cuff status. |
| Subacromial Impingement | 5% - 10% | Plate placed too superiorly (> 5mm from superior edge of greater tuberosity), or malreduction of greater tuberosity | Arthroscopic or open hardware removal once fracture union is confirmed (typically > 6-12 months post-op). Tuberosity osteotomy if severe malunion exists. |
| Nonunion / Malunion | 2% - 10% | Inadequate fixation, severe comminution, poor bone quality, infection | Revision open reduction internal fixation (ORIF) with bone grafting for nonunion. RTSA is often the salvage procedure of choice for severe symptomatic malunions in the elderly. |
| Infection | 1% - 3% | Prolonged operative time, significant soft tissue trauma, medical comorbidities (diabetes) | Acute: Debridement, antibiotics, implant retention (DAIR). Chronic: Hardware removal, staged reconstruction, or resection arthroplasty depending on host status. |
Post Operative Rehabilitation Protocols
Rehabilitation following proximal humerus fracture fixation via the lateral approach must be carefully tailored to the patient's bone quality, the security of the fixation, and the status of the rotator cuff. Communication between the orthopedic surgeon and the physical therapist is paramount.
Phase 1: Immediate Post Operative (Weeks 0 to 4)
The primary goal in this phase is to protect the surgical repair while preventing severe shoulder stiffness.
* Immobilization: The patient is placed in a standard shoulder sling or an abduction sling depending on the tension on the rotator cuff repair.
* Range of Motion: Pendulum exercises are initiated immediately. Passive Range of Motion (PROM) is permitted within safe limits defined intraoperatively by the surgeon (typically forward flexion to 90 degrees and
