Tension Band Arthrodesis of the Thumb Metacarpophalangeal Joint: A Comprehensive Surgical Guide
Key Takeaway
Tension band arthrodesis of the thumb metacarpophalangeal (MCP) joint is a highly reliable surgical technique for treating severe arthritis, instability, or deformity. By converting dorsal tensile forces into dynamic palmar compression, this construct ensures robust osteosynthesis. This guide details the step-by-step surgical approach, from the initial curved dorsal incision and joint preparation to the precise application of Kirschner wires and tension band wiring, ensuring optimal fusion and functional recovery.
Introduction to Thumb Metacarpophalangeal Joint Arthrodesis
The thumb metacarpophalangeal (MCP) joint is a critical structure for hand biomechanics, providing the essential stability required for powerful pinch and grasp. When this joint is compromised by end-stage arthritis, chronic instability, or severe deformity, the entire functional capacity of the hand is significantly diminished. Arthrodesis of the thumb MCP joint remains the gold standard surgical intervention for these pathologies, offering predictable pain relief, restoration of stability, and durable functional improvement.
Among the various techniques available for osteosynthesis—including plate and screw fixation, crossed Kirschner wires (K-wires), and intraosseous wiring—the tension band arthrodesis stands out for its biomechanical superiority, low profile, and cost-effectiveness. By applying the principles of dynamic compression, the tension band construct provides rigid fixation that promotes primary bone healing while minimizing the risk of hardware prominence.
Clinical Indications and Contraindications
Indications
Arthrodesis of the thumb MCP joint is indicated in patients with debilitating pain, instability, or deformity that has failed conservative management (e.g., splinting, NSAIDs, corticosteroid injections). Specific indications include:
* Rheumatoid Arthritis (RA): Particularly in patients presenting with a complex deformity (e.g., Nalebuff Type I boutonniere deformity or Type III swan neck deformity) where joint destruction is advanced.
* Post-Traumatic Osteoarthritis: Often secondary to neglected intra-articular fractures or chronic collateral ligament insufficiency (e.g., chronic Stener lesions or Gamekeeper's thumb).
* Primary Osteoarthritis: Though less common than carpometacarpal (CMC) joint osteoarthritis, isolated MCP joint OA can be severely limiting.
* Paralytic Deformities: To provide a stable post for pinch in patients with peripheral nerve injuries (e.g., median or ulnar nerve palsy).
Contraindications
- Active Infection: Absolute contraindication; must be eradicated prior to any fusion attempt.
- Poor Soft Tissue Envelope: Inadequate dorsal skin coverage may preclude the use of hardware or require preliminary flap coverage.
- Concomitant Uncompensated CMC Joint Arthritis: Fusing the MCP joint increases the lever arm and stress on the CMC joint. If the CMC joint is arthritic, a concurrent CMC arthroplasty or fusion must be considered.
Biomechanics of the Tension Band Construct
The tension band technique relies on the biomechanical principles originally described by Pauwels. During normal physiologic use (e.g., key pinch or tip-to-tip pinch), the thumb MCP joint experiences significant bending moments. These forces create tension on the dorsal cortex and compression on the palmar cortex.
Biomechanical Pearl:
A tension band wire placed on the dorsal (tension) side of the joint resists the distracting forces. As the patient uses the thumb, the dorsal wire prevents gapping, effectively converting the dorsal tensile forces into dynamic compressive forces at the palmar articular interface. This dynamic compression accelerates osteogenesis and increases the rigidity of the construct.
Preoperative Planning and Patient Positioning
Preoperative Assessment
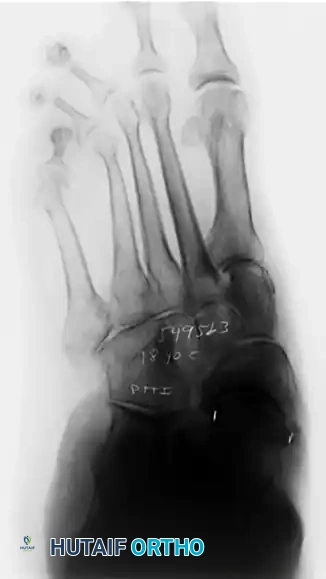
Standard posteroanterior (PA), lateral, and oblique radiographs of the thumb are mandatory to assess bone stock, deformity, and the presence of osteophytes. The surgeon must evaluate the adjacent joints (IP and CMC) clinically and radiographically.
Patient Positioning
- The patient is placed in the supine position with the operative arm extended on a radiolucent hand table.
- Regional anesthesia (e.g., axillary or supraclavicular brachial plexus block) is preferred, supplemented with intravenous sedation.
- A well-padded pneumatic tourniquet is applied to the upper arm and inflated to 250 mmHg (or 100 mmHg above systolic pressure) after exsanguination with an Esmarch bandage.
- Intravenous prophylactic antibiotics (e.g., first-generation cephalosporin) are administered 30 minutes prior to tourniquet inflation.
- A mini C-arm fluoroscopy unit is positioned perpendicular to the hand table for intraoperative imaging.
Surgical Anatomy and Approaches
The dorsal approach to the thumb MCP joint requires meticulous dissection due to the superficial and vulnerable nature of the surrounding neurovascular structures.
- Superficial Radial Nerve (SRN): The terminal sensory branches of the SRN cross the dorsal aspect of the thumb MCP joint. Iatrogenic injury or aggressive retraction can lead to a debilitating neuroma, which often causes more morbidity than the original joint pathology.
- Extensor Apparatus: The extensor pollicis longus (EPL) and extensor pollicis brevis (EPB) tendons traverse the joint dorsally. The EPB inserts on the base of the proximal phalanx, while the EPL continues to the distal phalanx.
Step-by-Step Surgical Technique
1. Incision and Superficial Dissection
The procedure begins with a carefully planned incision designed to maximize exposure while protecting critical structures.
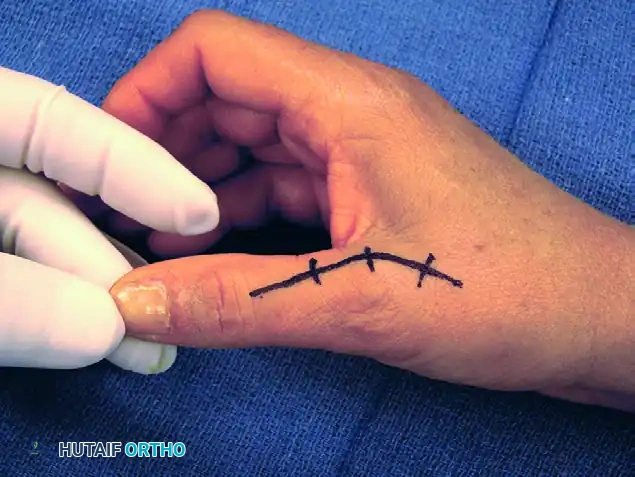
- Make a curved dorsal incision centered over the MCP joint. The apex of the curve should be positioned slightly ulnar or radial to the midline to prevent a straight-line scar contracture directly over the joint space.
- Carefully dissect through the subcutaneous tissues. Identify and gently retract the terminal sensory branches of the superficial radial nerve using vessel loops.
FIGURE 73-40A: Curved dorsal incision to allow safe dissection of sensory nerves from the underlying extensor apparatus.
Surgical Warning:
Never use self-retaining retractors aggressively in the superficial subcutaneous plane, as this can cause traction neurapraxia to the delicate sensory nerve branches.
2. Extensor Apparatus and Capsular Exposure
Once the superficial nerves are protected, the extensor apparatus is addressed to gain access to the joint capsule.
- Identify the extensor pollicis brevis (EPB) tendon and the radial aponeurotic fibers.
- Make a longitudinal incision through the EPB tendon and the radial sagittal band fibers. This interval allows for excellent exposure of the underlying dorsal capsule without compromising the centralizing forces of the extensor pollicis longus (EPL).
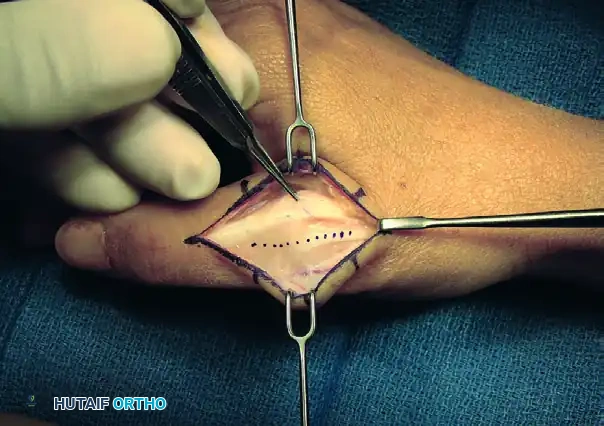
FIGURE 73-40B: Incision through the extensor pollicis brevis tendon and radial aponeurotic fibers exposing the dorsal capsule.
3. Arthrotomy and Joint Debridement
A thorough arthrotomy is required to mobilize the joint and prepare it for fusion.
- Split the dorsal capsule longitudinally to expose the metacarpal head and the base of the proximal phalanx.
- Use a rongeur and sharp dissection to excise all marginal osteophytes, which can tether the joint and prevent adequate positioning.
- Release the radial and ulnar collateral ligaments from their metacarpal origins. This step is crucial for achieving the necessary mobility to dislocate the joint and access the articular surfaces fully.
- Perform a complete synovectomy to remove inflammatory tissue, particularly in rheumatoid patients.
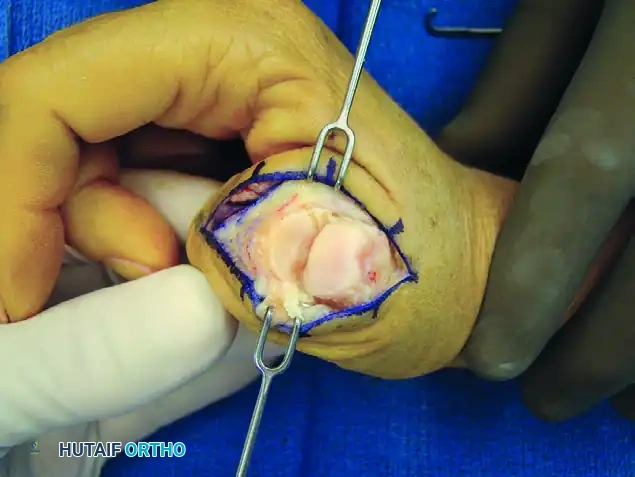
FIGURE 73-40C: Capsule split longitudinally to expose the metacarpal head and proximal phalanx base, followed by excision of osteophytes, collateral ligaments, and synovitic tissue.
4. Joint Surface Preparation
The success of the arthrodesis depends entirely on the quality of the bony preparation. The goal is to achieve broad, flush contact between healthy, bleeding cancellous bone surfaces.
- Technique Options: The surgeon may choose between flat planar cuts (using an oscillating saw) or a cup-and-cone technique (using specialized reamers). The cup-and-cone technique is generally preferred as it preserves thumb length and allows for multi-planar adjustments of the fusion angle prior to fixation.
- Remove all remaining articular cartilage and subchondral bone until punctate bleeding from the cancellous bone is observed.
- Optimal Fusion Position: The joint should be provisionally reduced and held in the ideal position for arthrodesis:
- 10 to 15 degrees of flexion
- 10 to 15 degrees of pronation (to allow the thumb pulp to face the index finger)
- 0 to 5 degrees of abduction
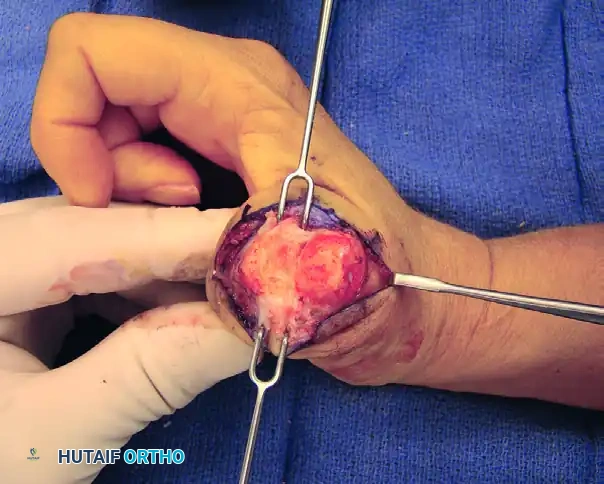
FIGURE 73-40D: Exposure of subchondral bone to obtain full contact of the raw cancellous metacarpal and proximal phalangeal surfaces.
5. Kirschner Wire Placement and Construct Initiation
With the joint held in the optimal position, the tension band construct is initiated.
- Drill a transverse hole through the distal third of the proximal phalangeal neck using a 1.1 mm (0.045-inch) K-wire. This hole will serve as the distal anchor for the tension band wire.
- Pass a 24-gauge or 26-gauge stainless steel orthopedic wire through this transverse hole.
- Next, drive two longitudinal 1.1 mm or 1.6 mm (0.045-inch or 0.062-inch) K-wires in a retrograde fashion. Start at the dorsal base of the proximal phalanx, cross the prepared MCP joint interface, and advance into the metacarpal shaft. Ensure these wires cross proximal to the fusion site to provide rotational stability.
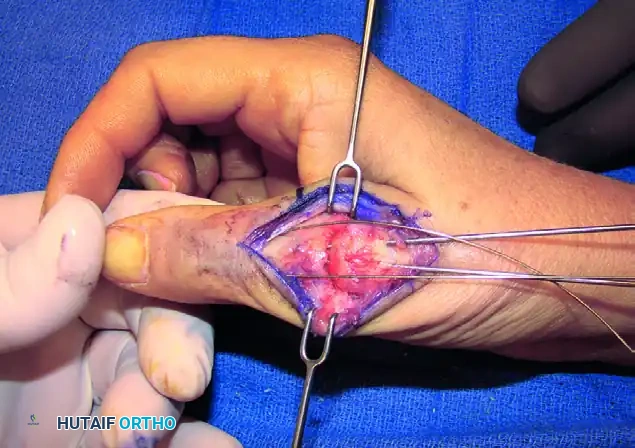
FIGURE 73-40E: Placement of a Kirschner wire in the distal third of the proximal phalangeal neck, completing the foundation of the tension band construct.
6. Tension Band Application and Compression
The application of the tension band wire is the critical step for achieving dynamic compression.
- Cross the two ends of the stainless steel wire over the dorsal aspect of the joint in a figure-of-eight pattern.
- Pass the wire ends around the protruding proximal ends of the longitudinal K-wires.
- Using heavy needle drivers or wire twisters, twist the wire ends together.
- Surgical Technique: Pull the wire radially outward while twisting to ensure the tension is distributed evenly and the wire tightens down firmly against the bone, compressing the arthrodesis site.
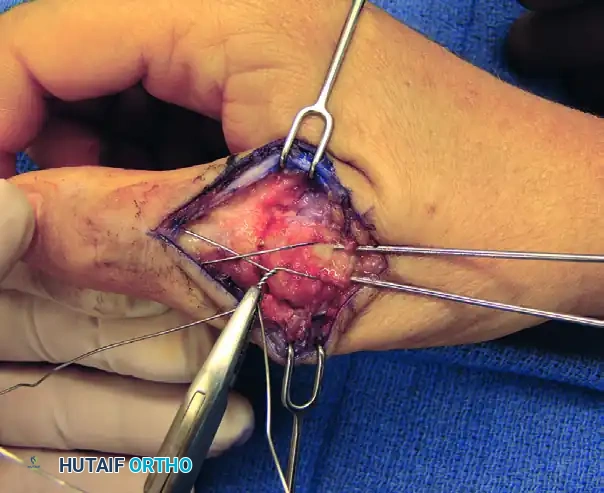
FIGURE 73-40F: Wire twisted and ends buried about the fusion site to achieve dynamic compression.
7. Construct Finalization and Hardware Burial
To prevent postoperative soft tissue irritation, the hardware must be meticulously buried.
- Cut the twisted wire leaving approximately 3 to 4 twists (about 5 mm).
- Bend the twisted knot and tamp it down flat against the dorsal cortex of the metacarpal.
- Cut the proximal ends of the longitudinal K-wires, leaving just enough length to hold the tension band wire. Bend these ends 180 degrees and tamp them into the metacarpal bone. This creates a smooth, low-profile construct that will not impinge on the extensor tendons.
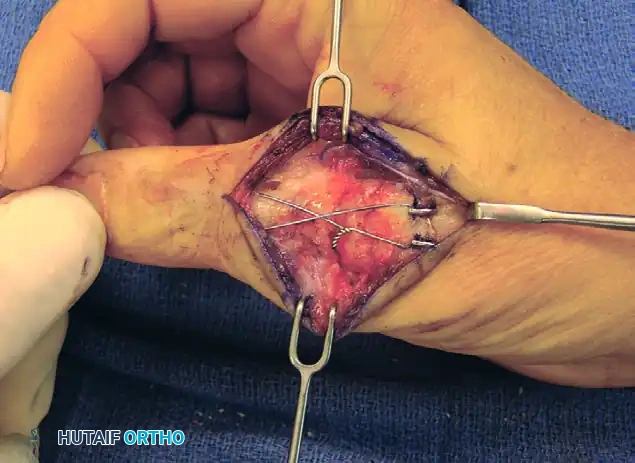
FIGURE 73-40G: Ends of wires cut and tamped into the metacarpal over the low-profile construct.
8. Radiographic Verification and Closure
- Utilize the mini C-arm fluoroscope to confirm the position of the hardware, the angle of the fusion, and the apposition of the bony surfaces in both AP and lateral planes.
- Irrigate the wound copiously with sterile saline.
- Repair the extensor mechanism and capsule using 4-0 absorbable sutures (e.g., Vicryl).
- Close the skin with 4-0 or 5-0 non-absorbable sutures (e.g., Nylon) in an interrupted fashion.
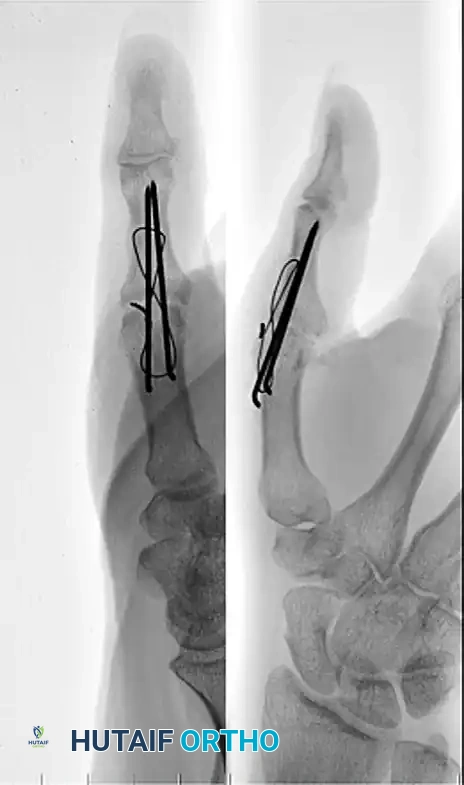
FIGURE 73-40H: Postoperative radiographic appearance demonstrating excellent bony apposition and a secure tension band construct.
Postoperative Rehabilitation Protocol
A strict postoperative protocol is essential to ensure bony union and prevent hardware failure.
- 0 to 2 Weeks: The thumb is immobilized in a bulky, rigid thumb spica splint immediately postoperatively. The patient is instructed to keep the hand strictly elevated above heart level to minimize edema. Active range of motion of the interphalangeal (IP) joint and the uninvolved fingers is encouraged immediately to prevent stiffness.
- 2 to 6 Weeks: At the two-week mark, the surgical dressings and skin sutures are removed. A short-arm fiberglass thumb spica cast is applied. The IP joint may be left free if fixation is deemed rigidly stable, though some surgeons prefer to include it to minimize lever-arm forces on the MCP joint.
- 6 to 8 Weeks: The cast is removed, and clinical/radiographic evaluation is performed. If bridging trabeculae are visible on radiographs and the joint is non-tender to palpation, the patient is transitioned to a removable custom thermoplastic thumb spica splint.
- 8+ Weeks: Progressive weaning from the splint and initiation of strengthening exercises. Full unrestricted activity is typically permitted by 10 to 12 weeks once solid radiographic union is confirmed.
Complications and Pitfalls
While tension band arthrodesis is highly successful, surgeons must be prepared to manage potential complications:
- Hardware Prominence and Irritation: This is the most common complication of tension band wiring. Failure to adequately tamp the K-wires and wire knots into the bone can lead to skin breakdown, tendon irritation, or pain. If symptomatic after solid bony union (usually >6 months post-op), the hardware can be removed in a minor secondary procedure.
- Nonunion or Delayed Union: Risk factors include smoking, poor bone stock, inadequate joint preparation (failure to reach bleeding cancellous bone), and insufficient compression. Treatment requires revision arthrodesis, often utilizing bone graft and potentially upgrading to plate fixation.
- Malunion: Fusing the thumb in excessive extension or inadequate pronation severely limits pinch mechanics. Meticulous intraoperative assessment of the thumb pulp orientation relative to the index finger is mandatory before final wire tightening.
- Superficial Radial Nerve Injury: Neuroma formation can cause debilitating chronic regional pain syndrome (CRPS). Prevention through careful, blunt superficial dissection is paramount.
Conclusion
Tension band arthrodesis of the thumb metacarpophalangeal joint is a robust, biomechanically sound procedure that provides excellent outcomes for patients suffering from end-stage joint pathology. By adhering to the meticulous surgical steps outlined in this guide—prioritizing soft tissue handling, precise bony preparation, and rigid dynamic compression—orthopaedic surgeons can consistently achieve high rates of fusion, restore hand function, and significantly improve patient quality of life.
You Might Also Like