Mastering Foot & Ankle Amputations: Lisfranc and Chopart Techniques
Key Takeaway
Join us in the OR for an in-depth masterclass on Lisfranc and Chopart amputations. We'll meticulously detail preoperative planning, precise surgical steps, critical anatomical considerations, and the essential tibialis anterior transfer technique to prevent equinus contracture. Learn pearls for optimal stump creation, neurovascular preservation, and comprehensive postoperative care, ensuring functional outcomes for patients facing forefoot or midfoot tumor resections.
Comprehensive Introduction and Patho-Epidemiology
Welcome, fellows and esteemed colleagues, to the operating theater and to this definitive exploration of midfoot amputations. Today, we are tackling a complex and critical area of reconstructive orthopaedics: foot and ankle amputations, specifically focusing on the Lisfranc (tarsometatarsal) and Chopart (transverse tarsal) levels. These procedures, while technically demanding and historically fraught with biomechanical complications, offer patients with extensive forefoot or midfoot pathology a profound opportunity for functional limb preservation. Our overarching surgical goal is invariably bipartite: to achieve a wide oncologic or infectious margin while meticulously constructing a durable, end-bearing residual limb that facilitates maximal ambulation and optimal prosthetic fit.
Historically, amputations at the Chopart and Lisfranc levels suffered from a poor reputation, primarily due to the high incidence of post-operative equinus and equinovarus deformities. Early surgeons often performed these disarticulations without adequate consideration for the resultant muscular imbalances, leading to anterior stump breakdown, intractable ulcerations, and the eventual need for more proximal revisions, such as transtibial (below-knee) amputations. However, the modern era of orthopaedic surgery has witnessed a paradigm shift. Through a rigorous understanding of foot and ankle biomechanics, coupled with advanced techniques in tendon balancing and myodesis, we have transformed these historically problematic procedures into highly successful limb-salvage options.
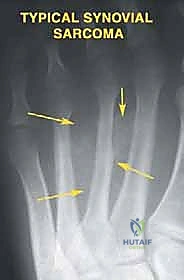
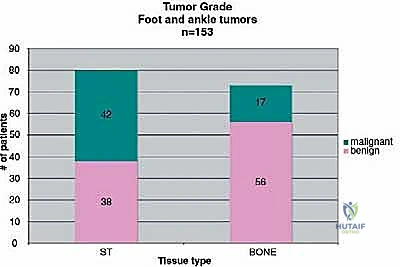
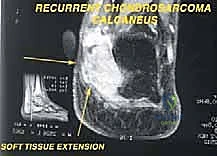
The patho-epidemiology necessitating these specific amputation levels is diverse, encompassing oncologic, traumatic, and severe dysvascular or infectious etiologies. In the realm of orthopaedic oncology, primary bone and soft tissue sarcomas of the foot—such as synovial sarcoma, clear cell sarcoma, chondrosarcoma, and osteosarcoma—often dictate the need for partial foot amputations to achieve negative margins while sparing the hindfoot. Unlike the appendicular skeleton where limb-sparing wide resections are commonplace, the compact, compartmentalized anatomy of the foot frequently precludes marginal resections without sacrificing critical neurovascular bundles, thereby making Lisfranc or Chopart amputations the oncologically sound choice.
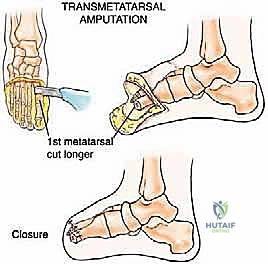
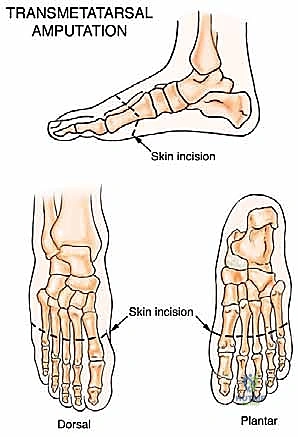
Beyond oncology, the escalating global prevalence of diabetes mellitus and peripheral arterial disease has dramatically increased the incidence of severe forefoot infections and gangrene. When a transmetatarsal amputation (TMA) is insufficient due to proximal extension of necrosis or osteomyelitis into the midfoot, the Lisfranc and Chopart levels become critical salvage points. Understanding the distinct vascular angiosomes of the foot is paramount in these dysvascular patients to ensure the viability of the crucial plantar flap. Ultimately, mastering these amputations requires not just surgical dexterity, but a profound, holistic comprehension of the patient's underlying pathology, vascular status, and rehabilitation potential.
Detailed Surgical Anatomy and Biomechanics
Before we make any incision, a deep, three-dimensional understanding of the foot's intricate anatomy and biomechanics is absolutely paramount. The foot is not merely a static pedestal but a dynamic, highly specialized organ of locomotion, and altering its osseous and tendinous architecture has profound downstream effects.
The Transverse Tarsal (Chopart) Joint
The Chopart joint, more formally known as the transverse tarsal joint, is a complex, compound articulation consisting of two distinct joints operating in tandem: the talonavicular joint medially and the calcaneocuboid joint laterally. The talonavicular joint is a highly mobile, ball-and-socket type articulation crucial for hindfoot inversion and eversion. Here, the convex head of the talus articulates intimately with the concave proximal surface of the navicular. Conversely, the calcaneocuboid joint is a saddle-shaped articulation that is inherently less mobile, providing vital rigid stability to the lateral column of the midfoot during the push-off phase of the gait cycle.
The stability of the Chopart joint complex relies heavily on a robust network of ligamentous supports. Key stabilizers include the plantar calcaneonavicular (spring) ligament, which supports the talar head; the bifurcate ligament, a strong Y-shaped structure connecting the dorsal calcaneus to both the navicular and cuboid; and the dorsal talonavicular and calcaneocuboid ligaments. When performing a Chopart disarticulation, these ligaments must be systematically identified and transected to mobilize the forefoot and midfoot away from the hindfoot block.
The muscular implications of an amputation at the Chopart level are severe and constitute the primary challenge of this procedure. A disarticulation here preserves the powerful plantarflexors of the hindfoot—primarily the gastrocnemius-soleus complex inserting via the Achilles tendon—but entirely sacrifices the primary dorsiflexors, namely the tibialis anterior, extensor hallucis longus, and extensor digitorum longus. This massive biomechanical imbalance, if left unaddressed surgically, invariably and rapidly leads to a severe equinus contracture. The calcaneus is pulled into plantarflexion, forcing the patient to bear weight on the vulnerable anterior aspect of the distal talus and calcaneus, leading to rapid skin breakdown. Addressing this via Achilles tendon lengthening and robust dorsiflexor myodesis is non-negotiable.
The Tarsometatarsal (Lisfranc) Joint
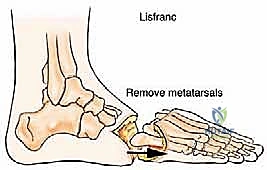
Moving distally, the Lisfranc joint complex refers to the intricate, interlocking articulations between the distal tarsal bones (the medial, intermediate, and lateral cuneiforms, along with the cuboid) and the bases of the five metatarsals. The medial cuneiform articulates with the first metatarsal, the intermediate with the second, the lateral with the third, and the cuboid supports the fourth and fifth metatarsals. The base of the second metatarsal is recessed proximally between the medial and lateral cuneiforms, acting as a crucial "keystone" that locks the entire tarsometatarsal complex into a rigid arch.
The inherent stability of the Lisfranc joint is derived not only from this keystone bony architecture but also from incredibly strong ligamentous support. The most critical of these is the eponymous Lisfranc ligament, a stout interosseous ligament connecting the lateral aspect of the medial cuneiform to the medial base of the second metatarsal. Notably, there is no direct ligamentous connection between the bases of the first and second metatarsals, making the Lisfranc ligament the primary stabilizer against lateral displacement of the lesser metatarsals.
From a biomechanical standpoint, a Lisfranc amputation is highly advantageous compared to a Chopart amputation. Because the insertions of the tibialis anterior (base of 1st metatarsal and medial cuneiform) and the peroneus brevis (base of 5th metatarsal) are either preserved or easily reattached to their respective tarsal bones, the delicate balance between dorsiflexion and plantarflexion, as well as inversion and eversion, is largely maintained. This makes the Lisfranc amputation a highly functional level with minimal biomechanical imbalance, provided the soft tissue envelope is adequately managed and the plantar fat pad is preserved.
Neurovascular Considerations
Meticulous attention to neurovascular structures is crucial to ensure flap viability, promote primary wound healing, and prevent the formation of debilitating, painful neuromas that can preclude prosthetic wear. On the dorsal aspect of the foot, the dorsalis pedis artery—a direct continuation of the anterior tibial artery—runs over the dorsum, giving off the arcuate artery and deep plantar artery. Its terminal branch often dives into the first dorsal interspace. While preservation of its contribution to the plantar arch is ideal for transmetatarsal amputations, for Lisfranc and Chopart disarticulations, the dorsalis pedis will inevitably need to be identified, meticulously isolated, and securely ligated.
Neurologically, the dorsal foot is innervated by the deep and superficial peroneal nerves. The deep peroneal nerve provides sensation to the first web space and motor innervation to the extensor digitorum brevis. The superficial peroneal nerve supplies sensation to the majority of the dorsum of the foot. During the dorsal approach, the cutaneous branches of these nerves will be encountered. It is imperative that these nerves are dissected proximally, placed under gentle traction, sharply transected, and allowed to retract deep into the soft tissue bed, well away from the surgical incision line and weight-bearing surfaces, to minimize neuroma risk.
The plantar aspect of the foot houses the critical medial and lateral plantar arteries, branches of the posterior tibial artery that form the deep plantar arch. These vessels are the absolute lifeline for the long plantar flap utilized in these amputations. Extreme care must be taken during the plantar dissection to stay close to the bone, preserving the full thickness of the plantar fascia and the underlying vascular plexus. The medial and lateral plantar nerves, branches of the tibial nerve, provide sensation and motor innervation to the intrinsic foot muscles. Similar to the dorsal nerves, their terminal branches must be identified, sharply divided under tension, and buried deep within the intrinsic muscle belly remnants to prevent symptomatic perineural fibrosis.
Exhaustive Indications and Contraindications
The decision to proceed with a midfoot amputation requires a rigorous, multidisciplinary evaluation. Surgical success is entirely dependent on selecting the correct amputation level based on the pathology, the patient's vascular status, and their systemic health.
Oncologic and Traumatic Indications
In the context of orthopaedic oncology, a Lisfranc amputation is indicated for extensive tumors involving the metatarsals, particularly those extending into the first and second interspaces or involving multiple metatarsals, where a standard transmetatarsal amputation (TMA) would yield positive margins. Patients typically present with localized pain, a palpable mass, and difficulty with weight-bearing. Sarcomas such as synovial sarcoma or clear cell sarcoma of the forefoot are classic indications. The goal is complete en bloc resection of the tumor with wide margins while preserving the highly functional tarsal bones.
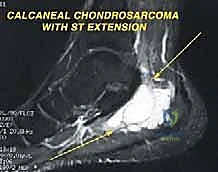
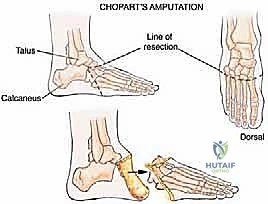
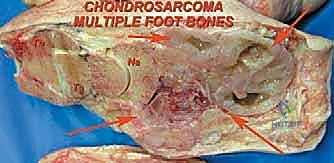
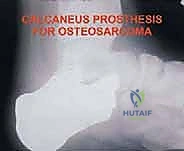
The Chopart amputation is considered for more proximal tumors extending to the tarsometatarsal joint with significant soft tissue involvement, where preservation of the midfoot is oncologically unsafe. By disarticulating at the transverse tarsal joint, the surgeon preserves the talus and calcaneus, thereby maintaining total hindfoot height and allowing for a direct end-bearing residual limb. This is vastly superior to a transtibial amputation in terms of energy expenditure during ambulation. Chondrosarcomas or osteosarcomas involving the cuneiforms or cuboid are prime indications for this level.
In cases of severe trauma, such as industrial crush injuries, lawnmower accidents, or blast injuries, midfoot amputations serve as vital salvage procedures. When the forefoot is irreversibly mangled, ischemic, or non-reconstructible, but the hindfoot soft tissue envelope remains viable, these amputations allow for the removal of devitalized tissue while preserving a functional stump. The decision between Lisfranc and Chopart in trauma is dictated entirely by the zone of injury and the availability of healthy, well-vascularized plantar skin for coverage.
Dysvascular and Infectious Considerations
In the dysvascular patient, particularly those with long-standing diabetes mellitus and peripheral neuropathy, the indications shift toward infection control and the management of unsalvageable gangrene. A Lisfranc or Chopart amputation is indicated when a severe diabetic foot infection, osteomyelitis, or ischemic necrosis extends proximal to the metatarsal necks, rendering a TMA impossible.
Crucially, the success of these amputations in the dysvascular population is entirely dependent on adequate arterial inflow. Pre-operative non-invasive vascular studies (ABIs, toe pressures, transcutaneous oxygen measurements) and often CT angiography or conventional angiography are mandatory. If inflow is inadequate, a revascularization procedure (endovascular angioplasty or open bypass) must be performed prior to, or concomitantly with, the amputation. Performing a midfoot amputation through ischemic tissue is a guaranteed path to flap necrosis and subsequent proximal revision.
Absolute and Relative Contraindications
Absolute contraindications for Lisfranc and Chopart amputations include inadequate soft tissue coverage—specifically, the lack of a viable, sensate plantar flap to cover the distal bony stump. If the plantar skin is compromised by tumor extension, severe infection, or profound ischemia, a more proximal amputation (e.g., Syme or transtibial) is required. Similarly, tumor extension into the talus or calcaneus absolutely contraindicates a Chopart amputation, necessitating a below-knee amputation to achieve oncologic clearance.
Relative contraindications include severe, uncorrectable equinus contracture or profound peripheral neuropathy combined with a history of non-compliance. In a deeply neuropathic patient who cannot adhere to strict offloading protocols, the altered biomechanics of a midfoot amputation, particularly a Chopart, can lead to rapid skin breakdown, recurrent ulceration, and deep space infection. In such highly selected cases, a primary transtibial amputation may offer a more predictable and definitive outcome, minimizing the risk of multiple, staged revision surgeries.
| Condition | Lisfranc/Chopart Indication | Contraindication |
|---|---|---|
| Oncologic | Forefoot/Midfoot Sarcoma (clear margins achievable) | Tumor invasion into Talus/Calcaneus |
| Traumatic | Crush injury limited to forefoot/midfoot | Massive degloving of plantar hindfoot skin |
| Infectious | Osteomyelitis of metatarsals/cuneiforms | Ascending gas gangrene / deep space infection of hindfoot |
| Vascular | Distal gangrene with palpable PT/DP pulses | Profound ischemia (TcPO2 < 30 mmHg) without revascularization options |
Pre-Operative Planning, Templating, and Patient Positioning
Surgical success begins long before the patient enters the operating suite. Careful, exhaustive preoperative evaluation and meticulous planning are absolutely necessary to ensure both oncologic safety and biomechanical functionality.
Advanced Imaging Modalities
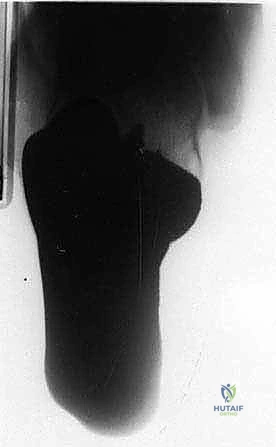
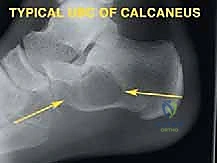
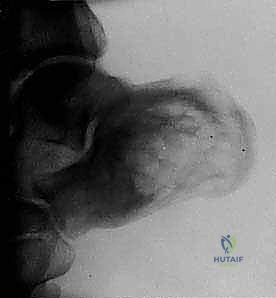
Standard plain radiographs, including weight-bearing anteroposterior (AP), lateral, and oblique views of the foot, are the initial cornerstone of evaluation. If ankle involvement is suspected, AP and mortise views are also obtained. These provide initial bony detail, help identify expansile osteolytic or sclerotic lesions, and assess the overall alignment of the foot. However, plain films drastically underestimate the extent of soft tissue involvement in oncologic cases.
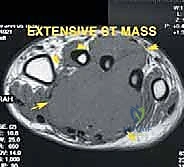
Magnetic Resonance Imaging (MRI) with and without intravenous contrast is our gold standard for assessing tumor extent. It is unparalleled in evaluating soft tissue mass expansion, neurovascular bundle encasement, and skip lesions within the marrow cavity of the metatarsals or tarsals. The T1-weighted images are excellent for assessing marrow replacement, while fluid-sensitive sequences (STIR or T2 fat-suppressed) delineate peritumoral edema and the true boundaries of the soft tissue mass. This imaging dictates the precise level of amputation and ensures adequate surgical margins.
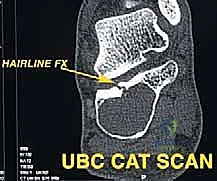
Computed Tomography (CT) scans offer superior bony detail compared to MRI and are particularly useful for evaluating complex osteolytic or sclerotic lesions, assessing cortical breakthrough, or planning precise bone cuts in cases where partial tarsal resections are considered. Definitive pathology from a pre-operative core needle biopsy dictates the margin requirements. For example, a high-grade osteosarcoma typically requires wide, radical resection margins, whereas a low-grade chondrosarcoma might allow for closer, marginal resections if anatomy dictates.
Surgical Templating and Flap Design
Pre-operative templating involves synthesizing the clinical exam and imaging data to design the surgical incisions. The standard approach for both Lisfranc and Chopart amputations utilizes a long plantar flap. The plantar skin of the foot is uniquely specialized for weight-bearing, characterized by a thick epidermis, dense fibrous septa, and robust fat pads. Preserving this tissue to cover the distal bony stump is the most critical soft-tissue goal of the operation.
The dorsal incision is typically designed as a gently convex line extending across the midfoot, just distal to the intended level of bone resection. The plantar incision extends significantly further distally—often to the level of the metatarsal heads—before curving across the plantar aspect of the foot. This creates a long, robust plantar flap that can be folded dorsally to cover the distal articular surfaces of the remaining tarsal bones. The precise length of the flap must be carefully measured to ensure tension-free closure without redundant, hypermobile tissue.
Patient Positioning and Operating Room Setup
The patient is positioned supine on a standard radiolucent operating table. A bump is placed under the ipsilateral hip to internally rotate the leg, bringing the foot into a neutral, upward-facing position, which greatly facilitates access to both the medial and lateral columns of the foot. A pneumatic tourniquet is applied to the proximal thigh. In dysvascular patients, the use of a tourniquet is controversial and often avoided to prevent ischemic injury to already compromised tissues; in these cases, meticulous hemostasis using electrocautery and suture ligation is required.
Intraoperative fluoroscopy (C-arm) must be available in the room. While the anatomy of the midfoot is predictable, severe deformity, tumor distortion, or prior trauma can obscure landmarks. Fluoroscopy is invaluable for confirming the correct joint spaces prior to disarticulation, ensuring complete removal of the intended osseous structures, and verifying the trajectory of drill holes used for tendon myodesis.
Step-by-Step Surgical Approach and Fixation Technique
The execution of midfoot amputations demands meticulous soft tissue handling, precise osteology, and a proactive approach to tendon balancing.
The Lisfranc Disarticulation Technique
The procedure begins with the planned dorsal incision, carried down through the skin and subcutaneous tissue to the level of the extensor tendons. The superficial and deep peroneal nerves are identified, dissected proximally, placed under tension, and sharply transected to allow proximal retraction. The dorsalis pedis artery is identified, ligated, and divided. The extensor tendons (EHL, EDL, TA) are identified and transected. Crucially, the insertion of the tibialis anterior on the medial cuneiform and first metatarsal base must be carefully managed; if the medial cuneiform is preserved, the TA should be tagged for later myodesis to maintain active dorsiflexion.
Attention is then turned to the plantar incision. The incision is carried down to the bone, elevating a full-thickness plantar flap consisting of skin, subcutaneous fat, plantar fascia, and intrinsic musculature. The dissection must remain strictly subperiosteal along the metatarsal shafts to preserve the blood supply to the flap. The medial and lateral plantar arteries are identified and ligated as they are encountered distally.
Disarticulation begins dorsally. The joint capsule of the tarsometatarsal joints is incised. The key to the Lisfranc disarticulation is identifying and dividing the Lisfranc ligament between the medial cuneiform and the base of the second metatarsal. Once this stout ligament is released, the "keystone" is unlocked, and the remaining metatarsal bases can be sequentially disarticulated from the cuneiforms and cuboid. A scalpel or key elevator is used to meticulously release the plantar ligaments and intrinsic muscle attachments, freeing the forefoot specimen. The articular cartilage of the remaining cuneiforms and cuboid is typically left intact, though prominent bony ridges may be rasped smooth to prevent pressure points.
The Chopart Disarticulation Technique
The initial approach for the Chopart amputation mirrors that of the Lisfranc, utilizing a long plantar flap. However, the dorsal incision is made more proximally, over the talonavicular and calcaneocuboid joints. Following neurovascular ligation and tendon transection, the dorsal capsules of the talonavicular and calcaneocuboid joints are identified and incised.
The disarticulation requires systematic release of the robust midfoot ligaments. The bifurcate ligament, connecting the calcaneus to the navicular and cuboid, is sharply divided. The foot is forced into plantarflexion to open the dorsal joint spaces. A scalpel is passed through the talonavicular joint, carefully following the contour of the talar head, and then through the calcaneocuboid joint. The spring ligament (plantar calcaneonavicular) must be released plantarly. The posterior tibial tendon, inserting broadly onto the navicular and cuneiforms, is transected, as are the peroneus longus and brevis laterally. The forefoot and midfoot are then completely detached.
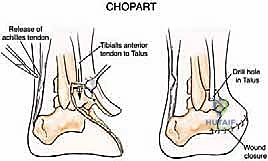
The most critical step in a Chopart amputation is tendon balancing. Without intervention, the unopposed pull of the Achilles tendon will rapidly cause a severe equinus deformity. Therefore, a percutaneous or open Achilles tendon lengthening (TAL) or complete tenotomy is mandatory. Furthermore, to restore active dorsiflexion, the transected tibialis anterior tendon is transferred and secured to the neck of the talus or the anterior aspect of the calcaneus. This is typically achieved by drilling a tunnel through the bone, passing the tendon through, and securing it with non-absorbable sutures or a biotenodesis screw. This myodesis is the linchpin of a functional Chopart amputation.
Soft Tissue Handling and Closure
Following disarticulation and tendon balancing, the tourniquet (if used) is deflated, and meticulous hemostasis is achieved. Hematoma formation is a primary cause of flap failure and infection. The bony stump is copiously irrigated with sterile saline. The long plantar flap is then brought dorsally over the remaining tarsal bones.
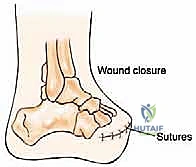
The flap should fold naturally without excessive tension. If the flap is too long and redundant, it will create an unstable, hypermobile soft tissue envelope that causes friction and ulceration within a prosthesis; it must be judiciously trimmed. Deep closure is performed by suturing the robust plantar fascia to the dorsal fascia and periosteum using heavy absorbable sutures. This fascial closure is critical for providing a stable, durable padding over the bone. The skin is closed with interrupted non-absorbable sutures, employing a technique that minimizes tension on the epidermal edges, such as vertical mattress sutures. A closed suction drain is frequently
Clinical & Radiographic Imaging Archive