Sublimis Tendon Transfer for Thumb Opposition (Riordan)
Key Takeaway
The Riordan technique for sublimis tendon transfer is a highly effective opponensplasty utilized to restore thumb opposition in median nerve palsy. By harvesting the ring finger flexor digitorum superficialis, routing it through a flexor carpi ulnaris pulley, and inserting it into the thumb's extensor mechanism, surgeons can reconstruct the complex biomechanics of palmar abduction, flexion, and pronation essential for functional pinch.
Introduction to Opponensplasty and the Riordan Technique
The restoration of thumb opposition is one of the most critical reconstructive procedures in hand surgery. Opposition is a complex, multi-planar movement requiring palmar abduction, flexion, and pronation of the first metacarpal, coupled with stable extension of the interphalangeal (IP) joint to facilitate a strong tip-to-tip or pulp-to-pulp pinch. In cases of isolated low median nerve palsy, severe carpal tunnel syndrome with irreversible thenar atrophy, or poliomyelitis, the intrinsic thenar musculature (specifically the abductor pollicis brevis, opponens pollicis, and the superficial head of the flexor pollicis brevis) is paralyzed, rendering the thumb functionally severely impaired.
The Transfer of the Sublimis Tendon, specifically utilizing the flexor digitorum superficialis (FDS) of the ring finger, remains a gold-standard opponensplasty. Pioneered and refined by surgeons such as Bunnell, Brand, and Riordan, this procedure leverages the synergistic action of the ring finger FDS. The Riordan Technique is particularly distinguished by its sophisticated dual-insertion method into the thumb's extensor mechanism, which not only restores opposition but actively prevents the hyperflexion of the IP joint (Froment’s sign equivalent) during forceful pinch.
💡 Clinical Pearl: The Synergistic Advantage
The ring finger sublimis (FDS) is an ideal donor for opponensplasty because its native physiological action (finger flexion during grasp) is highly synergistic with thumb opposition. This significantly reduces the cognitive burden of postoperative motor re-education compared to non-synergistic transfers.
Biomechanical Principles of the Transfer
To successfully reconstruct opposition, the transferred tendon must replicate the vector of the paralyzed abductor pollicis brevis (APB).
- The Vector of Pull: The ideal vector for opposition originates from the region of the pisiform and directs toward the metacarpophalangeal (MCP) joint of the thumb. By creating a pulley from the flexor carpi ulnaris (FCU) near the pisiform, the sublimis tendon is redirected to pull the thumb into palmar abduction and pronation.
- The Insertion Biomechanics: Riordan’s modification addresses a common failure in earlier opponensplasties: IP joint hyperflexion during pinch. By splitting the sublimis tendon and inserting one slip into the APB tendon (for abduction/pronation) and the other into the extensor pollicis longus (EPL) aponeurosis, the transfer simultaneously stabilizes the MCP joint and extends the IP joint, creating a rigid post for the index and middle fingers to pinch against.
Preoperative Evaluation and Optimization
Before proceeding with a sublimis tendon transfer, the surgeon must ensure the following prerequisites are met:
* Supple Web Space: The first web space must be completely free of contracture. If a severe adduction contracture exists, it must be released (via Z-plasty or release of the adductor pollicis fascia) either prior to or concomitantly with the tendon transfer. A tendon transfer cannot overcome a fixed skeletal or soft-tissue contracture.
* Donor Muscle Strength: The ring finger FDS must be Medical Research Council (MRC) Grade 5.
* Joint Mobility: The thumb carpometacarpal (CMC), MCP, and IP joints must have a functional, passive range of motion.
Surgical Technique: Step-by-Step (Riordan)
Phase 1: Harvesting the Ring Finger Sublimis Tendon
- Incision and Exposure: Expose the ring finger sublimis tendon through an ulnar midlateral incision centered over the proximal interphalangeal (PIP) joint. The ulnar approach is preferred to avoid the radial pinch surface of the digit and to protect the radial neurovascular bundle.
- Tendon Division: Identify the FDS tendon and divide it at the level of the PIP joint or just proximal to it.
- Managing Camper's Chiasm: This is a critical step. Meticulously divide the chiasm, separating the two slips of the sublimis tendon at the level of the joint. They must be completely freed from their passage around the flexor digitorum profundus (FDP). Failure to adequately separate these slips will result in tethering of the FDP, leading to restricted finger flexion or a "lumbrical plus" deformity. Once freed, the tendon can be withdrawn easily at the wrist.
Phase 2: Creation of the Flexor Carpi Ulnaris (FCU) Pulley
- Wrist Exposure: Expose the FCU tendon through an L-shaped incision. The incision should extend proximally along the FCU tendon and turn distally and radialward, running parallel to the major flexor creases of the wrist to prevent scar contracture.
- Constructing the Pulley: To create a robust pulley that provides the correct biomechanical vector, cut halfway through the FCU tendon at a point approximately 6.0 cm proximal to the pisiform.
- Loop Formation: Strip the radial half of the FCU tendon distally, stopping almost at the pisiform. Create a loop large enough for the sublimis tendon to pass through smoothly without friction. Carry the radial segment of the FCU through a split made in the remaining intact half of the tendon, loop it back upon itself, and suture it securely with nonabsorbable braided sutures.
Phase 3: Thumb Exposure and Preparation
- The C-Shaped Incision: Make a wide C-shaped incision on the thumb. Begin on the dorsum of the thumb just proximal to the IP joint. Proceed proximally and volarward around to the radial aspect of the thumb. At a point just proximal to the MCP joint, curve the incision dorsalward, keeping it in line with the major skin creases of the thenar eminence.
- Nerve Protection: Meticulously dissect and preserve the fine sensory branches of the superficial radial nerve on the dorsoradial aspect of the thumb. Injury here results in debilitating neuromas.
- Defining the Insertion Sites: Expose and clearly define the extensor pollicis longus (EPL) tendon over the proximal phalanx, the extensor aponeurosis over the MCP joint, and the abductor pollicis brevis (APB) tendon.
Phase 4: Tendon Routing
- Withdrawal: At the wrist, identify the previously released ring finger sublimis tendon and withdraw it into the proximal forearm incision.
- Pulley Passage: Pass the sublimis tendon through the newly fashioned FCU loop. Ensure there is no twisting of the tendon.
- Subcutaneous Tunneling: Using a small hemostat or a specialized tendon carrier, pass the sublimis tendon subcutaneously across the thenar eminence. The trajectory must be in line with the native fibers of the paralyzed APB.
🚨 Surgical Warning: Subcutaneous Routing
The tunnel across the thenar eminence must be strictly subcutaneous. If the tendon is passed deep to the palmar fascia, its vector will be altered, and it will fail to provide adequate palmar abduction. Conversely, if the tunnel is too superficial, cosmetically unappealing bowstringing will occur.
Phase 5: Insertion and Tensioning (The Riordan Dual-Insertion)
This phase dictates the functional success of the opponensplasty.
- Preparation of the Sublimis: Split the distal end of the sublimis tendon longitudinally for approximately 2.5 cm (or more if required by the anatomy).
- The APB Tunnel: Make a small tunnel for the first insertion by burrowing between two small parallel incisions in the APB tendon. Pass one half of the split sublimis through this tunnel.
- The Extensor Aponeurosis Tunnel: Separate the extensor aponeurosis from the periosteum of the thumb's proximal phalanx. Make a small incision in the aponeurosis approximately 6 mm distal to the first APB tunnel. Pass the same strip of sublimis through it.
- The EPL Slit: Bring this slip out from beneath the aponeurosis through a small longitudinal slit made in the EPL tendon, located about 3 mm proximal to the IP joint.
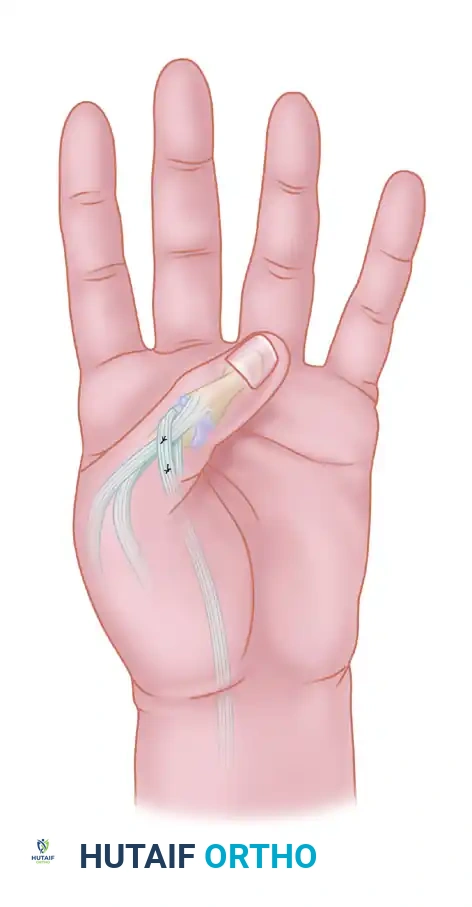
Figure: Diagrammatic representation of the sublimis tendon transfer routed to restore opposition. Note the vector of pull directed toward the pisiform to replicate the abductor pollicis brevis.
- Setting the Tension (The Tenodesis Test): Determining the proper tension is the most demanding aspect of the procedure.
- Grasp the two slips of the sublimis with small hemostats and cross them.
- Place the thumb in full opposition and hold the wrist in a straight line (neutral). Place the overlapping slips under moderate tension.
- The Relaxation Test: Release the thumb and passively flex the wrist. This maneuver should completely relax the transfer, allowing the thumb to be brought into full extension and abduction passively.
- The Opposition Test: Passively extend the wrist to 45 degrees. The tenodesis effect should place enough tension on the transfer to automatically bring the thumb into complete opposition and the tip of the thumb into complete IP extension.
- If the tension is insufficient (the thumb does not fully oppose upon wrist extension), increase the tension and repeat the test.
- Final Fixation: Once the correct tension is confirmed, suture the slips of the sublimis together using nonabsorbable sutures (e.g., 3-0 or 4-0 braided polyester), ensuring the cut ends are buried to minimize adhesions.
- Capsular Anchoring (Crucial Step): Anchor the transfer and the tendon of the APB to the MCP joint capsule with a single nylon or wire suture. This anchor must be positioned so that the transfer passes directly over the middle of the metacarpal head.
- Rationale: This specific anchoring prevents the transferred tendon from displacing toward the palmar aspect of the joint during active opposition, which would alter the moment arm and reduce the mechanical advantage of the transfer.
Postoperative Care and Rehabilitation Protocol
The success of a tendon transfer relies as much on meticulous postoperative rehabilitation as it does on surgical execution.
Immobilization Phase (Weeks 0-3)
- Close the wounds with nonabsorbable sutures.
- Immobilize the hand in a bulky pressure dressing reinforced with a dorsal plaster splint.
- Splint Position:
- Wrist: 30 degrees of flexion (to relieve tension on the transfer).
- Fingers: Functional position (MCPs flexed 70 degrees, IPs extended).
- Thumb: Full opposition with the distal phalanx (IP joint) fully extended.
- Place a few layers of sterile gauze between the individual fingers to prevent skin maceration.
Mobilization and Motor Re-education Phase (Weeks 3-9)
- At exactly 3 weeks postoperative, remove the dressing, splint, and sutures.
- Begin active, therapist-supervised range of motion exercises.
- Opponens Splinting: The thumb must be supported with a custom thermoplastic opponens splint between exercise sessions and at night for an additional 6 weeks. This prevents stretching of the healing tendon transfer.
- Motor Re-education (The "Ring Finger Trick"): Because the ring finger sublimis was utilized, training the patient to use the transfer is highly intuitive. Instruct the patient to attempt to place the tip of their thumb against their ring finger. This maneuver naturally produces flexion of the ring finger, which automatically fires the transferred sublimis, resulting in synergistic thumb opposition. Many patients achieve active opposition almost immediately upon splint removal using this technique.
Long-Term Protection
- High-Demand Patients: In patients with weak quadriceps muscles who habitually rise from a sitting position by pushing up with flattened hands, or in patients who rely on crutches for ambulation, the transfer is at high risk of catastrophic stretching.
- In these specific populations, the transfer must be protected with a rigid splint during weight-bearing activities for 3 months or longer. Failure to protect the transfer in these scenarios will inevitably result in an overstretched, non-functional opponensplasty.
Potential Complications and Pitfalls
- Over-tensioning: Results in a fixed flexion/opposition contracture of the thumb, making it difficult for the patient to open the first web space to grasp large objects.
- Under-tensioning: The most common error. Results in a weak pinch and incomplete opposition. The tenodesis test intraoperatively is the only way to prevent this.
- Donor Digit Stiffness: Harvesting the FDS can lead to PIP joint stiffness or a swan-neck deformity in the ring finger. Meticulous closure of the flexor sheath and early mobilization of the donor digit are required.
- Bowstringing: Occurs if the FCU pulley fails or if the subcutaneous tunnel across the thenar eminence is made too superficial. Ensure the FCU loop is robustly sutured.
You Might Also Like