Operative Management of Distal Radius Malunions: External Fixation and Intramedullary Nailing Techniques
Key Takeaway
Distal radius malunions often present with significant functional impairment and pain. While volar plating remains popular, prominent hardware and extensor tendon ruptures are notable complications. Non-spanning external fixation and intramedullary nailing combined with corrective osteotomy offer robust alternatives. These techniques allow for precise deformity correction, early mobilization, and minimization of hardware-related morbidity. This guide details the biomechanical principles, step-by-step surgical approaches, and postoperative protocols for managing complex distal radius malunions.
Introduction to Distal Radius Malunion Management
The management of distal radius malunions remains a formidable challenge in orthopaedic surgery. While traditional plate and screw fixation—particularly volar locking plates—has revolutionized the treatment of acute distal radius fractures, its application in corrective osteotomies for malunions is not without significant drawbacks. Complications such as prominent hardware, late extensor tendon rupture (most notably the extensor pollicis longus), flexor tendon irritation, and the frequent necessity for subsequent hardware removal have prompted the evolution of alternative fixation strategies.
To circumvent these hardware-related morbidities, alternative techniques utilizing non-spanning external fixation and intramedullary nailing have been developed. Melendez pioneered a highly effective technique employing an opening wedge osteotomy, structural bone grafting, and non-spanning external fixation for symptomatic extraarticular distal radial malunions. This construct avoids spanning the radiocarpal joint, thereby permitting early postoperative motion while maintaining rigid stabilization of the osteotomy. Similarly, Shin and Jones introduced the use of intramedullary nailing with provisional external fixation, offering a minimally invasive, load-sharing alternative that further mitigates soft tissue irritation.
This comprehensive guide delineates the biomechanical rationale, precise surgical techniques, and postoperative protocols for these advanced joint-sparing and minimally invasive corrective procedures.
Biomechanical Principles and Rationale
A malunited distal radius alters the fundamental biomechanics of the radiocarpal and distal radioulnar joints (DRUJ). Loss of volar tilt, radial inclination, and radial height shifts the load-bearing axis of the wrist. Normally, the radius absorbs approximately 80% of the axial load across the wrist; however, with significant dorsal angulation and radial shortening, load transmission shifts disproportionately to the ulna and the triangular fibrocartilage complex (TFCC), leading to ulnocarpal impaction syndrome, DRUJ incongruity, and early-onset arthrosis.
Clinical Pearl: Correction of radial height and volar tilt is paramount. A residual dorsal tilt greater than 10 degrees or radial shortening exceeding 2 mm significantly alters carpal kinematics, increasing the risk of midcarpal instability and degenerative joint disease.
The rationale for non-spanning external fixation and intramedullary nailing lies in their ability to provide stable fixation while minimizing the surgical footprint.
* Non-Spanning External Fixation: By placing pins strictly within the distal and proximal radial fragments, the radiocarpal joint remains free. The external fixator acts as a neutralization device, protecting the structural bone graft placed in the opening wedge osteotomy from compressive and torsional forces.
* Intramedullary Nailing: This load-sharing device offers a central axis of fixation. Because the implant is buried within the medullary canal and subchondral bone, it virtually eliminates the risk of tendon attrition associated with dorsal or prominent volar plates.
Indications and Contraindications
Patient selection is the cornerstone of successful outcomes in corrective osteotomies. These techniques are primarily indicated for symptomatic extraarticular distal radial malunions characterized by significant radiographic deformities, pain associated with lifting or axial loading, and restricted forearm rotation.
Indications
- Symptomatic extraarticular distal radius malunion.
- Pain exacerbated by axial loading or grip.
- Loss of forearm supination/pronation due to DRUJ incongruity secondary to radial deformity.
- Patients at high risk for soft tissue complications with traditional plating.
Contraindications
Melendez explicitly outlined several contraindications to the non-spanning external fixation technique:
* Severe Osteoporosis: Poor bone stock precludes adequate pin purchase, risking pin loosening and loss of reduction.
* Excessive Radial Shortening: Shortening greater than 8 mm is difficult to correct acutely without excessive tension on the soft tissues and neurovascular structures. (Note: In cases of severe shortening, a concomitant ulnar shortening osteotomy or a Darrach procedure may be required).
* Intraarticular Malunions: Step-offs or gaps within the radiocarpal joint require direct visualization and articular reconstruction, typically necessitating arthrotomy and internal fixation.
* Advanced Arthritis: Pre-existing radiocarpal or midcarpal arthrosis will not be alleviated by extraarticular realignment alone; such cases may require salvage procedures like partial or total wrist arthrodesis.
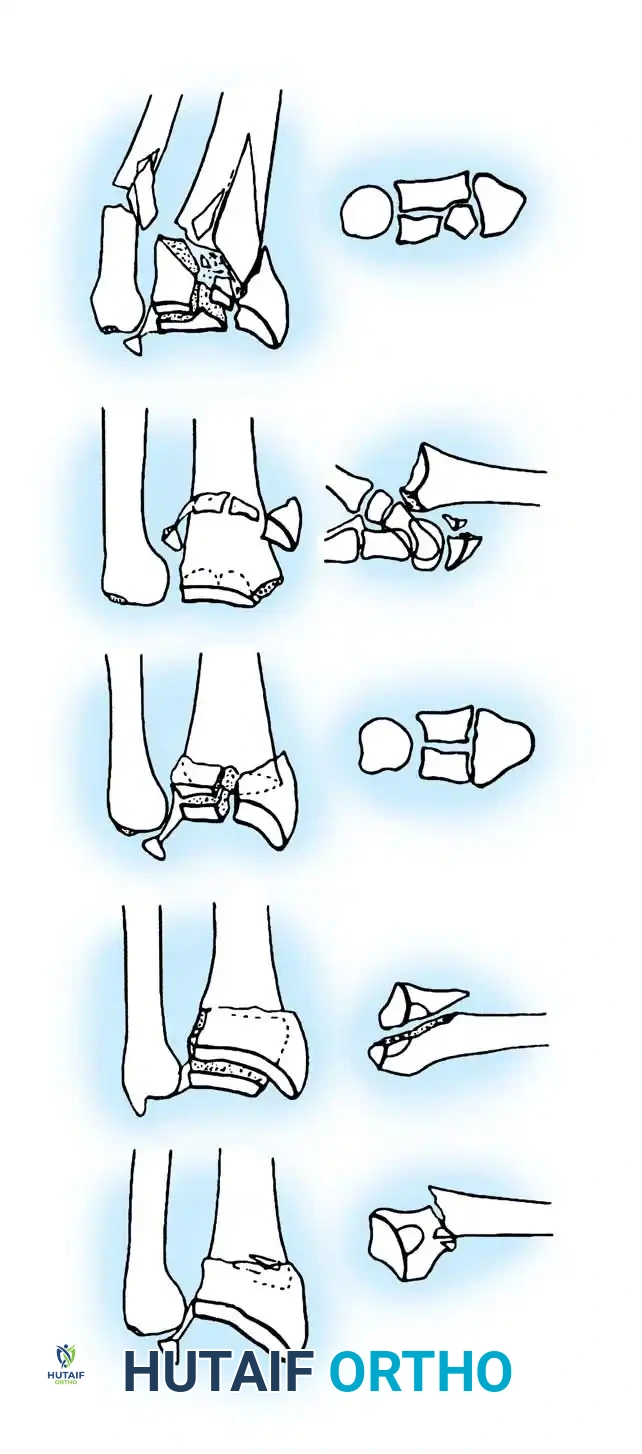
Surgical Technique: Non-Spanning External Fixation (Melendez Technique)
The Melendez technique utilizes an Orthofix minifixator (or equivalent non-spanning device) to stabilize an opening wedge osteotomy.
Patient Positioning and Preparation
- Place the patient supine with the operative arm extended on a radiolucent hand table.
- Apply a well-padded proximal arm tourniquet.
- Administer prophylactic intravenous antibiotics (e.g., a first-generation cephalosporin) prior to tourniquet inflation.
- Prepare the ipsilateral iliac crest for structural corticocancellous bone graft harvesting.
Surgical Approach and Pin Placement
- Incision: Approach the wrist through a longitudinal radial incision centered over the first dorsal compartment.
- Soft Tissue Dissection: Carefully incise the extensor retinaculum over the first dorsal compartment. Retract the abductor pollicis longus (APL) and extensor pollicis brevis (EPB) tendons dorsally.
- Nerve Protection: Meticulously identify and protect the sensory branches of the radial nerve, which are highly vulnerable in this zone.
- Distal Pin Placement:
- Insert small guiding needles into the subcutaneous tissue to establish the trajectory.
- Under fluoroscopic guidance (image intensification), drill the first pin into the distal radius in a radial-to-ulnar direction. The starting point is the groove of the first dorsal compartment, and the trajectory must be strictly parallel to the articular surface.
- Insert the second distal pin dorsal to the tendons of the first dorsal compartment, again aiming radially to ulnarly and paralleling the articular surface.
- Crucial Anatomy: The extensor tendons of the first dorsal compartment and the sensory branch of the radial nerve must lie safely between these two distal pins.
Osteotomy and Deformity Correction
- Perform the osteotomy at the site of the malunion using an oscillating saw, taking care to protect the volar structures with malleable retractors.
- Proximal Pin Placement: Using the external minifixator as a template, insert the two proximal pins into the radial diaphysis.
- Distraction: Open the osteotomy site using manual traction or a lamina spreader.
- Fixator Application: Attach the fixator to the pins. Utilize the ball joint and gear-driven distraction mechanism of the fixator to fine-tune the reduction, restoring volar tilt, radial inclination, and radial length.
- Confirm the restoration of radiographic parameters using multi-planar fluoroscopy.
Surgical Warning: Over-distraction can lead to median nerve traction neuropathy or digital stiffness. Ensure that the correction does not exceed the soft tissue envelope's compliance.
Bone Grafting and Closure
- Graft Harvest: Harvest a block of corticocancellous bone from the iliac crest.
- Graft Placement: Fashion the graft to precisely fit the trapezoidal defect created by the opening wedge osteotomy. Impact the graft into the osteotomy site. The structural cortex of the graft should be placed dorsally or radially to provide mechanical buttressing.
- Closure: Close the skin over a drain if necessary. Make relaxing incisions around the pin sites to prevent skin tethering and subsequent pin tract infections.
- Apply a removable volar wrist splint.
Surgical Technique: Intramedullary Nailing with Provisional Fixation (Shin and Jones)
For surgeons preferring internal fixation without the risks of prominent plates, Shin and Jones described an elegant technique utilizing an intramedullary nail, facilitated by provisional external fixation.
Provisional Stabilization and Osteotomy
- Apply a spanning external fixation device, such as the Agee-Wristjack, to provisionally stabilize the wrist and apply longitudinal traction.
- Perform the corrective osteotomy.
- Important Biomechanical Note: Volar tilt cannot be significantly corrected after the intramedullary nail is fully seated. Therefore, volar tilt must be anatomically restored and provisionally fixed (via the external fixator and K-wires) prior to nail insertion. Radial height and inclination, however, can be fine-tuned during nail insertion.
Approach and Canal Preparation
- Incision: Make a 3-cm longitudinal incision over the radial styloid.
- Dissection: Use blunt dissection to develop the interval between the first and second dorsal compartments. Identify and gently retract the superficial branches of the radial sensory nerve.
- Guidewire Placement: Place a 0.062-inch Kirschner wire into the radial styloid, precisely in the "bare spot" between the first and second dorsal compartments.
- Reaming: Pass a cannulated reamer over the K-wire.
- Pitfall: Do not violate the articular surface of the radiocarpal joint or the DRUJ.
- Enter the distal radius with a starting awl and broach. Sequentially ream the medullary canal while the osteotomy is held in its reduced position.
Implant Insertion and Locking
- Implant Selection: Select an intramedullary nail. Downsizing the nail proximally allows for a few degrees of toggle, which facilitates further manipulation and final reduction of the radial diaphysis.
- Insertion: Attach the implant to the aiming jig and advance it into the broached path through the radial styloid.
- Distal Locking: Place three divergent locking screws through the aiming jig, directing them into the subchondral bone of the distal radius.
- Pearl: The screws must remain strictly subchondral to optimize purchase in the dense cancellous bone. Avoid penetration into the radiocarpal joint.
- Final Manipulation: If necessary, optimize the final position by manipulating the handle of the aiming jig, which remains attached to the nail within the distal fragment.
- Bone Grafting: Pack cancellous or corticocancellous bone graft into the dorsal osteotomy defect.
- Proximal Locking: Place the proximal locking screws using the locking jig over the dorsum of the distal radius through the primary incision, thereby locking the osteotomy in its corrected position.
- Remove the provisional external fixator.
Postoperative Care and Rehabilitation Protocols
Postoperative rehabilitation is critical for maximizing functional outcomes and preventing stiffness.
Non-Spanning External Fixation Protocol
- Immediate Post-Op: Active finger motion (full composite flexion and extension) is encouraged immediately to prevent tendon adhesions and reduce edema.
- Pin Care: Patients are instructed on daily pin site care using chlorhexidine or saline solutions.
- Weeks 0-2: The wrist is supported in a removable splint. Patients are seen weekly.
- Weeks 2-6: After suture removal, active range of motion (ROM) of the wrist is initiated, as the non-spanning fixator permits radiocarpal movement. The removable splint is worn between exercise sessions.
- Fixator Removal: The external fixator is typically removed in the outpatient clinic once radiographic union is confirmed, usually at an average of 7.5 weeks postoperatively.
Intramedullary Nailing Protocol
- Immediate Post-Op: A plaster volar splint is applied with the metacarpophalangeal (MCP) joints and fingers left completely free to allow immediate digital ROM.
- Weeks 1-2: The initial splint is left in place for 10 to 14 days.
- Weeks 2-6: Sutures are removed, and a custom removable thermoplastic splint is applied. Gentle, progressive active and active-assisted ROM of the wrist and forearm is commenced.
- Weeks 6+: Strengthening exercises are introduced once clinical and radiographic healing is evident.
Complications and Clinical Outcomes
Clinical Outcomes
Both techniques yield highly satisfactory results in appropriately selected patients. In Melendez’s series, all osteotomies healed at an average of 7.5 weeks. Patients experienced significant pain reduction, increased mobility, and marked improvement in radiographic parameters. Postoperative motion averaged 88% of the contralateral, uninjured wrist.
In broader studies evaluating intraarticular and extraarticular malunions (utilizing Fernandez and Gartland/Werley criteria), corrective osteotomies achieved 83% good or excellent results. Grip strength typically returns to approximately 83% of the contralateral side, with functional arcs of motion averaging 56 degrees of flexion and 56 degrees of extension. While these procedures cannot restore a perfectly normal wrist, they reliably improve function, alleviate pain, and delay the onset of post-traumatic arthrosis in healthy, active patients.
Complications
Despite the advantages of avoiding prominent plates, complications can still occur:
* Pin Site Infections: The most common complication in external fixation. Typically superficial, these are managed effectively with local wound care, oral cephalosporins, and increased frequency of pin cleaning.
* Wound Dehiscence: Tension on the skin around pin sites can lead to dehiscence. Relaxing incisions during the index procedure are critical. Severe dehiscence may require early fixator removal and conversion to cast immobilization.
* Neurologic Injury: Transient radial sensory nerve paresthesia can occur due to traction or direct irritation during pin/nail insertion. Meticulous soft tissue protection is mandatory.
* Loss of Reduction: Requires remanipulation or revision fixation. This is often secondary to poor bone quality (osteoporosis) or premature removal of the fixation device.
* Hardware Removal: While significantly less common than with dorsal plating, some patients may still require removal of intramedullary locking screws if they back out or cause localized irritation.
By adhering to strict biomechanical principles, meticulous surgical technique, and structured rehabilitation, orthopaedic surgeons can effectively utilize external fixation and intramedullary nailing to salvage complex distal radius malunions, restoring function and quality of life to their patients.
You Might Also Like