Surgical Correction of First Metatarsal Malunion
Key Takeaway
First metatarsal malunion frequently presents with transfer metatarsalgia, altered forefoot biomechanics, and multiplanar deformities. Successful surgical correction demands a meticulous understanding of the first metatarsal's vascular supply to prevent avascular necrosis. This guide details the step-by-step execution of corrective osteotomies, including the 'broomstick' technique, emphasizing precise anatomical alignment, rigid internal fixation, and strategic postoperative rehabilitation to restore optimal weight-bearing distribution and functional range of motion.
INTRODUCTION TO FIRST METATARSAL MALUNION
The first ray is a complex biomechanical unit responsible for bearing approximately one-third of the body's weight during the stance phase of gait. Surgical interventions for hallux valgus, such as proximal or distal chevron osteotomies, carry an inherent risk of complications, including malunion. Malunion of the first metatarsal typically presents as a multiplanar deformity—most commonly involving dorsal elevation (dorsiflexion malunion), excessive shortening, or residual varus/valgus angulation.
These anatomical alterations disrupt the normal weight-transfer mechanism of the forefoot. Iatrogenic elevation or excessive shortening of the first metatarsal head offloads the first ray, transferring pathological ground reaction forces to the lesser metatarsals. This biomechanical failure inevitably results in transfer metatarsalgia, intractable plantar keratoses, and severe forefoot pain. Corrective surgery requires a profound understanding of forefoot biomechanics, meticulous preoperative planning, and strict adherence to vascular safe zones to prevent the catastrophic complication of avascular necrosis (AVN) of the metatarsal head.
VASCULAR ANATOMY AND SURGICAL SAFE ZONES
The vascular supply to the first metatarsal head is delicate and highly susceptible to iatrogenic injury during corrective osteotomies and capsular releases. A thorough comprehension of the extraosseous and intraosseous arterial networks is mandatory for any reconstructive foot and ankle surgeon.
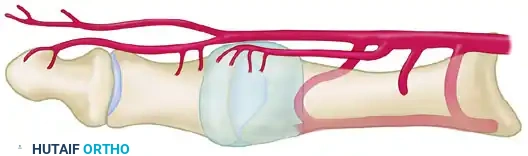
The Medial and Plantar Blood Supply
The primary blood supply to the first metatarsal head is derived from the first dorsal metatarsal artery, the first plantar metatarsal artery, and the superficial branch of the medial plantar artery. These vessels give rise to a rich network of pericapsular perforators that enter the metatarsal head distally. The principal nutrient artery enters the lateral aspect of the metatarsal shaft proximally.
Surgical Warning: The site of a cortical osteotomy must remain strictly within the interval between the pericapsular perforators distally and the nutrient artery proximally. Violation of this safe zone significantly increases the risk of osteonecrosis.
The Dorsal Vulnerability
From a dorsal perspective, the relationship between the osteotomy site, the nutrient artery, and the distal pericapsular perforators becomes highly apparent. The first dorsal metatarsal artery and its branching network are especially vulnerable to overpenetration of the lateral cortex by an oscillating saw during the osteotomy cut.
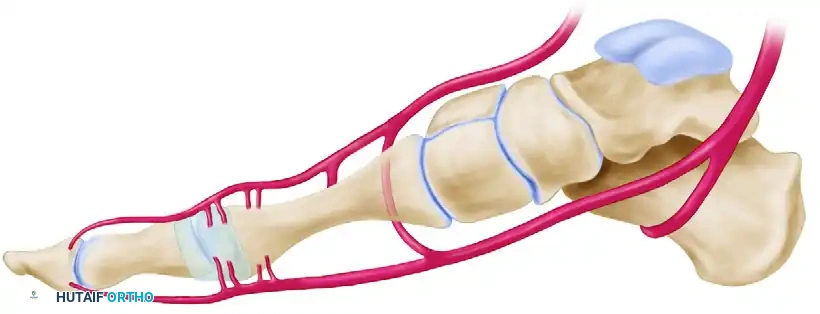
Safe Zones for Lateral Capsular Release
When a lateral capsular release is indicated to correct residual deformity, it must be executed with precision. The safe zone for a lateral capsular release spares all perforators entering the metatarsal head proximally and all perforators entering the proximal phalanx distally. This is achieved as long as the capsulotomy is performed strictly in line with the metatarsophalangeal (MTP) joint in the coronal plane.

PREOPERATIVE EVALUATION AND IMAGING
Patients presenting with a suspected malunion require a comprehensive clinical and radiographic evaluation.
Clinical Assessment
- Gait Analysis: Observe for antalgic gait, avoidance of first ray loading, and lateral weight shift.
- Plantar Evaluation: Inspect for hyperkeratotic lesions beneath the second and third metatarsal heads, indicative of transfer metatarsalgia.
- Range of Motion (ROM): Assess the first MTP joint for stiffness, crepitus, and pain, which may indicate concurrent degenerative joint disease or capsular contracture.
Radiographic Protocol
Standard weight-bearing radiographs are non-negotiable.
* Anteroposterior (AP) View: Evaluates the intermetatarsal angle, hallux valgus/varus angle, and relative metatarsal lengths.
* Lateral View: Critical for assessing sagittal plane alignment. Dorsal elevation of the first metatarsal head is a primary driver of transfer lesions.
* Sesamoid Axial View: Determines the position of the sesamoid apparatus relative to the crista, identifying subluxation or arthritic changes.
SURGICAL TECHNIQUE: THE "BROOMSTICK" OSTEOTOMY
The "broomstick" osteotomy is a highly versatile, multiplanar corrective technique designed to address complex malunions of the first metatarsal. By utilizing a meticulously drilled semicircular arc, the surgeon can rotate and translate the capital fragment in multiple planes while minimizing further bone loss and shortening.
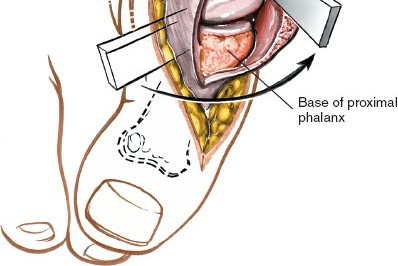
Step 1: Exposure and Preparation
- Utilize a dorsal or medial longitudinal incision, incorporating or excising the previous surgical scar.
- Perform a meticulous dissection, preserving the dorsal sensory nerves and the critical vascular structures outlined previously.
- Expose the malunion site subperiosteally, limiting the stripping of the capital fragment to preserve its tenuous blood supply.
Step 2: The Unicortical Drill Arc
- Utilize a 2-mm drill bit (or smaller, such as a 1.5-mm K-wire, if available to minimize thermal necrosis and bone loss).
- Create a precise semicircle of unicortical holes extending from the dorsal cortex to the plantar cortex.
- This arc should be positioned adjacent to, or directly within, the previous osteotomy site, encompassing an arc of approximately 150 degrees.
Clinical Pearl: The use of multiple small drill holes rather than an immediate saw cut prevents the saw blade from skiving, reduces thermal osteonecrosis, and preserves maximal bone stock, which is critical in a metatarsal that may already be iatrogenically shortened.
Step 3: Osteotome Connection
- Connect the unicortical drill holes using only the corner of a 5-mm or 6-mm sharp, straight, thin osteotome.
- Use the osteotome strictly as a cutting edge to break the cortical bridges between the drill holes.
- Crucial Step: Do not penetrate the lateral cortex with the osteotome at this stage. Premature penetration can lead to uncontrolled propagation of the fracture line into the diaphysis or the articular surface.
Step 4: Completion of the Osteotomy
- Return to the 2-mm (or smaller) drill bit.
- Make numerous holes in the lateral cortex by passing the drill through the newly created unicortical osteotomized semicircle.
- Complete the osteotomy using a thin (4 mm wide) blade on a small power oscillating saw. This staged, drill-assisted technique significantly reduces the amount of shortening compared to a standard freehand saw cut.
Step 5: Multiplanar Deformity Correction
- Sagittal Plane (Elevation): Manually rotate the metatarsal head plantarward until the dorsal cortex of the capital (distal) fragment is positioned inferior (plantar) to the dorsal cortex of the shaft (proximal) fragment. This maneuver slightly plantarflexes the first metatarsal head, restoring its ability to assume the appropriate weight-bearing load across the forefoot.
- Coronal/Transverse Plane (Varus/Valgus): If the capital fragment has healed in varus or valgus, reverse the deformity until the capital fragment is reduced to normal anatomical alignment with the shaft.
- The "broomstick" configuration allows the capital fragment to pivot smoothly, enabling simultaneous correction of all planes of deformity without the need for complex closing or opening wedges.
Step 6: Internal Fixation
- Once anatomical alignment is achieved and temporarily held with reduction forceps or provisional K-wires, definitive internal fixation is applied.
- Fixation options include smooth Kirschner wires, small fragment cortical screws (e.g., 2.0 mm or 2.4 mm), or absorbable pins.
- While interfragmentary wires are technically difficult to utilize in this confined location, they are not strictly contraindicated if rigid compression can be achieved.
MANAGEMENT OF IATROGENIC HALLUX VARUS
Hallux varus is a distressing complication often resulting from over-resection of the medial eminence, excessive lateral capsular release, or over-tightening of the medial capsule during a McBride or similar bunionectomy. It presents with medial deviation of the great toe, intrinsic minus deformity, and subluxation of the sesamoid apparatus.
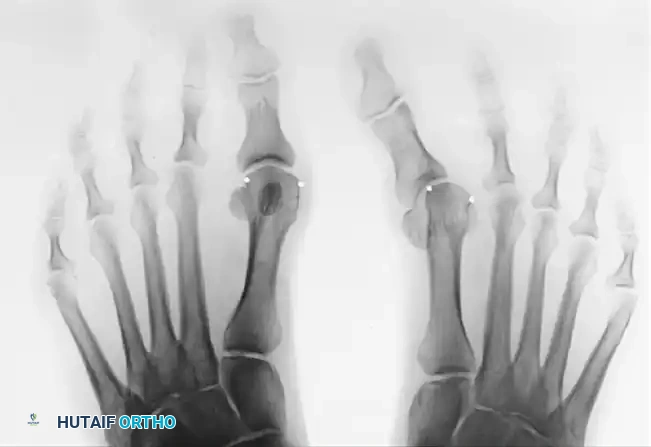
Figure A demonstrates a severe iatrogenic hallux varus following a McBride bunionectomy, characterized by medial deviation of the proximal phalanx and subluxation of the tibial sesamoid.
Correction of a rigid or long-standing hallux varus often requires a salvage procedure if soft tissue reconstruction (e.g., extensor hallucis brevis transfer) is no longer viable due to joint contracture or arthrosis. In older, lower-demand patients, a Keller resection arthroplasty or a first MTP joint arthrodesis may be indicated to restore a plantigrade, braceable foot.
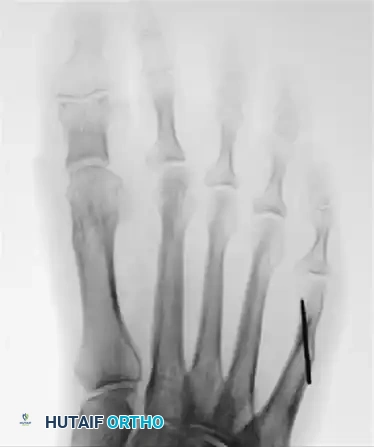
Figure B illustrates the radiographic correction of the hallux varus deformity following a Keller procedure, which decompresses the joint and allows for realignment of the first ray.
COMPLICATIONS: METATARSAL SHORTENING AND TRANSFER METATARSALGIA
The Biomechanics of Shortening
Some degree of shortening of the first metatarsal is an expected consequence of both proximal and distal chevron osteotomies, as well as closing wedge osteotomies. The literature reports an average shortening of 2 to 6 mm with distal osteotomies and nearly 3 mm with proximal osteotomies.
While minor shortening is often well-tolerated, significant shortening of the first metatarsal disrupts the normal weight-transfer mechanism (the windlass mechanism of Hicks). This results in a functional elevation of the first ray, leading to an overload of the adjacent lesser metatarsals. The clinical manifestation is severe transfer metatarsalgia, characterized by intractable pain and hyperkeratosis beneath the second and third metatarsal heads.
Conservative Management
Initial treatment for transfer metatarsalgia must always be conservative. This includes:
* Custom orthoses with a first ray cut-out and a metatarsal pad placed proximal to the lesser metatarsal heads.
* Rocker-bottom shoe modifications to offload the forefoot during the terminal stance phase of gait.
* Activity modification and non-steroidal anti-inflammatory drugs (NSAIDs).
Operative Management Strategies
When conservative treatment fails and symptoms remain debilitating, operative intervention is indicated. The surgeon faces a philosophical and biomechanical choice: alter the normal lesser metatarsals to match the shortened first metatarsal, or lengthen the abnormal first metatarsal.
1. Lesser Metatarsal Osteotomies
Shortening or elevating osteotomies of the lesser metatarsals (e.g., Weil osteotomies) are frequently recommended to restore the metatarsal parabola.
* Advantages: Technically straightforward, reliable bone healing due to large cancellous surfaces.
* Complications: The potential exists for several significant complications, including nonunion, the dreaded "floating-toe" deformity (due to intrinsic muscle imbalance), persistent metatarsalgia, and marked overall forefoot shortening.
2. Distraction Osteogenesis of the First Metatarsal
Rather than shortening the normal lesser metatarsals and further altering the native anatomy of the foot, distraction osteogenesis of the first metatarsal has been recommended to more closely restore normal foot anatomy and biomechanics.
* Technique: As described by Hurst and Nunley, this technique utilizes a unilateral, single-plane external fixator. Following a low-energy corticotomy, gradual distraction is applied (typically 1 mm per day in divided increments) until the anatomical length of the first metatarsal is restored.
* Outcomes: While biomechanically sound, there are relatively few large-scale reports on the long-term outcomes of this procedure. It requires meticulous pin-site care, prolonged external fixation time, and high patient compliance.
POSTOPERATIVE CARE AND REHABILITATION
The postoperative protocol following the correction of a first metatarsal malunion must be tailored to the rigidity of the internal fixation, the patient's body habitus, bone quality, and anticipated compliance.
Weight-Bearing Status
- Immediate Protected Weight-Bearing: Depending on the stability of the construct, protected weight-bearing in a rigid postoperative shoe or a controlled ankle motion (CAM) boot can occasionally begin immediately.
- Immobilization: In cases of tenuous fixation, poor bone stock, or extensive multiplanar correction, a short-leg cast that extends distal to the toes is mandatory. The patient must remain strictly non-weight-bearing with crutches, a knee scooter, or a walker for 4 to 6 weeks.
Clinical and Radiographic Union
Full, unprotected weight-bearing in standard footwear is only permitted when union of the osteotomy is apparent both clinically (absence of pain on palpation and loading) and radiographically (bridging trabeculae across three out of four cortices). This typically occurs between 6 and 10 weeks postoperatively.
Long-Term Expectations
Patient Counseling: The patient must be explicitly informed prior to surgery that permanent loss of some metatarsophalangeal joint motion is highly probable due to capsular scarring and altered joint mechanics. However, they should be reassured that overall foot function and pain levels should be significantly improved.
Aggressive physical therapy focusing on first MTP joint dorsiflexion and plantarflexion should commence as soon as clinical union is achieved. Patients should be advised that the final range of motion and maximal medical improvement are often not reached until 12 to 18 months postoperatively. Soft tissue remodeling and resolution of postoperative edema are gradual processes that require sustained patient compliance and realistic expectations.
You Might Also Like