The Latarjet Procedure: Surgical Technique & Glenoid Bone Loss
Key Takeaway
The Latarjet procedure is the gold standard for treating recurrent anterior shoulder instability associated with significant anterior glenoid bone loss or an engaging Hill-Sachs lesion. By transferring the coracoid process to the anterior glenoid rim, it restores the articular arc and provides a dynamic subscapularis sling. This guide details the indications, biomechanical principles, step-by-step surgical technique, and complication management for optimal patient outcomes.
ANTERIOR STABILIZATION WITH ASSOCIATED GLENOID DEFICIENCY (LATARJET PROCEDURE)
The management of recurrent anterior glenohumeral instability in the setting of significant bone loss remains one of the most challenging paradigms in orthopedic surgery. In patients who present with an "inverted pear-shaped" glenoid and an engaging Hill-Sachs lesion, soft-tissue stabilization alone (e.g., arthroscopic Bankart repair) carries an unacceptably high failure rate. For these complex presentations, the Latarjet procedure (coracoid transfer) is widely considered the gold standard.
The procedure effectively addresses combined bipolar bone deficiency. The transferred coracoid bone graft corrects the anterior glenoid deficiency, allowing the joint to resist axial forces across an expanded glenoid diameter. Furthermore, the graft lengthens the glenoid articular arc, which prevents a concurrent Hill-Sachs lesion from engaging the anterior rim during abduction and external rotation. This technique is particularly indicated when a large (35% to 45%) humeral head lesion is present alongside anterior glenoid attrition.
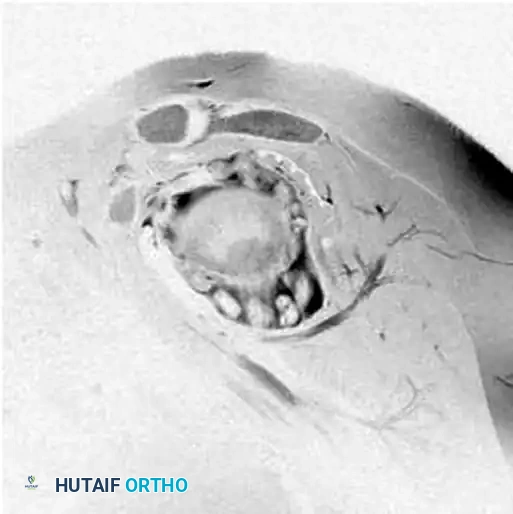
Preoperative sagittal MRI of the shoulder demonstrating multiple loose bodies and significant anterior structural compromise.
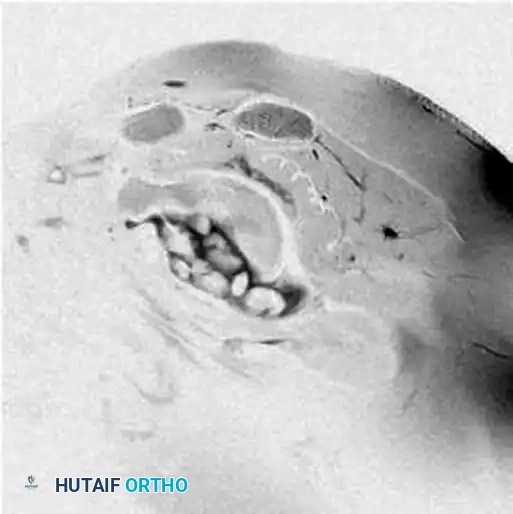
Axial MRI view highlighting loose bodies and the loss of approximately 35% of the anterior glenoid articular surface.
Biomechanical Principles: The "Triple Blocking" Effect
The success of the Latarjet procedure relies on a synergistic biomechanical triad, originally described by Patte, known as the "triple blocking" effect:
1. Bone Effect: The coracoid bone block restores the anterior-posterior diameter of the glenoid, increasing the articular surface area and preventing the humeral head from translating anteriorly.
2. Sling Effect: By transferring the coracoid with the attached conjoined tendon (short head of the biceps and coracobrachialis) through a horizontal split in the subscapularis, a dynamic sling is created. When the arm is abducted and externally rotated (the position of apprehension), the conjoined tendon acts as a tension band across the anterior-inferior capsule.
3. Capsular Effect: The repair of the native capsule to the stump of the coracoacromial (CA) ligament on the transferred bone block restores anterior capsular tension.
💡 Clinical Pearl: Patient Selection
A three-dimensional computed tomography (3D CT) scan with humeral head subtraction is mandatory for quantifying glenoid bone loss. Glenoid deficiency exceeding 20-25%, or the presence of an off-track engaging Hill-Sachs lesion, are absolute indications for an open Latarjet procedure over an arthroscopic soft-tissue repair.
SURGICAL TECHNIQUE: THE WALCH AND BOILEAU MODIFICATION
The following step-by-step technique details the modified Latarjet procedure as popularized by Walch and Boileau, emphasizing a horizontal subscapularis split and flush bicortical screw fixation.
Patient Positioning and Preparation
Optimal positioning is critical for adequate exposure and intraoperative fluoroscopic assessment.
- Anesthesia & Setup: After the induction of general endotracheal anesthesia (often combined with an interscalene regional block for postoperative analgesia), secure the patient in a modified beach-chair position.
- Scapular Positioning: Place a small folded towel or pillow behind the medial border of the scapula. This serves to protract the scapula and position the glenoid articular surface perpendicular to the operative table, greatly facilitating the trajectory for bone block fixation.
- Draping: Sterilize and drape the neck, chest, axilla, and entire arm free to allow unhindered manipulation of the limb throughout the procedure.
Approach and Exposure
- Incision: Make a 4- to 7-cm vertical or slightly oblique skin incision beginning just inferior to the tip of the coracoid process and extending toward the axillary fold.
Vertical incision marked under the tip of the coracoid process.
- Deltopectoral Interval: Identify and open the deltopectoral interval. The cephalic vein should generally be retracted laterally with the deltoid muscle to preserve its venous drainage and minimize bleeding, though medial retraction is acceptable if the anatomy dictates.
- Retraction: Place a self-retaining retractor (e.g., Gelpi or Kolbel) into the deltopectoral interval. Insert a Hohmann retractor over the superior aspect of the coracoid process to expose its entire length.
Harvesting and Preparation of the Bone Block
Meticulous preparation of the coracoid is essential to prevent graft fracture and ensure robust healing.
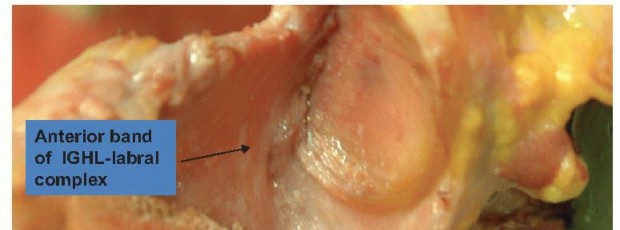
- Coracoacromial Ligament Release: Position the patient’s arm in 90 degrees of abduction and external rotation. Identify the coracoacromial (CA) ligament and section it approximately 1 cm from its insertion on the lateral aspect of the coracoid. This 1-cm stump will later be used for capsular repair.
- Pectoralis Minor Release: Adduct and internally rotate the arm to relax the neurovascular structures. Release the pectoralis minor insertion from the medial aspect of the coracoid process. Use a periosteal elevator to expose the base of the coracoid, allowing clear visualization of the coracoid "knee" (the junction between the horizontal and vertical parts).
- Osteotomy: Use a curved osteotome or a small angulated oscillating saw to osteotomize the coracoid at its base (the "knee"), directing the cut from medial to lateral. Carefully obtain hemostasis at the osteotomy site using bone wax or electrocautery.

Harvest of the bone block corresponding to the horizontal part of the coracoid process, retaining the conjoined tendon and the CA ligament stump.
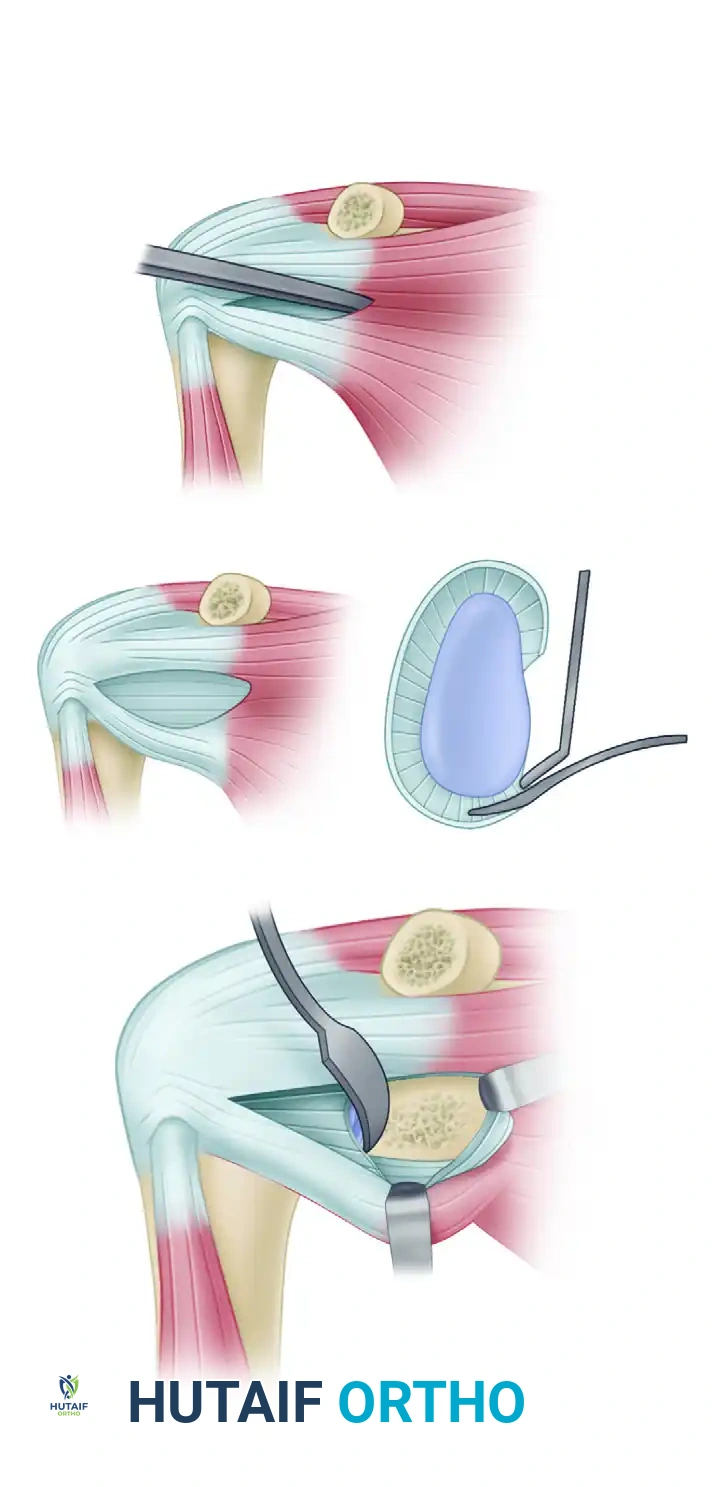
Detailed view of the coracoid osteotomy and preparation.
- Graft Preparation: Evert the harvested bone graft using a towel clip or specialized coracoid grasper. Decorticate the deep (inferior) surface of the coracoid using a cutting rongeur or oscillating saw to expose a flat, bleeding cancellous bone bed. This surface will interface with the anterior glenoid.
- Drilling: With a 3.2-mm drill, create two parallel holes in the central axis of the bone graft, spaced approximately 1 cm apart.
- Storage: Measure the thickness of the bone graft with a caliper to determine the appropriate screw length later. Place the prepared graft safely under the pectoralis major muscle for temporary storage, holding it in place with the self-retaining retractor.
⚠️ Surgical Warning: Neurovascular Protection
The musculocutaneous nerve typically enters the conjoined tendon 3 to 5 cm distal to the coracoid tip. Avoid excessive distal dissection or aggressive medial retraction of the conjoined tendon to prevent neuropraxia.
Division of the Subscapularis and Capsulotomy
The horizontal split of the subscapularis is a hallmark of the modern Latarjet, preserving the muscle's function and innervation.
- Subscapularis Split: Place the upper limb in full external rotation to place the subscapularis under tension. Identify the superior and inferior margins of the tendon. Using electrocautery followed by Mayo scissors, divide the muscle horizontally at the junction of the superior two-thirds and inferior one-third.
- Deep Dissection: Carefully carry the division down to the underlying white joint capsule. Extend the split medially by inserting a 4 × 4-inch sponge into the cleavage plane, exposing the subscapular fossa. Extend the division laterally to the lesser tuberosity.
- Retraction: Retract the superior two-thirds of the subscapularis superiorly. A Steinmann pin or specialized retractor can be impacted into the superior part of the glenoid neck to hold the muscle out of the way. Retract the inferior one-third inferiorly with a Hohmann retractor placed under the scapular neck.

Division of the subscapularis horizontally, exposing the underlying capsule and anterior glenoid rim.

Retraction of the split subscapularis to visualize the anterior-inferior glenoid.
- Capsulotomy: Place the arm in neutral rotation. Make a 1.5-cm vertical capsulotomy at the level of the anterior-inferior margin of the glenoid. Move the arm into full internal rotation to insert a Fukuda or humeral head retractor, resting it on the posterior margin of the glenoid to subluxate the humeral head posteriorly and expose the joint.
Glenoid Preparation
- Joint Inspection: Inspect the labrum, articular cartilage, and the insertion site of the glenohumeral ligaments. Resect the medial capsular flap along with any damaged, degenerative portions of the labrum or loose fracture fragments.
- Decortication: Use a scalpel to clear the anterior-inferior margin of the glenoid (from the 2 o'clock to 5 o'clock position for a right shoulder). Decorticate the anterior glenoid neck with a curette, burr, or osteotome to create a flat, bleeding cancellous bed that perfectly matches the prepared surface of the coracoid graft.
Decortication of the anterior-inferior glenoid rim to create a bleeding bone bed for graft incorporation.
Fixation of the Bone Block
Precise positioning of the bone block is the most critical step to ensure stability and prevent postoperative osteoarthritis.
- Positioning: Retrieve the bone block and insert it through the horizontal split in the subscapularis. Position it flush with the anterior-inferior margin of the articular cartilage.
- Assessment: Check the position of the bone block with the arm in internal rotation. Never accept a lateral overhang of the coracoid into the joint space, as this will inevitably lead to rapid, severe degenerative joint disease. A perfectly flush position is ideal; a slight medial position (no more than 1 to 2 mm) is acceptable.
Bicortical fixation of the bone block flush with the articular margin. The outer capsular flap is sutured to the CA ligament stump.
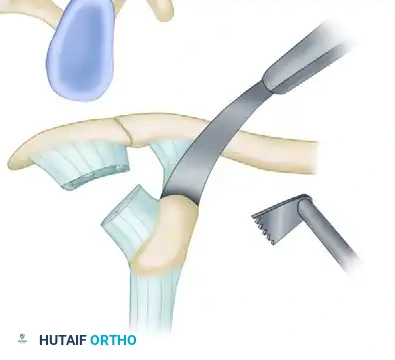
Cross-sectional diagram illustrating the flush positioning of the coracoid graft and parallel screw trajectory.
- Drilling the Glenoid: Insert a 3.2-mm drill through the inferior hole of the bone graft and into the glenoid neck. The trajectory must be anterior-posterior and strictly parallel to the glenoid articular surface.
- Measurement: Temporarily reflect the bone block or use a depth gauge through the drilled hole to measure the required screw length (typically 30 to 36 mm).
- Screw Insertion: Place an AO malleolar screw (or fully threaded cortical screw, depending on surgeon preference) into the posterior cortex to secure the bone block. Tighten this inferior screw loosely to allow the graft to rotate for final superior-inferior adjustments.
- Final Fixation: Once the superior aspect of the block is perfectly aligned, drill through the superior hole, measure, and insert the second AO malleolar screw. Tighten both screws firmly to achieve rigid bicortical compression. Do not use washers, as they may cause impingement against the humeral head.

Final seating of the coracoid block with two parallel screws.
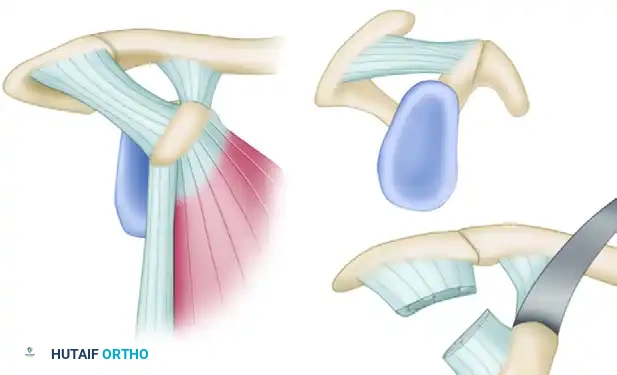
- Capsular Repair: Suture the lateral capsular flap to the retained stump of the coracoacromial ligament on the bone block. This renders the bone block extra-articular and restores anterior capsular tension.
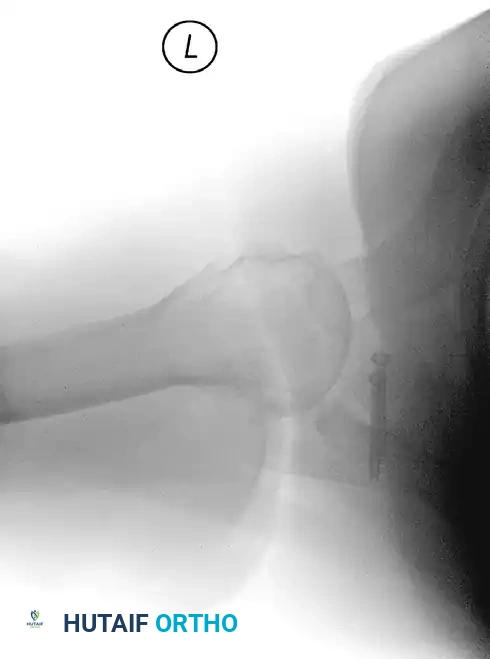
Postoperative West Point axillary radiograph showing restoration of the anterior glenoid surface and flush graft positioning.

Postoperative Anteroposterior (AP) radiograph demonstrating parallel screw fixation of the Latarjet graft.
MANAGEMENT OF UNSUCCESSFUL SURGICAL REPAIRS
Failure of anterior stabilization procedures can occur due to failure to correct the underlying pathology (e.g., unrecognized bone loss), failure of biological healing, or poor patient compliance.
Diagnostic Evaluation of Failure
All potential causes of failure must be fully evaluated. A comprehensive workup should include:
- 3D CT Evaluation: Essential for quantifying recurrent or unaddressed bony deficiency of the glenoid and humeral head. It also assesses the position, healing, and potential osteolysis of a previous Latarjet graft.
- MR Arthrography: Useful to identify the exact site of capsular failure, labral tearing, or failure of soft-tissue healing.
Revision Strategies
- Soft-Tissue Failure: If failure is determined to be caused solely by failure of soft tissues to heal (with intact bone), the procedure may be revised arthroscopically, though open repair remains a highly reliable option.
- Humeral Head Deficiency: Significant engaging Hill-Sachs lesions missed during the index procedure are usually corrected with an arthroscopic remplissage procedure (insetting the infraspinatus into the defect).
- Glenoid Deficiency: If a primary soft-tissue repair fails and imaging reveals glenoid bone loss greater than 20-25%, the patient must be approached with an open Latarjet procedure. If a primary Latarjet fails due to graft resorption or fracture, revision options include iliac crest bone grafting (Eden-Hybinette procedure) or distal tibial allografting.
💡 Clinical Pearl: Managing Stiffness
Excessive loss of motion following stabilization is often due to overtightening of the capsule or hardware impingement. If severe restriction of rotation is present (e.g., < 15 degrees of external rotation), an arthroscopic capsular release should be considered. In refractory cases, an open coronal subscapularis lengthening may be required.
POSTOPERATIVE REHABILITATION PROTOCOL
A structured, goal-specific rehabilitation program is paramount to achieving a stable, functional shoulder while protecting the healing bone block and subscapularis split.
Phase I: Protection Phase (Weeks 0-4)
- The shoulder is immobilized in a sling for 4 weeks.
- Pendulum exercises and passive forward flexion (up to 90 degrees) are initiated immediately.
- External rotation is strictly limited to neutral (0 degrees) to protect the subscapularis split and avoid tension on the bone block.
- Active elbow, wrist, and hand range of motion (ROM) are encouraged.
Phase II: Intermediate Phase (Weeks 4-8)
- Discontinue the sling.
- Progress passive and active-assisted ROM. Forward flexion is advanced to full.
- External rotation is gradually increased by 10-15 degrees per week.
- Initiate gentle isometric strengthening for the rotator cuff and deltoid.
Phase III: Strengthening Phase (Weeks 8-12)
- Radiographic confirmation of bone block incorporation is typically assessed at 8 weeks.
- Once union is confirmed, begin isotonic strengthening of the rotator cuff, deltoid, and scapular stabilizers.
- Progress active external rotation and abduction.
Phase IV: Return to Play (Months 3-6)
- Advanced plyometrics and sport-specific drills.
- Return to contact sports is generally permitted at 5 to 6 months postoperatively, provided there is full ROM, symmetric strength, and radiographic evidence of solid graft union.
COMPLICATIONS AND AVOIDANCE
Reported complications of the Latarjet procedure include recurrent instability, loss of motion, neurovascular injury, infection, and postoperative degenerative changes. These can be significantly reduced with meticulous preoperative planning and precise intraoperative execution.
- Degenerative Joint Disease (DJD): The most devastating long-term complication. It is almost exclusively caused by lateral overhang of the bone block. The graft must be flush or slightly medial (1-2 mm).
- Neurovascular Injury: The musculocutaneous nerve and axillary nerve are at highest risk. Avoid aggressive retraction of the conjoined tendon and ensure the Hohmann retractor under the scapular neck is placed carefully to protect the axillary nerve.
- Graft Nonunion/Osteolysis: Often results from inadequate decortication of the glenoid or coracoid, or failure to achieve rigid bicortical compression with the screws.
- Hardware Complications: Screws that are too long can irritate the suprascapular nerve posteriorly. Screws placed with washers can impinge on the humeral head anteriorly.
The basic principles for successful surgical repair—whether primary or revision—remain constant: create an optimal healing environment, re-create the glenoid concavity, secure anatomical capsular fixation, restore physiological capsular tension, and ensure supervised, goal-specific postoperative therapy.
You Might Also Like