Transtendinous Repair of Partial Articular-Side Supraspinatus Tendon Avulsions
Key Takeaway
The transtendinous repair of partial articular-side supraspinatus tendon avulsion (PASTA) lesions is an advanced arthroscopic technique designed to restore the rotator cuff footprint while preserving intact lateral fibers. By utilizing a transtendinous approach, surgeons can achieve superior biomechanical fixation, optimize the healing environment, and minimize iatrogenic trauma. This comprehensive guide details patient positioning, portal placement, anchor insertion, suture management, and evidence-based postoperative rehabilitation protocols for optimal clinical outcomes.
INTRODUCTION TO PARTIAL ARTICULAR-SIDE SUPRASPINATUS TENDON AVULSIONS (PASTA)
Partial articular-side supraspinatus tendon avulsion (PASTA) lesions represent a significant source of glenohumeral pathology, particularly in overhead athletes and the aging population. The management of these lesions is dictated by the depth of the tear, the quality of the remaining tendon, and the patient's functional demands. When the articular-side avulsion exceeds 50% of the tendon footprint thickness (approximately 6 to 7 mm), surgical intervention is generally indicated.
Historically, surgeons debated whether to complete the tear and perform a standard full-thickness repair or to perform an in situ transtendinous repair. Contemporary biomechanical evidence strongly supports the transtendinous approach. By preserving the intact bursal-sided fibers, the surgeon maintains the native lateral attachment of the rotator cuff. This intact lateral bridge acts as a biological splint, reducing tension on the repaired articular fibers and allowing for a modified double-row equivalent construct that maximizes the footprint contact area for optimal biological healing.
Clinical Pearl: Leaving the lateral attachment intact allows the suture anchor to be placed more medially. This creates a biomechanically superior double-row type of fixation that reestablishes the native footprint and significantly increases the contact area for tendon-to-bone healing.
PREOPERATIVE PLANNING AND PATIENT POSITIONING
Meticulous patient positioning is the foundation of a successful arthroscopic transtendinous repair. The procedure requires dynamic manipulation of the operative extremity to optimize visualization and anchor trajectory.
Patient Positioning
Place the patient in the lateral decubitus position. Ensure all bony prominences are meticulously padded, and utilize a beanbag or specialized lateral positioner to secure the torso. The operative arm is placed in a sterile traction sleeve connected to a balanced suspension system.
Dynamic Arm Positioning
The degree of glenohumeral abduction must be adjusted throughout the procedure to facilitate different surgical steps:
* Subacromial Work (30 Degrees): Placing the arm in approximately 30 degrees of abduction is optimal for performing the initial diagnostic bursoscopy, acromioplasty (if indicated by a type II or III acromion), and bursectomy.
* Transtendinous Repair (70 Degrees): For the transtendinous repair itself, the arm must be gently repositioned to about 70 degrees of abduction. This maneuver relaxes the supraspinatus tendon, opens the subacromial space, and provides the optimal perpendicular trajectory for suture anchor placement into the medial footprint. An assistant may manually position the arm to provide the exact vector required for precise anchor insertion.
SURGICAL TECHNIQUE: STEP-BY-STEP TRANSTENDINOUS REPAIR
Portal Placement and Diagnostic Arthroscopy
Establish standard arthroscopic portals to ensure comprehensive visualization and instrumentation angles.
1. Posterior Portal: Utilized as the primary viewing portal for the glenohumeral joint.
2. Anterior Midglenoid Portal: Established via an outside-in technique through the rotator interval for instrumentation and suture management.
3. Anterolateral Portal: Essential for subacromial viewing and knot tying.
Tendon Debridement and Footprint Preparation
Begin within the glenohumeral joint. Identify the PASTA lesion at the medial footprint of the greater tuberosity.
Débride the frayed, devitalized edges of the articular-side tear using an arthroscopic shaver. This step is critical to stimulate a localized inflammatory response, which is a prerequisite for soft tissue healing. Following soft tissue debridement, abrade the exposed bony tuberosity (the footprint) using a shaver or a small arthroscopic burr to expose bleeding cancellous bone.
Surgical Warning: When abrading the footprint, start at the articular margin and extend laterally, but exercise extreme caution to not disrupt the intact lateral attachment of the cuff. Preserving these lateral fibers is the crux of the transtendinous technique.
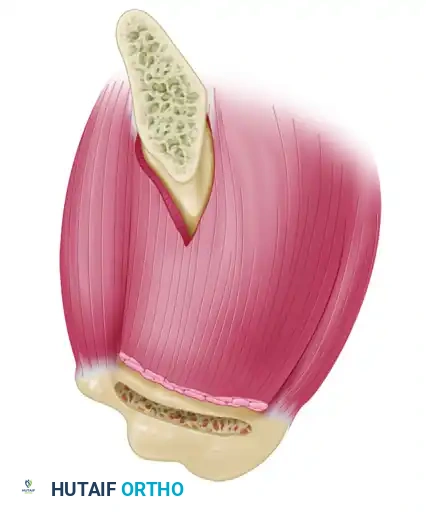
Figure 52-34A: Eight-millimeter partial-thickness articular-sided cuff tear. The medial tuberosity has been abraded to bleeding bone, while the lateral bursal fibers are deliberately left attached.
Suture Anchor Insertion
Precise anchor placement dictates the biomechanical integrity of the repair.
- Spinal Needle Localization: Insert an 18-gauge spinal needle just lateral to the anterior third of the acromion. Advance it transtendinously into the joint. This localizes the exact site and trajectory for anchor insertion. The angle must allow the anchor to be placed just lateral to the articular cartilage margin, angled slightly away from the joint to prevent iatrogenic chondral damage.
- Tendon Preparation: Make a small skin incision at the needle entry site. Using an arthroscopic banana knife, make a longitudinal nick in the supraspinatus tendon, strictly in the plane of the tendon fibers. This prevents structural damage and limits tear propagation.
- Anchor Placement: Introduce a bone punch through the tendon slit to create a starting hole just lateral to the articular surface. Pass the suture anchor through the tendon slit and into the prepared bone socket. Under direct arthroscopic visualization, screw the anchor down securely. Ensure that the anchor eyelet and all suture threads are entirely subcortical to prevent tendon abrasion.
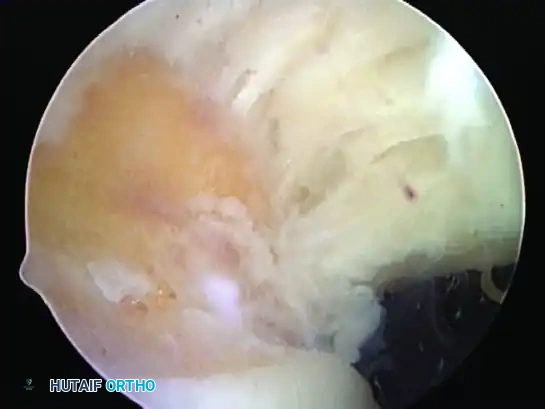
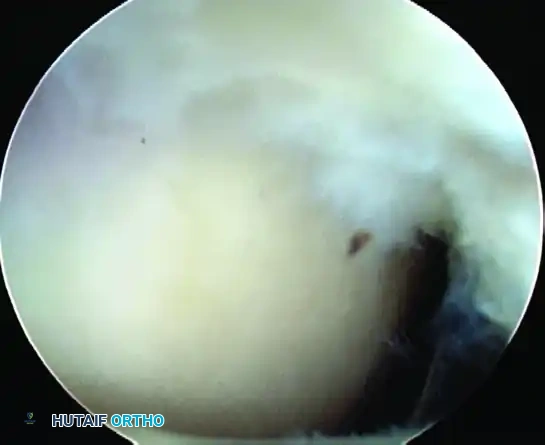
Figure 52-34B: Transtendinous placement of the suture anchor just lateral to the articular surface, utilizing the established trajectory.
Suture Passing and Management
Suture management in a transtendinous repair requires a systematic approach to avoid tangling and ensure proper tissue capture.
- Posterior Suture Passing: Pass a spinal needle from a lateral trajectory, piercing the tendon just posterior to the newly placed suture anchor. Pass a No. 1 PDS (polydioxanone) suture through the needle and retrieve it out the anterior cannula using a suture grasper. This PDS will act as a suture shuttle.
- Shuttling the Anchor Suture: Retrieve one limb of the anchor suture out the anterior cannula. Tie a simple throw from the PDS shuttle around this anchor suture tail. Pull the PDS back up through the capsule, shuttling the anchor suture through the tendon just posterior to the anchor, and out through the lateral skin incision.
- Anterior Suture Passing: Repeat the process anteriorly. Pass a second spinal needle just anterior to the anchor, pass a PDS shuttle from lateral to anterior, and retrieve it. Retrieve the second limb of the anchor suture out the anterior portal, tie it to the PDS, and shuttle it back up through the tendon to form a robust mattress configuration.
- Multiple Anchors: If the anterior-to-posterior dimension of the tear is large, the arthroscope may be moved to the anterior portal, and a second suture anchor can be placed posteriorly using an identical transtendinous technique.
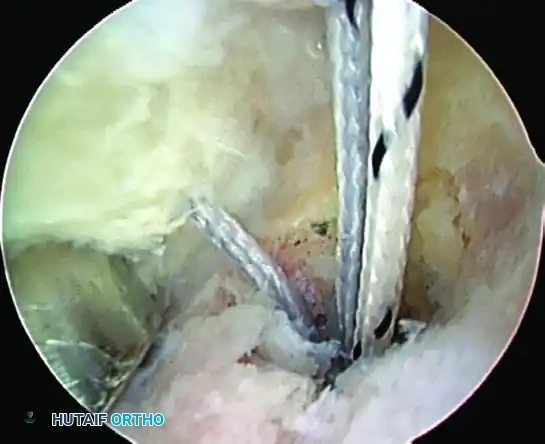
Figure 52-34C: Completed repair viewed from the subacromial space, demonstrating the knots securely tied over the bursal surface of the tendon.
Subacromial Knot Tying and Final Assessment
Once all sutures are passed, redirect the arthroscope into the subacromial space.
- Clear the bursa to visualize the sutures exiting the bursal surface of the tendon.
- Insert a 7-mm clear plastic cannula into the lateral portal using a switching stick.
- Retrieve the paired sutures into the cannula.
- Starting with the most posterior sutures and working anteriorly, tie secure arthroscopic sliding-locking knots (e.g., SMC or Weston knot) followed by alternating half-hitches. This compresses the articular side of the cuff down to the prepared medial footprint.
- Final Intraarticular Assessment: Return the arthroscope to the glenohumeral joint to confirm the reduction. The articular margin of the rotator cuff should be firmly approximated to the medial footprint, completely obliterating the PASTA defect.
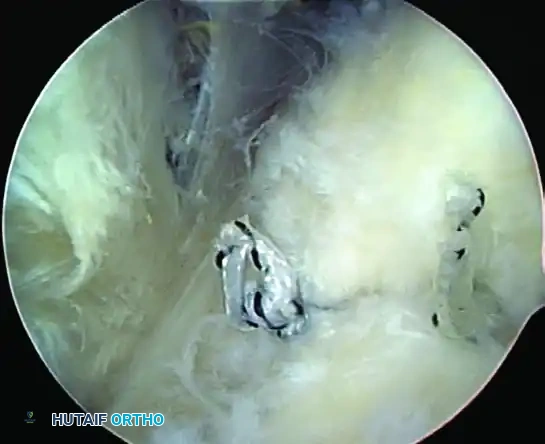
Figure 52-34D: Intraarticular view of the completed repair. The footprint is completely covered over to the articular edge, confirming excellent tissue approximation.
ADVANCED TEAR CONFIGURATIONS AND MARGIN CONVERGENCE
While PASTA lesions represent partial tears, understanding the geometric progression of rotator cuff tears is vital for the arthroscopic surgeon. As tears progress to full-thickness and retract, their geometry dictates the repair strategy. Lo and Burkhart classically categorized these tears into crescent-shaped, U-shaped, and L-shaped configurations.
With the advent of double-row repair techniques and increased clinical experience, modern cuff repairs demonstrate excellent healing rates. Double-row repair is biomechanically superior to single-row fixation, reestablishing the native footprint and maximizing the contact area for osteotendinous integration.
Crescent-Shaped Tears
Crescent-shaped tears are typically avulsions with minimal medial retraction. They possess excellent medial-to-lateral mobility and can usually be repaired directly to the bone bed using standard single or double-row techniques without the need for extensive releases.
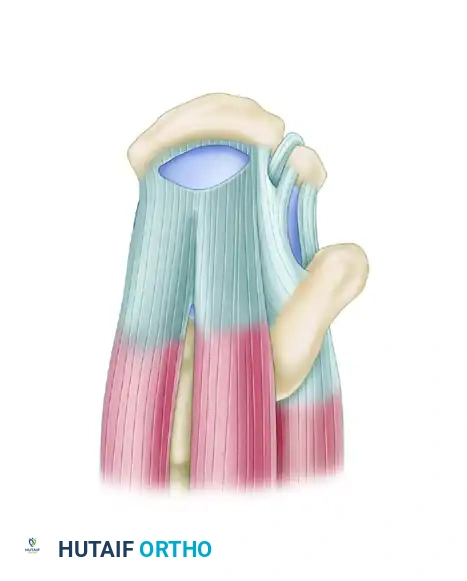
Figure 52-35A: Superior view of a crescent-shaped rotator cuff tear involving the supraspinatus (SS) and infraspinatus (IS) tendons.
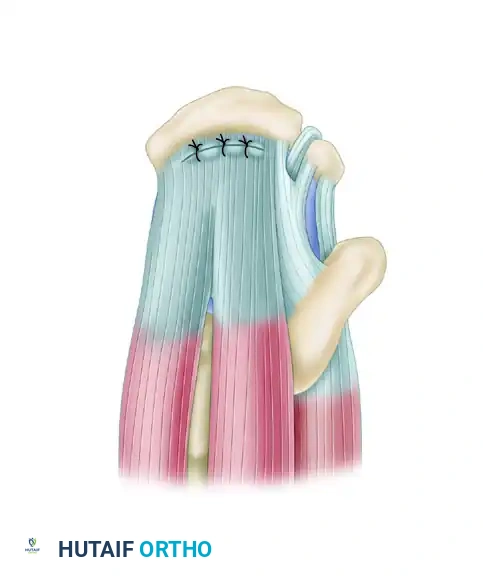
Figure 52-35B: The repaired crescent-shaped tear, demonstrating direct tendon-to-bone approximation.
U-Shaped and L-Shaped Tears (Margin Convergence)
U-shaped and L-shaped tears present a different biomechanical challenge. These tears often exhibit excellent mobility in the anterior-to-posterior direction but limited medial-to-lateral excursion. Attempting to pull the apex of a U-shaped tear directly lateral to the footprint places excessive, failure-prone tension on the repair.
Repair of U- and L-shaped tears relies on the principle of margin convergence. Sutures are passed side-to-side, starting medially at the apex of the tear and progressing laterally. Tying these sutures converges the margins, effectively decreasing the overall size of the defect and converting a U-shape into a smaller crescent shape. This allows for a tension-free reapproximation of the newly converged lateral edge to the tuberosity using a double-row technique.
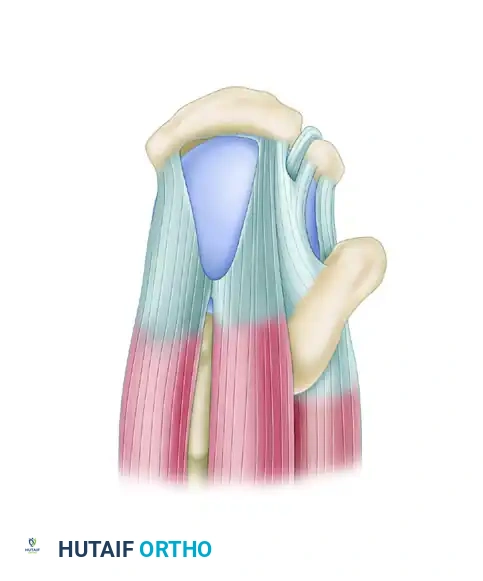
Figure 52-36A: Superior view of a U-shaped rotator cuff tear involving the supraspinatus (SS) and infraspinatus (IS) tendons.
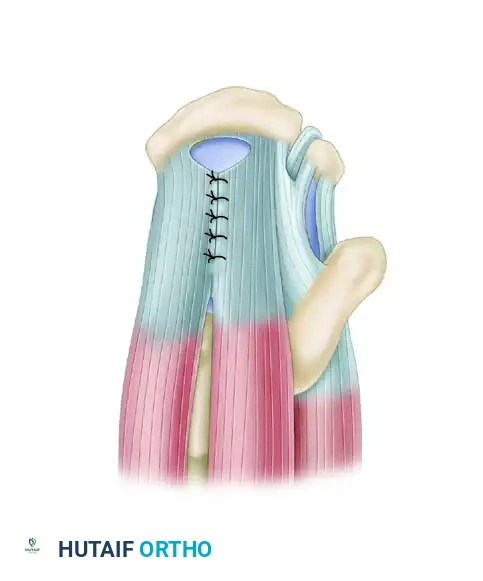
Figure 52-36B: U-shaped tears show excellent mobility from the anterior-to-posterior direction and are initially repaired with side-to-side sutures using the principle of margin convergence.
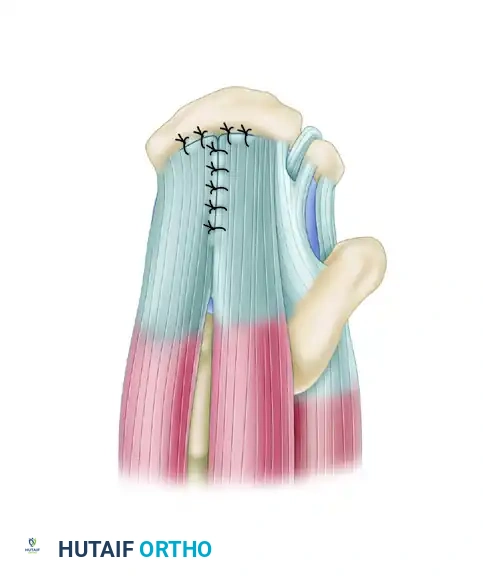
Figure 52-36C: Following margin convergence, the remaining lateral margin is repaired to the bone in a tension-free manner.
Clinical Pearl: Chronic massive contracted tears, such as chronic L-shaped tears or severely retracted crescent tears, require meticulous capsular releases and interval slides (e.g., anterior or posterior interval slides) prior to repair to achieve a tension-free construct.
POSTOPERATIVE REHABILITATION PROTOCOL
The postoperative rehabilitation following a transtendinous PASTA repair generally follows the protocol for a small to medium rotator cuff repair. However, for comprehensive academic reference, the following details the rigorous progression required for larger or massive tears (>5 cm), highlighting the strict precautions necessary to protect the healing footprint.
Phase I: Protection and Progressive PROM (Weeks 1–8)
Immediately Postoperatively (Weeks 1–4):
* Immobilization: Sling and abduction (ABD) pillow must be worn at all times for 4 to 6 weeks, then transitioned to "as needed" for comfort.
* Early Motion: Begin pendulum exercises immediately. Active range of motion (AROM) of the elbow, wrist, and hand is encouraged to prevent distal stiffness.
* Passive Range of Motion (PROM): Initiate PROM targeting flexion (FL), scaption, and external rotation (ER). ER should be performed in ≤ 45 degrees of scaption to protect the supraspinatus repair.
* Modalities: Ice and electrical stimulation (E-stim) for pain control and edema reduction.
* Precautions: No active or active-assisted range of motion (A/AAROM) of the shoulder, as this would jeopardize the repair. Do not stretch into internal rotation (IR).
Weeks 5–8 Postoperative:
* Sling Weaning: Discontinue the sling after 6 weeks.
* Motion Progression: Begin AROM < 60 degrees of elevation after sling removal. Continue advancing PROM. Initiate gentle IR without overpressure.
* Strengthening: Begin submaximal (25%) isometrics with the arm at the side (IR, FL, ABD, EXT).
* Goals by Week 8: PROM ≥ 150 degrees FL; PROM ≥ 65 degrees ER; PROM ≥ 160 degrees scaption. Able to perform light activities of daily living (ADLs) such as combing hair or opening a car door.
* Precautions: Lifting restricted to ≤ 1 lb. No aggressive IR stretching to protect the posterior cuff and capsule.
Phase II: Progressive AROM and Strengthening (Weeks 9–14)
Weeks 9–10 Postoperative:
* Motion: Advance AROM ≤ 120 degrees of elevation.
* Strengthening: Initiate isotonic exercises (light weight/high repetitions), including biceps curls, triceps extension, shoulder shrugs, and supine scapular protraction. Begin upper body ergometer (UBE) with minimal resistance.
* Goals by Week 10: AROM ≥ 110 degrees FL and scaption; AROM ≥ 60 degrees ER. Able to reach behind the back for a wallet.
* Precautions: Unilateral lifting limited to ≤ 2 lb. Prevent posterior capsular tightness.
Weeks 11–14 Postoperative:
* Advanced Strengthening: Progress isotonic exercises to standing (FL and ABD to 90 degrees, ER/IR with resistance tubing). Incorporate prone rows and horizontal abduction.
* Proprioception: Begin wall push-ups with a "plus" phase, gradually progressing to lower surfaces (table, chair). Initiate supine manual resistance proprioceptive neuromuscular facilitation (PNF) patterns.
* Goals by Week 14: AROM within functional limits (WFL) for all planes. Manual muscle testing (MMT) ≥ 4/5 for FL, ABD, and ER.
Phase III: Advanced Strengthening and Return to Sports (Months 3–6)
Months 3–6 Postoperative:
* High-Level Strengthening: Progress wall push-ups to the floor. Incorporate bench press (light weight, short range), lateral pull-downs, and incline chest press.
* Dynamic Stability: Introduce short arc, high-speed Theraband ER and IR at 90 degrees of abduction. Implement weighted PNF patterns (D1 and D2).
* Plyometrics (Month 4): Begin chest passes, plyoball chop tosses, and overhead throws.
* Return to Play: Initiate thrower's or racquet sport progression at 4 months, contingent upon achieving normal strength (MMT 5/5 in all planes), normal glenohumeral mechanics, and a pain-free clinical exam. Isokinetic evaluation may be utilized if necessary to objectively quantify strength deficits prior to clearing the athlete for full competition.
Surgical Warning: It is imperative to counsel the patient preoperatively that following the repair of massive or highly retracted tears, achieving completely normal AROM and strength may be limited, and the primary goals are pain relief and functional restoration.
You Might Also Like