Mastering the Extended Distal Chevron Osteotomy for Hallux Valgus Correction
Key Takeaway
This masterclass details the extended distal chevron osteotomy for hallux valgus, guiding fellows through comprehensive surgical anatomy, meticulous preoperative planning, and precise intraoperative execution. We cover neurovascular risks, instrument use, hardware application, and critical pearls to optimize outcomes. Postoperative rehabilitation and complication management are also thoroughly discussed, preparing you for successful bunion repair.
Comprehensive Introduction and Patho-Epidemiology
Hallux valgus is a complex, progressive, three-dimensional deformity of the first ray characterized by lateral deviation of the hallux and medial deviation of the first metatarsal (metatarsus primus varus). For decades, the distal chevron osteotomy, originally popularized by Austin and Leventen in 1981, has served as the workhorse procedure for correcting mild to moderate hallux valgus deformities. However, the traditional distal chevron, characterized by a 60-degree V-shaped cut with equal dorsal and plantar arms centered in the metatarsal head, is biomechanically limited in its capacity for lateral translation. Attempting to translate the capital fragment by more than 30% to 40% of the metatarsal shaft width in a traditional chevron severely compromises bone contact, risking instability, delayed union, and avascular necrosis (AVN). Consequently, its traditional indications were strictly limited to intermetatarsal angles (IMA) of less than 13 degrees.
To address these limitations and expand the utility of this inherently stable osteotomy, the "extended" or "long-arm" distal chevron osteotomy was developed. By modifying the geometry of the osteotomy—specifically, by moving the apex proximally into the metaphysis and extending the plantar arm proximally along the metatarsal shaft—surgeons can achieve a vastly increased surface area for bony contact. This geometric modification permits safe lateral translation of the capital fragment up to 50% or even 60% of the metatarsal shaft width. Consequently, the extended distal chevron osteotomy effectively bridges the gap between distal and proximal osteotomies, allowing for the correction of moderate to severe deformities (IMA up to 18-20 degrees) without the morbidity or nonunion risks associated with proximal metatarsal osteotomies or first tarsometatarsal (Lapidus) arthrodesis.
The pathophysiology of hallux valgus dictates that successful surgical intervention must go beyond simple two-dimensional radiographic correction. The deformity involves attenuation of the medial joint capsule, contracture of the lateral soft tissues (including the adductor hallucis and lateral collateral ligaments), and progressive lateral subluxation of the sesamoid apparatus beneath the first metatarsal head. As the metatarsal head drifts medially off the sesamoids, the flexor hallucis longus and extensor hallucis longus tendons become lateralized, transforming their mechanical vectors into deforming forces that exacerbate the valgus drift and pronation of the great toe. The extended distal chevron allows for the restoration of this critical biomechanical alignment by translating the metatarsal head laterally back over the sesamoid complex, rather than simply shaving off the medial eminence.
Furthermore, the extended distal chevron osteotomy offers unparalleled versatility in addressing the Distal Metatarsal Articular Angle (DMAA). An abnormally high DMAA indicates a lateral slope of the distal articular surface. If a translational osteotomy is performed without correcting a high DMAA, the joint remains incongruent, and the patient is at a high risk for recurrent deformity. The extended chevron allows for multiplanar correction; the capital fragment can be translated laterally, rotated medially to correct the DMAA, and even plantarflexed to address metatarsus primus elevatus. This chapter will exhaustively detail the anatomical considerations, preoperative templating, and meticulous surgical execution required to master this powerful technique.
Detailed Surgical Anatomy and Biomechanics
A profound understanding of the surgical anatomy and biomechanics of the first ray is non-negotiable for the orthopedic surgeon undertaking an extended distal chevron osteotomy. The first metatarsal is a robust, weight-bearing strut, but its distal articular geometry and soft-tissue envelope are highly complex. The metatarsal head articulates with the proximal phalanx, while its plantar aspect features two longitudinal grooves separated by a central crista. These grooves house the medial (tibial) and lateral (fibular) sesamoids, which are embedded within the fibrocartilaginous plantar plate and the tendons of the flexor hallucis brevis. The sesamoid complex acts as a vital fulcrum, increasing the mechanical advantage of the intrinsic musculature and protecting the intra-articular cartilage during the propulsive phase of gait.
The vascular anatomy of the first metatarsal head is of paramount clinical importance, particularly when performing distal osteotomies. The primary blood supply to the first metatarsal head is derived from the first dorsal metatarsal artery and the first plantar metatarsal artery. These vessels form an intricate extraosseous anastomotic ring around the anatomical neck of the metatarsal. Crucially, the intraosseous blood supply to the capital fragment enters predominantly through the plantar-lateral capsular attachments. Aggressive lateral capsular release, combined with extensive medial stripping and a distal osteotomy, can severely disrupt this blood supply, precipitating avascular necrosis (AVN) of the metatarsal head. The extended chevron osteotomy mitigates this risk; by moving the osteotomy apex proximally and preserving the plantar-lateral soft tissue tether, the vascular integrity of the capital fragment is robustly maintained.
Neurologically, the surgical approach places several critical structures at risk. The dorsomedial cutaneous branch of the superficial peroneal nerve courses superficially over the medial aspect of the first metatarsophalangeal (MTP) joint. Inadvertent transection or traction injury to this nerve during the medial capsulotomy or skin retraction can result in painful neuromas or persistent dysesthesia over the dorsomedial hallux. Plantarly, the medial proper plantar digital nerve courses adjacent to the medial sesamoid. When resecting the medial eminence or performing a medial capsular plication, the surgeon must maintain a dissection plane dorsal to the plantar plate to avoid tethering or transecting this nerve.
Biomechanically, the success of the extended chevron osteotomy relies on the principle of intrinsic stability. The V-shaped configuration of the osteotomy, typically cut at an angle of 60 to 90 degrees, provides inherent resistance to dorsal translation and sagittal plane rotation under weight-bearing loads. The extended plantar arm creates a massive cancellous bone interface, which not only facilitates rapid primary bone healing but also allows for the placement of robust internal fixation, typically one or two headless compression screws. This rigid osteosynthesis permits early weight-bearing, which is crucial for preventing postoperative stiffness and accelerating functional recovery. However, the surgeon must carefully assess the width of the metatarsal diaphysis preoperatively; a narrow, "hourglass" shaped metatarsal physically limits the amount of lateral translation achievable before the capital fragment loses cortical contact, thereby dictating the upper limits of deformity correction for this specific procedure.
Exhaustive Indications and Contraindications
The decision to utilize an extended distal chevron osteotomy must be based on a rigorous clinical and radiographic assessment. While highly versatile, it is not a panacea for all hallux valgus deformities. Proper patient selection is the cornerstone of achieving durable, excellent outcomes and avoiding catastrophic failures.
The primary indication for the extended distal chevron osteotomy is a moderate to severe, symptomatic hallux valgus deformity in a patient with a congruent or incongruent first MTP joint, provided there is no advanced degenerative joint disease. Radiographically, this typically corresponds to a Hallux Valgus Angle (HVA) between 20 and 40 degrees, and an Intermetatarsal Angle (IMA) between 13 and 20 degrees. The procedure is particularly advantageous when there is an abnormal Distal Metatarsal Articular Angle (DMAA) that requires rotational correction, as the geometry of the extended cut allows for simultaneous translation and biplanar rotation. Furthermore, it is an excellent choice for patients who require significant lateral translation of the metatarsal head to restore the sesamoid apparatus to its anatomical position beneath the metatarsal head.
Contraindications must be strictly observed to prevent recurrence or progression of the deformity. Severe hypermobility of the first tarsometatarsal (TMT) joint is a relative to absolute contraindication. If clinical examination reveals profound sagittal plane instability at the TMT joint, a distal osteotomy will likely fail over time, as the primary apex of the deformity (the unstable TMT joint) has not been addressed; in such cases, a Lapidus arthrodesis is mandated. Similarly, advanced osteoarthritis of the first MTP joint (hallux rigidus) precludes joint-sparing osteotomies, necessitating arthrodesis or arthroplasty.
| Category | Extended Distal Chevron Osteotomy Parameters |
|---|---|
| Primary Indications | Symptomatic moderate to severe hallux valgus; HVA 20° - 40°; IMA 13° - 20°. |
| Anatomical Indications | Increased DMAA requiring derotation; lateral sesamoid subluxation (Hardcastle Grade II-III); adequate metatarsal shaft width for translation. |
| Absolute Contraindications | Advanced first MTP joint osteoarthritis; active local or systemic infection; severe peripheral vascular disease; Charcot neuroarthropathy. |
| Relative Contraindications | Severe first ray hypermobility (consider Lapidus); spastic neuromuscular disorders; extreme deformities (IMA > 20°); narrow "hourglass" metatarsal shaft limiting translation. |
It is also crucial to consider the patient's physiological age and bone quality. While the extended chevron provides excellent bony contact, severe osteopenia or osteoporosis may compromise screw purchase and lead to loss of fixation or dorsal malunion. In such osteoporotic patients, a more proximal osteotomy or arthrodesis with robust plate fixation might be considered, or the extended chevron must be augmented with supplemental K-wire fixation and a prolonged period of non-weight-bearing.
Pre-Operative Planning, Templating, and Patient Positioning
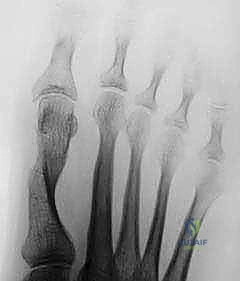
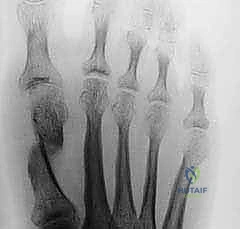
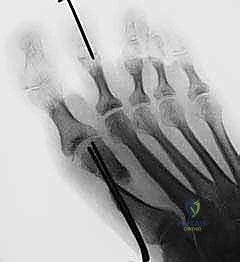
Meticulous preoperative planning is the blueprint for surgical success. The evaluation begins with high-quality, standardized, weight-bearing radiographs of the foot, including anteroposterior (AP), lateral, and sesamoid axial views. Non-weight-bearing films are entirely inadequate, as they fail to demonstrate the true dynamic splaying of the forefoot and the functional severity of the deformity.
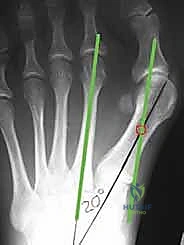
On the weight-bearing AP radiograph, the surgeon must systematically measure the HVA, IMA, and DMAA. The position of the tibial sesamoid relative to the mid-diaphyseal axis of the first metatarsal (tibial sesamoid station, graded I-VII) is assessed to determine the necessity of a lateral capsular release. Templating the "ideal correction" is a critical step. A line is drawn parallel to the bisector of the second metatarsal shaft, intersecting the medial base of the first metatarsal or medial cuneiform. The distance between this ideal axis and the current central axis of the first metatarsal head dictates the exact millimeter amount of lateral translation required. The apex of the planned osteotomy is marked 15 to 20 mm proximal to the articular surface, ensuring it lies within the vascular metaphyseal bone.
Patient positioning and anesthesia are tailored to optimize surgical flow and patient comfort. The procedure is typically performed under a regional ankle block or a popliteal sciatic nerve block, supplemented with monitored anesthesia care (MAC) or general anesthesia. A regional block provides excellent intraoperative muscle relaxation and profound postoperative analgesia, significantly reducing the need for systemic opioids. Depending on the anesthesia choice, either a pneumatic thigh tourniquet or an ankle tourniquet is applied to ensure a bloodless surgical field, which is essential for identifying delicate neurovascular structures and assessing the articular cartilage.
The patient is positioned supine on the operating table. A small bump is placed beneath the ipsilateral hip to internally rotate the leg slightly, bringing the medial aspect of the foot into a direct, vertical orientation facing the surgeon. The foot is positioned at the very edge of the table to allow unrestricted manipulation of the surgical instruments, particularly the sagittal saw, without interference from the table mattress. The C-arm fluoroscopy unit is draped and positioned either entering from the contralateral side or from the foot of the bed, ensuring that perfect AP and lateral orthogonal views can be obtained instantaneously without requiring the surgeon to break scrub or adjust the patient's leg position.
Step-by-Step Surgical Approach and Fixation Technique
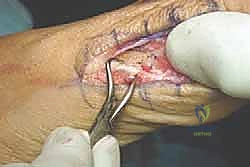
Incision and Soft Tissue Dissection
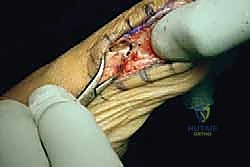
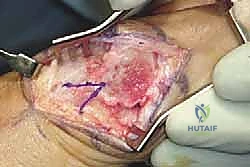
The operation commences with a precise medial longitudinal incision. The incision is centered over the medial eminence, extending from the mid-diaphysis of the first metatarsal to the mid-shaft of the proximal phalanx. The skin is incised sharply, and blunt dissection is utilized to navigate the subcutaneous tissues. The surgeon must meticulously identify and protect the dorsomedial cutaneous nerve dorsally and the medial plantar digital nerve plantarly. Veins crossing the operative field are carefully cauterized or ligated to prevent postoperative hematoma.
An inverted L-shaped or longitudinal medial capsulotomy is performed. The capsule is carefully elevated off the medial eminence, creating dorsal and plantar full-thickness flaps. The plantar flap must be developed with caution, staying strictly subperiosteal to avoid injury to the medial sesamoid and its ligamentous attachments. Once the joint is exposed, the articular cartilage is inspected for degenerative changes, and the medial eminence (bunion) is visualized.
Lateral Capsular Release
If preoperative templating and intraoperative assessment reveal a laterally subluxed sesamoid complex (Hardcastle Grade II or III), a lateral release is mandatory. This is often performed through a separate dorsal longitudinal incision in the first web space. The incision is deepened through the subcutaneous fat, protecting the dorsal digital branches of the deep peroneal nerve. A self-retaining retractor is placed, and a Freer elevator is used to identify the lateral capsule and the suspensory sesamoid ligament.
A controlled longitudinal incision is made through the lateral capsule, just dorsal to the lateral sesamoid. Crucially, in the context of an extended distal chevron, the adductor hallucis tendon is typically preserved to maintain dynamic lateral stability and prevent overcorrection (hallux varus), unless the deformity is exceptionally rigid. The release allows the sesamoid apparatus to be mobilized and manually reduced beneath the metatarsal head.
Exostectomy and Osteotomy Execution
Attention is returned to the medial aspect. The medial eminence is resected using an oscillating saw. The cut is initiated at the parasagittal groove, just medial to the articular cartilage, and directed proximally in line with the medial cortex of the metatarsal shaft. It is imperative not to resect too much bone, as the medial cortex provides essential structural support for the subsequent osteotomy and fixation.
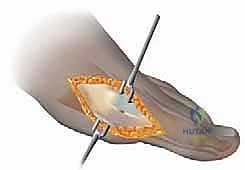
The extended chevron osteotomy is now marked. The apex is placed centrally in the metaphysis, approximately 15 to 20 mm proximal to the articular surface. A 0.045-inch K-wire can be driven transversely at the planned apex to serve as a guide and prevent the saw blade from crossing the apex and creating a stress riser. The dorsal arm is cut first, exiting the dorsal cortex at an angle of roughly 60 degrees from the longitudinal axis.
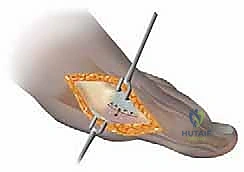
The plantar arm is then executed. This is the defining feature of the "extended" technique. The saw blade is directed proximally, maintaining a long, oblique trajectory that exits the plantar cortex well proximal to the sesamoid apparatus. This long plantar arm maximizes the cancellous surface area.
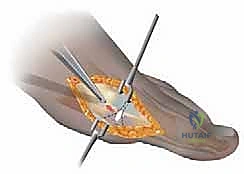
Once both cuts are complete, the capital fragment is mobilized. A towel clip is placed on the proximal phalanx to apply gentle traction, while the surgeon manually translates the metatarsal head laterally. The fragment is translated the pre-calculated distance, up to 50% of the shaft width. If the DMAA requires correction, the capital fragment is simultaneously rotated medially (varus rotation) to orthogonalize the articular surface.

Fixation and Capsulorrhaphy
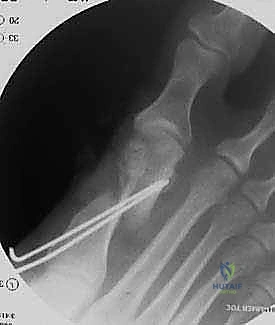
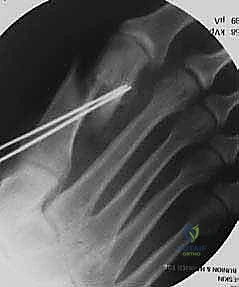
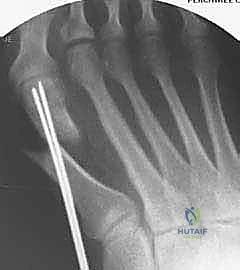
Once optimal translation, rotation, and sesamoid reduction are confirmed clinically and via fluoroscopy, temporary fixation is achieved with a smooth K-wire driven from dorsal-proximal to plantar-distal.
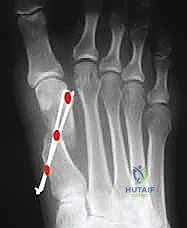
Definitive osteosynthesis is typically performed using one or two headless compression screws. The guide wire for the screw is inserted perpendicular to the osteotomy plane to ensure maximum compression. The screw length is measured, and the bone is drilled and countersunk. The screw is advanced until the head is fully buried within the dorsal cortex, compressing the massive cancellous interface of the long plantar arm.
After rigid fixation is verified, the medial bony prominence of the proximal fragment is meticulously contoured with a saw or rongeur so that it is flush with the translated metatarsal head. Finally, the medial capsule is plicated. The toe is held in slight plantarflexion and neutral rotation while the dorsal and plantar capsular flaps are sutured together under tension using heavy absorbable suture (e.g., 2-0 Vicryl). This plication corrects the medial soft-tissue attenuation and reinforces the bony alignment.
Complications, Incidence Rates, and Salvage Management
Despite its high success rate, the extended distal chevron osteotomy carries inherent risks. A thorough understanding of potential complications and their salvage pathways is essential for the operating surgeon. The most feared complication of any distal metatarsal osteotomy is avascular necrosis (AVN) of the capital fragment. While the extended chevron's proximal apex theoretically preserves the intraosseous blood supply better than a traditional Austin bunionectomy, aggressive lateral soft tissue stripping or damage to the plantar-lateral capsular attachments can still precipitate ischemia.

Hallux varus is another significant complication, often resulting from overzealous lateral capsular release, excessive lateral translation of the metatarsal head, or over-plication of the medial capsule. This iatrogenic deformity is highly symptomatic, causing pain, shoe-wear difficulty, and a cosmetically unacceptable "cock-up" deformity of the toe. Prevention relies on preserving the adductor hallucis tendon when possible, translating the head only as templated, and suturing the medial capsule with the toe in neutral alignment, never forced into varus.
Recurrence of hallux valgus is typically the result of technical errors or poor patient selection. Under-translation of the capital fragment, failure to correct an abnormal DMAA, or performing the procedure in the presence of unrecognized first TMT joint hypermobility will almost inevitably lead to recurrent deformity. In cases of recurrence, revision surgery is often complex and may require a proximal osteotomy or a Lapidus arthrodesis to achieve durable realignment.
| Complication | Estimated Incidence | Pathophysiology & Etiology | Salvage / Management Strategy |
|---|---|---|---|
| Avascular Necrosis (AVN) | 1% - 3% | Disruption of plantar-lateral blood supply; excessive stripping. | Conservative initially (offloading); late collapse requires MTP joint arthrodesis. |
| Hallux Varus | 2% - 8% | Overcorrection; excessive lateral release; over-plication of medial capsule. | Soft tissue release (early); EHB tendon transfer; MTP joint arthrodesis (rigid/late). |
| Recurrence | 5% - 12% | Under-translation; uncorrected DMAA; unrecognized TMT hypermobility. | Revision osteotomy (Scarf/Proximal); Lapidus arthrodesis for hypermobility. |
| Nonunion / Delayed Union | < 1% | Inadequate fixation; poor bone quality; premature weight-bearing. | Prolonged immobilization; bone stimulator; revision with bone grafting and rigid plating. |
Hardware irritation is a relatively common, albeit minor, complication. If a headless compression screw is not fully countersunk, or if a K-wire is utilized and left prominent, the patient may experience pain over the dorsal cortex. This is easily managed with simple hardware removal once radiographic union is confirmed, typically after 3 to 4 months. Nonunion is exceedingly rare with the extended chevron due to the large surface area of metaphyseal cancellous bone; however, it can occur in patients with severe osteoporosis, heavy tobacco use, or uncontrolled diabetes.
Phased Post-Operative Rehabilitation Protocols
The postoperative rehabilitation following an extended distal chevron osteotomy is designed to protect the osteosynthesis while preventing joint stiffness and muscle atrophy. The inherent biomechanical stability of the extended chevron allows for a more aggressive rehabilitation timeline compared to proximal osteotomies or fusions, which is a major advantage for patient satisfaction and functional recovery.
Phase 1: Immediate Post-Operative (Weeks 0-2)
Immediately following surgery, the foot is placed in a bulky, compressive soft dressing. The patient is fitted with a rigid, flat-bottomed postoperative shoe or a controlled ankle motion (CAM) boot. Weight-bearing is strictly limited to heel-touch or strict flat-foot weight-bearing only. The patient is instructed to elevate the limb strictly above the level of the heart for the first 48 to 72 hours to minimize edema, which is the primary driver of early postoperative pain. The initial dressing remains intact until the first postoperative visit at approximately two weeks.
Phase 2: Early Mobilization and Healing (Weeks 2-6)
At the two-week mark, the sutures are removed. Radiographs are obtained to verify the maintenance of hardware position and osteotomy alignment. The patient is transitioned to a toe spacer to maintain the corrected alignment of the hallux and is allowed to progressively increase weight-bearing to tolerance in the rigid postoperative shoe. Crucially, active and passive range-of-motion (ROM) exercises of the first MTP joint are initiated. Patients are taught to manually plantarflex and dorsiflex the great toe to prevent capsular adhesions and joint stiffness.
Phase 3: Maturation and Return to Function (Weeks 6-12+)
By six weeks, clinical and radiographic evidence of early bone consolidation should be present. The patient is typically transitioned out of the postoperative shoe and into a wide-toed, supportive athletic shoe. Physical therapy is often prescribed at this stage to focus on aggressive first MTP joint mobilization, strengthening of the intrinsic foot
