Management of Proximal Humerus Malunions: Surgical Techniques and Osteotomy
Key Takeaway
Proximal humerus malunions present complex reconstructive challenges, often resulting in severe pain, restricted range of motion, and altered glenohumeral biomechanics. Treatment algorithms depend heavily on the anatomical location—anatomical neck, surgical neck, or proximal third—and the presence of traumatic arthritis. This guide details the evidence-based surgical management of these deformities, including arthroplasty indications and step-by-step execution of the closing wedge valgus osteotomy for varus malunions.
PATHOMECHANICS AND CLASSIFICATION OF PROXIMAL HUMERUS MALUNIONS
The management of proximal humerus malunions requires a profound understanding of glenohumeral biomechanics, soft tissue balancing, and the specific anatomical region involved. Fractures of the proximal humerus that heal in unacceptable alignment significantly alter the moment arms of the rotator cuff and deltoid musculature, leading to profound functional deficits, impingement syndromes, and early-onset post-traumatic osteoarthritis.
Surgical decision-making is dictated by the anatomical location of the malunion, the degree of articular cartilage degradation, the status of the rotator cuff, and the patient's physiological age and functional demands.
Anatomical Neck Malunions
Malunions involving the anatomical neck of the humerus are notoriously difficult to manage due to the high incidence of concomitant avascular necrosis (AVN) of the humeral head and the rapid progression to severe, painful traumatic arthritis. The anatomical neck serves as the critical junction between the articular surface and the tuberosities; disruption here severely compromises the tenuous blood supply derived primarily from the anterior circumflex humeral artery and its anterolateral ascending branch.
When severe traumatic arthritis is present, joint-preserving osteotomies are contraindicated. Treatment must pivot to salvage or reconstructive arthroplasty procedures:
* Shoulder Arthrodesis: Historically a primary salvage procedure, glenohumeral arthrodesis is now largely reserved for young, heavy laborers with profound rotator cuff deficiency, deltoid paralysis, or recalcitrant deep infections where arthroplasty is contraindicated.
* Prosthetic Humeral Head Replacement (Hemiarthroplasty): Indicated in younger patients with an intact, functioning rotator cuff and concentric glenoid wear. However, outcomes in the setting of malunion are often inferior to those for acute fractures due to tuberosity malposition.
* Total Shoulder Arthroplasty (TSA) / Reverse Total Shoulder Arthroplasty (RTSA): Anatomic TSA is appropriate if the rotator cuff is intact and the tuberosities are relatively anatomic. In the modern era, RTSA has become the workhorse for anatomical neck malunions, particularly when tuberosity malposition has compromised rotator cuff function, or in the elderly population.
* Acromioplasty: May be utilized as an isolated palliative procedure in low-demand patients where the primary symptom is subacromial impingement secondary to superior migration of the malunited head, though its efficacy as a standalone procedure is limited.
💡 Clinical Pearl: Non-Operative Management in the Elderly
Severe fractures of the shoulder often result in a permanent limitation of motion, especially in elderly patients. However, limitation of motion alone rarely constitutes a sufficient reason for complex reconstructive surgery. If the patient is relatively pain-free and can perform basic activities of daily living (ADLs), non-operative management with targeted physical therapy is the preferred course.
Surgical Neck Malunions
The surgical neck is the most common site for proximal humerus fractures. Fortunately, the glenohumeral joint and the scapulothoracic articulation possess a remarkable ability to compensate for deformity in this region. Considerable angular deformity in the surgical neck may be entirely compatible with satisfactory, pain-free function.
However, surgical intervention becomes mandatory when the distal diaphyseal fragment is markedly displaced anteriorly or medially.
* Anterior Displacement: Severe anterior displacement of the distal fragment creates a mechanical block to forward elevation and internal rotation. It can also tether the neurovascular bundle (axillary nerve and posterior cord of the brachial plexus), leading to chronic neuropathic pain and functional disability severe enough to require corrective osteotomy.
* Varus Deformity: A varus malunion at the surgical neck decreases the articulodiaphyseal angle, effectively shortening the resting length of the supraspinatus and reducing its tension, which manifests as profound weakness in abduction.
Proximal Third Diaphyseal-Metaphyseal Malunions
In malunions extending into the proximal third of the humeral shaft, the bone is typically angulated medially (varus) and either anteriorly (apex anterior) or posteriorly (apex posterior).
The clinical presentation of a proximal third medial angulation is highly characteristic:
1. Inability to Adduct: The medial angulation causes the distal humerus to impinge against the lateral chest wall. Patients will complain that it is physically impossible to touch their elbow to their chest.
2. Restricted Range of Motion: Shoulder motion is usually severely limited in both abduction (due to altered deltoid and supraspinatus mechanics) and external rotation (due to contracture of the subscapularis and pectoralis major, combined with the osseous deformity).
PREOPERATIVE EVALUATION AND TEMPLATING
Successful correction of a proximal humerus malunion relies on meticulous preoperative planning. The goal of a corrective osteotomy is to restore the normal articulodiaphyseal angle (typically 130° to 140°) and correct any rotational malalignment.
Radiographic Assessment
- True Anteroposterior (Grashey) View: Essential for evaluating the glenohumeral joint space and the degree of varus/valgus deformity.
- Scapular Y and Axillary Views: Critical for assessing anterior/posterior angulation, glenoid version, and humeral head subluxation.
- Bilateral External Rotation AP Radiographs: As described by Benegas et al., obtaining comparative views of both the affected and contralateral (normal) shoulders is mandatory to accurately calculate the dimensions of the corrective bone wedge.
- Computed Tomography (CT): A 3D CT reconstruction is highly recommended to fully appreciate the complex multiplanar nature of the malunion, particularly regarding rotational deformity and tuberosity position.
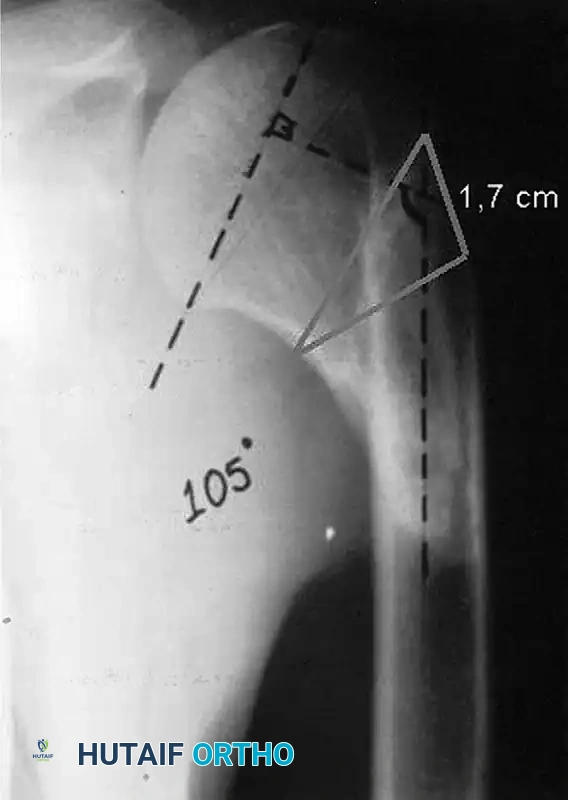
Calculation of the Bone Wedge Osteotomy
The preoperative calculation is the most critical step in ensuring an anatomic correction. The technique modified by Benegas et al. utilizes the contralateral normal shoulder as a template.
Figure 58-32: Calculation of bone wedge osteotomy. The radiograph demonstrates a varus malunion with an articulodiaphyseal angle of 105°. By templating against the normal contralateral shoulder (which typically has an angle of ~135°), the surgeon determines that a 30° correction is required. This translates to a laterally based wedge with a base measuring exactly 1.7 cm. (Reproduced from Benegas E, Filho AZ, Filho AAF, et al: Surgical treatment of varus malunion of the proximal humerus with valgus osteotomy: J Shoulder Elbow Surg 16:55, 2007.)
SURGICAL TECHNIQUE 58-21: CLOSING WEDGE VALGUS OSTEOTOMY FOR VARUS MALUNION OF THE PROXIMAL HUMERUS
(Modified from Benegas et al.)
This technique is specifically indicated for symptomatic varus malunions of the surgical neck or proximal third of the humerus where the articular surface remains pristine and the rotator cuff is functional.
1. Patient Positioning and Anesthesia
- Induce general endotracheal anesthesia. An interscalene regional block is highly recommended for postoperative pain control.
- Place the patient in the "beach chair" position (approximately 45° to 60° of upright elevation).
- Ensure the operative arm is completely free and draped into the sterile field to allow for full intraoperative range of motion and fluoroscopic evaluation.
- Place a sandbag or a specialized scapular positioner between the medial border of the scapula and the spine to protract the shoulder girdle, providing optimal anterior exposure.
2. Surgical Approach
- Make an incision over the anterolateral aspect of the shoulder. Begin at the lateral third of the clavicle and extend it distally for approximately 10 cm, remaining in line with the anterior border of the deltoid muscle.
- Develop the deltopectoral interval. Identify and separate the deltoid and pectoralis major muscles.
- Vascular Protection: Meticulously identify and protect the cephalic vein. It is generally preferred to retract the vein laterally with the deltoid to preserve its primary venous drainage, though medial retraction with the pectoralis major is acceptable if lateral mobilization is difficult.
- If the standard deltopectoral exposure is insufficient to access the lateral aspect of the proximal humerus, divide the anterior attachment of the deltoid to the clavicle (leaving a small cuff of tissue for later repair) and reflect the muscle laterally (see Chapter 1 for detailed deltoid release techniques).
⚠️ Surgical Warning: Axillary Nerve Protection
When reflecting the deltoid laterally and exposing the proximal humerus, remain acutely aware of the axillary nerve. It courses transversely across the deep surface of the deltoid, approximately 5 to 7 cm distal to the lateral edge of the acromion. Do not place retractors blindly on the posterior aspect of the humeral shaft.
3. Site Preparation and Callus Resection
- Incise the clavipectoral fascia to expose the underlying malunion site.
- Identify the long head of the biceps tendon in the bicipital groove to orient yourself to the true anterior aspect of the humerus.
- Using a combination of rongeurs, osteotomes, and a high-speed burr, carefully remove the excess fracture callus from the anterior, lateral, and medial surfaces of the bone. This step is crucial not only for visualization but also to allow the osteotomy surfaces to sit flush upon closure.
- Expose the area immediately distal to the greater tuberosity. This specific region will serve as the lateral base of the closing wedge.
4. Execution of the Osteotomy
- Under fluoroscopic guidance, place two parallel Kirschner wires (K-wires) to mark the planned osteotomy cuts.
- The proximal K-wire should be placed parallel to the anatomical neck (perpendicular to the articular surface).
- The distal K-wire is placed at an angle intersecting the proximal wire at the medial cortex. The angle between these wires must exactly match the preoperative calculation (e.g., 30° to correct a 105° varus deformity to 135°).
- The distance between the two wires at the lateral cortex should equal the pre-calculated wedge base (e.g., 1.7 cm, as seen in Figure 58-32).
- Using an oscillating saw, make the proximal cut first, followed by the distal cut.
- Hinge Preservation: It is imperative to leave the medial periosteal hinge intact if possible. Do not complete the saw cut entirely through the medial cortex; instead, leave 1-2 mm of bone and carefully complete the osteotomy by weakening the medial cortex with a drill or thin osteotome, allowing it to act as a greenstick hinge.
5. Reduction and Fixation
- Gently abduct the arm to close the lateral wedge. The medial cortex should act as a hinge, preventing medial translation of the shaft.
- Verify the correction clinically by ensuring the arm can now be fully adducted to the chest wall without impingement.
- Verify the correction radiographically with orthogonal fluoroscopic views. The articulodiaphyseal angle should be restored to approximately 135°.
- Apply a Proximal Humerus Interlocking System (PHILOS) plate or a similar anatomically contoured locking plate to the lateral aspect of the humerus.
- Secure the plate with locking screws proximally into the humeral head (ensuring no screws penetrate the articular surface) and a combination of locking and cortical screws distally in the shaft.
- If a rotational deformity was also present, this must be corrected prior to final plate fixation by externally rotating the distal fragment relative to the proximal fragment.
6. Closure
- Thoroughly irrigate the wound to remove all bone debris.
- If the anterior deltoid was detached from the clavicle, repair it meticulously using heavy non-absorbable transosseous sutures. Failure to secure this origin will result in catastrophic postoperative deltoid dehiscence.
- Close the deltopectoral interval loosely.
- Close the subcutaneous tissues and skin in a standard layered fashion. Place a closed suction drain if significant dead space or bleeding is present.
POSTOPERATIVE REHABILITATION PROTOCOL
The rehabilitation following a closing wedge valgus osteotomy must balance the need for early motion to prevent adhesive capsulitis with the necessity of protecting the osteotomy site until radiographic union is achieved.
Phase I: Maximum Protection (Weeks 0-4)
* The patient is immobilized in a standard shoulder sling.
* Immediate initiation of elbow, wrist, and hand active range of motion (ROM) exercises.
* Pendulum exercises are initiated on postoperative day 1.
* Passive forward elevation and external rotation (limited to 30° to protect the subscapularis if it was manipulated) are performed under the guidance of a physical therapist.
* Active and active-assisted ROM of the shoulder are strictly prohibited to prevent displacement of the osteotomy.
Phase II: Active-Assisted Motion (Weeks 4-8)
* At 4 weeks, clinical and radiographic evaluation is performed. If early callus formation is visible and the hardware is stable, the sling is gradually weaned.
* Initiate active-assisted ROM (pulley systems, wand exercises) in all planes.
* Begin submaximal isometric strengthening of the deltoid and rotator cuff.
Phase III: Active Motion and Strengthening (Weeks 8-12+)
* Once radiographic union is confirmed (typically between 8 to 10 weeks), progress to full active ROM.
* Initiate isotonic strengthening, focusing on the rotator cuff, deltoid, and periscapular stabilizers.
* Return to heavy lifting or high-impact activities is generally restricted until 4 to 6 months postoperatively, contingent upon complete osseous consolidation and restoration of near-normal strength.
COMPLICATIONS AND PITFALLS
- Nonunion / Delayed Union: The proximal humerus has a robust blood supply, but extensive periosteal stripping during callus resection can devascularize the fragments. Meticulous soft tissue handling and rigid locking plate fixation minimize this risk.
- Avascular Necrosis (AVN): While less common in extra-articular osteotomies compared to acute anatomical neck fractures, aggressive medial dissection can compromise the ascending branch of the anterior circumflex humeral artery.
- Hardware Penetration: The osteoporotic nature of the humeral head in chronic malunions increases the risk of primary or secondary screw cut-out into the glenohumeral joint. Intraoperative fluoroscopy through a full range of motion is mandatory to confirm that all proximal screws are extra-articular.
- Loss of Fixation: Failure to achieve a flush reduction of the osteotomy surfaces places excessive bending moments on the plate, potentially leading to hardware failure before union occurs.
You Might Also Like