Proximal Interphalangeal Joint Arthroplasty: Comprehensive Surgical Techniques
Key Takeaway
Proximal interphalangeal (PIP) joint arthroplasty is a critical surgical intervention for advanced arthritis or severe deformity. This guide details the Swanson dorsal approach and the alternative volar approach. Key steps include precise medullary canal preparation, meticulous soft tissue balancing for swan-neck and boutonniere deformities, and rigorous postoperative rehabilitation to restore digital kinematics and preserve functional range of motion.
Introduction to Proximal Interphalangeal Joint Arthroplasty
Proximal interphalangeal (PIP) joint arthroplasty is a sophisticated surgical intervention designed to alleviate pain, restore functional kinematics, and correct severe deformities in digits compromised by advanced osteoarthritis, rheumatoid arthritis, or post-traumatic arthropathy. Unlike the distal interphalangeal (DIP) joint, where arthrodesis is universally well-tolerated, arthrodesis of the PIP joint significantly impairs the functional sweep of the digit and diminishes overall grip strength and dexterity. Consequently, PIP joint arthroplasty remains the gold standard for the ulnar digits (middle, ring, and small fingers) to preserve the hand's adaptive grip span.
💡 Clinical Pearl: Index Finger Considerations
While PIP arthroplasty is highly successful in the ulnar digits, it is generally contraindicated in the index finger for patients who perform heavy manual labor. The index PIP joint is subjected to immense lateral shear forces during key pinch. In such cases, arthrodesis at 35 to 40 degrees of flexion provides a more stable and durable construct.
Biomechanics and Implant Considerations
The PIP joint is a ginglymus (hinge) joint with a bicondylar proximal phalanx head articulating with the biconcave base of the middle phalanx. Stability is conferred by a robust soft-tissue envelope comprising the true and accessory collateral ligaments, the volar plate, and the extensor mechanism.
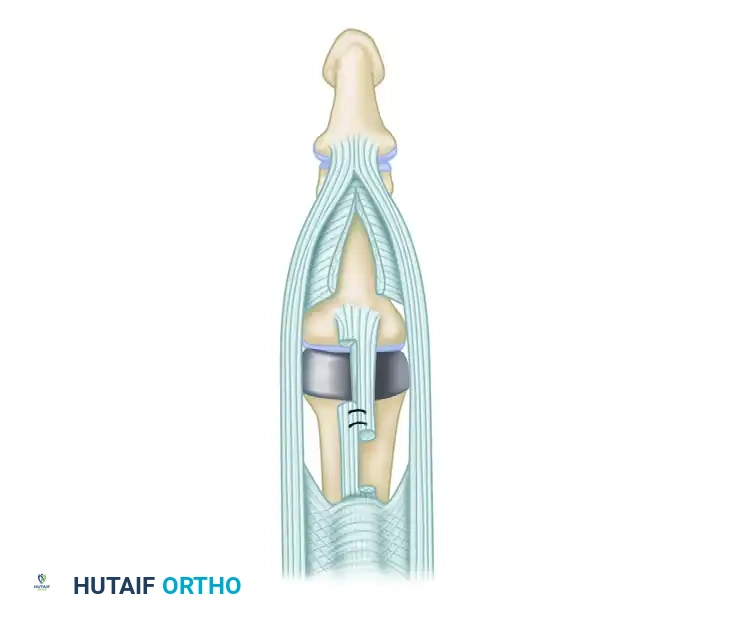
Silicone elastomer implants (e.g., Swanson design) act as dynamic spacers rather than true articulating prostheses. They rely on the phenomenon of "encapsulation"—the formation of a fibrous pseudocapsule around the implant—to provide long-term stability. The implant's flexible hinge absorbs shock and maintains joint alignment while the surrounding soft tissues heal. Precise surgical technique is paramount; the implant must be perfectly sized to prevent cortical abutment, which can lead to premature implant failure, particulate synovitis, or periprosthetic fracture.
Preoperative Planning and Patient Positioning
Thorough preoperative clinical and radiographic evaluation is mandatory. Standard posteroanterior, true lateral, and oblique radiographs of the affected digit are required to assess bone stock, medullary canal width, and the extent of deformity.
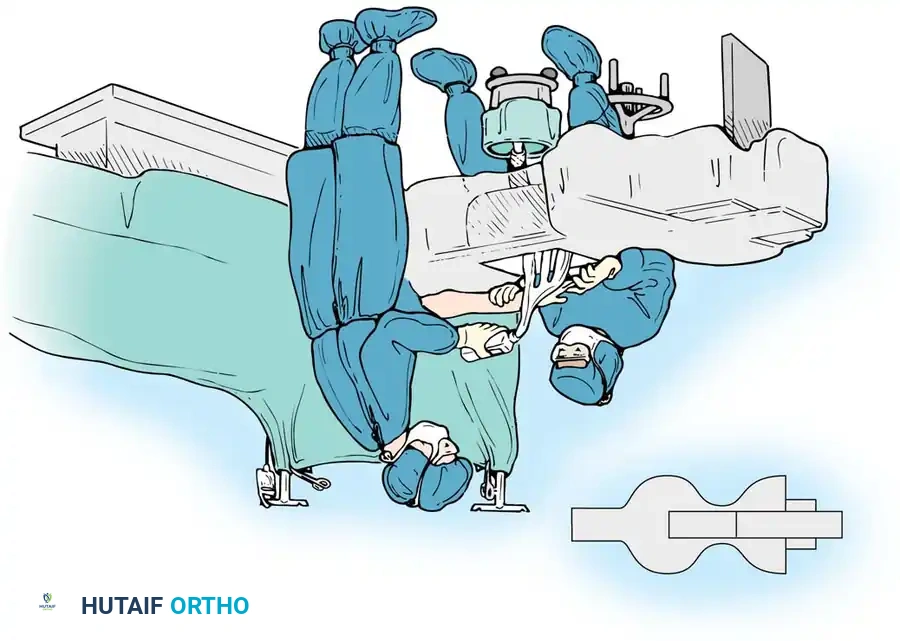
The patient is positioned supine with the operative arm extended on a radiolucent hand table. Regional anesthesia (brachial plexus block) or general anesthesia is utilized. A well-padded pneumatic upper arm tourniquet is applied to ensure a bloodless surgical field. Prophylactic intravenous antibiotics are administered prior to tourniquet inflation.
Surgical Technique: The Dorsal Approach (Swanson)
The dorsal approach is the traditional and most widely utilized technique for PIP joint arthroplasty, particularly favored when concurrent extensor mechanism reconstruction is required.
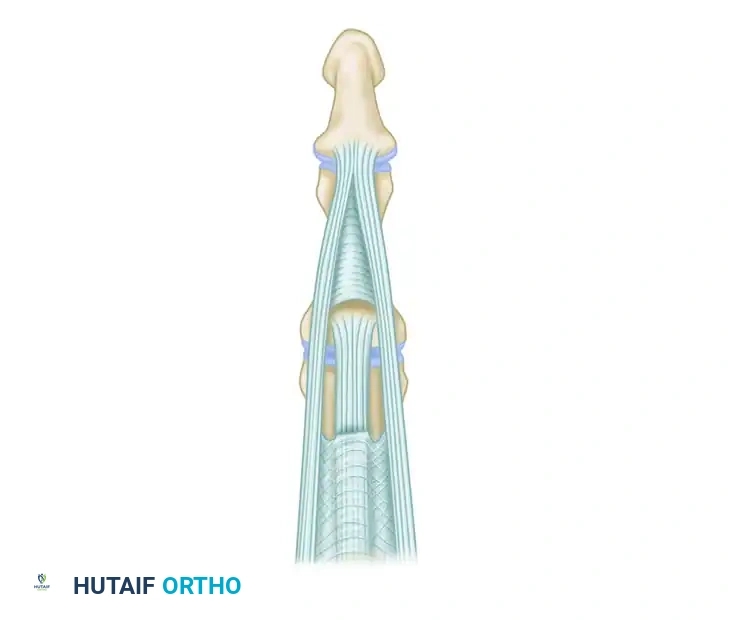
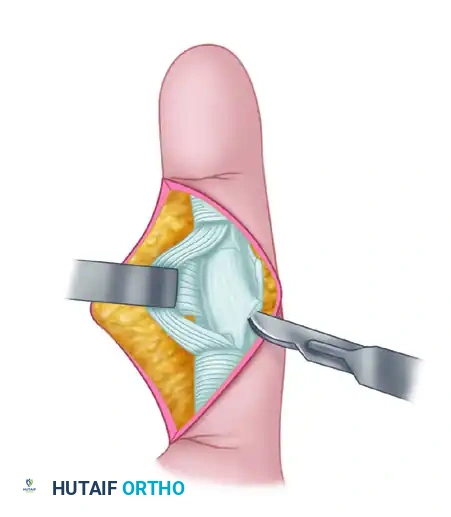
Incision and Extensor Mechanism Exposure
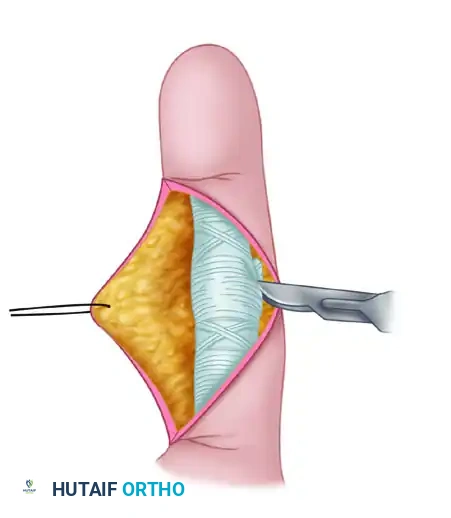
Make a dorsal, longitudinal, slightly curved (or lazy-S) incision centered over the PIP joint. This mitigates the risk of dorsal scar contracture. Carefully dissect through the subcutaneous tissues to expose the extensor mechanism.
Incise the central tendon longitudinally, precisely in the midline. It is critical to preserve the distal insertion of the central slip at the dorsal base of the middle phalanx. Gently retract the split central tendon radially and ulnarly to expose the underlying joint capsule. Maintain the collateral ligament insertions as much as possible to preserve coronal plane stability.
Joint Resection and Canal Preparation
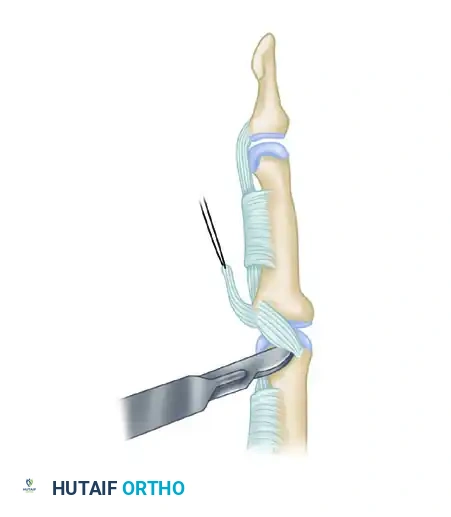
Expose the head of the proximal phalanx. Using an oscillating microsaw, resect the proximal phalanx head just proximal to the collateral ligament origins. The resection must be perpendicular to the long axis of the phalanx and sufficient to accommodate the hinge of the implant.
⚠️ Surgical Warning: Bone Resection
Inadequate resection of the proximal phalanx head will result in a tight joint space, leading to restricted flexion, excessive compressive forces on the implant hinge, and early mechanical failure.
Accurately determine the central axis of the proximal phalanx medullary canal using a sharp awl. Fluoroscopy is highly recommended during this step to prevent inadvertent cortical perforation. Ream and broach the medullary canal using the provided proprietary instruments. The goal is to accommodate the largest possible implant stem without compromising the cortical integrity.
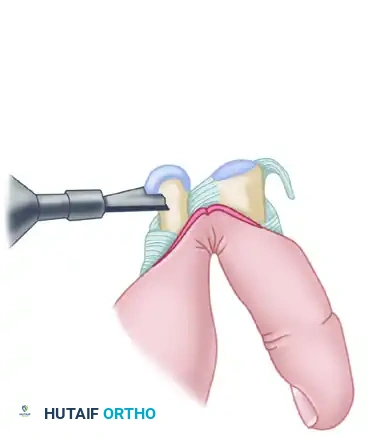
Next, address the middle phalanx. Enter the base of the middle phalanx with the awl or a small power burr.
💡 Clinical Pearl: Middle Phalanx Articular Surface
The articular surface of the middle phalanx is usually not resected. Preservation of the subchondral bone provides a stable platform for the distal implant stem. However, if severe bony distortion or prominent osteophytes are present, recontouring is necessary to make the base perpendicular to the long axis of the middle phalanx.
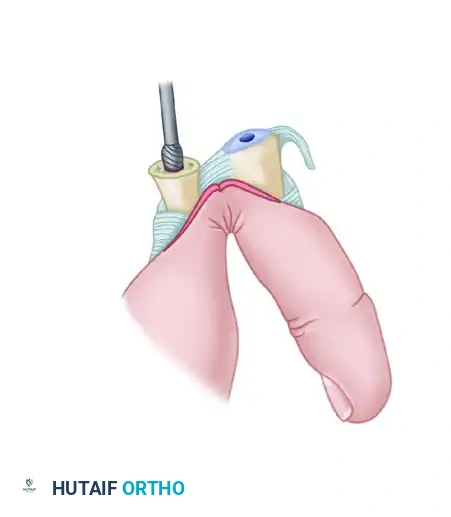
Ream and broach the middle phalangeal canal to accommodate the largest implant possible, ensuring it corresponds with the proximal phalangeal preparation.
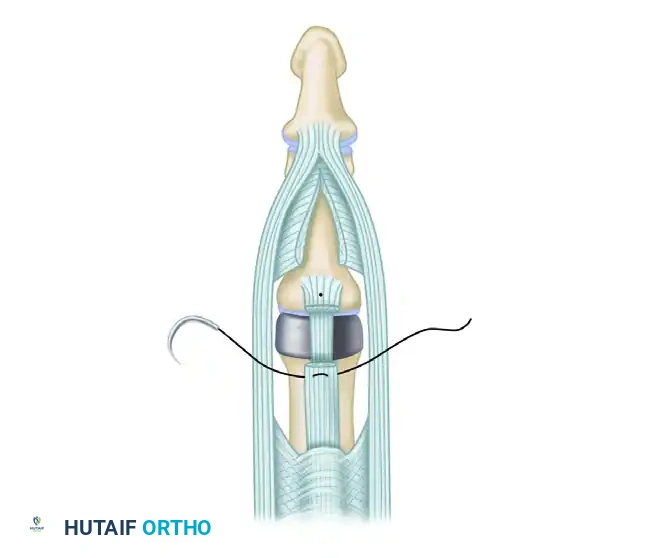
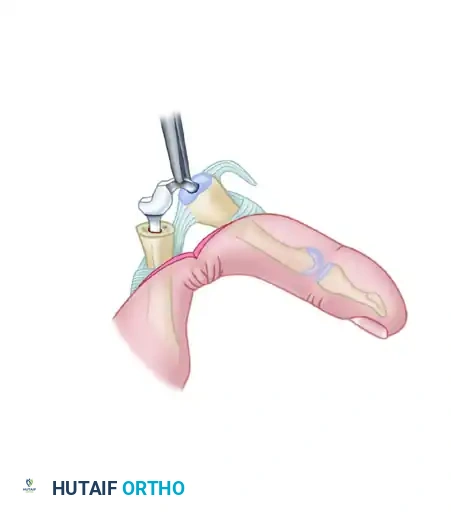
Implant Trialing and Insertion
With gentle longitudinal traction and the joint held in full extension, evaluate the created joint space. The distance between the prepared bone ends must comfortably accommodate the waist (hinge) portion of the implant.
Insert a properly sized prosthetic implant trial. Fold the implant and place both stems into their respective canals simultaneously while the PIP joint is flexed.
Assess the kinematics:
1. The proximal and distal stems must be fully seated.
2. In full extension, the waist of the implant must not be compressed.
3. In full flexion, the cortices of the proximal and middle phalanges must not abut.
Once optimal sizing and kinematics are confirmed, irrigate the canals copiously and insert the permanent silicone implant using a no-touch technique to minimize contamination risk.
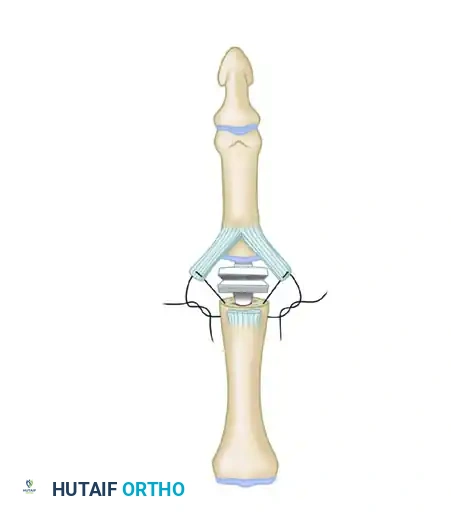
Closure and Extensor Mechanism Repair
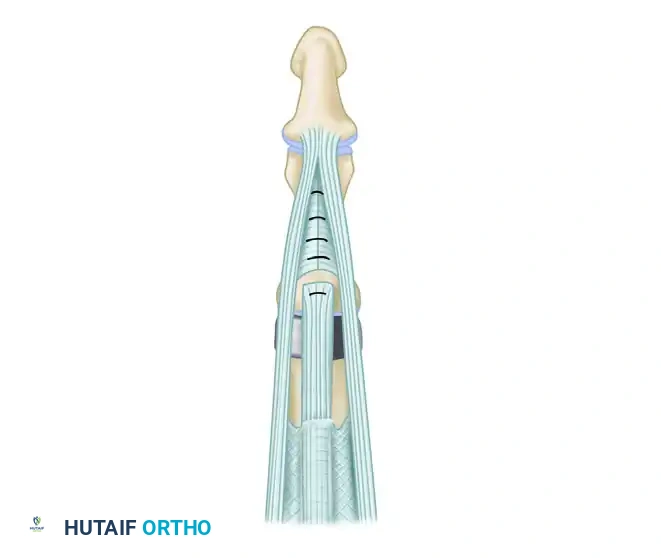
Reattach and repair the central tendon. If the insertion was compromised, it must be reattached through a small drill hole at the dorsal cortex of the middle phalanx base. Repair the longitudinal split in the central tendon with non-absorbable or slowly absorbable horizontal mattress sutures. Close the skin with interrupted sutures.
Management of Concurrent Digital Deformities
Rheumatoid arthritis frequently presents with complex digital deformities that must be addressed concurrently with the arthroplasty to ensure a successful outcome.
Swan-Neck Deformity Correction
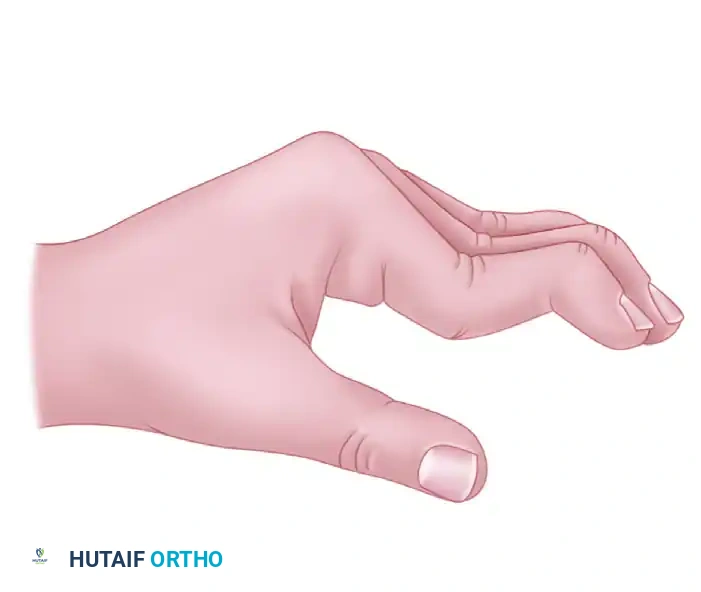
A swan-neck deformity is characterized by PIP joint hyperextension and DIP joint flexion, driven by volar plate laxity and dorsal subluxation of the lateral bands.
To correct this during the dorsal approach, the central tendon must be separated from the lateral tendons by dividing the connecting fibers. The central tendon is then step-cut transversely and dissected proximally, effectively lengthening it.
Release the triangular ligament to allow the lateral bands to mobilize. The lateral tendons are then relocated palmarward (volarly) to restore their normal mechanical axis below the center of rotation of the PIP joint. After the implant is inserted, the cut ends of the lengthened central tendon are approximated with interrupted sutures, ensuring the knots are buried to prevent dorsal irritation.
Boutonniere (Buttonhole) Deformity Correction
A boutonniere deformity presents with PIP joint flexion and DIP joint hyperextension, resulting from attenuation or rupture of the central slip and subsequent volar subluxation of the lateral bands.
Correction requires meticulous rebalancing. The triangular ligament must be released and imbricated to permit the lateral bands to shift dorsally, restoring PIP joint extension.
The attenuated central tendon is advanced distally and reinserted securely into the dorsum of the middle phalanx. Collateral ligaments may also require release or partial excision to permit satisfactory joint alignment, especially in joints severely distorted by chronic arthritic contractures.
Surgical Technique: The Anterior (Volar) Approach
The anterior (volar) approach is an excellent alternative, particularly for patients with primary osteoarthritis or post-traumatic arthritis without significant extensor mechanism compromise. This approach preserves the dorsal venous drainage and the extensor apparatus entirely, allowing for immediate postoperative mobilization.
Incision and Flexor Tendon Management
Make a V-shaped or Brunner zigzag incision over the volar aspect of the PIP joint. Elevate the skin flaps, taking care to identify and protect the neurovascular bundles bilaterally.
Expose the flexor tendon sheath. Divide the A3 pulley to allow mobilization of the flexor tendons.
Retract the flexor digitorum superficialis (FDS) and flexor digitorum profundus (FDP) tendons laterally to expose the underlying volar plate. Detach the volar plate proximally from its origin on the proximal phalanx, leaving its distal insertion on the middle phalanx intact.
Joint Exposure and Resection
Identify the collateral ligaments. To achieve adequate exposure, the collateral ligament origins on the proximal phalanx must be completely released.
Once the collaterals and volar plate are released, hyperextend the PIP joint (the "shotgun" maneuver) to fully expose the articular surfaces of both the proximal and middle phalanges.
Using an oscillating microsaw, remove the head of the proximal phalanx at the metaphyseal flare.
Canal Preparation and Implant Insertion
Prepare the medullary canals of the proximal and middle phalanges using properly sized power burrs and broaches. Ensure the central axis is maintained to prevent angular deformity.
Insert provisional trial implants to assess sizing. Perform a trial of active and passive motion to ensure there is no impingement, cortical abutment, or instability.
Once satisfied with the kinematics, insert the permanent silicone implant.
Volar Plate Reconstruction
A critical step in the volar approach is the reconstruction of the collateral ligaments to restore coronal stability. The proximally detached volar plate can be split longitudinally. The two halves are then sutured to the lateral aspects of the proximal phalanx to reconstruct the collateral ligaments and prevent postoperative hyperextension.
Repair the A3 pulley if possible, or ensure the A2 and A4 pulleys are intact to prevent flexor tendon bowstringing. Close the skin meticulously.
Postoperative Protocol and Rehabilitation
The success of PIP joint arthroplasty is heavily dependent on a rigorous, specialized hand therapy protocol.
For the Dorsal Approach (Uncomplicated):
- Days 1-5: The hand is immobilized in a bulky compressive dressing with the PIP joint in full extension to protect the central slip repair.
- Week 1-4: A dynamic extension splint is fabricated. Active flexion is permitted within the constraints of the splint, but passive flexion is strictly avoided to prevent central slip rupture.
- Week 4-6: Splinting is gradually weaned. Active and passive range of motion exercises are advanced.
- Week 6+: Strengthening exercises commence.
For Deformity Corrections:
- Swan-Neck: The PIP joint is splinted in 10 to 20 degrees of flexion for 3 to 4 weeks to allow the volar structures to scar and prevent recurrent hyperextension.
- Boutonniere: The PIP joint is splinted in absolute full extension for 4 to 6 weeks to protect the central slip advancement. Only DIP joint flexion is encouraged during this phase to glide the lateral bands.
For the Volar Approach:
Because the extensor mechanism is entirely uncompromised, early active motion can begin within 3 to 5 days postoperatively. A buddy-taping protocol is often sufficient, alongside a resting extension splint at night to prevent flexion contractures.
Complications and Salvage Procedures
Despite meticulous technique, complications can arise.
- Infection: Requires immediate washout, implant removal, and placement of an antibiotic spacer.
- Implant Fracture/Failure: Silicone implants may fracture over time due to shear forces. If the patient remains asymptomatic and stable due to the fibrous pseudocapsule, observation is appropriate. Symptomatic failure requires revision arthroplasty or arthrodesis.
- Recurrent Deformity: Often stems from inadequate soft tissue balancing at the index operation or non-compliance with postoperative splinting.
- Stiffness: The most common complication. Aggressive hand therapy is the first line of management, followed by surgical tenolysis or capsulotomy in refractory cases.
When revision arthroplasty is not feasible due to severe bone loss or soft tissue incompetence, salvage is achieved via PIP joint arthrodesis using tension band wiring, headless compression screws, or specialized fusion plates, locking the joint in a functional position of 30 to 40 degrees of flexion.
You Might Also Like