Anatomical DRUJ Reconstruction: Adams-Berger Technique
Key Takeaway
The Adams-Berger technique for anatomical reconstruction of the distal radioulnar joint (DRUJ) restores stability by recreating the palmar and dorsal radioulnar ligaments using a tendon graft. This procedure is indicated for chronic DRUJ instability where the triangular fibrocartilage complex (TFCC) is irreparable. Precise tunnel placement in the radius and ulnar fovea is critical to restore native biomechanics and forearm rotation.
INTRODUCTION TO DRUJ INSTABILITY AND RECONSTRUCTION
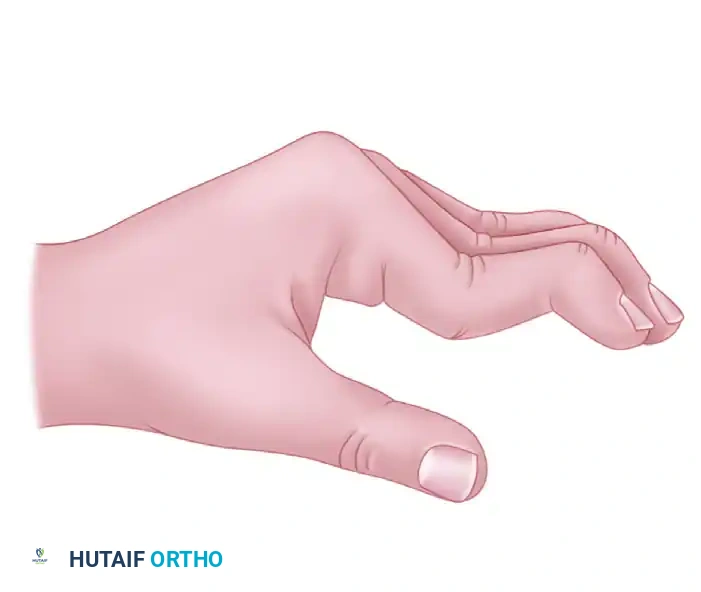
The distal radioulnar joint (DRUJ) is a highly complex trochoid joint that relies heavily on soft-tissue restraints for stability during forearm pronation and supination. The primary stabilizers of the DRUJ are the dorsal and palmar radioulnar ligaments, which form the structural foundation of the triangular fibrocartilage complex (TFCC). These ligaments originate from the sigmoid notch of the radius and converge to insert on the fovea at the base of the ulnar styloid, acting as the true isometric axis of forearm rotation.
When the TFCC is irreparably torn or chronically attenuated, patients present with debilitating ulnar-sided wrist pain, weakness, and mechanical instability. Historically, non-anatomical tenodesis procedures failed to replicate the complex kinematics of the DRUJ, often leading to restricted motion or recurrent instability.
The Adams and Berger Anatomical Reconstruction revolutionized the management of chronic DRUJ instability. By utilizing a free tendon graft (typically the palmaris longus) routed through precisely drilled osseous tunnels in the radius and the ulnar fovea, this technique anatomically recreates both the dorsal and palmar radioulnar ligaments. This restores the native biomechanics of the joint, providing robust stability while preserving the full arc of forearm rotation.
Clinical Pearl: The success of the Adams-Berger reconstruction hinges on the precise anatomical placement of the ulnar tunnel at the fovea. Non-isometric placement (e.g., at the ulnar styloid tip) will result in graft laxity in pronation or supination, leading to construct failure or severe stiffness.
INDICATIONS AND CONTRAINDICATIONS
Indications
- Chronic, symptomatic DRUJ instability refractory to conservative management.
- Irreparable tears of the TFCC (e.g., severe degenerative tearing, lack of viable tissue).
- Failed prior primary TFCC repairs.
- Iatrogenic DRUJ instability following distal radius fracture malunion (often performed concurrently with corrective radial osteotomy).
Contraindications
- Absolute: Advanced osteoarthritis of the DRUJ (requires salvage procedures such as the Darrach procedure, Sauvé-Kapandji procedure, or prosthetic arthroplasty).
- Relative: Fixed ulnocarpal translation, severe uncorrected distal radius malunion, or active local infection.
PREOPERATIVE PLANNING AND POSITIONING
Clinical and Radiographic Assessment
Thorough preoperative evaluation is mandatory. Advanced imaging, including a high-resolution MRI, is utilized to assess the integrity of the TFCC and the articular cartilage of the sigmoid notch and ulnar head. A CT scan of both wrists is highly recommended to evaluate the bony architecture, sigmoid notch version, and to rule out subtle distal radius malunions that may be driving the instability.
Graft Selection
Before the induction of anesthesia, the surgeon must determine if a palmaris longus (PL) tendon is present on either upper extremity. Prepare the extremities accordingly.
* If the palmaris longus is unavailable, alternative autografts (e.g., plantaris, half of the flexor carpi radialis, or a toe extensor) or an allograft tendon must be considered.
Operating Room Setup
- Anesthesia: Regional block (supraclavicular or axillary) or general anesthesia.
- Positioning: The patient is placed supine. Apply a well-padded tourniquet to the proximal upper arm.
- Preparation: Prepare the skin and apply sterile drapes with the arm positioned on a radiolucent hand table. Ensure the C-arm fluoroscopy unit can easily access the surgical field for orthogonal imaging.
SURGICAL TECHNIQUE: ADAMS AND BERGER RECONSTRUCTION
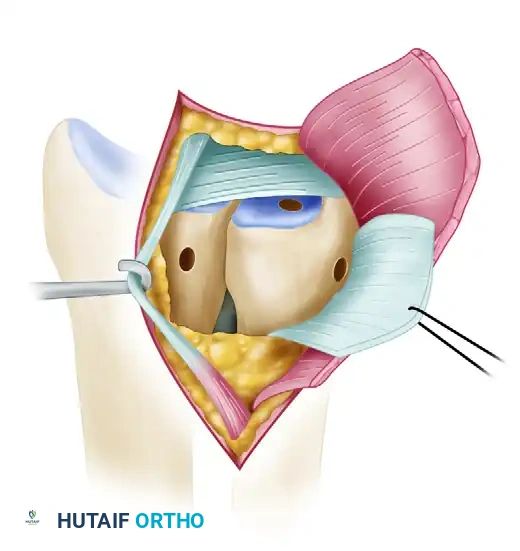
1. Dorsal Approach and DRUJ Exposure
- Make a longitudinal 4-cm incision over the dorsal wrist, centered between the fifth and sixth extensor compartments. Begin the incision at the level of the ulnar styloid and extend it proximally.
- Carefully dissect through the subcutaneous tissues, protecting the dorsal sensory branches of the ulnar nerve.
- Open the fifth extensor compartment, taking care to preserve the distal retinaculum over the ulnocarpal joint to prevent extensor digiti quinti (EDQ) bowstringing.
- Retract the EDQ tendon laterally (radially) to expose the underlying DRUJ capsule.
- Open the DRUJ capsule using an L-shaped incision. Make the longitudinal limb of the capsular incision along the dorsal rim of the sigmoid notch. The transverse limb should run proximal and parallel to the normal anatomical location of the dorsal radioulnar ligament.
- Retract the capsular flap proximally and medially (ulnarward) to expose the articular surface of the DRUJ and the proximal surface of the TFCC remnant.
2. Joint Preparation and Debridement
- Directly inspect the TFCC. Determine conclusively whether the TFCC can be primarily repaired. If the tissue is deficient, degenerative, or cannot be used to stabilize the DRUJ, proceed with the anatomical reconstruction.
- Thoroughly débride granulation tissue and fibrotic scar from the fovea of the ulnar head to create a bleeding bony bed for graft incorporation.
- Crucial Step: Leave any functioning remnants of the TFCC intact. This includes the palmar radioulnar and ulnocarpal ligaments, which provide secondary stability and proprioception.
- Débride any central tears in the triangular fibrocartilage disc to create smooth, stable edges, preventing future mechanical catching.
- ECU Preservation: Leave the extensor carpi ulnaris (ECU) sheath completely intact during the procedure. Do not open the ECU sheath or dissect it from the ulnar groove, as doing so can precipitate ECU subluxation.
- If an ulnar styloid nonunion is encountered, excise the styloid fragment using sharp, subperiosteal dissection to prevent impingement.
3. Graft Harvesting
- Harvest the palmaris longus tendon graft from the ipsilateral arm.
- Make a 1- to 2-cm transverse incision at the volar wrist flexion crease. Identify the PL tendon and mobilize it using blunt dissection. Strictly protect the median nerve, which lies directly deep and slightly radial to the PL.
- Leave the PL attached distally at the palmar aponeurosis temporarily.
- In the mid-to-proximal forearm, make a second 1- to 2-cm longitudinal incision over the PL musculotendinous junction.
- Transect the tendon proximally, deliver it through the distal incision, and then transect it distally. Place the harvested graft in a moist saline sponge in a safe location on the back table. Close the donor incisions.
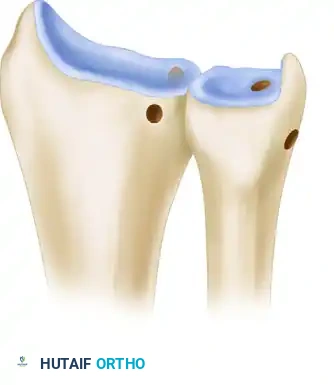
4. Preparation of the Radial Tunnel
- Prepare the site for the radial tunnel by elevating the periosteum from the dorsal radius at the ulnar margin of the sigmoid notch.
- Using C-arm fluoroscopy, drive a guidewire for a 2- to 4-mm cannulated drill through the radius from dorsal to palmar.
- Trajectory: The starting point must be far enough proximal to the lunate fossa and lateral (radial) to the articular surface of the sigmoid notch so that a 5-mm tunnel can be reamed without fracturing into the radiocarpal joint or the DRUJ.
- Use posteroanterior and lateral fluoroscopy to confirm that the guidewire is safely and accurately placed without passing completely through the palmar cortex prematurely.
- Use a cannulated 2- or 3-mm drill to create the initial pilot tunnel over the wire.
- Progressively enlarge the radial tunnel using noncannulated drill bits until it is sufficiently large (typically 4.5 to 5.0 mm) to allow smooth passage of the folded tendon graft.
Surgical Warning - Concurrent Osteotomy: If a radial osteotomy is planned to correct a malunion simultaneously, drill the radial tunnel before completing the osteotomy. This provides a stable osseous platform for drilling. Ensure the tunnel trajectory is parallel to the malaligned lunate fossa to avoid articular penetration.
5. Preparation of the Ulnar Tunnel
- The ulnar tunnel must be directed obliquely from the fovea (the true isometric center of rotation) to the ulnar neck.
- Expose the fovea at the base of the ulnar styloid by flexing the wrist and retracting the remaining TFCC remnants distally.
- Insert a guidewire precisely at the fovea. Direct it to exit the ulnar neck medially, just palmar to the ECU sheath.
- Retrograde Reaming Technique: To avoid fracturing the delicate ulnar neck and to prevent injury to the carpus, place the 2- or 3-mm cannulated drill over the guidewire from the medial ulnar neck cortex. Ream from the superficial ulnar neck in a retrograde direction toward the fovea.
- Carefully enlarge the ulnar tunnel with noncannulated drill bits. The foveal opening must be large enough to accommodate the passage of both limbs of the tendon graft simultaneously.
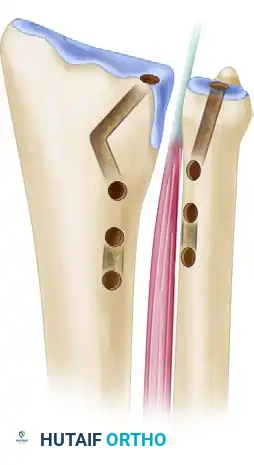
6. Volar Exposure and Graft Routing
- Make a 3-cm longitudinal incision on the volar aspect of the wrist, positioned between the ulnar neurovascular bundle and the flexor tendons to the fingers. Begin at the proximal wrist flexion crease.
- Carefully retract the ulnar neurovascular bundle medially (ulnarward) and the finger flexors laterally (radialward) to expose the palmar opening of the newly created radial tunnel.
- Pass a wire loop or suture retriever through the radial tunnel from dorsal to palmar.
- Capture one end of the tendon graft and pull it from the palmar side to the dorsum through the radius.
- Next, pass a straight hemostat from dorsal to palmar over the ulnar head, staying proximal to any TFCC remnants. Push the hemostat through the palmar DRUJ capsule.
- Grasp the palmar end of the graft and pull it into the ulnocarpal joint, proximal to the TFCC remnant.
- Pitfall Avoidance: Meticulously avoid capturing adjacent flexor tendons or the ulnar neurovascular bundle as the palmar end of the graft is delivered from palmar to dorsal and out the dorsal incision.
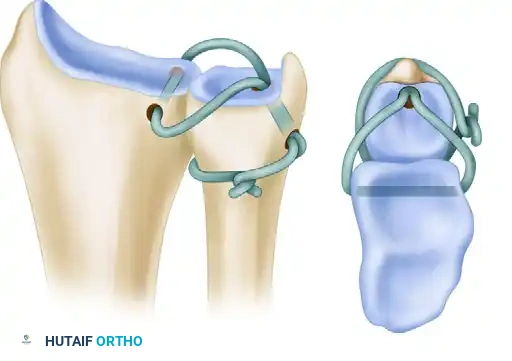
7. Ulnar Graft Passage and Tensioning
- Use a suture retriever to pull both limbs of the graft proximally through the tunnel in the distal ulna. The grafts must pass from the fovea distally, exiting at the cortex of the ulnar neck proximally.
- At the ulnar neck, pass a hemostat from the interosseous space (radial to ulnar) under the ECU sheath, dorsal to the ulna. Grasp one limb of the graft and deliver it dorsal to the ulna, beneath the ECU sheath, into the dorsal incision.
- Pass a medium-sized right-angle clamp (e.g., Kantrowicz) from the dorsal incision, between the radius and ulna, around the neck of the ulna, deep to the flexor carpi ulnaris (FCU). Retrieve the other limb of the tendon graft from the palmar medial side of the ulnar neck.
- Pass this second limb around the ulnar neck from palmar to dorsal, strictly avoiding the ulnar neurovascular bundle.
- Deliver this limb into the dorsal incision. Both limbs of the tendon graft should now lie in the dorsal incision, converging at the ulnar neck.
8. Final Fixation and Closure
- Place the forearm in neutral rotation. This is the critical position for isometric tensioning.
- Pull both limbs of the tendon graft taut, while an assistant manually compresses the DRUJ to reduce the joint anatomically.
- Tie a “half-hitch” knot in the two limbs of the graft directly over the ulnar neck.
- Maintain maximal tension on the construct and secure the limbs of the graft together at the half-hitch using multiple figure-of-eight 3-0 nonabsorbable sutures.
- Thoroughly irrigate the surgical field. Close the dorsal DRUJ capsule and the extensor retinaculum in anatomical layers using 3-0 sutures. Ensure the EDQ tendon is left in the subcutaneous tissue over the DRUJ to prevent tethering.
- Close the palmar and dorsal skin incisions in layers.
9. Supplemental Radioulnar Pinning
- If there is any concern regarding the durability of the soft-tissue repair, poor bone quality, or anticipated patient non-compliance, the ulna should be pinned to the radius.
- Use a smooth Kirschner wire (K-wire) of sufficient diameter (typically 0.062-inch) to stabilize the DRUJ and minimize the risk of pin breakage.
- Placement: To avoid creating a stress riser and fracturing through the newly drilled ulnar tunnel, place the transfixion pin at least 2 cm proximal to the ulnar tunnel.
- Advance the pin through the ulna, across the interosseous space, and through the lateral (radial) cortex of the radius. Cut the point of the pin off beneath the skin on the radial side, and cut the trailing shaft beneath the skin on the medial (ulnar) side of the forearm.
ALTERNATIVE RECONSTRUCTIVE TECHNIQUES: THE SCHEKER METHOD
While the Adams-Berger technique is the gold standard for anatomical reconstruction utilizing a single foveal tunnel, alternative methods exist for specific anatomical variants or revision scenarios.
The Scheker Technique is a notable alternative that utilizes a double-tunnel configuration. In this method, two distinct tunnels are created in both the distal radius and the distal ulna. This allows for a broader footprint of graft fixation, theoretically mimicking the broad origin and insertion of the native radioulnar ligaments. However, it requires a larger volume of bone and carries a higher risk of iatrogenic fracture during tunnel preparation.
POSTOPERATIVE REHABILITATION PROTOCOL
The postoperative phase is critical to allow for biological incorporation of the tendon graft within the osseous tunnels while preventing debilitating wrist stiffness.
Phase 1: Immobilization (Weeks 0 to 6)
- Immediately postoperatively, apply a well-padded, long-arm cast with the forearm locked in neutral rotation. This neutralizes deforming forces and protects the graft during the initial healing phase.
- If nonabsorbable skin closure is used, sutures or staples are removed, and the cast is changed at 10 to 14 days.
- Pin Management: If a transfixion pin was placed and causes irritation of the superficial radial nerve, it can be backed out slightly under local anesthesia to relieve symptoms.
- The long-arm cast and the radioulnar transfixion pin are maintained for a total of 6 weeks.
Phase 2: Protected Mobilization (Weeks 6 to 10)
- At 6 weeks, the long-arm cast is removed. The radioulnar transfixion pin is extracted in the clinic.
- A custom-molded, ulnar-gutter wrist splint is applied. This splint is designed to prevent extreme forearm rotation and wrist deviation while allowing digital motion.
- The splint is worn continuously for another 4 weeks, removed only for hygiene and controlled therapy.
- Therapy Initiation: Begin active wrist flexion/extension, gentle hand strengthening (putty exercises), and active forearm rotation within a pain-free arc.
- Strict Restriction: Passive motion exercises and aggressive stretching are strictly avoided during this phase to prevent stretching out the newly reconstructed ligaments.
Phase 3: Strengthening and Return to Function (Months 3 to 6)
- At 10 weeks, the removable splint is discontinued.
- Supination and pronation range of motion will be regained gradually over the next 4 to 6 months. Patients must be counseled that terminal rotation may take up to a year to fully normalize.
- If grip strength and wrist motion have recovered adequately, most activities of daily living are permitted after 4 months.
- Heavy lifting, power tool operation, and impact-loading sports must be strictly avoided for a minimum of 6 months postoperatively to ensure complete graft maturation and osseous integration.
===```
You Might Also Like