Corrective Osteotomy for Bimalleolar Fracture Malunion: A Master Surgical Guide
Key Takeaway
Corrective osteotomy for bimalleolar fracture malunion is a complex salvage procedure aimed at restoring fibular length, rotation, and ankle mortise congruity. By utilizing AO distraction techniques and structural bone grafting, surgeons can reverse talar shift, normalize joint contact pressures, and delay the onset of post-traumatic osteoarthritis. This guide details the precise surgical steps, biomechanical principles, and postoperative protocols required for optimal outcomes.
Introduction to Bimalleolar Fracture Malunion
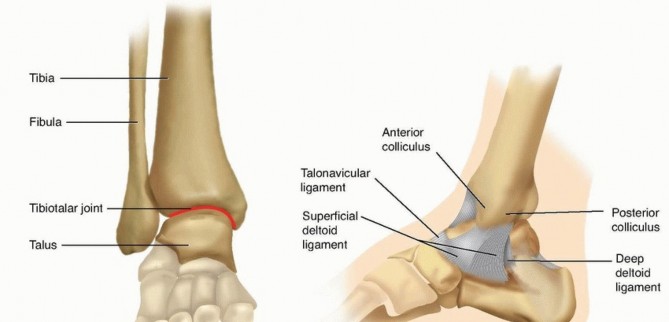
The anatomical reduction of bimalleolar ankle fractures is paramount to preserving the biomechanical integrity of the tibiotalar joint. When conservative management fails, or primary surgical fixation is inadequate, patients frequently develop a malunion. The most common and biomechanically devastating deformity is shortening and external rotation of the distal fibula, often accompanied by lateral subluxation of the talus.
Corrective osteotomy of the fibula is a highly specialized, joint-preserving salvage procedure. The primary objective is to restore the anatomical length and rotation of the lateral malleolus, thereby re-establishing the congruity of the ankle mortise, normalizing joint contact pressures, and halting the progression of post-traumatic osteoarthritis. This comprehensive guide details the indications, biomechanical rationale, preoperative planning, and step-by-step surgical execution of a corrective fibular osteotomy.
Biomechanics and Pathoanatomy
Understanding the pathoanatomy of a bimalleolar malunion is critical for executing a successful corrective osteotomy. The ankle joint is a highly congruent, weight-bearing hinge joint. The distal fibula acts as the lateral buttress of the ankle mortise.
🔬 Biomechanical Pearl: The Ramsey and Hamilton Principle
In their classic biomechanical study, Ramsey and Hamilton demonstrated that a mere 1 mm of lateral talar shift reduces the tibiotalar contact area by 42%. This exponential decrease in contact area leads to a massive increase in peak articular cartilage stress, rapidly accelerating the onset of secondary osteoarthritis.
When the fibula heals in a shortened and externally rotated position:
1. Talar Shift: The talus follows the lateral malleolus laterally, widening the medial clear space.
2. Syndesmotic Incongruity: The fibula no longer sits anatomically within the incisura fibularis (syndesmotic notch) of the tibia.
3. Altered Kinematics: The axis of rotation of the ankle joint is skewed, leading to abnormal sheer forces across the articular cartilage during the gait cycle.
The corrective osteotomy aims to reverse this triad by lengthening the fibula, internally rotating it to its native position, and rigidly securing it to allow for bony union.
Indications and Contraindications
Indications
- Symptomatic malunion of a bimalleolar or lateral malleolar fracture.
- Radiographic evidence of fibular shortening and/or external rotation.
- Widening of the medial clear space (>4 mm) with lateral talar subluxation.
- Preserved tibiotalar articular cartilage (minimal to no pre-existing osteoarthritis).
- Persistent ankle pain, swelling, and subjective instability following a previous fracture.
Contraindications
- Absolute: Advanced post-traumatic osteoarthritis (Kellgren-Lawrence Grade 3 or 4). In these cases, ankle arthrodesis or total ankle arthroplasty is indicated.
- Absolute: Active surgical site infection or osteomyelitis.
- Relative: Severe peripheral vascular disease or compromised soft tissue envelope over the lateral ankle.
- Relative: Poor patient compliance, as strict postoperative weight-bearing restrictions are mandatory.
Preoperative Planning and Radiographic Assessment
Meticulous preoperative planning is the cornerstone of a successful corrective osteotomy. Standard weight-bearing radiographs (Anteroposterior, Lateral, and Mortise views) of both the affected and contralateral normal ankle must be obtained.
Key Radiographic Parameters
- Talocrural Angle: Formed by a line parallel to the tibial plafond and a line connecting the tips of the medial and lateral malleoli. Normal is 83 ± 4 degrees. A decreased angle indicates fibular shortening.
- Shenton's Line of the Ankle: A continuous arc should be formed by the articular surface of the medial malleolus and the superior articular surface of the talus. Disruption indicates talar shift.
- The "Dime Sign": On the AP radiograph, the recess of the distal tip of the fibula should form a perfect, unbroken circle with the lateral process of the talus. A broken circle indicates shortening.
- Medial Clear Space: Should be equal to the superior clear space (typically ≤ 4 mm).
⚠️ Surgical Warning: CT Templating
A bilateral CT scan with 3D reconstructions is highly recommended. It allows for precise quantification of the rotational deformity (which is often difficult to assess on plain radiographs) and aids in templating the exact size of the structural bone graft required to fill the osteotomy gap.
Patient Positioning and Preparation
- Anesthesia: General anesthesia or regional anesthesia (spinal/epidural) combined with a popliteal nerve block for postoperative pain control.
- Positioning: The patient is placed supine on a radiolucent operating table. A bump is placed under the ipsilateral hip to internally rotate the leg, bringing the lateral malleolus directly anterior for optimal exposure.
- Tourniquet: A well-padded pneumatic tourniquet is applied to the proximal thigh.
- Fluoroscopy: The C-arm is positioned on the contralateral side of the table, ensuring unobstructed AP, Mortise, and Lateral views can be obtained seamlessly throughout the procedure.
- Preparation: The entire lower extremity from the toes to the mid-thigh is prepped and draped in a standard sterile fashion. The ipsilateral iliac crest should also be prepped if autograft harvest is anticipated, though the proximal medial tibia is the preferred local harvest site.
Step-by-Step Surgical Technique
1. Surgical Approach and Exposure
- Make a longitudinal lateral incision directly over the old fibular fracture site. The incision should be approximately 10 to 15 cm long, curving slightly anteriorly at its distal end toward the tip of the lateral malleolus.
- Carefully dissect through the subcutaneous tissues. Identify and protect the superficial peroneal nerve proximally and the sural nerve distally.
- Incise the periosteum longitudinally and elevate it minimally to expose the malunited fracture site. Excessive periosteal stripping must be avoided to preserve the blood supply to the fibula.
2. Debridement of the Syndesmosis
- This is arguably the most critical step for achieving anatomical reduction.
- Radically excise all scar tissue, callus, and fibrotic debris between the medial aspect of the fibula and the lateral aspect of the tibia (the incisura fibularis).
- If the syndesmotic notch is not completely cleared, the fibula cannot be translated medially or rotated internally into its correct anatomical position, rendering the lengthening procedure ineffective.
3. The Fibular Osteotomy
- Using a microsagittal or oscillating saw, create an osteotomy at the level of the previous fracture malunion.
- The osteotomy can be either transverse or oblique. A transverse osteotomy is generally preferred when significant lengthening is required, as it provides a stable platform for the structural interpositional bone graft. An oblique osteotomy (typically running from proximal-anterior to distal-posterior) increases the surface area for healing but can be more difficult to distract symmetrically.
- Ensure the osteotomy is complete and the distal fibular fragment is freely mobile.
4. Distal Plate Application
- Select a five-hole or six-hole, 3.5-mm dynamic compression plate (DCP) or locking compression plate (LCP).
- Before applying the plate, use a burr to create a small recess in the lateral cortex of the distal fibula. This prevents hardware prominence, which is a common source of postoperative pain in this subcutaneous region.
- Attach the plate to the distal fibular fragment using two 3.5-mm cortical or locking screws.
- Crucial Rotational Correction: Place the plate slightly posterior on the distal fragment. Because the malunited fibula is typically externally rotated, placing the plate posteriorly will force the distal fragment into approximately 10 degrees of internal rotation when the plate is eventually secured to the proximal fragment.
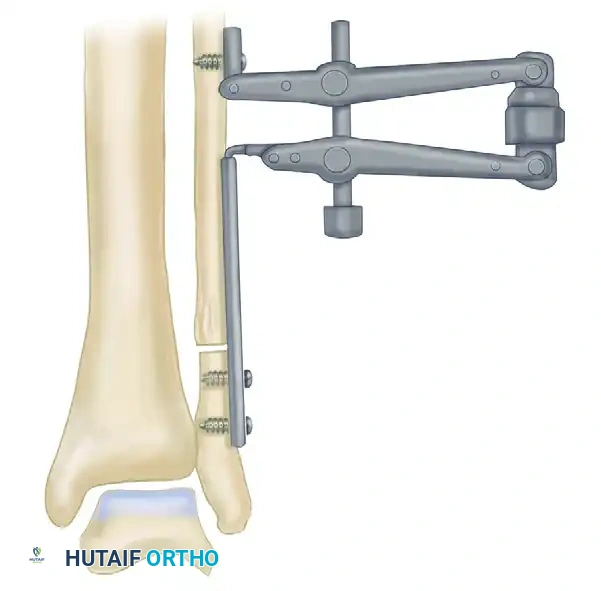
FIGURE 58-10A: A five-hole 3.5-mm plate is secured to the distal fibular fragment with two screws. The transverse osteotomy has been completed, and the distal fragment is mobilized.
5. Distraction and Restoration of Length
- Attach the articulated tensioning device (from the AO small fragment system) to the proximal end of the plate. Secure the tensioning device to the proximal fibular shaft using a single cortical screw.
- Slowly apply distraction by turning the knob on the tensioning device.
- As distraction is applied, the distal fibula is pulled distally. Because of the posterior placement of the plate distally, the distraction force simultaneously induces the required internal rotation.
- Continue distraction until the distal fibula is reduced anatomically to its articulations with the tibia and the talus. The talus should follow the fibula medially, closing the medial clear space.
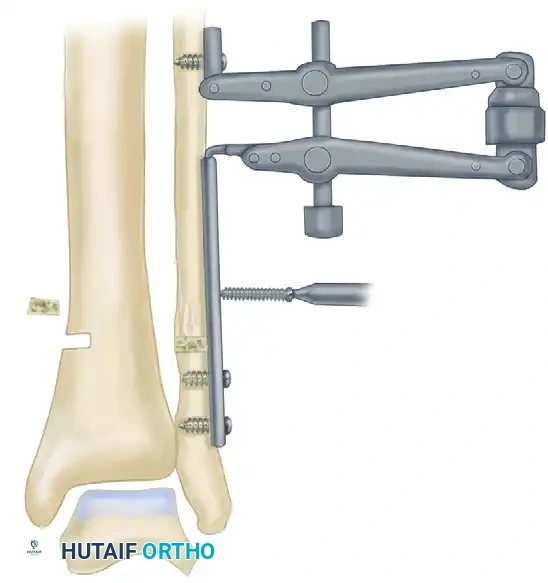
FIGURE 58-10B: The AO articulated tensioning device is attached to the proximal fibula and the plate. Distraction is applied to restore fibular length and correct the rotational deformity.
6. Fluoroscopic Confirmation
- Pause distraction and obtain intraoperative fluoroscopy (Mortise and Lateral views).
- Checklist for Anatomical Reduction:
- Is the Shenton's line of the ankle restored?
- Is the "dime sign" intact?
- Is the medial clear space reduced to ≤ 4 mm and equal to the superior clear space?
- Is the talocrural angle restored to match the contralateral templated side?
- Do not proceed until perfect anatomical reduction is confirmed radiographically.
7. Bone Grafting
- Once the correct length is achieved, a gap will exist at the osteotomy site. This gap must be filled with a structural bone graft to prevent collapse and promote union.
- Graft Harvest: Make a small 3 cm incision over the medial tibial metaphysis, just proximal to the medial malleolus. Using an osteotome or oscillating saw, harvest a small, precisely measured wafer of corticocancellous bone.
- Shape the corticocancellous graft to match the exact dimensions of the distraction gap.
- Insert the graft into the osteotomy gap. The cortical edge of the graft should face laterally to provide structural support against the plate.
8. Compression and Proximal Fixation
- Once the graft is perfectly seated, change the AO tensioning device from the distraction mode to the compression mode.
- Apply gentle compression across the osteotomy site. This compresses the proximal fibula, the structural graft, and the distal fibula together, maximizing stability and primary bone healing.
- With compression maintained, drill, measure, tap, and insert three 3.5-mm cortical screws through the proximal holes of the plate into the proximal fibular shaft.
- Remove the AO tensioning device.
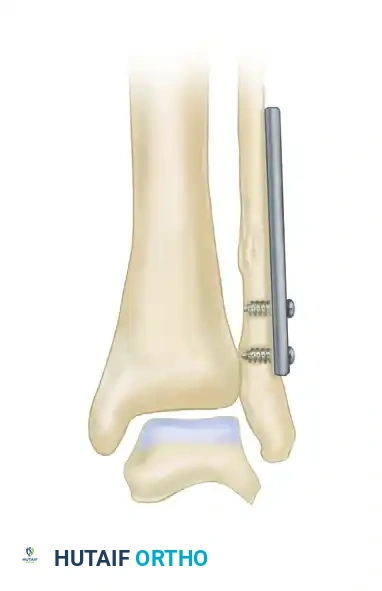
FIGURE 58-10C: The corticocancellous graft harvested from the medial tibia is placed into the osteotomy gap. The tensioning device is reversed to apply compression, and the remaining proximal screws are inserted to finalize the construct.
9. Syndesmotic Stabilization
- Assess the stability of the distal tibiofibular syndesmosis using the Cotton test (lateral stress applied to the fibula with a bone hook under fluoroscopy).
-
💡 Clinical Pearl: Yablon and Leach Recommendation
> Yablon and Leach strongly recommend the addition of a **syndesmosis screw** (position screw) if the interosseous membrane and syndesmotic ligaments were extensively detached or debrided during the initial scar excision. This protects the osteotomy and maintains the fibula within the incisura while the soft tissues heal. - If required, insert a 3.5-mm or 4.5-mm fully threaded cortical screw across the syndesmosis, parallel to the joint line, engaging three or four cortices.
- Note on Distal Fractures: In cases where the original fracture was very distal (e.g., Weber A or low Weber B), the distal fragment may be too small to accommodate two plate screws. In such instances, it may be necessary to stabilize the distal fibula with transfixing Kirschner wires or a specialized hook plate.
Alternative Technique: The Ward et al. Method
For surgeons who prefer not to use the articulated tensioning device, Ward et al. described an alternative method utilizing the small AO distractor.
- Expose the fibula, resect the scar tissue from the syndesmosis, and perform the osteotomy as previously described.
- Insert two 2.5-mm partially threaded Schanz pins. Place one pin in the proximal fibular fragment and the second pin in the anterior aspect of the distal fibular fragment.
- Crucial Step: Insert the distal pin in 10 degrees of external rotation relative to the proximal pin.
- Apply the small AO distractor over the pins.
- As distraction is applied to restore length, the distractor is used to internally rotate the distal fragment by 10 degrees (bringing the pins into parallel alignment), thereby simultaneously correcting the rotational malunion.
- Once length and rotation are restored and confirmed via fluoroscopy, apply the plate, insert the bone graft, and secure the construct.
Postoperative Protocol and Rehabilitation
The success of a corrective osteotomy relies heavily on strict adherence to postoperative rehabilitation protocols to prevent graft collapse or hardware failure.
- Phase 1: Immediate Postoperative (Weeks 0-2)
- The patient is placed in a well-padded, short-leg posterior splint in neutral dorsiflexion.
- Strict non-weight-bearing (NWB) status with crutches or a knee scooter.
- Elevation of the limb above the heart is critical to minimize edema and protect the surgical incisions.
- Phase 2: Early Healing (Weeks 2-6)
- Sutures are removed at 14 days postoperatively, provided the incisions are fully healed.
- The patient is transitioned to a removable Controlled Ankle Motion (CAM) boot.
- Strict NWB status is maintained.
- Gentle active range of motion (AROM) exercises for the ankle (plantarflexion and dorsiflexion) are initiated out of the boot to prevent stiffness. Inversion and eversion are restricted.
- Phase 3: Progressive Weight-Bearing (Weeks 6-12)
- At 6 weeks, follow-up radiographs are obtained to assess graft incorporation and osteotomy healing.
- If radiographic healing is evident, the patient begins progressive partial weight-bearing in the CAM boot, advancing by 25% body weight per week.
- Formal physical therapy is initiated, focusing on proprioception, peroneal strengthening, and Achilles stretching.
- Phase 4: Return to Function (Months 3-6)
- Transition to regular footwear, often with an ankle brace for support during strenuous activities.
- If a syndesmotic screw was placed, it is typically removed at 10 to 12 weeks postoperatively, prior to the patient resuming full, unprotected weight-bearing, to prevent screw breakage.
Complications and Management
While highly effective, corrective osteotomy of the fibula is a technically demanding procedure with potential complications:
- Nonunion or Delayed Union: The osteotomy site, particularly with structural grafting, is at risk for nonunion. Risk factors include smoking, inadequate compression, and premature weight-bearing. Management may require revision bone grafting and optimization of biology (e.g., bone marrow aspirate concentrate).
- Hardware Prominence: The lateral malleolus has minimal soft tissue coverage. Even with recessing the plate, patients may experience irritation from the hardware. Routine hardware removal is not recommended but can be performed after 12-18 months if the osteotomy is fully consolidated and the patient is symptomatic.
- Progression of Osteoarthritis: If the articular cartilage sustained irreversible damage during the initial trauma or the prolonged period of malunion, the patient may continue to experience pain despite a successful anatomical correction. In such cases, the osteotomy serves as a "buy-time" procedure, but eventual ankle arthrodesis may be required.
- Infection: Superficial wound dehiscence or deep infection requires prompt aggressive management, including intravenous antibiotics and potential surgical debridement. Meticulous soft tissue handling during the initial exposure is the best prevention.
Conclusion
Corrective osteotomy for bimalleolar fracture malunion is a powerful, joint-preserving technique. By meticulously excising syndesmotic scar tissue, utilizing AO distraction principles to restore fibular length and rotation, and providing rigid internal fixation with structural bone grafting, the orthopedic surgeon can successfully restore the biomechanical integrity of the ankle mortise. Thorough preoperative templating and strict adherence to postoperative weight-bearing restrictions are essential to achieving excellent long-term clinical outcomes.
You Might Also Like