Surgical Reconstruction of the Thumb: Web Deepening and Opponensplasty Techniques
Key Takeaway
Restoring thumb function following severe adduction contractures or median nerve palsy requires meticulous surgical reconstruction. This guide details the Brand and Milford sliding flap technique for first web space deepening and the Riordan ring sublimis opponensplasty. Key steps include precise fascial release, flexor carpi ulnaris pulley creation, and biomechanically optimized tendon tensioning to restore dynamic thumb opposition and functional pinch kinematics.
INTRODUCTION TO THUMB RECONSTRUCTION
The human thumb is responsible for approximately 40% to 50% of overall hand function. Its unique biomechanical capacity for opposition—a complex, multi-planar movement combining palmar abduction, flexion, and pronation—allows for precision pinch and power grasp. Pathologic conditions such as severe median nerve palsy, ischemic contractures, trauma, or spasticity can lead to a profound loss of opposition and secondary adduction contractures of the first web space.
Surgical restoration of thumb function in these scenarios is a two-fold challenge. First, the static architecture must be restored by releasing the adduction contracture and deepening the first web space. Second, dynamic function must be re-established through tendon transfer. This comprehensive guide details two foundational procedures in operative hand surgery: the Brand and Milford Sliding Flap for web deepening, and the Riordan Ring Sublimis Opponensplasty for dynamic restoration of opposition.
WEB DEEPENING WITH A SLIDING FLAP (BRAND AND MILFORD)
Severe adduction contractures of the thumb obliterate the first web space, rendering the thumb functionally useless even if dynamic tendon transfers are performed. The Brand and Milford sliding flap technique is an elegant solution that transposes durable, sensate palmar skin into the critical contact area of the web space, shifting the resultant soft tissue defect to the dorsal aspect of the hand where a split-thickness skin graft (STSG) is well tolerated.
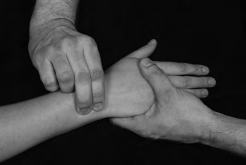
Preoperative Evaluation and Biomechanics
Before proceeding with a sliding flap, the surgeon must differentiate between a purely soft-tissue contracture and a joint contracture. Long-standing adduction contractures often involve shortening of the adductor pollicis muscle, contracture of the first dorsal interosseous fascia, and capsular contracture of the trapeziometacarpal (carpometacarpal, CMC) joint.
Clinical Pearl: A dynamic tendon transfer for opposition will inevitably fail if the passive first web space angle cannot be restored to at least 40 to 50 degrees intraoperatively. The web space must be released first.
Surgical Technique: Brand and Milford Sliding Flap
1. Flap Design and Incision
- Pre-Tourniquet Marking: Precise flap design is critical and must be performed prior to exsanguination to accurately assess skin tension lines. Draw a line dorsally originating from the apex of the first and second metacarpals.
- Distal Extension: Extend this line distally to the radial side of the proximal phalanx of the index finger.
- Palmar Curve: Curve the line back across the web space into the palm, proceeding proximally to meet the starting point at the apex of the first and second metacarpals.
- Preparation: Exsanguinate the upper extremity and inflate the pneumatic tourniquet to the standard upper extremity pressure (typically 250 mm Hg or 100 mm Hg above systolic blood pressure). Make the skin incisions exactly as outlined.
2. Flap Elevation and Fascial Release
- Elevation: Sharply elevate the skin flaps, ensuring a small but uniform amount of subcutaneous tissue is retained with the flap to preserve the subdermal vascular plexus.
- Fascial Release: Carefully release any thickened dorsal and volar fascia. The fascia overlying the adductor pollicis and the first dorsal interosseous is often fibrotic.
Surgical Warning: Deep dissection in the first web space places the radial artery (as it passes between the two heads of the first dorsal interosseous) and the digital nerves to the thumb and radial index finger at significant risk. Dissect with loupe magnification and maintain strict hemostasis.
3. Addressing Severe Contractures
- Capsulotomy: If severe contracture persists despite soft tissue and fascial release, the limitation is likely articular. Incise the capsule of the carpometacarpal (CMC) joint of the thumb to allow full palmar abduction.
- Skeletal Stabilization: Pull the thumb away from the palm into maximal palmar abduction and extension. Hold this corrected position rigidly by driving a smooth Kirschner wire (K-wire) across the first metacarpal into the second metacarpal.
4. Flap Transposition and Grafting
- Sliding the Flap: Allow the mobilized palmar flap to slide radially with the thumb. Use this durable, sensate tissue to cover the volar aspect of the thumb and the palmar web space.
- Dorsal Defect Coverage: The sliding of the flap will leave a secondary defect on the dorsal aspect of the web space. Harvest a split-thickness skin graft (STSG) from an appropriate donor site (e.g., proximal forearm or lateral thigh) and use it to cover the dorsal defect.
- Closure: Suture the sliding flaps in place using interrupted 6-0 nylon sutures. Secure the STSG with peripheral sutures and apply a tie-over bolster dressing to prevent hematoma accumulation and shear forces.
5. Tourniquet Deflation and Dressing
- Deflate the tourniquet and achieve meticulous hemostasis.
- Inspect the sliding flap for capillary refill and overall viability.
- Apply a bulky, sterile pressure dressing with the thumb splinted in the fully abducted and opposed position.
Postoperative Care for Web Deepening
- Immobilization: The hand remains immobilized in the bulky dressing and splint.
- Suture Removal: Skin sutures and the tie-over bolster are removed at 2 weeks postoperatively.
- K-wire Removal: The transmetacarpal K-wire is removed at 4 weeks in the clinic.
- Rehabilitation: Following K-wire removal, unrestricted active and passive motion of the thumb is initiated. Night splinting in abduction may be continued for several months to prevent recurrent contracture.
RING SUBLIMIS OPPONENSPLASTY (RIORDAN)
Once the first web space is adequately deepened and passive mobility is restored, dynamic opposition can be reconstructed. The Riordan technique utilizes the flexor digitorum superficialis (FDS, or sublimis) of the ring finger. This tendon is an ideal donor due to its synergistic action, adequate excursion (approximately 7 cm), and expendable nature in the presence of an intact flexor digitorum profundus (FDP).
Biomechanical Principles of the Riordan Transfer
To recreate true opposition, the transferred tendon must pull the thumb in a vector that mimics the abductor pollicis brevis (APB). This requires a pulley located at the ulnar aspect of the wrist (specifically, the pisiform). Furthermore, the insertion must not only abduct and pronate the first metacarpal but also extend the interphalangeal (IP) joint to prevent the thumb from collapsing into hyperflexion during strong pinch. Riordan's dual-insertion technique addresses all these biomechanical requirements.
Surgical Technique: Riordan Opponensplasty
1. Harvest of the Ring Sublimis Tendon
- Incision: Expose the sublimis tendon of the ring finger through an ulnar midlateral incision over the proximal interphalangeal (PIP) joint.
- Division: Divide the tendon at the level of the joint or just proximal to it.
- Chiasm Release: Divide the Camper's chiasm, separating the two slips of the FDS tendon at the level of the joint so that they pass freely around the profundus tendon. This ensures the tendon can be easily withdrawn at the wrist without tethering.
2. Creation of the Flexor Carpi Ulnaris (FCU) Pulley
- Wrist Exposure: Expose the FCU tendon through an L-shaped incision. The vertical limb extends proximally along the FCU tendon, and the distal limb turns radialward, parallel with the major flexor creases of the wrist.
- Pulley Construction: To construct the pulley, cut halfway through the FCU tendon at a point approximately 6.3 cm proximal to the pisiform.
- Loop Formation: Strip the radial half of the FCU tendon distally almost to its insertion on the pisiform. Create a loop large enough for the sublimis tendon to pass through easily. Carry the free end of the radial segment of the FCU through a split made in the remaining intact half of the tendon, loop it back upon itself, and suture it securely with nonabsorbable braided sutures.
3. Thumb Exposure and Preparation
- Incision Design: Make a wide C-shaped incision on the thumb. Begin on the dorsum of the thumb just proximal to the IP joint. Proceed proximally and volarward around to the radial aspect of the thumb. At a point just proximal to the metacarpophalangeal (MCP) joint, curve the incision dorsalward in line with the major skin creases of the thenar eminence.
- Nerve Protection: Meticulously identify and preserve the fine sensory branches of the superficial radial nerve on the dorsoradial aspect of the thumb.
- Structural Exposure: Expose and clearly define three critical structures:
- The extensor pollicis longus (EPL) tendon over the proximal phalanx.
- The extensor aponeurosis over the MCP joint.
- The tendon of the abductor pollicis brevis (APB).
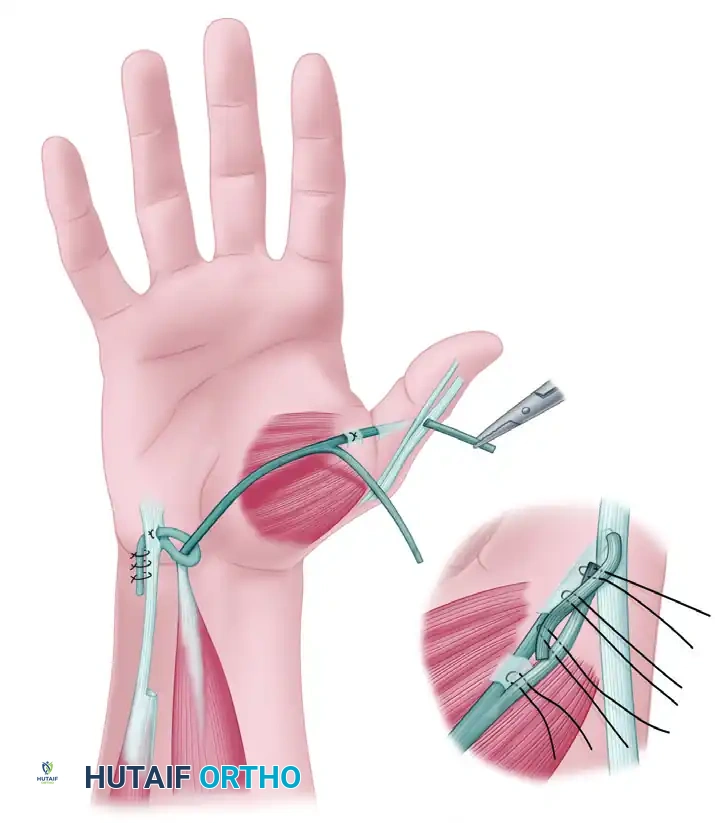
4. Tendon Routing
- Withdrawal: At the wrist, identify the previously released sublimis tendon to the ring finger and withdraw it into the forearm incision.
- Passing the Pulley: Pass the FDS tendon through the newly fashioned FCU loop.
- Subcutaneous Tunneling: Using a small hemostat or a specialized tendon carrier, pass the FDS tendon subcutaneously across the thenar eminence. The vector must be in direct line with the native fibers of the APB to ensure optimal biomechanical advantage.
5. The Riordan Dual Insertion
- APB Tunnel: Make a small tunnel for the insertion of the transfer by burrowing between two small parallel incisions in the APB tendon.
- Tendon Splitting: Split the distal end of the sublimis tendon longitudinally for approximately 2.5 cm (or more if necessary). Pass one half of the split tendon through the APB tunnel.
- EPL Routing: Separate the extensor aponeurosis from the periosteum of the proximal phalanx of the thumb. Make a small incision in the aponeurosis 6 mm distal to the first tunnel, and pass the same strip of sublimis through it.
- EPL Slit: Bring this slip out from beneath the aponeurosis through a small longitudinal slit made directly in the EPL tendon, about 3 mm proximal to the IP joint.
6. Tensioning the Transfer (The Critical Step)
Clinical Pearl: Incorrect tensioning is the most common cause of opponensplasty failure. A transfer that is too loose will fail to provide opposition, while one that is too tight will result in a fixed flexion/adduction deformity.
- Testing Tension: Grasp the two slips of the sublimis with small hemostats and cross them. Place the thumb in full opposition and hold the wrist in a neutral (straight) line. Place the two overlapping slips of sublimis under moderate tension.
- The Tenodesis Test:
- Release the thumb and passively flex the wrist: This should completely relax the transfer, allowing the thumb to be brought into full extension and palmar abduction.
- Extend the wrist 45 degrees: This should place enough tension on the transfer to automatically bring the thumb into complete opposition, with the tip of the thumb extending fully (due to the EPL insertion).
- Adjustment: If the tension is insufficient, increase the pull on the slips and repeat the tenodesis test until perfect kinematics are achieved.
7. Final Fixation and Closure
- Suturing: Once correct tension is confirmed, suture the two slips of the sublimis together, ensuring the cut ends are buried to minimize adhesions.
- Capsular Anchoring: Anchor the transfer and the tendon of the APB to the MCP joint capsule with a single nonabsorbable nylon or wire suture. Ensure the transfer passes over the exact middle of the metacarpal head.
- Rationale: This critical anchoring step prevents the tendon from displacing toward the palmar aspect of the joint during active opposition, which would alter the moment arm and reduce mechanical efficiency.
- Wound Closure: Close all wounds with nonabsorbable sutures.
Postoperative Care and Rehabilitation for Opponensplasty
Immobilization Phase
- Dressing: Immobilize the hand in a bulky pressure dressing reinforced with a dorsal plaster splint.
- Positioning: Place the wrist in 30 degrees of flexion. Place the fingers in a functional resting position. Position the thumb in full opposition with the distal phalanx extended.
- Skin Care: Place a few layers of sterile gauze between the individual fingers to prevent skin maceration.
Mobilization and Cortical Retraining
- Splint Removal: At 3 weeks postoperatively, the surgical dressing and dorsal splint are removed. Active motion is initiated.
- Opponens Splinting: The thumb must be supported with a custom thermoplastic opponens splint between exercise sessions for an additional 6 weeks to protect the healing tendon transfer from stretching.
- Motor Re-education: Many patients can actively oppose the thumb as soon as the splint is removed. Because the ring FDS was used, cortical retraining is highly effective.
- Rehab Trick: Instruct the patient to attempt to place the tip of the thumb against the tip of the ring finger. This maneuver naturally produces flexion of the ring finger, triggering an automatic, synergistic contraction of the transferred sublimis muscle, thereby facilitating thumb opposition.
Long-Term Precautions
Surgical Warning: Tendon transfers remain vulnerable to stretching under high loads for months after surgery.
- In patients with weak quadriceps muscles who habitually rise from a sitting position by pushing up with flattened hands, or in patients who rely on crutches for ambulation, the transfer is at extreme risk of elongation.
- In these specific populations, the transfer must be rigorously protected with a rigid splint during weight-bearing activities for 3 months or longer. Failure to protect the transfer will result in overstretching, leading to a complete cessation of functional opposition.
CONCLUSION
The reconstruction of the severely contracted, non-opposing thumb requires a meticulous, staged approach. The Brand and Milford sliding flap effectively addresses the static soft-tissue deficit, restoring the critical dimensions of the first web space. Following this, the Riordan ring sublimis opponensplasty provides a biomechanically sound dynamic reconstruction. By utilizing the FCU as a directional pulley and employing a dual-insertion technique into the APB and EPL, the surgeon can reliably restore the complex kinematics of thumb opposition, ultimately salvaging the functional capacity of the hand. Strict adherence to tensioning principles and tailored postoperative rehabilitation are paramount to achieving excellent, long-lasting clinical outcomes.
You Might Also Like