Arthroscopic Masterclass: Evaluation and Treatment of Scapholunate and Lunotriquetral Ligament Disruptions
Key Takeaway
Join us in the OR for an immersive masterclass on arthroscopic management of scapholunate (SLIL) and lunotriquetral (LTIL) ligament injuries. We'll meticulously cover patient positioning, precise portal placement, diagnostic evaluation, and advanced techniques like thermal shrinkage and percutaneous pinning to stabilize the carpus and restore wrist kinematics.
Comprehensive Introduction and Patho-Epidemiology
Fellows, welcome to the operating theater. Today, we are tackling a complex, unforgiving, and often challenging domain of upper extremity surgery: the arthroscopic evaluation and treatment of scapholunate interosseous ligament (SLIL) and lunotriquetral interosseous ligament (LTIL) disruptions. These injuries, while seemingly subtle on initial presentation, can lead to devastating long-term carpal instability and irreversible degenerative changes if not accurately diagnosed and appropriately managed. Our goal as orthopedic surgeons is not merely to fix the immediate anatomical disruption, but to preserve complex wrist kinematics and prevent the relentless, predictable progression of carpal collapse.
Let us begin by revisiting the fundamental patho-epidemiology of these injuries. Mayfield, Johnson, and Kilcoyne, in their seminal biomechanical work, postulated that scapholunate disruption is predictably the initial component of the lesser arc perilunate injury pattern. This typically occurs when a significant, high-energy axial load is applied to the thenar eminence with the wrist in extension, supination, and ulnar deviation. The kinetic energy propagates through the carpus, sequentially stripping the ligamentous restraints. These interosseous ligament tears are remarkably common, occurring either in isolation—often dismissed initially as a benign "wrist sprain"—or as part of a much broader, catastrophic perilunate injury pattern.
With continuous advancements in high-resolution imaging and, critically, the advent of small-joint arthroscopy, we are diagnosing these injuries with increasing frequency and precision. However, their definitive management remains a highly debated clinical problem. While surgical intervention has demonstrated reliability in mitigating pain and restoring gross stability, altering the natural history of carpal degeneration in the setting of delayed presentation remains a significant hurdle. SLIL injuries span a vast spectrum, ranging from simple microscopic sprains to partial tears, and ultimately to complete disruptions accompanied by catastrophic failure of the crucial extrinsic secondary capsular stabilizers.
Understanding the epidemiology requires acknowledging that these injuries predominantly affect young, active, working-age individuals and athletes. The socioeconomic impact of a missed SLIL or LTIL tear is profound, often leading to chronic pain, significantly diminished grip strength, and premature cessation of manual labor or athletic pursuits. Therefore, a high index of suspicion must be maintained for any patient presenting with persistent, localized wrist pain following a hyperextension injury, regardless of initial negative plain radiographs.
Detailed Surgical Anatomy and Biomechanics
Before we make any incisions or establish our arthroscopic portals, a master-level understanding of wrist anatomy and biomechanics is paramount. The wrist is not a simple hinge; it is an incredibly complex kinematic chain. The intrinsic (interosseous) and extrinsic (capsular) ligaments function synergistically as its primary stabilizers, orchestrating the smooth, synchronous motion of the carpal bones during physiologic loading.
The Scapholunate Complex and Kinematics
The scapholunate complex is subjected to immense, continuous physiological loads because the scaphoid is the unique carpal bone that anatomically spans both the proximal and distal carpal rows. This strategic position makes it the critical mechanical link in carpal kinematics. The proximal carpal row, acting as an intercalated segment devoid of direct tendinous insertions, flexes with radial deviation and extends with ulnar deviation. Inherently, due to its geometry and articulation with the trapezium and trapezoid, the scaphoid "wants" to flex. Conversely, the triquetrum, driven by its helicoidal articulation with the hamate, "wants" to extend. The lunate is tethered precariously between these two massive, opposing biomechanical forces. This creates a tremendous amount of potential energy within the proximal carpal row, rendering it highly susceptible to catastrophic instability when its ligamentous constraints are compromised.
Stability to the scapholunate complex is provided primarily by the intrinsic scapholunate interosseous ligament (SLIL), but also significantly by secondary extrinsic capsular ligaments. The SLIL itself is a complex, C-shaped structure divided into three distinct anatomical zones. The dorsal ligamentous portion is the thickest (typically 2 to 3 mm) and biomechanically the most critical for resisting translational and rotational forces. The volar ligamentous portion is thinner (approximately 1 mm thick) but crucial for resisting rotational moments. Finally, the proximal fibrocartilaginous (membranous) portion is essentially avascular and provides negligible mechanical restraint, acting primarily as a synovial seal. When SLIL tears occur, they most frequently fail at the bone-ligament interface off the scaphoid, leaving a stump attached to the lunate.
Arthroscopic evaluations have revealed associated SLIL injuries in up to 30% of intra-articular distal radius fractures. This staggering statistic highlights the absolute necessity of a comprehensive arthroscopic assessment even in seemingly straightforward fracture patterns, as a missed SLIL tear will compromise the functional outcome of an otherwise perfectly reduced radius.
The Lunotriquetral Complex and Kinematics
The lunotriquetral complex is similarly stabilized by an intrinsic lunotriquetral interosseous ligament (LTIL) and its surrounding extrinsic volar and dorsal capsular ligaments. The LTIL is also C-shaped, analogous to the SLIL, featuring dorsal, volar, and proximal membranous portions. However, a critical biomechanical distinction exists: the volar ligamentous portion of the LTIL is significantly thicker, stronger, and more functionally vital than its dorsal counterpart. This is in direct contrast to the SLIL, where the dorsal band is dominant.
LTIL disruption can be traumatic or atraumatic. Traumatic ruptures typically occur as the final component of a greater or lesser arc perilunate injury pattern (Mayfield Stage III). Isolated LTIL tears can result from a fall on an outstretched hand in extension, pronation, and radial deviation—often termed a "reverse perilunate injury"—or from a sudden, violent dorsally applied force on a flexed wrist. Atraumatic ruptures are frequently secondary to chronic, degenerative conditions such as inflammatory arthritis or ulnar impaction syndrome, where a positive ulnar variance leads to chronic abutment and attritional wear of the LTIL and the adjacent triangular fibrocartilage complex (TFCC).
The kinematics of the lunotriquetral joint dictate that the LTIL must resist the independent extension moment of the triquetrum. When the LTIL fails, the triquetrum extends, and the lunate, now detached from the triquetrum but still tethered to the scaphoid via an intact SLIL, follows the scaphoid into abnormal flexion. This uncoupling leads to profound alterations in load transfer across the ulnocarpal and radiocarpal articulations.
Extrinsic Ligamentous Stabilizers
While the intrinsic interosseous ligaments are the primary restraints, the extrinsic capsular ligaments act as essential secondary stabilizers. For the scapholunate complex, the extrinsic stabilizers include the Dorsal Radiocarpal (DRC) ligament, a crucial dorsal restraint; the Dorsal Intercarpal (DIC) ligament, which connects the scaphoid, lunate, and triquetrum dorsally and acts as a vital transverse stabilizer; the Volar Radioscaphocapitate (RSC) ligament, a robust volar sling; and the Scaphotrapezium-Trapezoid (STT) ligaments, which provide essential stability to the distal pole of the scaphoid.
For the lunotriquetral complex, the extrinsic stabilizers are predominantly volar, reflecting the importance of the volar LTIL band. These include the Volar Ulnotriquetral (UT) ligament, Ulnolunate (UL) ligament, and Ulnocapitate (UC) ligament. Dorsally, the DRC and DIC ligaments also contribute to lunotriquetral stability. Complete carpal instability (static deformity) rarely occurs without concomitant injury to these secondary extrinsic restraints. Therefore, surgical reconstruction must often address both the intrinsic tear and the extrinsic capsular laxity.
Neurovascular Topography and Portal Anatomy
When establishing our arthroscopic portals, we must be acutely aware of the superficial neurovascular topography to avoid catastrophic iatrogenic injury. The Dorsal Sensory Branch of the Ulnar Nerve (DSBUN) lies subcutaneously on the ulnar side of the wrist and is highly susceptible to injury during the placement of the 6R and 6U portals. The Superficial Radial Nerve (SRN) courses radially and is at significant risk during the establishment of the 1-2 and 3-4 portals.
Furthermore, all dorsal wrist portals are strategically placed between specific extensor tendon compartments. Careful, meticulous blunt dissection is absolutely crucial to avoid tendon laceration, fraying, or subsequent rupture. For instance, the standard viewing 3-4 portal is established between the extensor pollicis longus (EPL) and the extensor digitorum communis (EDC) tendons. The 4-5 portal lies between the EDC and the extensor digiti minimi (EDM), while the 6R and 6U portals are situated radial and ulnar to the extensor carpi ulnaris (ECU), respectively.
Surgeons must strictly adhere to the principle of using blunt dissection with a fine hemostat or mosquito clamp to spread the subcutaneous tissues down to the capsule after the initial skin incision. Never blindly stab with a sharp trocar into the joint space. This simple, disciplined maneuver minimizes the risk of devastating neurovascular or tendinous complications that can overshadow an otherwise successful ligamentous repair.
Natural History and Instability Patterns
Tears of the SLIL or LTIL, with or without concomitant extrinsic ligamentous injury, predictably lead to various degrees of progressive carpal instability. This continuum is classically divided into three stages: predynamic, dynamic, and static instability. Predynamic instability involves subtle microscopic changes and localized synovitis, often only visualized on direct arthroscopy, with completely normal static and stress radiographs. Dynamic instability is characterized by normal static alignment, but frank instability becomes evident under physiological loading, provocative maneuvers, or stress radiographs (e.g., clenched fist views). Static instability represents the end-stage of ligamentous failure, where frank carpal malalignment is permanently visible on standard, resting radiographs.
Scapholunate Advanced Collapse and DISI
A complete, unaddressed SLIL tear, particularly when combined with failure of the dorsal secondary stabilizers (DIC/DRC), is inexorably associated with the development of a Dorsal Intercalated Segment Instability (DISI) deformity. In this pathological pattern, the scaphoid flexes volarly, uncoupled from the lunate. The lunate, now dictated solely by the intact LTIL and the extending force of the triquetrum, rotates into abnormal dorsal extension. As this DISI deformity solidifies, profoundly abnormal radiocarpal contact loading occurs due to the dramatic shift in proximal carpal bone positions and the complete loss of articular congruency.
Over time, this abnormal flexion and hypermobility of the scaphoid lead to a highly predictable pattern of degenerative changes, clinically termed Scapholunate Advanced Collapse (SLAC) wrist. The SLAC progression occurs in distinct stages. Stage I involves arthrosis isolated to the radial styloid-scaphoid articulation. Stage II sees the degeneration progress to involve the entire radioscaphoid fossa. Stage III involves the proximal migration of the capitate and subsequent arthrosis of the capitolunate joint. Notably, the radiolunate joint is almost invariably spared due to its spherical congruency, a fact that forms the basis for salvage procedures like the four-corner fusion.
These devastating degenerative changes have been documented to begin as early as 3 to 6 months post-injury in high-demand individuals, underscoring the absolute urgency of early, accurate diagnosis and aggressive surgical intervention.
Lunotriquetral Tears and VISI
Conversely, a complete LTIL tear is associated with the development of a Volar Intercalated Segment Instability (VISI) deformity. In this biomechanical scenario, the triquetrum extends, but the lunate, remaining tethered to the scaphoid via the intact SLIL, is pulled into abnormal volar flexion. It is critical to understand that isolated injuries to the LTIL are usually insufficient to produce a static VISI deformity; the presence of a static VISI strongly indicates additional, severe injury to the extrinsic ligamentous structures, particularly the volar ulnotriquetral, ulnolunate, and ulnocapitate ligaments, or the dorsal radiocarpal and intercarpal complex.
The natural history of partial tears of either the SLIL or LTIL is currently less rigidly defined than complete ruptures. However, clinical experience overwhelmingly demonstrates that these partial, "predynamic" injuries can cause severe, chronic, activity-related wrist pain and significant functional impairment, even in the complete absence of obvious radiographic findings. They serve as a nidus for chronic synovitis and altered proprioception, necessitating arthroscopic evaluation when conservative measures fail.
Pre-Operative Evaluation and Advanced Imaging
Preoperative planning is not merely an administrative formality; it is a critical, intellectual phase that dictates the entire intraoperative strategy. A meticulous review of the patient’s history, physical findings, and all available static and dynamic imaging provides the surgeon with a comprehensive understanding of the pathology and the necessary surgical armamentarium.
Clinical Examination and Provocative Testing
Fellows, always initiate your evaluation with a highly detailed history. Dorsoradial or ulnar-sided wrist pain, particularly with a history of a fall on an extended wrist, sudden axial loading, or violent twisting, should immediately raise your clinical suspicion for an SLIL or LTIL tear, respectively. However, do not be misled if the patient denies a specific, memorable traumatic event; some presentations are insidious, stemming from repetitive microtrauma. Patients frequently complain of subjective weakness, intermittent swelling, and a painful loss of terminal wrist range of motion. A sensation of instability, "giving way," or a painful, audible clunk during grip or rotation is a hallmark symptom.
A meticulous, structured physical examination is indispensable. Observe for subtle dorsal ganglion cysts, which are highly correlated with underlying SLIL pathology. Assess active and passive range of motion, comparing it strictly to the contralateral, uninjured side. Diminished grip strength, particularly pain at the central aspect of the wrist with attempted forceful grip (using a Jamar dynamometer), is highly indicative of scapholunate instability.
Specific provocative ligament tests must be mastered. Deep palpation of the scapholunate interval (just distal to Lister's tubercle) yielding point tenderness is highly suspicious. The Watson’s scaphoid shift test is the gold standard clinical maneuver. It involves grasping the scaphoid tubercle volarly and applying dorsal pressure while passively moving the wrist from ulnar to radial deviation. Pain, accompanied by a palpable dorsal clunk as the scaphoid subluxates over the dorsal rim of the radius, is diagnostic of scapholunate instability. Similarly, for the ulnar side, deep palpation of the lunotriquetral interval, the triquetrum ballottement test (assessing AP laxity), and ulnar wrist loading maneuvers are critical to isolate LTIL or TFCC pathology.
Radiographic Analysis and Advanced Modalities
Initial imaging must always include high-quality, zero-rotation Posteroanterior (PA) and true lateral radiographs. If dynamic scapholunate pathology is suspected, a bilateral pronated clenched-fist PA view (often termed the Mayo Clinic view) must be obtained to dynamically load the carpus and unmask subtle gapping.
On the PA view, look for static scapholunate instability indicated by an increased scapholunate interval of 3 mm or more (the classic "Terry Thomas sign"). Comparison to the contralateral wrist is mandatory, as some baseline laxity exists in the general population. Look for the scaphoid cortical “ring sign,” which represents the distal pole of the scaphoid seen end-on due to abnormal scaphoid flexion. A triangular, rather than trapezoidal, appearance of the lunate indicates abnormal lunate extension. On the lateral view, a DISI deformity is confirmed by an increased scapholunate angle (greater than 60 degrees) and an increased lunocapitate angle (greater than 10 degrees) with dorsal translation of the capitate.
For lunotriquetral instability, static radiographic findings are often frustratingly normal. However, on a PA view, one might observe proximal translation of the triquetrum, a disruption of Gilula’s arcs, or lunotriquetral overlap without frank gapping. On the lateral view, a VISI deformity is characterized by a normal or decreased scapholunate angle (less than 45 degrees), an increased lunocapitate angle (more than 10 degrees) with volar translation of the capitate, and a negative lunotriquetral angle.
While MRI (with or without intra-articular gadolinium arthrography) is frequently ordered, you must understand its limitations. MRI has notoriously limited value in accurately evaluating the intricate, 3D structure of the interosseous ligaments. Reported sensitivity rates for SLIL injuries range from a mere 40% to 65% compared to arthroscopy, and it is even less reliable for LTIL injuries. Therefore, a negative MRI in the face of a positive clinical exam absolutely does not rule out a tear. Arthroscopy remains the undisputed gold standard, allowing for direct, magnified visualization, dynamic probing, and immediate therapeutic intervention.
Exhaustive Indications and Contraindications
The decision to proceed with operative intervention, specifically wrist arthroscopy for ligamentous evaluation and treatment, must be carefully weighed. The following table outlines the rigorous indications and contraindications for this procedure.
| Category | Specific Criteria | Clinical Rationale |
|---|---|---|
| Absolute Indications | Positive clinical exam (Watson's/Ballottement) with failed conservative management (>6-12 weeks). | Chronic pain and dynamic instability will predictably lead to SLAC/VISI progression if left untreated. |
| Concomitant intra-articular distal radius fracture. | Up to 30% incidence of SLIL tears; failure to address compromises fracture outcomes. | |
| Unexplained chronic wrist pain with negative advanced imaging (MRI/CT). | Arthroscopy is the diagnostic gold standard for predynamic and subtle dynamic instability missed by static imaging. | |
| Geissler Grade II or III tears identified during diagnostic scoping. | Amenable to arthroscopic debridement, thermal shrinkage, and percutaneous pinning to restore stability. | |
| Relative Indications | Acute, isolated SLIL/LTIL sprains in high-demand elite athletes. | Expedited diagnosis and potential early stabilization to prevent career-altering chronic instability. |
| Partial interosseous ligament tears with primary extrinsic ligament laxity. | Allows for capsular plication and thermal shrinkage of secondary stabilizers. | |
| Absolute Contraindications | Active, untreated localized or systemic soft tissue infection overlying the portals. | High risk of introducing virulent pathogens into the sterile radiocarpal and midcarpal joints (septic arthritis). |
| Advanced, fixed carpal collapse (SLAC Stage II/III or fixed static DISI/VISI). | Arthroscopic pinning is futile; requires salvage procedures (PRC, Four-corner fusion, Total Wrist Arthrodesis). | |
| Severe, end-stage osteoarthritis of the radiocarpal joint. | Debridement will not alter the biomechanical failure; salvage required. | |
| Relative Contraindications | Severe, uncorrectable coagulopathy. | Risk of massive intra-articular hemarthrosis obscuring vision and causing post-operative stiffness. |
| Extensive prior open wrist surgery with severe capsular scarring. | Loss of joint compliance prevents adequate distraction, making safe portal placement and instrument navigation exceedingly difficult. |
Pre-Operative Planning, Templating, and Patient Positioning
Meticulous operating room setup is the foundation of a successful wrist arthroscopy. The margins for error are measured in millimeters, and a compromised setup will inevitably lead to a compromised procedure.
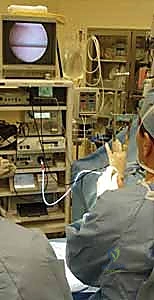
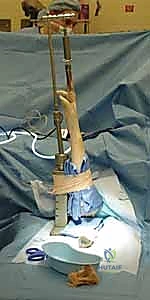
The patient is placed in the supine position on the operating table. The affected extremity is abducted and placed on a specialized, radiolucent hand table. Ensure the table is completely stable and allows sufficient, unobstructed space for the surgeon, the assistant, instrument manipulation, and the free ingress/egress of the C-arm fluoroscopy unit. A pneumatic tourniquet is applied to the proximal upper arm over generous padding. Following strict exsanguination with an Esmarch bandage, the tourniquet is inflated to 250 mmHg. Maintaining a completely bloodless field is not a luxury; it is an absolute requirement for clear arthroscopic visualization in such a small, confined joint space.
The extremity is then secured in a dedicated wrist distraction tower device using sterile finger traps applied to the index and middle fingers. We typically apply 10 to 12 lbs (5 to 6 kg) of longitudinal distraction. This traction is vital; it overcomes the robust capsular restraints and creates the necessary physical space within the radiocarpal and midcarpal joints for safe trocar entry and instrument manipulation without causing iatrogenic scuffing of the delicate articular cartilage.
The wrist should be positioned in 12 to 15 degrees of volar flexion. This specific degree of flexion is a critical technical pearl: it drops the proximal carpal row volarly, thereby opening up the dorsal radiocarpal space and vastly facilitating the safe establishment of the standard dorsal portals.
Step-by-Step Surgical Approach and Fixation Technique
With the patient optimally positioned and distracted, we proceed with the arthroscopic intervention. This phase demands precision, a deep understanding of 3D spatial anatomy, and strict adherence to a systematic diagnostic and therapeutic algorithm.
Diagnostic Arthroscopy and Geissler Classification
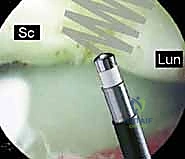
We begin by establishing the standard radiocarpal portals. The 3-4 portal is our primary viewing portal, established just distal to Lister's tubercle between the EPL and EDC. Following a superficial skin incision, blunt dissection with a mosquito clamp is performed down to the capsule to protect the SRN branches and extensor tendons. A blunt trocar is then introduced into the radiocarpal joint with a slight volar inclination (matching the normal 11-degree volar tilt of the distal radius). The 4-5 portal, or the 6R portal, is established under direct intra-articular visualization to serve as the primary working portal.
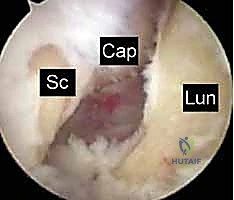
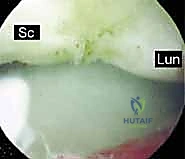
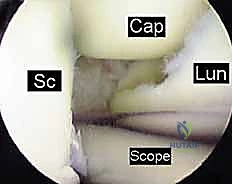
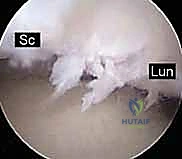
A comprehensive diagnostic sweep of the radiocarpal joint is performed, assessing the articular surfaces, the TFCC, and the proximal membranous and volar portions of the SLIL and LTIL. However, the true assessment of interosseous ligament integrity is performed from the midcarpal joint.
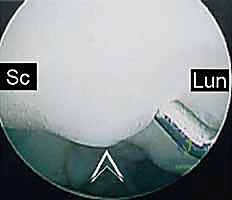
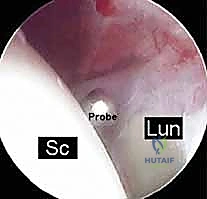
The midcarpal portals (radial midcarpal [RMC] and ulnar midcarpal [UMC]) are established. From the midcarpal perspective, we directly visualize the critical dorsal bands of the SLIL and the volar bands of the LTIL. We utilize an arthroscopic probe to dynamically test the stability of the scapholunate and lunotriquetral intervals.
We strictly utilize the Geissler Classification to grade the severity of the instability:
* Grade I: Attenuation or hemorrhage of the interosseous ligament seen from the radiocarpal space. No step-off or incongruency in the midcarpal joint.
* Grade II: Attenuation of the ligament with a slight step-off or incongruency between the carpal bones viewed from the midcarpal space. A probe cannot be passed through the interval.
* Grade III: Significant step-off and incongruency. The arthroscopic probe can be passed freely between the scaphoid and lunate (or lunate and triquetrum) from the midcarpal into the radiocarpal space.
* Grade IV: Massive instability. The 2.7mm arthroscope itself can be passed completely through the scapholunate or lunotriquetral interval. This indicates complete disruption of both intrinsic and extrinsic stabilizers.
Arthroscopic Debridement and Thermal Shrinkage
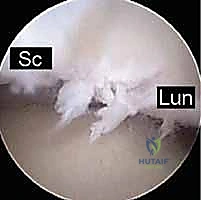
For Geissler Grade I and mild Grade II injuries, where there is predynamic or mild dynamic instability with intact secondary restraints, arthroscopic debridement of the frayed, redundant ligamentous tissue is performed using a motorized shaver. This removes the mechanical impingement and the source of chronic synovitis.
Following debridement, thermal shrinkage using a radiofrequency (RF) probe can be employed. The RF energy denatures the collagen triple helix, causing immediate tissue contraction and stimulating subsequent fibroblastic proliferation and scar formation. We carefully apply the RF energy to the attenuated dorsal SLIL or volar LTIL, as well as the redundant extrinsic capsular ligaments (DIC, DRC). It is imperative to use a sweeping motion and avoid excessive thermal dwell time to prevent full-thickness tissue necrosis or iatrogenic cartilage damage.
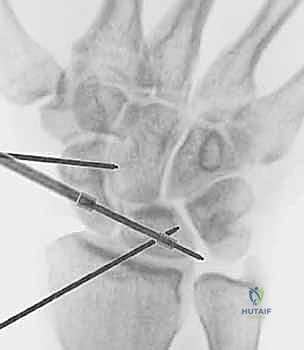
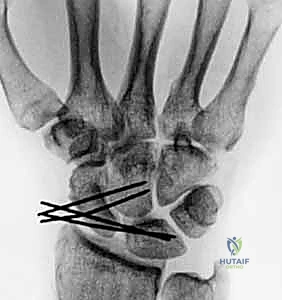
Arthroscopic-Assisted Reduction and Percutaneous Pinning
For Geissler Grade II and Grade III tears, debridement and
Clinical & Radiographic Imaging Archive