Modified Bankart Repair: Surgical Technique & Protocol
Key Takeaway
The Modified Bankart Repair, popularized by Montgomery and Jobe, is a highly effective open surgical technique for addressing anterior shoulder instability. By utilizing a muscle-splitting approach through the subscapularis and performing a precise anatomical capsulolabral shift, this procedure restores glenohumeral stability while preserving external rotation. It is particularly advantageous for collision athletes and patients with significant capsular laxity requiring robust, reinforced anterior reconstruction.
Introduction to the Modified Bankart Repair
The management of recurrent anterior glenohumeral instability has evolved significantly over the past several decades. While arthroscopic techniques have become the mainstay for many primary stabilizers, the open anterior capsulolabral reconstruction remains an indispensable procedure in the armamentarium of the orthopedic surgeon. The Modified Bankart Repair, popularized by Montgomery and Jobe, represents a critical evolution in open shoulder stabilization.
Historically, classic open Bankart procedures involved a vertical tenotomy or takedown of the subscapularis tendon. While effective for restoring stability, this approach frequently resulted in postoperative subscapularis weakness, loss of external rotation, and delayed rehabilitation. Montgomery and Jobe revolutionized this approach by introducing a muscle-splitting technique through the subscapularis, combined with a precise horizontal capsulotomy and an anatomic capsulolabral shift. This modification preserves the dynamic stabilizing function of the subscapularis, allows for a highly customized capsular imbrication, and is particularly favored in collision athletes, throwing athletes with microinstability, and patients with profound capsular redundancy.
Indications and Patient Selection
Careful patient selection is paramount for achieving optimal outcomes with the Modified Bankart Repair. While arthroscopic stabilization is suitable for many, the open modified approach is specifically indicated in the following clinical scenarios:
- Collision and Contact Athletes: Rugby, American football, and martial arts athletes who experience high-energy impacts and require robust, reinforced capsular repairs.
- Failed Arthroscopic Stabilization: Patients presenting with recurrent instability following a prior arthroscopic Bankart repair, where capsular tissue may be attenuated or scarred.
- Significant Capsular Laxity: Patients with generalized ligamentous laxity, multidirectional instability with a primary anterior component, or a large redundant axillary pouch that cannot be adequately plicated arthroscopically.
- Humeral Avulsion of the Glenohumeral Ligament (HAGL): Open approaches facilitate easier identification and repair of complex capsular avulsions.
- Throwing Athletes: When microinstability and capsular stretching are present, the Montgomery and Jobe technique allows for precise tensioning of the capsule without overconstraining external rotation.
Clinical Pearl: The Modified Bankart Repair is contraindicated in patients with significant glenoid bone loss (typically >15-20%). In such cases, a bony augmentation procedure, such as a Latarjet or distal tibial allograft, is required to restore the articular arc.
Biomechanics and Pathoanatomy
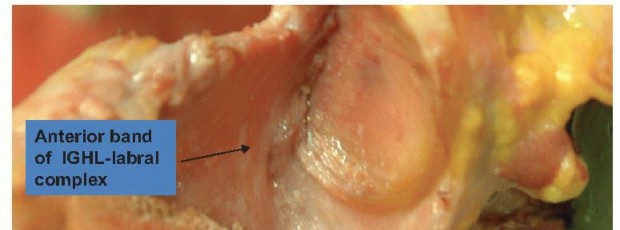
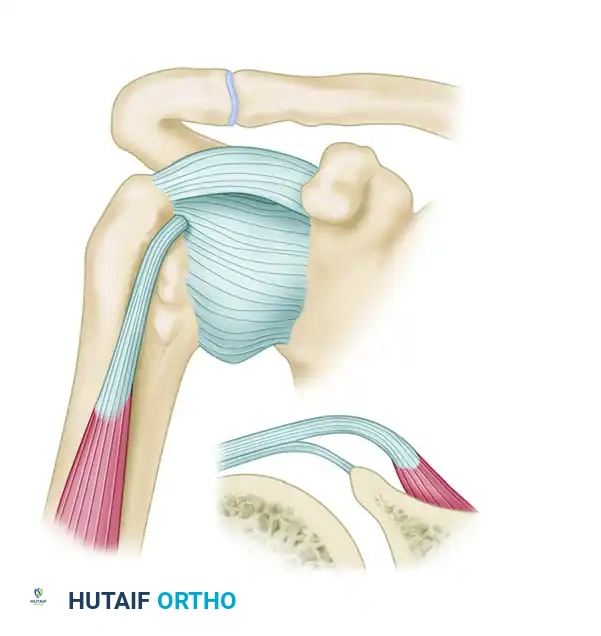
Anterior shoulder instability is rarely an isolated lesion of the anteroinferior labrum (the classic Bankart lesion). It is frequently accompanied by plastic deformation and elongation of the anterior band of the inferior glenohumeral ligament (AB-IGHL) and the middle glenohumeral ligament (MGHL).
The biomechanical genius of the Montgomery and Jobe modification lies in its ability to address both the labral detachment and the capsular redundancy simultaneously. By splitting the subscapularis at the junction of its upper two-thirds and lower one-third, the surgeon gains direct access to the equator of the glenoid. The subsequent horizontal capsulotomy creates superior and inferior capsular flaps.
When the inferior flap is advanced superiorly and secured to the glenoid rim, it effectively obliterates the redundant axillary pouch and restores the hammock-like sling of the IGHL. The superior flap is then brought down over the inferior flap in a "pants-over-vest" fashion, creating a double-layered, biomechanically robust reinforcement of the anterior joint wall.
Preoperative Planning and Patient Positioning
Imaging
Standard preoperative imaging must include a true anteroposterior (Grashey), scapular Y, and axillary lateral radiograph to assess for bony Bankart lesions or Hill-Sachs defects. Magnetic Resonance Arthrography (MRA) is the gold standard for evaluating the labrum, capsular volume, and rotator cuff integrity.
Anesthesia and Positioning
- Anesthesia: A combination of general anesthesia and an interscalene regional nerve block is highly recommended for optimal muscle relaxation and postoperative pain control.
- Examination Under Anesthesia (EUA): Always perform a bilateral EUA to assess the exact degree of translation, the presence of a sulcus sign, and the specific vectors of instability.
- Positioning: The patient is placed in the beach chair position with the head secured in a neutral position. The operative arm is draped free to allow for full, unrestricted range of motion during the procedure. A mechanical arm holder can be utilized to maintain specific degrees of abduction and external rotation during capsular tensioning.
Step-by-Step Surgical Technique
1. Incision and Superficial Dissection
The procedure begins with a meticulous approach to the anterior shoulder.
* Make a 5 to 7 cm incision along the Langer lines. The incision should begin approximately 2 cm distal and lateral to the coracoid process, extending inferiorly toward the anterior axillary crease. This cosmetic incision heals remarkably well.
* Develop the subcutaneous tissue flaps to expose the deltopectoral fascia.
2. The Deltopectoral Interval
- Identify the deltopectoral interval by locating the cephalic vein.
- Develop the interval, retracting the deltoid and the cephalic vein laterally, while retracting the pectoralis major muscle medially.
- Identify the conjoined tendon (short head of the biceps and coracobrachialis). Leave the conjoined tendon intact and retract it medially.
Surgical Warning: Do not dissect aggressively medial to the conjoined tendon. The musculocutaneous nerve typically enters the coracobrachialis 5 to 8 cm distal to the coracoid process. Overzealous medial retraction can result in a neuropraxia.
3. Subscapularis Split and Deep Dissection
This is the defining step of the Montgomery and Jobe technique.
* Identify the superior and inferior borders of the subscapularis tendon.
* Split the subscapularis tendon transversely, strictly in line with its fibers. This split should be located at the junction of the upper two-thirds and the lower one-third of the tendon.
* Carefully dissect the deep surface of the subscapularis muscle and tendon from the underlying anterior joint capsule. This plane is often adherent in revision cases.
* Maintain the subscapularis tendon interval using a modified Gelpi retractor. Place a three-pronged (or Fukuda) retractor medially on the glenoid neck to expose the capsule.
4. Capsulotomy and Joint Exposure
- Make a horizontal anterior capsulotomy directly in line with the split in the subscapularis tendon. This incision extends from the humeral insertion laterally to the anterior glenoid neck medially.
Figure A: Capsular incision made at the center (3 o’clock position) of the glenoid. The incision is extended medially over the neck of the glenoid. A stay suture is placed in the capsule to mark the glenoid attachment site.
- Place heavy nonabsorbable stay sutures in the superior and inferior capsular flaps at the glenoid margin. These sutures provide traction and control over the flaps during the shift.
- Insert a narrow humeral head retractor (such as a Fukuda retractor) into the joint and retract the humeral head laterally to expose the anterior glenoid rim.
5. Glenoid Preparation and Anchor Placement
Proper preparation of the glenoid bone bed is critical for biological healing of the capsulolabral tissue.
* Elevate the capsule on the anterior neck subperiosteally. If the labrum is still attached but the capsule is stretched, leave the labrum intact.
* Decorticate the anterior glenoid neck down to bleeding cancellous bone using a motorized burr or a rongeur. This bleeding bed is essential for tissue integration.
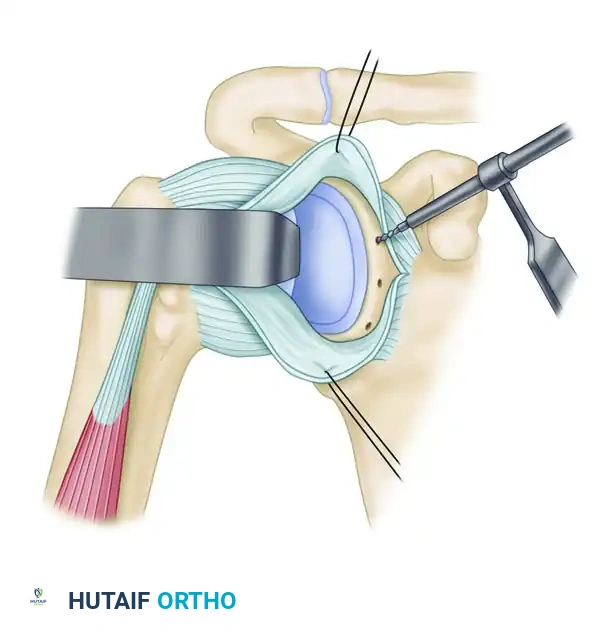
Figure B: Suture anchor drill holes are started in the scapular neck adjacent to the glenoid articular surface and directed medially away from the joint surface.
- Drill holes near the glenoid rim at approximately the 3-o'clock, 4-o'clock, and 5:30-o’clock positions (for a right shoulder).
- Technical Note: Keep the drill bit parallel to the glenoid articular surface or aimed medially by 20 degrees to prevent joint penetration.
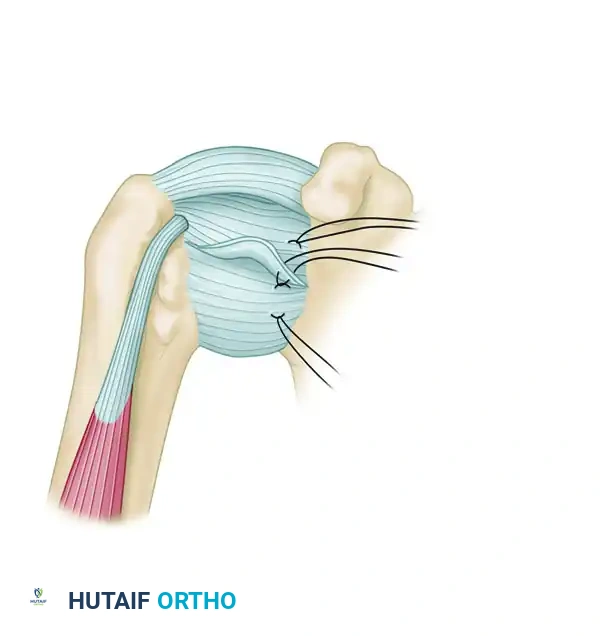
Figure C: Suture anchors are placed in each prepared drill hole. Sutures are pulled to set the anchor, ensuring the suture slides freely.
- Insert double-loaded suture anchors into each prepared hole. Test each anchor with firm traction to ensure secure cortical purchase.
6. Capsular Shift and Imbrication
The tensioning of the capsule must be tailored to the patient's athletic demands.
* Arm Positioning: During the tying of the sutures, the arm position is critical.
* For throwing athletes, maintain the shoulder in approximately 90 degrees of abduction and 60 degrees of external rotation to prevent overconstraint.
* For non-throwing athletes and the general population, maintain the shoulder in 60 degrees of abduction and 30 to 45 degrees of external rotation.
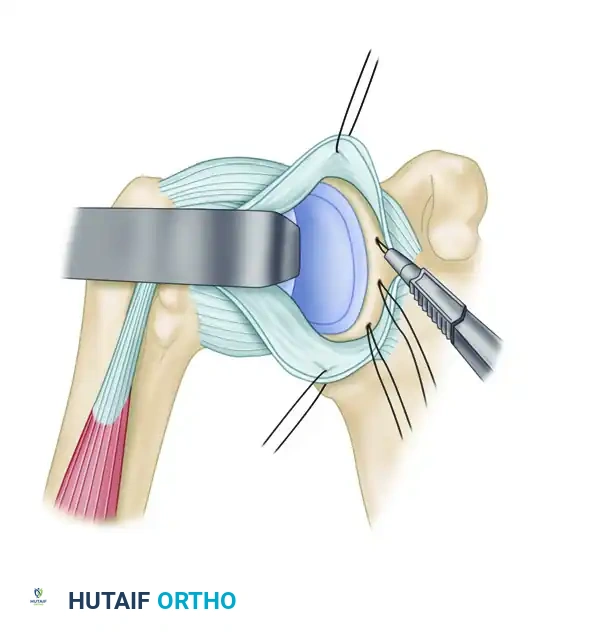
Figure D: Approximation of the capsule to the freshened neck. Two or three suture anchors are used to secure the inferior capsule firmly to the scapular neck. An assistant uses an Allis clamp to advance the capsule superiorly.
- Pass the sutures from the anchors through the inferior capsular flap. Tie the inferior flap down in a mattress fashion.
- Crucial Vector: Shift the inferior capsule superiorly, but not medially. Medialization will restrict external rotation. The previously placed stay sutures help prevent inadvertent medialization.
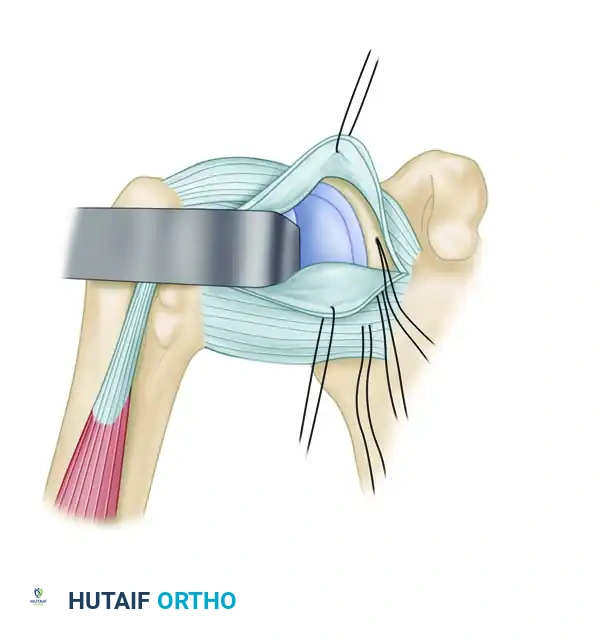
Figure E: Superior and middle suture anchors are used to secure and advance the superior flap in an inferior direction, overlapping the inferior flap.
- Once the inferior flap is secured, shift the superior capsular flap inferiorly. This creates a robust, overlapping "pants-over-vest" reinforcement of the anterior capsule.
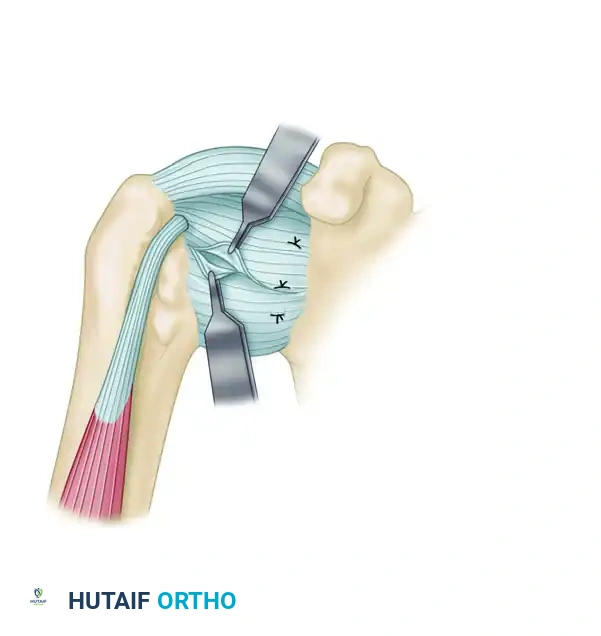
Figure F: Final imbrication of the capsule is completed with interrupted nonabsorbable sutures. The extremity is maintained in the appropriate degree of abduction and external rotation during closure to prevent overconstraint.
- Loosely close the remaining horizontal gap in the capsule. The final reconstruction yields two thick layers of reinforced capsule outside the joint, effectively eliminating the pathologic volume.
- Remove all retractors, achieve meticulous hemostasis, and close the deltopectoral interval, subcutaneous tissue, and skin in a standard layered fashion.
Postoperative Rehabilitation Protocol
The rehabilitation following a Modified Bankart Repair is a delicate balance between protecting the healing capsulolabral tissue and preventing postoperative stiffness. The protocol is divided into four distinct phases.
Phase I: Postoperative Period (0 to 3 Weeks)
The primary goal during this phase is protection of the repair and modulation of inflammation.
* Immobilization: The patient is placed in a sling or an abduction pillow.
* Range of Motion (ROM): Initiate passive and active-assisted ROM.
* Abduction is limited to 90 degrees.
* Flexion is limited to 90 degrees.
* External rotation is strictly limited to 45 degrees (or less, depending on intraoperative tension).
* Strict Precaution: No extension past the coronal plane, as this places direct stress on the anterior repair.
* Exercises: Isometric abduction, horizontal adduction, and internal/external rotation (submaximal). Elbow, wrist, and hand ROM. Ball squeezes.
* Modalities: Cryotherapy (ice) for pain and edema control.
Phase II: Early Mobilization (3 to 6 Weeks)
The goal is to gradually restore functional ROM while continuing to protect the anterior capsule from sudden stress.
* Immobilization: Discontinue the brace or abduction pillow.
* Range of Motion: Progressive passive and active ROM.
* Active internal rotation to full.
* Active external rotation to neutral, utilizing resistance tubing and light free weights.
* Exercises: Prone extension (ensuring the arm does not travel posterior to the trunk). Shoulder shrugs, active abduction, and isolated supraspinatus strengthening.
* Modalities: Continue ice and modalities as needed.
Phase III: Strengthening (6 Weeks to 3 Months)
Tissue healing is progressing, allowing for more aggressive stretching and strengthening.
* Range of Motion: Gradually increase external rotation stretching. The clinical goal is to achieve full, symmetric ROM by the end of the 2nd month.
* Exercises: Emphasize rotator cuff and parascapular muscle strengthening. Add shoulder flexion and horizontal adduction exercises against resistance.
* Manual Therapy: Joint mobilization techniques can be initiated if capsular stiffness persists.
* Endurance: Begin upper body ergometer (UBE) for muscular endurance at low resistance.
Phase IV: Advanced Conditioning (3 to 6 Months)
The final phase prepares the athlete for return to play.
* Exercises: Continue capsular stretching and advanced strengthening. Incorporate isokinetic strengthening and endurance exercises for internal and external rotation.
* Closed Chain: Add push-ups. Begin with wall push-ups, ensuring the body always remains posterior to the elbows to avoid anterior capsular stretch. Progress to standard push-ups and chin-ups at 4 to 5 months.
* Return to Sport: Total body conditioning. Advance to a structured throwing program or sport-specific skill training as tolerated, typically cleared for full contact at 6 months postoperatively.
Complications and Clinical Pearls
While highly successful, the Modified Bankart Repair carries specific risks that the surgeon must actively mitigate:
- Overconstraint and Loss of External Rotation: This is the most common complication of open stabilization. It is avoided by strictly adhering to the Montgomery and Jobe principle of shifting the capsule superiorly rather than medially, and by tying the capsular sutures with the arm in the appropriate degree of external rotation (60 degrees for throwers).
- Axillary Nerve Injury: The axillary nerve runs intimately close to the inferior capsule. When placing the 5:30 anchor and passing sutures through the inferior capsular flap, the surgeon must maintain direct visualization or palpation of the nerve. The subscapularis split inherently protects the nerve better than a full tenotomy, as the lower one-third of the muscle belly acts as a buffer.
- Subscapularis Failure: Because the tendon is split rather than detached, the risk of catastrophic subscapularis rupture is exceedingly low compared to classic techniques. However, aggressive retraction can cause neuropraxia to the upper or lower subscapular nerves. Gentle, meticulous retraction is mandatory.
By mastering the anatomic nuances and biomechanical principles of the Modified Bankart Repair, the orthopedic surgeon can reliably restore stability, preserve function, and return high-demand athletes to their peak level of performance.
You Might Also Like