Isolated Medial Column Arthrodesis: Comprehensive Surgical Techniques and Biomechanics
Key Takeaway
Isolated medial column arthrodesis is a critical surgical intervention for adult-acquired flatfoot deformity characterized by naviculocuneiform or first tarsometatarsal instability. This procedure restores the medial longitudinal arch and forefoot tripod biomechanics. Key steps include meticulous joint preparation, rigid lag screw fixation, and structural bone grafting. Proper patient selection and addressing concomitant gastrocnemius contracture or posterior tibial tendon insufficiency are paramount for achieving optimal, long-lasting functional outcomes.
Introduction to Medial Column Instability
The medial column of the foot—comprising the talus, navicular, medial cuneiform, and first metatarsal—serves as the primary load-bearing axis during the stance phase of gait. In the setting of adult-acquired flatfoot deformity (AAFD) or posterior tibial tendon insufficiency (PTTI), the dynamic and static stabilizers of the medial longitudinal arch progressively fail. This failure frequently leads to profound instability, subluxation, and eventual arthrosis at the naviculocuneiform (NC) and first tarsometatarsal (TMT) joints.
Isolated medial column arthrodesis is a powerful reconstructive tool designed to restore the structural integrity of the medial arch, correct forefoot supinatus, and re-establish the essential "tripod" weight-bearing mechanics of the foot. By selectively fusing the unstable segments of the medial column, orthopedic surgeons can effectively neutralize midfoot sag and provide a rigid lever arm for propulsion, often in conjunction with hindfoot corrective procedures.
Preoperative Evaluation and Clinical Staging
A meticulous preoperative assessment is mandatory. Patients typically present with medial midfoot pain, progressive loss of the arch, and an abducted forefoot. Clinical examination must evaluate the flexibility of the deformity, the integrity of the posterior tibial tendon, and the presence of equinus contracture (gastrocnemius vs. Achilles tightness).
Weight-bearing radiographs are critical for identifying the apex of the deformity. Key radiographic parameters include:
* Talonavicular Coverage Angle: Assesses forefoot abduction.
* Meary’s Angle (Talo-First Metatarsal Angle): Identifies midfoot sag on the lateral view.
* Calcaneal Pitch: Evaluates the overall height of the longitudinal arch.
Clinical Pearl: Always assess the first TMT joint for dorsal subluxation and the first metatarsal for varus angulation. A fixed forefoot supinatus that does not reduce with hindfoot correction is a primary indication for medial column stabilization.
Severe Deformity and Erosive Osteoarthritis
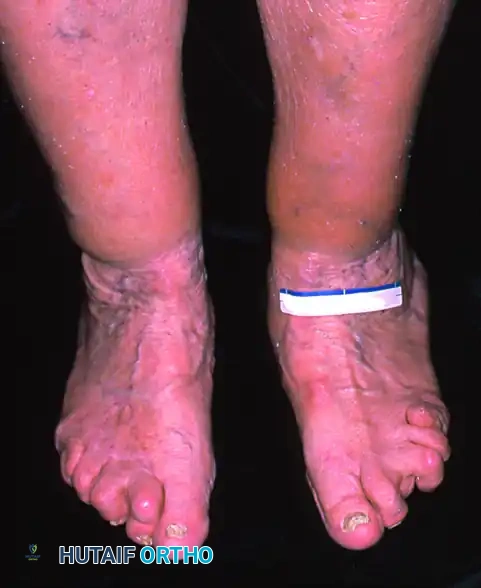
In advanced stages, patients may present with fixed hindfoot, midfoot, and forefoot deformities complicated by erosive osteoarthritis.
Patient with erosive osteoarthritis and posterior tibial tendon insufficiency. Note the fixed hindfoot, midfoot, and forefoot deformities.
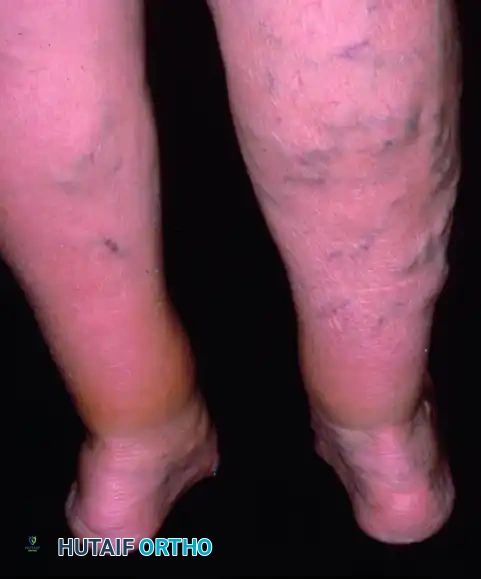
Posterior clinical view showing marked heel valgus bilaterally, worse on the left.
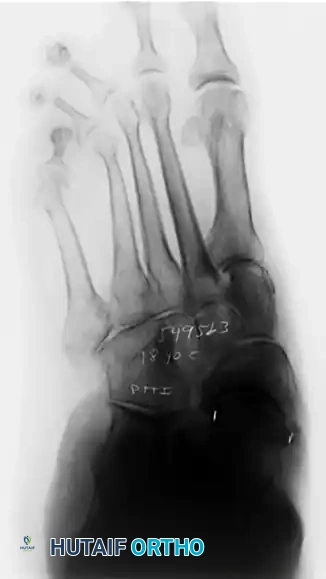
Weight-bearing anteroposterior view. With this degree of fixed deformity, a “reconstructive” triple arthrodesis is required, frequently necessitating structural bone grafting.
Surgical Technique: Isolated Medial Column Arthrodesis (Greisberg et al.)
The technique described by Greisberg et al. focuses on the direct reduction and arthrodesis of the naviculocuneiform and first tarsometatarsal joints to correct midfoot sag and restore alignment.
1. Anesthesia and Patient Positioning
The procedure is performed under spinal or general anesthesia. The patient is positioned supine on the operating table. A thigh tourniquet is applied to provide a bloodless surgical field.
2. Assessment of Equinus Contracture
Before inflating the tourniquet, the surgeon must carefully assess the calf musculature with the knee extended and flexed (Silfverskiöld test). If an isolated gastrocnemius contracture is identified, a gastrocnemius slide (Strayer procedure) is performed to prevent postoperative forefoot overload, which can compromise the arthrodesis.
3. Surgical Approach and Joint Preparation
Inflate the tourniquet. A medial utility incision is made, centered over the medial column, extending from the navicular tuberosity to the base of the first metatarsal.
If instability is localized to the naviculocuneiform joint:
* Perform deep dissection to expose the medial and middle naviculocuneiform joints.
* Use sharp osteotomes and curettes to meticulously denude the articular cartilage down to bleeding subchondral bone.
* Surgical Warning: The lateral naviculocuneiform joint is usually not included in the fusion mass. Preserving this joint maintains essential lateral column adaptability.
* Prepare the fusion beds by perforating the subchondral bone with a small drill (fenestration) to release osteoprogenitor cells and promote robust osteogenesis.
4. Fixation of the Naviculocuneiform Joint
Reduce the deformity, ensuring the medial arch is restored. Stabilize the medial and middle naviculocuneiform joints using multiple 3.5-mm cortical lag screws. The optimal trajectory is from the navicular, directed distally into the medial and middle cuneiforms, ensuring maximum thread purchase in the dense subchondral bone of the cuneiforms.
5. Management of the Posterior Tibial Tendon
Inspect the posterior tibial tendon. Depending on the degree of tendinopathy, perform aggressive tenosynovectomy and débridement. If the tendon is structurally insufficient (Stage II or III AAFD), augment the repair with a flexor digitorum longus (FDL) tendon transfer to the navicular.
6. First Tarsometatarsal Joint Arthrodesis
If preoperative imaging or intraoperative assessment reveals subluxation or instability at the first TMT joint, it must be included in the fusion construct.
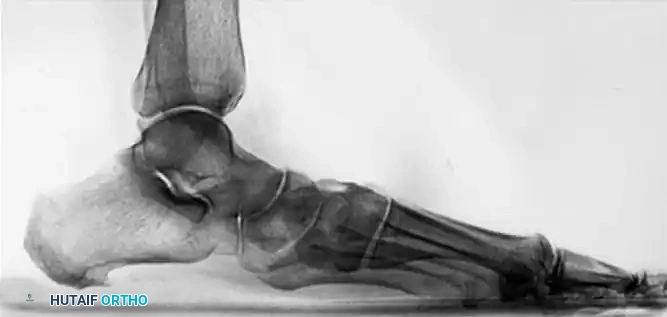
Preoperative lateral radiograph demonstrating significant sag at the naviculocuneiform and first tarsometatarsal joints. The lateral process of the talus is abutting the anterior process of the calcaneus.
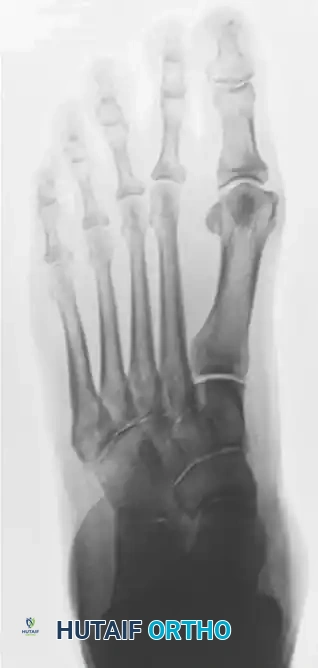
Preoperative anteroposterior radiograph showing varus of the first metatarsal, consistent with instability of the first tarsometatarsal joint, alongside subluxation of the talonavicular joint.
- Approach: Utilize a separate dorsal longitudinal incision over the first TMT joint. This prevents injury to the anterior tibial tendon insertion.
- Interval: Develop the interval between the extensor hallucis longus (EHL) and extensor hallucis brevis (EHB) tendons.
- Preparation: Open the joint capsule, denude the cartilage with osteotomes, and fenestrate the subchondral bone with a small drill.
- Fixation: Reduce the joint, correcting any dorsal elevation and varus malalignment. Secure the joint with multiple 3.5-mm lag screws.
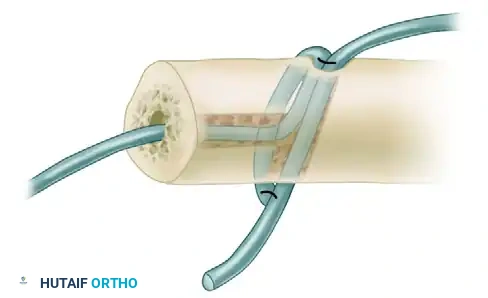
- Screw 1: Passed antegrade from the dorsal-proximal medial cuneiform into the plantar-distal first metatarsal base.
- Screw 2: Passed retrograde from the dorsal-distal first metatarsal into the plantar-proximal medial cuneiform.
- Screw 3 (Crucial): A third screw is directed transversely from the base of the first metatarsal into the base of the second metatarsal. This "intermetatarsal" screw is vital for holding the first metatarsal reduced to the second, neutralizing the deforming varus forces.
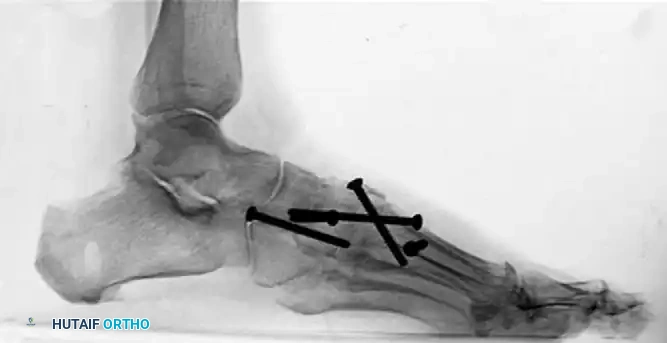
Lateral radiograph 6 months post-medial column arthrodesis. Note the dramatic improvement in the talometatarsal angle (Meary's line) and the opening of the sinus tarsi.
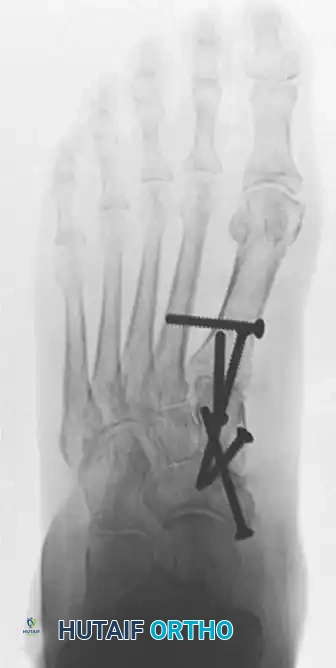
Anteroposterior radiograph demonstrating improved talonavicular coverage and solid fusion mass with crossed lag screw fixation.
7. Bone Grafting and Closure
Use a small burr to create strategic gaps along the arthrodesis sites. Pack these gaps tightly with cancellous bone graft, typically harvested from the proximal tibia or iliac crest, to enhance the fusion rate. Deflate the tourniquet, achieve meticulous hemostasis, close the wounds in layers, and apply a well-padded short-leg cast.
Postoperative Care (Greisberg et al.)
- 0-6 Weeks: The patient is maintained strictly non-weight-bearing in a short-leg cast.
- 6 Weeks: Radiographs are obtained. If early consolidation of the arthrodesis sites is evident, the patient is transitioned to a controlled ankle motion (CAM) boot, and weight-bearing is advanced as tolerated.
- 10-12 Weeks: Patients can typically transition to full weight-bearing in supportive, regular footwear.
Surgical Technique: Medial Cuneiform Opening Wedge Osteotomy (Hirose and Johnson)
In cases where the primary deformity is a fixed forefoot supinatus (elevation of the first ray) without frank instability of the TMT or NC joints, a plantar-flexion opening wedge osteotomy of the medial cuneiform (often referred to as a Cotton osteotomy) is highly effective.
Biomechanical Rationale
The goal of this procedure is to plantarflex the first ray to the level of the fifth metatarsal head. This restores the normal "tripod" configuration of the foot (calcaneal tuberosity, first metatarsal head, and fifth metatarsal head), ensuring even distribution of forefoot pressures during the stance phase.
1. Patient Positioning and Preparation
- Position the patient supine on the operating table.
- Place a bump or pad under the ipsilateral buttock to internally rotate the affected leg, bringing the medial column into a neutral, accessible position.
- Prepare and drape both the affected leg and the ipsilateral iliac crest (for structural bone graft harvesting).
2. Surgical Approach
- Under tourniquet control, make a dorsal longitudinal incision directly over the medial cuneiform and the base of the first metatarsal.
- Dissect carefully through the skin and subcutaneous tissues, taking care to identify and protect branches of the superficial peroneal nerve.
- Identify the extensor hallucis longus (EHL) tendon and retract it medially to expose the dorsal cortex of the medial cuneiform.
- Use intraoperative fluoroscopy to confirm the exact midportion of the medial cuneiform.
3. The Osteotomy
- Utilize a microsagittal saw to create a transverse osteotomy through the midportion of the medial cuneiform.
- The cut should be directed from dorsal to plantar, parallel to the second tarsometatarsal joint.
- Surgical Pitfall: Do not breach the plantar cortex initially. Leave a minimal plantar cortical hinge to maintain stability while opening the wedge.
4. Deformity Correction and Grafting
- Insert a broad osteotome into the osteotomy site. Gently pull the handle distally to lever open the dorsal aspect of the medial cuneiform, effectively plantarflexing the first ray.
- Measure the exact amount of opening required to bring the first metatarsal head down to the level of the fifth metatarsal head. Typically, a 5- to 6-mm wedge is required.
- Harvest a tricortical wedge of bone from the ipsilateral iliac crest matching the measured dimensions. Denude the graft of any soft tissue.
- Trim the tricortical wedge with the microsagittal saw until it fits perfectly into the dorsal defect.
- Place a small amount of cancellous bone graft into the deepest (plantar-most) aspect of the osteotomy to ensure complete bony apposition.
- While maintaining a plantar flexion force on the first metatarsal, use a bone tamp to impact the tricortical graft from dorsal to plantar into the defect.
5. Fixation and Contouring
- Drive a guide pin for a 4.0-mm or 3.5-mm cannulated screw from the dorsal aspect of the distal cuneiform fragment, across the osteotomy and the graft, into the plantar aspect of the proximal cuneiform fragment.
- Measure, drill, and insert the appropriate length cannulated screw, ensuring the screw head is countersunk to prevent dorsal hardware prominence.
- Use the microsagittal saw or a high-speed burr to contour any portion of the iliac crest graft that protrudes dorsally or medially outside the normal anatomical contours of the cuneiform.
- Critical Step: Ensure the graft is not placed too far laterally, as this can cause painful impingement against the middle (second) cuneiform.
Postoperative Care (Hirose and Johnson)
- 0-7/14 Days: The incisions are closed in a routine fashion, and a bulky compressive dressing with a posterior plaster splint is applied.
- 1-2 Weeks: The compressive dressing is removed, wounds are inspected, and the patient is placed in a non-weight-bearing cast.
- 6 Weeks: Radiographs are taken. If radiographic fusion of the osteotomy is evident, weight-bearing as tolerated is initiated in a protective boot.
Management of Stage IV Flatfoot Deformity
Stage IV chronic posterior tibial tendon deformity represents the end-stage of medial column and hindfoot failure, characterized by the development of ankle joint incongruency and valgus talar tilt. This is one of the most challenging problems in foot and ankle reconstruction.
While rigid ankle-foot orthoses (AFOs) and bracing remain the mainstay of conservative treatment, a subset of patients will experience intractable pain and require surgical intervention.
Surgical Options for Stage IV Deformity
- Rigid Deformities: For patients with rigid, fixed deformities and significant ankle arthrosis, the gold standard remains tibiotalocalcaneal (TTC) arthrodesis or isolated ankle arthrodesis. If the hindfoot deformity can be perfectly corrected and the ankle ligaments balanced, total ankle arthroplasty may be considered in highly selected, low-demand patients.
- Flexible Deformities (Deltoid Reconstruction): In a very select group of patients presenting with a flexible, reducible hindfoot deformity, less than 10 degrees of tibiotalar valgus tilt, and minimal lateral ankle joint arthrosis, joint-sparing procedures can be attempted.
- Jeng et al. described a specialized "minimally invasive" allograft technique for deltoid ligament reconstruction. This is virtually always performed in conjunction with a triple arthrodesis to provide a stable foundation, thereby protecting the medial ligamentous reconstruction from recurrent valgus forces.
Academic Perspective: The success of medial column arthrodesis relies heavily on the surgeon's ability to recognize the multi-planar nature of flatfoot deformity. Failing to address a tight gastrocnemius or ignoring a subluxed first TMT joint will inevitably lead to recurrent deformity, hardware failure, or nonunion. Meticulous joint preparation and rigid, multi-planar compression are the hallmarks of a successful outcome.
You Might Also Like