Arthroscopic Subtalar Arthrodesis: A Comprehensive Surgical Guide
Key Takeaway
Arthroscopic subtalar arthrodesis (ASTA) is a minimally invasive technique for isolated subtalar arthritis, offering fusion rates up to 100%. By utilizing lateral or prone posterior portals, surgeons can achieve excellent joint preparation with reduced morbidity. This guide details the indications, precise portal placement, intra-articular debridement, and fluoroscopically guided cannulated screw fixation required to achieve optimal outcomes in properly selected patients without significant hindfoot deformity.
Introduction and Historical Context
Advances in techniques and instrumentation for foot and ankle arthroscopy have catalyzed a paradigm shift in the management of hindfoot pathology, allowing for the development and refinement of arthroscopic techniques for subtalar arthrodesis. In the years since the first reports of arthroscopic subtalar arthrodesis (ASTA) in the mid-1990s, the technique has gained widespread credibility as a highly effective, minimally invasive procedure for isolated subtalar arthritis.
Current literature demonstrates exceptional efficacy, with reported fusion rates ranging from 91% to 100%. Compared to traditional open arthrodesis, arthroscopic subtalar arthrodesis offers significant advantages in properly selected patients, including faster functional recovery, decreased postoperative pain, minimized soft tissue stripping, and a lower incidence of wound healing complications. However, the surgeon must recognize the primary limitation of this minimally invasive approach: significant deformity correction is not possible. Therefore, meticulous patient selection is paramount.
Indications and Patient Selection
Arthroscopic subtalar arthrodesis is indicated for patients suffering from debilitating, isolated subtalar arthritis who have failed exhaustive conservative management (e.g., non-steroidal anti-inflammatory drugs, custom orthotics, bracing, and targeted corticosteroid injections).
Common etiologies include:
* Post-traumatic osteoarthritis (frequently following calcaneal fractures).
* Primary osteoarthritis of the subtalar joint.
* Inflammatory arthropathies (e.g., rheumatoid arthritis) localized to the hindfoot.
* Talocalcaneal coalitions requiring fusion.
* Posterior tibial tendon dysfunction (Stage IIb or early Stage III) where the hindfoot remains flexible or requires minimal correction.
Clinical Pearl: The ideal candidate for an arthroscopic subtalar arthrodesis has minimal to no coronal or sagittal plane deformity. If a patient presents with severe hindfoot valgus, varus, or significant loss of calcaneal height requiring structural bone grafting and extensive realignment, an open approach is strictly indicated.
Biomechanics and Anatomic Considerations
A profound understanding of hindfoot anatomy is non-negotiable when performing ASTA, particularly when utilizing posterior portals. The subtalar (talocalcaneal) joint is a complex, multi-faceted articulation primarily responsible for hindfoot inversion and eversion. The posterior facet is the largest of the three facets and bears the majority of the axial load.
When utilizing the posterior arthroscopic subtalar arthrodesis (PASTA) technique, the flexor hallucis longus (FHL) tendon serves as the critical anatomical landmark. The FHL acts as a physical barrier protecting the posteromedial neurovascular bundle.
Surgical Warning: All arthroscopic debridement and instrumentation must be performed strictly lateral to the flexor hallucis longus tendon.
Cadaveric and clinical studies have mapped the proximity of vital structures to the standard posteromedial portal:
* Tibial Nerve: Approximately 6.4 mm from the portal trajectory.
* Posterior Tibial Artery: Approximately 9.6 mm from the portal trajectory.
* Medial Calcaneal Nerve: Approximately 17.1 mm from the portal trajectory.
These distances provide sufficient working space for the skilled arthroscopist, provided that spatial awareness is maintained and the FHL is continuously visualized.
Preoperative Planning and Setup
Anesthesia and Positioning
The procedure is typically performed under general anesthesia combined with a regional nerve block (e.g., popliteal sciatic block) to ensure optimal postoperative pain control. A thigh tourniquet is applied and inflated to provide a bloodless visual field.
Patient positioning is dictated by the surgeon's choice of portals:
1. Lateral Decubitus Position: Utilized for the classic lateral approach (anterolateral, posterolateral, and accessory sinus tarsi portals).
2. Prone Position: Utilized for the posterior approach (PASTA). The prone position has become increasingly favored due to several distinct advantages:
* Superior and safer access to the posteromedial corner of the joint.
* Enhanced visualization of the complex, saddle-shaped geometry of the posterior facet.
* Ergonomically superior trajectory for the placement of cannulated screws from the posterior calcaneus directed anteriorly into the talar neck.
* Unimpeded intraoperative fluoroscopic imaging compared to the lateral decubitus position.
Joint Distraction
Adequate visualization requires joint space expansion. Soft tissue distraction (e.g., non-invasive ankle straps) may be useful to open the posterior facet. However, invasive bony distraction (using skeletal pins) is generally not recommended as it can tether soft tissues and complicate portal mobility.
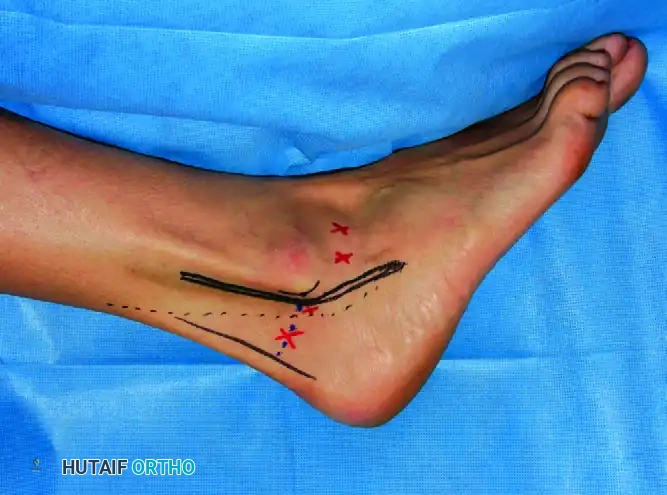
Portal Anatomy and Placement
Precise portal placement is the foundation of a successful arthroscopic arthrodesis. Prior to incision, standard preparation and draping are performed, preoperative antibiotics are administered, and the operative extremity is draped free.
The surgeon must meticulously mark the surface anatomy: the Achilles tendon, the medial and lateral malleoli, the estimated course of the sural nerve, the peroneal tendons, and the posteromedial neurovascular bundle.
Lateral Approach Portals (Patient in Lateral Decubitus)
When the patient is in the lateral position, the most common portals are the anterolateral and posterolateral portals.
- Anterolateral Portal: Located approximately 1 cm anterior to the tip of the fibula. Care must be taken to avoid the terminal branches of the superficial peroneal nerve.
- Posterolateral Portal: Located just lateral to the Achilles tendon and 2 cm proximal to the tip of the fibula. The sural nerve is at significant risk with this portal and must be protected during incision and instrument insertion.
- Accessory Sinus Tarsi Portal: If additional access or fluid outflow is required, an accessory portal can be established just anterior and distal to the tip of the lateral malleolus.
Posterior Approach Portals (Patient Prone - PASTA Technique)
With the patient prone, the working space is established through the posterior ankle, utilizing the posterolateral and posteromedial portals.
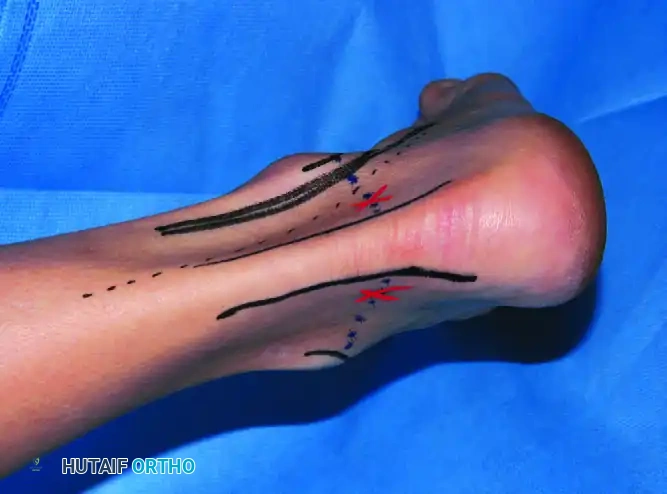
- Posterolateral Portal: Established just lateral to the Achilles tendon, 2 cm proximal to the tip of the lateral malleolus.
- Posteromedial Portal: Located 1 cm medial to the Achilles tendon, at the level of the tip of the medial malleolus. The tibial nerve and posterior tibial artery are at risk with this approach.
- Accessory Lateral Portal: Can be made 1 cm posterior and 1 cm proximal to the tip of the lateral malleolus to aid in distraction or alternate viewing.
Step-by-Step Surgical Technique
1. Joint Localization and Insufflation
Identify the exact portal position using an 18-gauge spinal needle. Under fluoroscopic guidance or tactile feedback, advance the needle into the posterior subtalar joint. Inflate the joint with 10 to 20 mL of local anesthetic (e.g., lidocaine with epinephrine) or sterile saline.
Clinical Pearl: Successful intra-articular instillation is confirmed clinically when the fluid pressure causes spontaneous inversion of the foot.
2. Portal Creation
Create the portals by making a superficial skin incision with a #15 blade. To protect underlying neurovascular structures, strictly avoid plunging. Gently spread the subcutaneous tissue down to the capsule using a straight hemostat.
* For the lateral approach: Enter the joint directly with the hemostat.
* For the posterior approach: Create the posterolateral portal first. Direct the arthroscope (with a blunt trocar) anteriorly, in line with the second metatarsal, while holding the hindfoot in a neutral position.
Once the posterolateral portal is established and the camera is inserted, establish the posteromedial portal under direct intra-articular vision. Ensure that the spinal needle and subsequent instruments enter the joint lateral to the FHL tendon.
3. Creating the Working Space
With the patient prone, initial visualization is often obscured by the posterior fat pad and capsular tissue.
* Introduce 3.5-mm arthroscopic instruments (shavers and radiofrequency wands) to carefully resect the posterior fat pad.
* Locate the flexor hallucis longus (FHL) tendon immediately. This is your medial boundary.
* Partially debride the posterior ligaments and capsule to gain access to the talocalcaneal joint space.
* Small 2.7-mm to 3.0-mm instruments with a 30-degree arthroscope are often necessary to begin the intra-articular debridement. Once adequate space is created, transition to larger 3.5-mm to 4.0-mm instruments for efficiency.
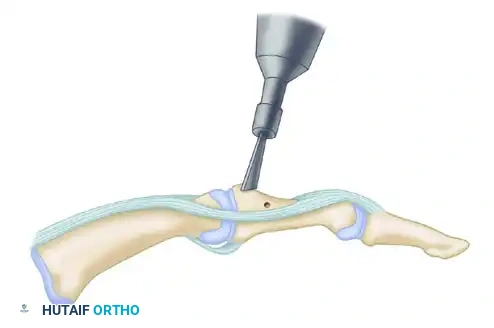
4. Articular Preparation and Decortication
The success of any arthrodesis relies on the meticulous preparation of the fusion bed. Use the posterolateral and posteromedial portals in an alternating fashion for viewing and instrumentation to ensure no area of the joint is neglected.
- Perform an initial synovectomy and debridement using a 4.0-mm full-radius resector.
- Utilize an acromioplasty burr, an aggressive shaver, and curved ring curettes to systematically remove all articular cartilage from the entire posterior facet.
- The posterior approach allows excellent retention of the interosseous talocalcaneal ligament, which preserves local vascularity and provides inherent stability during the fusion process.
- Once the cartilage is removed, use a burr to remove 1 to 2 mm of subchondral bone posterior to the interosseous ligament until healthy, bleeding cancellous bone is visible.
Surgical Warning: Do not over-resect the subchondral bone. Aggressive burring can alter the complex geometry of the joint, leading to loss of calcaneal height, malalignment, and failure of the bony surfaces to appose correctly.
If local bone quality is poor or if small cystic voids are present, allograft or autograft bone (e.g., demineralized bone matrix or cancellous chips) may be inserted into the joint space prior to compression.
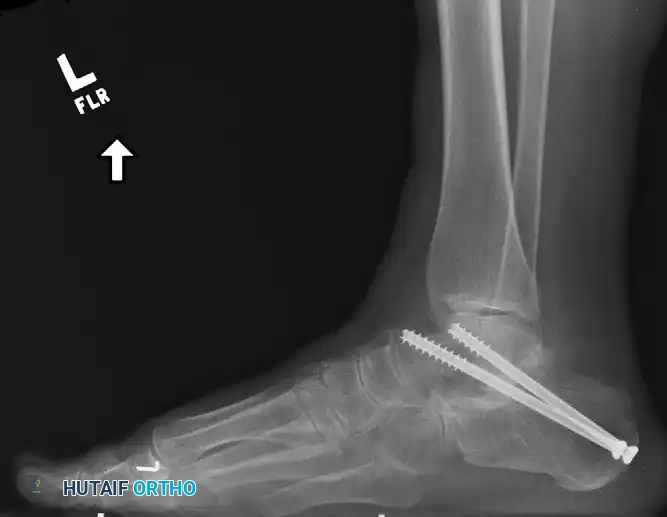
5. Fluoroscopically Guided Fixation
Rigid internal fixation is achieved using large-diameter cannulated cancellous screws. The goal is to achieve orthogonal compression across the posterior facet.
- Insert a threaded guide pin through a percutaneous stab incision at the posterolateral aspect of the calcaneus.
- Angle the pin anterosuperiorly, directing it across the posterior facet and into the center of the talar neck.
- Optimal Trajectory: The best biomechanical fixation is obtained by having the screw exit the talus just distal to the body-neck junction. This allows the threads of the screw to grip the dense superior cortex of the talar neck.
- Starting Point: Place the pin proximal to the weight-bearing surface of the heel pad and distal to the primary insertion footprint of the Achilles tendon to prevent painful hardware prominence.
- Confirm the trajectory of the guide pin in both the lateral and Harris axial fluoroscopic views.
- Place a second guide pin just medial and superior to the first pin to provide rotational stability. Two screws are biomechanically superior to a single screw for subtalar arthrodesis.
- Measure the depth, drill the near cortex, and place a 6.5-mm to 8.0-mm partially threaded cannulated cancellous screw over each guide pin. Ensure the threads fully bypass the arthrodesis site to achieve maximal interfragmentary compression.
6. Final Assessment and Closure
Following screw insertion, examine the arthrodesis clinically. Grasp the heel and verify the absolute elimination of subtalar motion. Ensure the hindfoot is locked in a neutral to slight valgus position (approximately 5 degrees of valgus).
Perform a final fluoroscopic check to confirm proper screw placement, adequate joint compression, and the absence of hardware penetrating the ankle or talonavicular joints.
Thoroughly irrigate the joint to remove bone debris. Close the portal skin incisions with non-absorbable nylon sutures. Apply a sterile, bulky compressive dressing and a rigid posterior splint with the ankle in neutral dorsiflexion.
Postoperative Care and Rehabilitation Protocol
The postoperative protocol is designed to protect the mechanical integrity of the fixation while biological fusion occurs.
- Phase I (Days 1 to 7): The patient is discharged with instructions to remain strictly non-weight bearing on the operative extremity. Crutch or walker ambulation is required. Elevation of the limb is critical to minimize edema and promote wound healing.
- Phase II (Weeks 1 to 6): At the 5 to 7-day postoperative visit, the bulky dressing and posterior splint are removed. Wounds are inspected, and sutures are removed if healed. The patient is transitioned into a short-leg removable cast boot. Strict non-weight bearing is maintained for a total of 6 weeks.
- Phase III (Weeks 6 to 12): At the 6-week mark, weight-bearing radiographs (AP, Lateral, and Harris axial views) are obtained. If there is radiographic evidence of consolidating bone across the posterior facet and the patient is clinically non-tender, progressive weight bearing in the cast boot is initiated.
- Phase IV (12 Weeks and Beyond): The patient is gradually transitioned to regular supportive footwear once radiographs demonstrate complete bony union and the patient exhibits no pain with full weight-bearing ambulation. Physical therapy may be prescribed to address ankle stiffness and restore proprioception.
Complications and Avoidance
While ASTA minimizes the complications associated with open approaches, specific risks remain:
1. Neurological Injury: The sural nerve (lateral portals) and the tibial nerve (posteromedial portal) are at highest risk. Strict adherence to anatomic landmarks, avoiding plunging with the scalpel, and utilizing blunt dissection down to the capsule mitigate this risk.
2. Nonunion: Reported in up to 9% of cases. Risk factors include smoking, non-compliance with weight-bearing restrictions, inadequate cartilage removal, and failure to achieve rigid compression. Meticulous joint preparation down to bleeding subchondral bone is essential.
3. Hardware Prominence: Screws placed too far inferiorly on the calcaneus can irritate the plantar heel pad. Screws placed too far posteriorly can irritate the Achilles tendon. Precise starting point selection under fluoroscopy is required.
📚 Medical References
- arthroscopic subtalar arthrodesis using injectable bone morphogenic proteinenhanced graft, Foot Ankle Int 20:162, 1999.
- Segal D, Marsh JL, Leiter B: Clinical applications of computerized axial tomography (CAT) scanning of calcaneus fractures, Clin Orthop Relat Res 199:114, 1985.
- Shereff MJ: Radiographic anatomy of the hindfoot, Clin Orthop Relat Res 177:16, 1983.
- Simpson LA, Schulak DJ, Spiegel PG: Intraarticular fractures of the calcaneus: a review, Contemp Orthop 6:19, 1983.
- Stephenson JR: Displaced fractures of the os calcis involving the subtalar joint: the key role of the superomedial fragment, Foot Ankle 4:91, 1983.
- Stephenson JR: Treatment of displaced intraarticular fractures of the calcaneus using medial and lateral approaches, internal fi xation, and early motion, J Bone Joint Surg 69A:115, 1987.
- Stephenson JR: Surgical treatment of displaced intraarticular fractures of the calcaneus: a combined lateral and medial approach, Clin Orthop Relat Res 290:68, 1993.
- Thompson KR: Treatment of comminuted fractures of the calcaneus by
You Might Also Like