Proximal Crescentic Osteotomy: A Masterclass in Hallux Valgus Correction
Key Takeaway
Join us in the OR for an immersive masterclass on the Proximal Crescentic Osteotomy for hallux valgus. We'll meticulously dissect the anatomy, detail precise surgical steps from incision to fixation, and share critical pearls for avoiding complications. Learn expert techniques for lateral release, medial capsular management, medial eminence excision, and osteotomy correction, ensuring optimal patient outcomes.
Comprehensive Introduction and Patho-Epidemiology
The surgical management of hallux valgus remains one of the most intensely debated and continuously evolving domains within orthopedic foot and ankle surgery. Among the vast armamentarium of corrective procedures, the proximal crescentic osteotomy stands as a foundational, workhorse technique for addressing moderate to severe forefoot deformities. By executing a curved osteotomy at the metaphyseal-diaphyseal junction of the first metatarsal, the surgeon is afforded the unique biomechanical advantage of rotating the metatarsal shaft in the transverse plane to reduce the intermetatarsal angle without inducing the deleterious shortening commonly associated with closing base wedge osteotomies. This masterclass chapter delineates the precise anatomical, biomechanical, and technical principles required to execute this procedure with uncompromising accuracy, thereby ensuring reproducible, long-term functional outcomes for our patients.
Hallux valgus is not merely a cosmetic bump; it is a complex, progressive pathoanatomical deformity involving the entire first ray complex. Epidemiologically, it disproportionately affects females and exhibits a strong familial predisposition, exacerbated by extrinsic factors such as constricting footwear. The deformity is characterized by lateral deviation and pronation of the hallux, medial deviation of the first metatarsal, and subsequent lateral subluxation of the sesamoid apparatus. As the first metatarsal drifts medially, the adductor hallucis and the lateral joint capsule become contracted, essentially tethering the proximal phalanx and the sesamoids in a laterally displaced position. The intrinsic muscles, particularly the abductor hallucis, lose their mechanical advantage, migrating plantarward and further driving the pronatory force on the digit.
Understanding the progressive nature of this deformity is paramount for the operating surgeon. As the intermetatarsal angle widens, the medial capsule undergoes attenuation, and the medial eminence hypertrophies due to altered biomechanical stresses and shoe wear friction. The proximal crescentic osteotomy specifically targets the apex of the osseous deformity—the widened intermetatarsal angle—while the concurrent soft tissue procedures (lateral release and medial capsulorrhaphy) address the deforming forces at the metatarsophalangeal (MTP) joint. Mastery of this procedure requires a holistic understanding that osseous correction alone is insufficient; it must be coupled with meticulous soft tissue rebalancing to prevent recurrence and restore the complex kinematics of the first ray.
Detailed Surgical Anatomy and Biomechanics
First Web Space and Lateral Contractures
The anatomy of the first web space is a dense, highly specialized neurovascular and musculotendinous network that dictates the lateral deforming forces in hallux valgus. The primary structure of interest during the lateral release is the adductor hallucis muscle, which consists of an oblique and a transverse head. These heads converge to insert onto the fibular sesamoid and the lateral base of the proximal phalanx. In the setting of a hallux valgus deformity, the adductor hallucis becomes a primary deforming force, pulling the hallux into valgus and pronation. Releasing this tendinous insertion is an absolute prerequisite for achieving a congruent MTP joint and allowing the sesamoid apparatus to relocate beneath the metatarsal head.

Spanning the distance between the first and second metatarsal heads is the transverse metatarsal ligament. This strong, fibrous band acts as a critical tether; it does not attach directly to the first metatarsal but rather to the plantar plate and the sesamoid apparatus. In hallux valgus, as the first metatarsal drifts medially, the transverse metatarsal ligament holds the sesamoids laterally. Transection of this ligament is necessary to mobilize the sesamoid complex, allowing it to glide medially back into its anatomic position beneath the first metatarsal head. However, this dissection must be performed with exquisite care, as the common digital nerve to the first web space and its accompanying vessels lie immediately plantar to this ligament.
The lateral joint capsule itself undergoes severe contracture in chronic hallux valgus. The capsule thickens and shortens, forming a rigid barrier to manual reduction of the deformity. A comprehensive lateral release requires not only the detachment of the adductor hallucis and the transection of the transverse metatarsal ligament but also a systematic fenestration or release of this lateral capsular tissue. The surgeon must navigate this space while preserving the plantar lateral capsular artery, which provides a critical blood supply to the first metatarsal head. Iatrogenic injury to this vascular network, particularly when combined with an extensive medial capsulotomy and a distal osteotomy, significantly elevates the risk of avascular necrosis of the metatarsal head.
Medial Column and Sesamoid Complex
The medial aspect of the first MTP joint is characterized by attenuated, redundant capsular tissue and a hypertrophic medial eminence. The superficial anatomy is dominated by the dorsal medial cutaneous nerve and the plantar medial cutaneous nerve. These sensory branches are highly susceptible to neuropraxia or transection during the initial surgical exposure. Retraction must be gentle, utilizing blunt instruments to sweep the nerves away from the capsulotomy site. Deep to the subcutaneous tissue lies the medial joint capsule, blending with the medial collateral ligament and the abductor hallucis tendon.
The abductor hallucis is a critical dynamic stabilizer of the first MTP joint. In a normal foot, it resists valgus deviation. However, as the hallux valgus deformity progresses, the abductor hallucis tendon slides plantarward, losing its abductor moment arm and paradoxically contributing to the pronation of the hallux. During the medial capsulorrhaphy, it is often necessary to mobilize the abductor hallucis and incorporate it into the capsular repair to restore its proper anatomic alignment and biomechanical function. The medial eminence itself, often mistakenly referred to as an exostosis, is largely the uncovered medial aspect of the first metatarsal head resulting from the lateral subluxation of the proximal phalanx.
The sesamoid complex, embedded within the plantar plate, articulates with the plantar aspect of the first metatarsal head at the crista. The tibial and fibular sesamoids act as fulcrums for the flexor hallucis brevis, increasing its mechanical advantage. In hallux valgus, the crista is often eroded, and the sesamoids subluxate laterally into the first web space. Assessing the tibial sesamoid position (TSP) on weight-bearing anteroposterior radiographs is a critical component of preoperative planning. Successful execution of the proximal crescentic osteotomy and the accompanying soft tissue releases must result in the complete anatomic reduction of the sesamoids beneath the metatarsal head to ensure optimal flexor mechanics and prevent postoperative metatarsalgia.
Osteology and Vascularity of the First Metatarsal
The first metatarsal is a unique tubular bone with a robust diaphyseal cortex and expansive metaphyseal cancellous bone at both its proximal and distal ends. The proximal crescentic osteotomy is specifically designed to be performed at the proximal metaphyseal-diaphyseal junction, approximately 1 to 1.5 centimeters distal to the first metatarsocuneiform (MC) joint. This location is chosen strategically; the cancellous bone in this region possesses excellent osteogenic potential, facilitating rapid union. Furthermore, an osteotomy in this proximal location provides a longer lever arm, allowing for a greater degree of angular correction of the intermetatarsal angle with minimal osseous translation.
The vascular supply to the first metatarsal is a critical consideration for any osteotomy. The primary nutrient artery enters the lateral aspect of the diaphysis, while the metaphyseal regions receive rich collateral flow from the periosteal network and capsular vessels. The proximal crescentic osteotomy, by virtue of its location, generally preserves the distal vascularity better than distal metaphyseal osteotomies (such as the Chevron). However, the surgeon must be meticulous in preserving the periosteal sleeve during exposure. Excessive periosteal stripping at the osteotomy site can compromise local blood flow, leading to delayed union or nonunion.
Biomechanically, the crescentic shape of the osteotomy is its defining advantage. Unlike a closing base wedge osteotomy, which removes a wedge of bone and inherently shortens the first ray, the crescentic cut allows the distal fragment to rotate along the arc of the osteotomy. This transverse plane rotation effectively closes the intermetatarsal angle without altering the longitudinal axis of the bone. Maintaining the length of the first metatarsal is absolutely critical; iatrogenic shortening can disrupt the weight-bearing mechanics of the forefoot, leading to transfer lesions and intractable metatarsalgia beneath the lesser metatarsal heads.
Exhaustive Indications and Contraindications
Patient Selection Criteria
The proximal crescentic osteotomy is ideally suited for patients presenting with a symptomatic, moderate to severe hallux valgus deformity that has failed conservative management (e.g., shoe modification, orthotics, anti-inflammatory medications). Radiographically, this corresponds to an intermetatarsal (IM) angle exceeding 12 to 15 degrees and a hallux valgus angle (HVA) greater than 30 degrees. The procedure is particularly valuable when the deformity is driven by a proximal angular deviation of the first metatarsal rather than a deformity localized to the MTP joint itself.
A critical radiographic parameter for this procedure is a congruent or subluxated MTP joint with a normal distal metatarsal articular angle (DMAA). The DMAA should ideally be less than 10 degrees. If the DMAA is significantly elevated (indicating that the articular surface of the metatarsal head is laterally deviated), a proximal osteotomy alone will exacerbate the joint incongruency, potentially leading to early osteoarthritis or recurrent deformity. In such cases, a double osteotomy (proximal crescentic combined with a distal biplanar osteotomy) may be required.
Patient age and bone quality are also vital selection criteria. The ideal candidate is a healthy adult with good bone stock capable of supporting internal fixation. The cancellous nature of the proximal metaphysis requires adequate trabecular density to hold the compression screws or plates used for fixation. In older patients with severe osteopenia or osteoporosis, the risk of hardware failure, loss of fixation, and subsequent malunion is significantly elevated, and alternative procedures, such as a Lapidus arthrodesis or a joint-sacrificing procedure, should be considered.
Absolute and Relative Contraindications
Absolute contraindications to the proximal crescentic osteotomy include the presence of severe degenerative joint disease (osteoarthritis) at the first MTP joint. Performing an osteotomy in the presence of advanced hallux rigidus will not relieve the patient's pain and may exacerbate joint stiffness. In these scenarios, an MTP joint arthrodesis or arthroplasty is the standard of care. Active infection, severe peripheral vascular disease, and uncontrolled medical comorbidities that preclude safe anesthesia or wound healing are also absolute contraindications.
Relative contraindications require careful clinical judgment. Hypermobility of the first tarsometatarsal (TMT) joint is a highly debated topic. If profound, multi-planar instability is present at the TMT joint, a proximal osteotomy may fail to provide long-term correction, as the deforming forces will simply recur at the unstable joint. In these cases, a Lapidus procedure (first TMT arthrodesis) is generally preferred to permanently stabilize the medial column. Additionally, an open proximal physis in an adolescent patient is a contraindication, as the osteotomy may inadvertently damage the growth plate, leading to premature closure and severe growth disturbances.
An elevated DMAA (greater than 15 degrees) serves as a strong relative contraindication for an isolated proximal crescentic osteotomy. As previously mentioned, correcting the IM angle proximally without addressing the distal articular deviation will result in a joint that is structurally misaligned. Furthermore, patients with a severely shortened first metatarsal preoperatively should be approached with caution. While the crescentic osteotomy is designed to preserve length, any minor bone loss from the saw blade or compression can exacerbate a pre-existing short first ray, increasing the risk of transfer metatarsalgia.
| Parameter | Indications for Proximal Crescentic Osteotomy | Contraindications |
|---|---|---|
| Intermetatarsal (IM) Angle | > 12 - 15 degrees (Moderate to Severe) | < 10 degrees (Consider distal osteotomy) |
| Hallux Valgus Angle (HVA) | > 30 degrees | Mild deformity adequately treated distally |
| First MTP Joint Status | Congruent or subluxated, NO arthritis | Advanced Osteoarthritis (Hallux Rigidus) |
| First TMT Joint Stability | Stable to mildly hypermobile | Severe multi-planar hypermobility (Requires Lapidus) |
| DMAA | Normal (< 10 degrees) | Elevated (> 15 degrees) (Requires distal correction) |
| Bone Quality | Good bone stock for hardware purchase | Severe osteopenia / osteoporosis |
Pre-Operative Planning, Templating, and Patient Positioning
Radiographic Analysis and Templating
Meticulous preoperative planning is the cornerstone of a successful proximal crescentic osteotomy. This process begins with high-quality, weight-bearing radiographs of the foot, including anteroposterior (AP), lateral, and sesamoid axial views. The weight-bearing AP view is utilized to measure the critical angles: the HVA, the IM angle, and the DMAA. The surgeon must also assess the tibial sesamoid position (TSP), grading it from 1 to 7 based on its relationship to the bisecting axis of the first metatarsal. A TSP of 4 or greater indicates significant lateral subluxation requiring extensive soft tissue release.
Templating is performed either digitally or using traditional acetate overlays. The surgeon templates the proposed osteotomy site, typically 1 to 1.5 cm distal to the MC joint. By simulating the rotation of the distal fragment on the template, the surgeon can accurately predict the degree of correction achievable and ensure that the IM angle can be reduced to less than 9 degrees without causing impingement on the second metatarsal. Templating also allows for the pre-selection of hardware, estimating the length of the cannulated screws or the size of the locking plate required for rigid fixation.
The lateral radiograph is scrutinized to evaluate the sagittal plane alignment of the first metatarsal. It is critical to note any pre-existing elevatus or plantarflexion. The proximal crescentic osteotomy inherently carries a risk of dorsiflexion malunion if not properly stabilized. By establishing the baseline sagittal alignment, the surgeon can intraoperatively monitor the osteotomy to ensure the metatarsal head is not inadvertently elevated, which is the primary cause of postoperative transfer metatarsalgia. The sesamoid axial view confirms the presence of crista erosion and the degree of sesamoid subluxation.
Operating Room Setup and Positioning
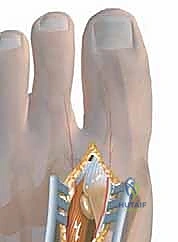
The operating room must be configured to facilitate seamless surgical workflow and unhindered fluoroscopic access. The patient is positioned supine on the operating table. A small bump or sandbag is placed beneath the ipsilateral hip to internally rotate the lower extremity, bringing the foot into a neutral, vertical position. This is crucial because the natural external rotation of the leg can make accessing the medial aspect of the foot ergonomically challenging for the surgeon. All bony prominences are meticulously padded to prevent positioning neuropraxias.
A well-padded pneumatic tourniquet is applied to the proximal thigh or calf, depending on surgeon preference and patient anatomy. Exsanguination is achieved using an Esmarch bandage, and the tourniquet is inflated to standard pressures (typically 250-300 mmHg) to provide a completely bloodless surgical field. This is not merely for convenience; it is an absolute necessity for the safe identification and preservation of the delicate neurovascular structures in the first web space and along the medial aspect of the joint.
Fluoroscopy is an indispensable tool during this procedure. The C-arm is draped sterilely and positioned either parallel or perpendicular to the operating table, allowing for rapid acquisition of AP, lateral, and oblique views without requiring the surgeon to break scrub or reposition the patient's leg significantly. The monitor should be positioned directly in the surgeon's line of sight. The foot is prepped and draped in a standard sterile fashion, ensuring exposure from the mid-calf down to the toes, allowing full access to the dorsal, medial, and plantar aspects of the foot.
Step-by-Step Surgical Approach and Fixation Technique
Lateral Soft Tissue Release
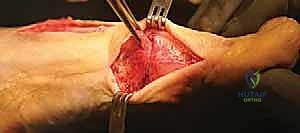
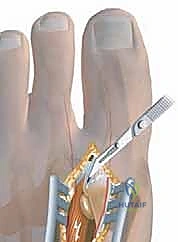
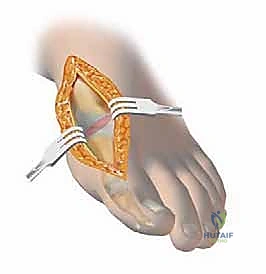
Our first objective is to address the contracted lateral structures responsible for pulling the hallux into valgus. This is performed through a separate dorsal web space incision. I make a 2.5-cm longitudinal incision on the dorsal aspect of the first web space, precisely between the first and second metatarsal heads. Carefully deepening this incision through the subcutaneous tissue, we must avoid any damage to the superficial branches of the deep peroneal nerve. I place a Weitlaner retractor with its blades gently positioned between the first and second metatarsal heads. This maneuver puts the transverse metatarsal ligament under tension, making it distinctly palpable and visible.
With the ligament clearly identified and under tension, I use a #15 scalpel blade to carefully transect it. This immediately releases the tethering between the metatarsal heads. As you deepen this incision, remember that directly beneath the transverse metatarsal ligament lies the common digital nerve to the first web space and its accompanying vessels. Exercise extreme caution; we only cut ligamentous tissue under direct visualization. Once the transverse metatarsal ligament is cut, the floor of the web space reveals the adductor hallucis muscle and tendon, passing obliquely to insert into the lateral sesamoid and the base of the proximal phalanx.
I meticulously release the contracted capsule between the subluxated fibular sesamoid and the lateral base of the first metatarsal head. By extending the incision distally within this interval, we detach the adductor hallucis tendon from its insertion into the base of the proximal phalanx. Next, I detach the adductor tendon from the lateral aspect of the fibular sesamoid, dissecting proximally along the tendon until the muscular tissue of the flexor hallucis brevis is noted. With the blade well seated against the bone, I pass the scalpel proximally, stripping the origin of the lateral joint capsule off the metatarsal head over a distance of approximately 1.5 cm. I then create a flap of lateral joint capsule by making an incision through its dorsal aspect, passing the knife blade to the plantar aspect.
Medial Capsulotomy and Exostectomy
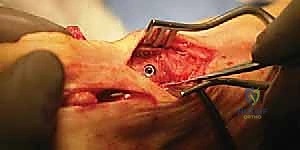
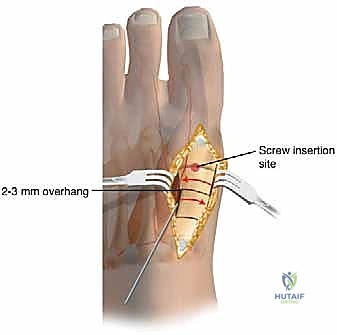
Shifting focus to the medial side, I make a longitudinal incision in the midline, starting at the middle of the proximal phalanx and extending proximally, just past the medial eminence. Carefully identifying the plane between the subcutaneous tissue and the joint capsule, I dissect dorsally first, gently pulling the skin flap away to expose and protect the dorsal medial cutaneous nerve. Next, I dissect the skin flap off the plantar half of the capsule until the abductor hallucis muscle and tendon are identified, taking great care to protect the plantar medial cutaneous nerve lying just plantar to the abductor tendon.
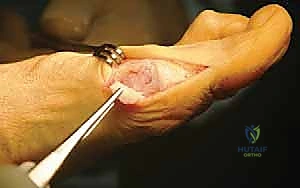
Our preferred capsulotomy is a modified H-incision or an inverted L-capsulotomy. I start with a vertical cut in the medial joint capsule, positioned 2 to 3 mm proximal to the base of the proximal phalanx. I peel this capsular flap proximally and plantarward until the medial eminence is completely exposed. A second, parallel cut is then made 3 to 8 mm proximal to the first cut, resecting a vertical wedge of redundant medial capsular tissue based on the severity of the deformity.
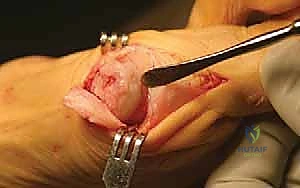
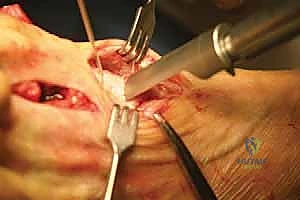
With the medial eminence exposed, the exostectomy is performed. It is critical to identify the sagittal sulcus, which represents the true medial border of the articular cartilage. Using an oscillating saw, I resect the medial eminence starting 1 to 2 mm medial to the sagittal sulcus, directing the blade slightly plantarward to align with the medial border of the metatarsal shaft. Over-resection, or "staking" the metatarsal head, must be strictly avoided, as this removes the medial buttress for the proximal phalanx and drastically increases the risk of an iatrogenic hallux varus deformity.
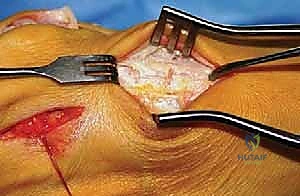
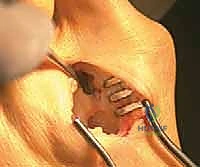
Execution of the Proximal Crescentic Osteotomy
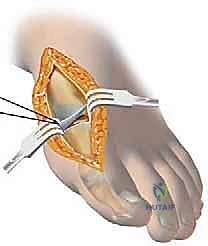
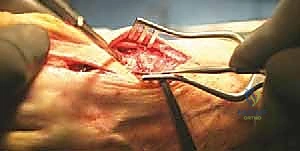
The exposure for the proximal osteotomy is achieved by extending the medial incision proximally or creating a separate 3-cm dorsal-medial incision over the first MC joint. The periosteum is incised longitudinally and elevated minimally to expose the proximal metaphysis. I identify the MC joint using a Freer elevator. The osteotomy site is marked precisely 1 to 1.5 cm distal to the MC joint line. Using a specialized crescentic saw blade attached to an oscillating handpiece, the osteotomy is initiated.

The concavity of the crescentic blade is typically directed proximally. The blade must be held perfectly perpendicular to the longitudinal axis of the metatarsal shaft in the sagittal plane. Any inadvertent angulation of the saw blade will result in unintended elevation or plantarflexion of the distal fragment upon rotation. I proceed with the cut slowly, utilizing copious saline irrigation to prevent thermal necrosis of the cancellous bone. The cut is completed through the lateral cortex, ensuring the bone is entirely freed to allow for smooth rotation.
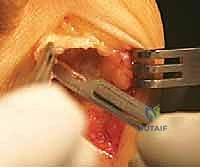
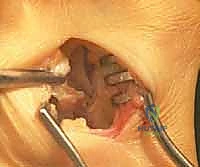
Once the osteotomy is complete, a periosteal elevator or a sturdy K-wire is inserted into the proximal fragment to stabilize it. The distal fragment is then gently rotated laterally (closing the intermetatarsal angle) while maintaining intimate bony contact at the osteotomy interface. The crescentic shape allows this rotation to occur smoothly without creating a gap or shortening the bone. The degree of rotation is dictated by the preoperative templating and intraoperative visual reduction of the first and second metatarsals.
Deformity Correction and Internal Fixation
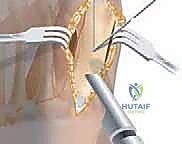
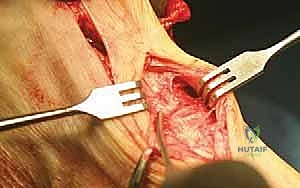
With the distal fragment rotated into its corrected position, temporary fixation is achieved using a smooth 0.062-inch Kirschner wire driven from dorsal-distal to plantar-proximal across the osteotomy site. At this juncture, fluoroscopy is utilized to confirm the reduction of the intermetatarsal angle, the restoration of the sesamoid position beneath the metatarsal head, and the sagittal alignment of the first metatarsal. It is imperative to ensure that the metatarsal head has not been elevated during the rotation.
Definitive fixation is typically achieved using a single 4.0-mm or 3.0-mm cannulated, partially threaded cancellous screw. A guide pin is introduced on the dorsal aspect of the first metatarsal, approximately 1 cm distal to the osteotomy, and directed proximally and plantarward, aiming for the dense plantar-proximal cortex of the metatarsal base. Care must be taken to avoid violating the MC joint. The screw length is measured, the near cortex is over-drilled to allow for lag compression, and the screw is inserted under fluoroscopic guidance.
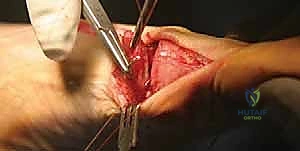
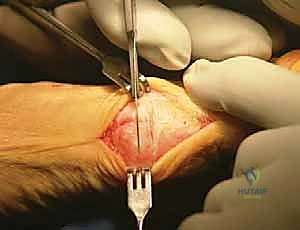
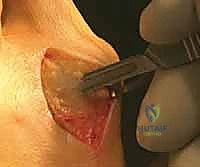
Alternatively, in cases of softer bone or when a more rigid construct is desired, a low-profile dorsal or medial locking plate can be utilized. Once fixation is secure, the temporary K-wire is removed. The medial capsule is then repaired. The hallux is held in neutral alignment, and the capsular flaps are imbricated using interrupted non-absorbable sutures to restore tension to the medial column. The tourniquet is deflated, hemostasis is achieved, and the skin is closed in layers.

Complications, Incidence Rates, and Salvage Management
Intraoperative and Early Postoperative Complications
Despite meticulous technique, the proximal crescentic osteotomy carries a distinct risk profile. Intraoperatively, the most common technical error is an inadvertent breach of the metatarsocuneiform joint with the saw blade or fixation hardware. This can lead to early degenerative joint disease and chronic midfoot pain.
Clinical & Radiographic Imaging Archive