Proximal Closing Wedge Osteotomy: A Masterclass in Hallux Valgus Correction
Key Takeaway
This masterclass provides an exhaustive, real-time walkthrough of the proximal closing wedge osteotomy for symptomatic hallux valgus. Fellows will learn intricate surgical anatomy, precise intraoperative techniques, and critical pearls for optimal correction and fixation. We cover preoperative planning, patient positioning, detailed soft tissue release, meticulous osteotomy execution, and comprehensive postoperative care, ensuring a deep understanding of this foundational procedure.
Comprehensive Introduction and Pathophysiology
Welcome, fellows and colleagues, to the operating theater and to this definitive masterclass on forefoot reconstruction. Today, we are undertaking a comprehensive analysis of a foundational, highly powerful procedure in the orthopedic armamentarium: the proximal closing wedge osteotomy (PCWO) for hallux valgus correction. This intervention is not merely an exercise in carpentry or moving bone; it is a sophisticated endeavor aimed at restoring complex biomechanical alignment, relieving debilitating pain, and ensuring the long-term, durable function of the medial column. The proximal closing wedge osteotomy remains a workhorse for severe deformities, demanding precision, a profound understanding of first ray kinematics, and sound surgical judgment.
Hallux valgus is a complex, progressive deformity characterized by lateral deviation of the hallux and medial deviation of the first metatarsal (metatarsus primus varus). As the first metatarsal drifts medially, it escapes the stabilizing embrace of the sesamoid apparatus. The adductor hallucis, now functioning with an altered vector, pulls the proximal phalanx into further valgus and pronation. This pathoanatomic cascade results in the attenuation of the medial capsule, contracture of the lateral structures, and the development of the characteristic medial eminence, which is often the primary source of patient discomfort due to shoe wear friction.
The rationale for selecting a proximal osteotomy over a distal or diaphyseal procedure lies in the geometric principles of angular correction. The center of rotation of angulation (CORA) in a severe hallux valgus deformity with a high intermetatarsal angle (IMA) is located proximally, near the first tarsometatarsal (TMT) joint. By executing our corrective osteotomy near this apex, we achieve a larger magnitude of correction at the metatarsal head for every degree of angular change made at the base. This mechanical advantage makes the PCWO exceptionally suited for severe deformities that distal osteotomies simply cannot adequately address without risking severe translation and instability.
However, the power of this procedure is inextricably linked to its potential pitfalls. Historically, the proximal closing wedge osteotomy was plagued by complications such as first metatarsal shortening and dorsal elevation of the metatarsal head, leading to devastating transfer metatarsalgia. Modern techniques, which we will detail exhaustively in this chapter, emphasize precise wedge geometry, preservation of a robust lateral cortical hinge, and the application of rigid, low-profile internal fixation. These advancements have drastically reduced historical complication rates, cementing the PCWO as a reliable, highly effective technique in the hands of a meticulous surgeon.
Pathoanatomy of Hallux Valgus
To truly master the correction, one must first master the deformity. Hallux valgus is a multiplanar derangement. In the transverse plane, we observe the classic divergence: the first metatarsal deviates medially, increasing the intermetatarsal angle, while the hallux deviates laterally. In the sagittal plane, the first metatarsal often elevates, compromising its load-bearing capacity during the terminal stance phase of gait. Perhaps most critically, in the coronal plane, the first metatarsal pronates. This pronation rotates the crista laterally, leading to erosive changes and subluxation of the sesamoid complex.
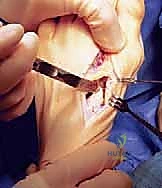
The soft tissue envelope adapts pathologically to these osseous changes. The lateral joint capsule and the suspensory ligaments of the fibular sesamoid become severely contracted. The adductor hallucis tendon, inserting on the base of the proximal phalanx and the fibular sesamoid, acts as a relentless deforming bowstring. Conversely, the medial capsule becomes attenuated and redundant, failing to provide any counter-stabilization. The medial eminence itself is largely unmasked native metatarsal head, supplemented by reactive hyperostosis due to chronic pressure.
Understanding the sesamoid apparatus is paramount. The sesamoids are embedded within the flexor hallucis brevis tendons and articulate with the plantar aspect of the first metatarsal head, separated by the crista. As the metatarsal drifts medially, the sesamoids, tethered to the second metatarsal by the deep transverse metatarsal ligament, remain functionally in place. Thus, it is the metatarsal that subluxates off the sesamoids, not the other way around. Relocating the metatarsal head over the sesamoid apparatus is a primary goal of our reconstructive effort.
Failure to address all components of this pathoanatomy—osseous and soft tissue—inevitably leads to recurrence. A technically perfect osteotomy will fail if the lateral soft tissue contractures are not released, as the deforming forces will simply pull the hallux back into valgus over time. Therefore, our surgical approach must be holistic, combining meticulous bone work with precise, targeted soft tissue balancing.
Evolution of the Proximal Closing Wedge Osteotomy
The concept of a proximal osteotomy for hallux valgus is not new. Early iterations were described in the late 19th and early 20th centuries by pioneers like Loison and Balacescu. These early procedures, while conceptually sound, were often fraught with complications due to a lack of rigid internal fixation. Surgeons relied on cast immobilization or simple K-wires, which frequently failed to counteract the powerful deforming forces of the Achilles tendon and the plantar fascia, leading to dorsal malunion.
The evolution of this procedure has been defined by the quest for stability. The advent of compression screw technology marked a significant leap forward, allowing for rigid interfragmentary compression across the osteotomy site. This minimized micromotion, promoted primary bone healing, and allowed for earlier mobilization. However, screw fixation alone in poor bone quality could still lead to loss of the lateral hinge and subsequent shortening.
Today, the gold standard involves the use of specialized, low-profile locking plate constructs. These plates act as a neutralization device, protecting the lateral hinge and maintaining the plantarflexion vector of the first ray. Some modern systems even utilize plantar-medial plating to sit on the tension side of the bone, offering superior biomechanical stability against dorsal elevation forces.
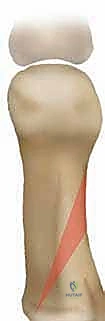
Furthermore, our understanding of wedge geometry has evolved. We no longer simply take a transverse wedge. We angle the saw blade from dorsal-distal to plantar-proximal. This oblique orientation not only increases the surface area for healing but also inherently plantarflexes the metatarsal head as the osteotomy is closed, counteracting the historical risk of elevation and transfer metatarsalgia. This nuanced understanding of three-dimensional geometry is what separates an average outcome from an exceptional one.
Detailed Surgical Anatomy and Biomechanics
A profound respect for and understanding of the surgical anatomy of the first ray is non-negotiable. The first metatarsal is the shortest and thickest of the metatarsals, designed to bear approximately twice the load of the lesser metatarsals during the propulsive phase of gait. Its base articulates with the medial cuneiform, forming the first tarsometatarsal (TMT) joint. This joint is typically kidney-bean shaped, lacking interlocking bony constraints, relying instead on a robust ligamentous complex, including the Lisfranc ligament, for stability.
The vascular supply to the first metatarsal is a critical consideration, particularly when performing proximal osteotomies. The principal nutrient artery enters the lateral aspect of the diaphyseal shaft. However, the metatarsal head and neck rely heavily on an extraosseous capsular network supplied by the first dorsal metatarsal artery and the first plantar metatarsal artery. Extensive soft tissue stripping, particularly laterally, combined with a proximal osteotomy, can theoretically jeopardize the perfusion to the metatarsal head, leading to avascular necrosis (AVN), though this is exceedingly rare with the PCWO compared to distal osteotomies.
Muscular attachments dictate the deforming forces and the post-osteotomy stability. The tibialis anterior inserts onto the plantar-medial aspect of the first metatarsal base and medial cuneiform, acting as a dorsiflexor and invertor. The peroneus longus inserts onto the plantar-lateral aspect of the base, acting as a powerful plantarflexor and evertor. The balance between these two dynamic stabilizers is crucial for the function of the medial column.
Osteology and Articular Geometry
The base of the first metatarsal is robust, featuring a flare that provides a broad surface area for articulation with the medial cuneiform. When planning our osteotomy, we target the metaphyseal-diaphyseal junction, typically 1 to 1.5 centimeters distal to the TMT joint line. This region offers excellent cancellous bone for rapid healing while leaving a sufficient proximal fragment for secure hardware purchase.
The lateral cortex of the first metatarsal is the crux of the proximal closing wedge osteotomy. This cortex must be preserved as an intact hinge. The hinge dictates the plane of correction and provides inherent stability to the construct. If the lateral hinge is breached, the osteotomy becomes inherently unstable, transitioning from a closing wedge to a free-floating segment, dramatically increasing the risk of shortening, translation, and dorsal elevation.
The articular geometry of the first metatarsophalangeal (MTP) joint must also be evaluated. We assess the Proximal Articular Set Angle (PASA) or Distal Metatarsal Articular Angle (DMAA). If the articular cartilage of the metatarsal head is laterally deviated (high PASA), a proximal osteotomy alone will align the shaft but leave the joint incongruent. In such cases, a biplanar or double osteotomy (adding a distal Reverdin-type cut) may be necessary to achieve a congruent, functional joint.
Neurovascular Topography of the First Ray
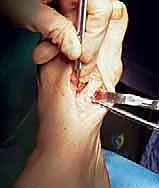
Navigating the neurovascular landscape of the dorsal foot requires vigilance. The primary nerve at risk during the dorsal approach is the dorsal medial cutaneous nerve (DMCN), a terminal branch of the superficial peroneal nerve. The DMCN courses over the dorsal-medial aspect of the first metatarsal and MTP joint. Iatrogenic injury to this nerve, either through direct transection or aggressive retraction, can result in a painful neuroma or debilitating numbness, severely compromising patient satisfaction despite a perfect radiographic correction.
Deep to the extensor hallucis longus (EHL) tendon lies the first dorsal metatarsal artery (FDMA) and the deep peroneal nerve. The deep peroneal nerve supplies sensation to the first web space. When dissecting the interval between the EHL and the extensor hallucis brevis (EHB), meticulous blunt dissection is required to avoid injuring these structures, which reside in the neurovascular bundle traversing the first intermetatarsal space.
On the medial aspect, during the bunionectomy approach, one must be cognizant of the medial proper plantar digital nerve. While typically located more plantarward, aberrant branches or aggressive plantar dissection can put this nerve at risk. Hemostasis is achieved primarily through the use of a pneumatic tourniquet, but meticulous electrocautery of superficial veins is necessary to prevent postoperative hematoma, which can compromise wound healing and increase infection risk.
Biomechanics of the First Ray and Medial Column
The biomechanics of the first ray are elegantly described by the windlass mechanism, a concept popularized by J.H. Hicks. As the hallux dorsiflexes during the terminal stance phase of gait, the plantar fascia is drawn taut around the metatarsal head like a cable around a windlass. This action plantarflexes the first metatarsal, elevates the longitudinal arch, and locks the midtarsal joints, transforming the foot into a rigid lever for propulsion.
A successful proximal closing wedge osteotomy must respect and restore this mechanism. If the osteotomy results in dorsal elevation of the first metatarsal head, the windlass mechanism is defeated. The first metatarsal cannot engage the ground effectively, and the propulsive load is transferred laterally to the lesser metatarsals, resulting in intractable transfer metatarsalgia under the second and third metatarsal heads.
Furthermore, the relative length of the first metatarsal compared to the second metatarsal is a critical biomechanical parameter. The PCWO inherently shortens the first metatarsal due to the resection of the bone wedge. While a small amount of shortening (average 1-2 mm) is generally well-tolerated and can actually help decompress the MTP joint, excessive shortening will also lead to load transfer and metatarsalgia. Precise preoperative geometric calculation is necessary to minimize this shortening effect.
Exhaustive Indications and Contraindications
Before a scalpel is ever passed, a rigorous assessment of indications and contraindications is paramount. Patient selection is the ultimate determinant of success in forefoot reconstruction. The proximal closing wedge osteotomy is a powerful tool, but it is not a panacea. It is specifically designed for a distinct subset of patients with severe, symptomatic deformity and specific anatomical prerequisites.
The primary indication is a symptomatic hallux valgus deformity that has failed conservative management (e.g., shoe modifications, orthotics, padding). The pain is typically localized to the medial eminence due to shoe pressure, or deep within the MTP joint due to incongruency and early degenerative changes. Cosmesis alone is an absolute contraindication for this, or any, major reconstructive foot surgery.
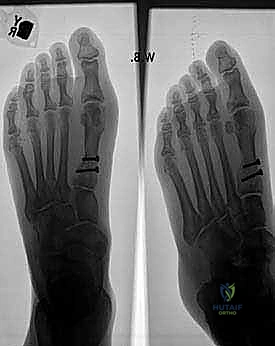
Radiographically, this procedure is reserved for severe deformities. The standard criteria include a first intermetatarsal angle (IMA) of 14 degrees or greater, and a hallux valgus angle (HVA) typically exceeding 30 to 35 degrees. For mild to moderate deformities (IMA < 13 degrees), a distal osteotomy (like a Chevron) or a diaphyseal osteotomy (like a Scarf) is generally preferred due to their lower risk profile regarding shortening and elevation.
Crucially, the first metatarsocuneiform (MC) joint must remain stable. If the primary driver of the severe IMA is hypermobility or instability at the TMT joint, a proximal osteotomy will fail over time, as the base will simply drift back into varus. In the presence of TMT instability, a Lapidus arthrodesis is the mandatory procedure of choice.
Clinical and Radiographic Indications
The clinical evaluation begins with observing the patient's gait and standing posture. We look for pronation of the foot, Achilles contracture, and the presence of lesser toe deformities (crossover toes, hammertoes), which often accompany severe hallux valgus due to load transfer. Palpation of the medial eminence evaluates for bursa formation and focal tenderness. We assess the range of motion of the first MTP joint; pain at the extremes of motion or crepitus may indicate underlying osteoarthritis, which alters our surgical algorithm.
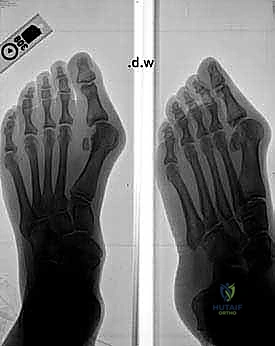
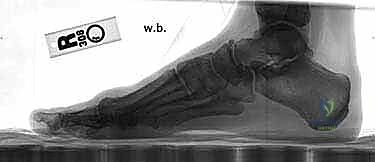
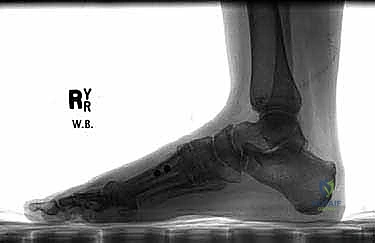
Radiographic indications are derived from standardized, weight-bearing anteroposterior (AP), lateral, and sesamoid axial views. On the AP view, we meticulously measure the IMA and HVA. We assess the congruency of the MTP joint. A subluxated or incongruent joint requires soft tissue balancing and realignment, whereas a congruous joint with a high HVA suggests a distal articular set angle abnormality.
On the lateral radiograph, we evaluate the sagittal alignment of the first ray. We look at Meary's line (the axis of the talus relative to the first metatarsal). We also inspect the TMT joint for any dorsal gapping or plantar sag, which are subtle signs of instability. The sesamoid axial view is critical for evaluating the degree of sesamoid subluxation and the condition of the crista; severe erosion of the crista may necessitate a sesamoidectomy or aggressive soft tissue release to achieve relocation.
Assessing Metatarsocuneiform Joint Stability
How do we definitively assess this stability? It requires a nuanced combination of clinical examination and radiographic scrutiny. The concept of "hypermobility" is debated in the literature; we prefer to focus on clinical instability.
- Physical Examination (The Modified Root Test): I want you to stabilize the medial cuneiform and the lesser metatarsals firmly with one hand. With your other hand, grasp the head of the first metatarsal and attempt to translate it superiorly and inferiorly in the sagittal plane. Compare the excursion to the contralateral foot. Excessive motion, particularly a soft end-point during dorsiflexion, indicates clinical instability.
- Radiographic Evaluation: We meticulously inspect weight-bearing AP views for joint incongruency or a widened medial joint space at the TMT joint. On lateral weight-bearing views, we look for plantar widening of the MC joint space or a "sag" at the TMT joint line. If we identify definitive clinical or radiographic instability, a Lapidus-type procedure (TMT arthrodesis) is the appropriate choice to address the root cause of the deformity and provide a durable correction.
Contraindications to Proximal Closing Wedge Osteotomy
Knowing when not to operate is the hallmark of a master surgeon. The contraindications for the PCWO must be strictly adhered to.
| Contraindication Type | Specific Condition | Rationale / Consequence of Surgery |
|---|---|---|
| Absolute | Advanced Osteoarthritis of 1st MTP Joint | Realignment will not relieve arthritic pain; may exacerbate stiffness. MTP Arthrodesis is required. |
| ** |
Clinical & Radiographic Imaging Archive